
In one of my previous posts, I’ve described how to install Roundcube web mail client on a CentOS 6. This time, we’ll do the same for CentOS 7.
There are some prerequisites. First, you need a working LAMP stack (Linux, Apache, MySQL and PHP). Read here how to install this. Then, you need a working mail server. You can also read here how to do this. Once you have that completed and tested, we can install Roundcube from the source. In my case, I’ll use roundcube as a virtual Apache host at mail.domain.com. Go to Roundcube’s web site and download the latest tarball and put it under /var/www or just execute this:
cd /var/www
wget http://iweb.dl.sourceforge.net/project/roundcubemail/roundcubemail/1.1.1/roundcubemail-1.1.1-complete.tar.gz
tar xzvf roundcubemail-1.1.1-complete.tar.gz
rm -f roundcubemail-1.1.1-complete.tar.gz
mv roundcubemail-1.1.1 mail.domain.com
chown -R apache:apache mail.domain.com
This is your DocumentRoot /var/www/mail.domain.com. You can rename or move the directory somewhere else if you want, but you have to change the virtual host config files as well.
First, change the date and time zone in PHP. Just edit /etc/php.ini and change the date.timezone variable. In my case it looks like this (don’t forget to remove the semi-colon in front).
date.timezone = America/New_York
Pick your time zone from here.
Then, install some PHP modules needed fro Roundcube.
yum install php-xml php-mbstring php-intl php-mcrypt php-ldap
apachectl restart
Finally, create the database.
mysql -u root -p
create database roundcube;
grant all privileges on roundcube.* to 'roundcube'@'localhost' identified by 'password';
flush privileges;
quit
This will create a database called roundcube and a MySQL user called roundcube with password…well password, so replace the values to suit your needs. Now, browse to the DocumentRoot, the directory where you installed Roundcube, by doing http://yourserver.com/roundcube/installer or http://roundcube.yourserver.com/installer. In my case, I’ve placed the files under /var/www/mail.domain.com, so I have to go to http://mail.domain.com/installer.
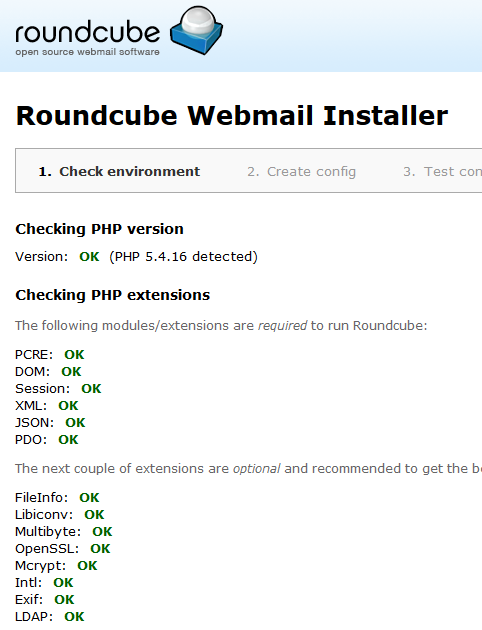
You should see something like this.

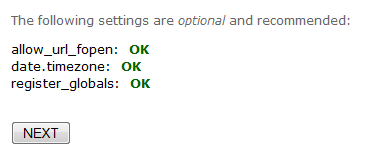
Click Next at the bottom to reach step 2.
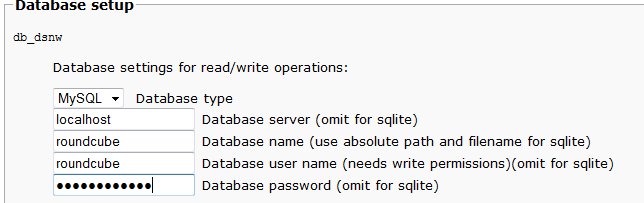
Look for the Database setup and enter the database name and the credentials that you’ve created above in MySQL.
For IMAP settings, use ssl://localhost and port 993.

For SMTP settings type tls://localhost and port 587. Check “Use the current IMAP username…“.

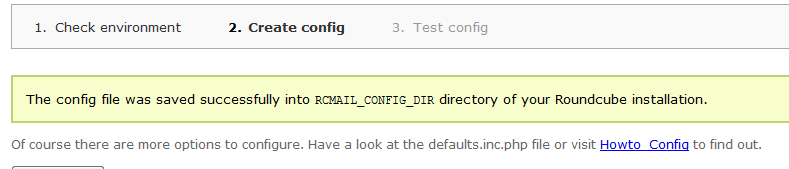
Scroll all the way at the bottom and click Create Config. Roundcube will create the config file for you and hopefully it will tell you that everything is OK.
Click Continue.
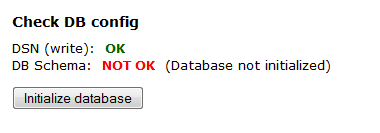
You will notice that the database is not initialized, so click Initialize database.
Look at the bottom where it says “After completing the installation and the final tests please remove the whole installer folder from the document root of the webserver or make sure that enable_installer option in config.inc.php is disabled.”
Do that:
cd /var/www/mail.domain.com
mv installer installer.something_here_not_easy_to_remember
Finally, point your browser to the main URL in my case http://mail.domain.com.