
There are many sites that offer this functionality (temp-mail.org, guerrillamail.org, throwawaymail.com), but if you want to build your own solution from scratch, I’ll show how I managed to accomplish this. I have a CentOS 7 server running in a cloud with a public IP and a valid domain name. You won’t need any SSL certificates, but you can add them if you want. This is not a complete guide on how to create a valid postfix and dovecot e-mail solution. If you are looking for that, stop and look further. The solution described here uses just the basic functionalities to send and receive e-mails. I’ll create some small scripts to manage the temporary e-mail addresses and you can use squirrelmail to check your e-mails. Actually, if you want you can skip that part and use some other e-mail POP3/IMAP e-mail client to check your e-mails.
Table of Contents
Valid domain and MX records
You will need a valid domain for this. The scripts cover multiple virtual domains, so if you have many domains, you can use them as well. In the DNS for your domain make sure you have a valid MX record that points to your server. I use Route 53 and this is how my records look like.

Make sure you have the MX record set properly. Go to this site and type your domain name. I’ll use my domain called cloudranger.live. This is how it looks like.
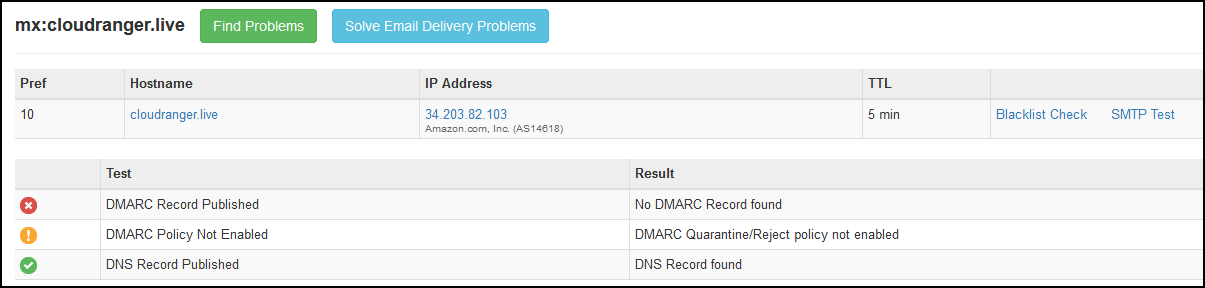
Don’t worry about the DMARC error, we won’t use that. As you can see from both screenshots above, the IPs from the DNS and the tool match, which means your e-mail server will be properly configured on the Internet to receive e-mails.
Firewall and SELinux
If you use firewall, make sure you have these ports opened: 25 for SMTP, 143 for IMAP or 110 for POP3 and 80 for squirrelmail/Apache.
SELinux can stay as is, but if you use squirrelmail, you’ll have to disable it in /etc/selinux/config. Or temporarily, do:
setenforce 0
postfix Part I
We’ll use postfix as MTA. It comes preinstalled on CentOS, but it runs on the localhost interface only, so we have to make some changes. The postfix daemon is running under the postfix user, but later we’ll see that because this users UID is lower than 1000, we can’t use it with dovecot. Actually, we can, but it’s not recommended. We’ll create a user called vpostfix.
groupadd vpostfix && useradd vpostfix -g vpostfix -s /sbin/nologin -c "Virtual postfix user" -d /var/empty
This will create a user and a group called vpostfix. Let’s get the UID and GID.
grep vpostfix /etc/passwd && grep vpostfix /etc/group
vpostfix:x:1002:1002:Virtual postfix user:/var/empty:/sbin/nologin
vpostfix:x:1002:
The UID and the GID are 1002. Write down this number. Now, edit the main configuration file for postfix which is /etc/postfix/main.cf. Make a copy first for the config file in case something goes wrong.
cd /etc/postfix
cp main.cf main.cf.ORIG
Then edit main.cf and search for inet_interfaces. IMPORTANT! Uncomment inet_interfaces = all and add a comment for inet_interfaces = localhost. If you don’t put comment in front of …localhost it will override the …all.
inet_interfaces = all
#inet_interfaces = $myhostname
#inet_interfaces = $myhostname, localhost
#inet_interfaces = localhost
Find and uncomment this line.
#home_mailbox = Maildir/
Then add these lines at the end of the file.
# Virtual domains, users, and aliases
virtual_mailbox_domains = mysql:/etc/postfix/virtual_domains.cf
virtual_mailbox_maps = mysql:/etc/postfix/virtual_users.cf
virtual_mailbox_base = /var/mail/virtual_domains
# Make sure you replace these UID:GID numbers
virtual_minimum_uid = 1002
virtual_uid_maps = static:1002
virtual_gid_maps = static:1002
virtual_transport = lmtp:unix:private/dovecot
So, we’ll use virtual domains that will be defined in a MySQL database, our temp/disposable e-mail addresses will be also stored in a MySQL database and we’ll have a directory /var/mail/virtual_domains where we’ll get the e-mails in a Maildir format. Make sure you replace those numbers that you got for the postfix user. The last line is used to override the actual postfix delivery and use dovecot for that.
Let’s create the directory where e-mails will be stored.
mkdir /var/mail/virtual_domains
chown -R vpostfix:vpostfix /var/mail/virtual_domains
Leave postfix as is for now and let’s proceed with MySQL database.
MySQL
I prefer to use MariaDB, so we’ll install that first.
yum -y install mariadb-server
Enable the daemon on boot and start it.
systemctl enable mariadb
systemctl start mariadb
Do an initial config.
mysql_secure_installation
Pretty much, accept the defaults with ENTER and just enter the new root database password.
Now, we have to create the database and two tables for the virtual domains and the virtual users as specified in lines 2 and 3 in the main.cf file above. Copy and paste these lines but change the password in line 3. That is your password for the postfix database user. This DB user has nothing to do with postfix account in /etc/passwd that runs postfix. You can change the name if you want, but you have to remember it later when we do the scripts.
cat << 'EOF' > /tmp/temp.sql
CREATE DATABASE db_postfix;
GRANT ALL PRIVILEGES ON db_postfix.* TO "postfix"@"localhost" IDENTIFIED BY "your_password";

use db_postfix;

CREATE TABLE virtual_domains (
  id INT(11) NOT NULL AUTO_INCREMENT,
  name VARCHAR(50) NOT NULL,
  PRIMARY KEY (id),
  UNIQUE(name)
);

CREATE TABLE virtual_users (
  id int(11) NOT NULL AUTO_INCREMENT,
  domain_id INT(11) NOT NULL,
  password VARCHAR(106) NOT NULL,
  email VARCHAR(100) NOT NULL,
  PRIMARY KEY (id),
  UNIQUE KEY email (email),
  FOREIGN KEY (domain_id) REFERENCES virtual_domains(id) ON DELETE CASCADE
) DEFAULT CHARSET=utf8;
EOF
Run the script.
mysql -u root -p < /tmp/temp.sql
You can check the tables. Log to the database as the postfix with the password you specified in line 3.
mysql -u postfix -p
Then switch to our new database db_postfix defined in line 2.
use db_postfix;
Show the tables.
show tables;
+----------------------+
| Tables_in_db_postfix |
+----------------------+
| virtual_domains      |
| virtual_users        |
+----------------------+
2 rows in set (0.00 sec)
At this point, we are good with the database. Now we have to create the scripts that will manage the domains and users. You can (of course) use mysql commands to create domains and users, but I’ve made some scripts that will make this easier.
Scripts
These scripts are the backbone of how you’ll interact when creating domains and users. It simplifies everything for you. So, we’ll have a couple of scripts/commands and this is their syntax. I’ll put them under /usr/local/bin so if you run these commands as root, this directory is not in the path. But under CentOS, if you have any non-root user, /usr/local/bin is already in the $PATH. So, do echo $PATH and see if you can execute them without specifying the full path.
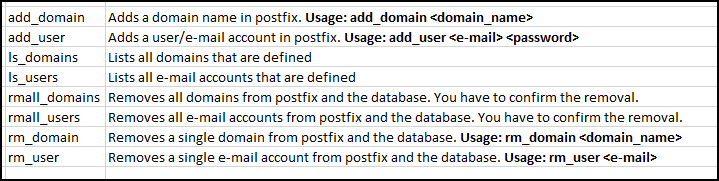
There are 8 scripts in total. If you run them without any parameters, they’ll give you the syntax. This is a brief description.
Here is the kick. These scripts call the mysql utility and you have to provide a password for every interaction with the database. You can easily modify them and specify -p parameter in the script and type the password there, but that’s not recommended. So, you have to either specify the postfix DB user password all the time… or, my suggestion is to export the postfix password in a variable that only lasts for the duration of your session.
So, before running any of the scripts, I recommend that you export your password like this. This is the password for the postfix DB user, not the root DB user.
export MYSQL_PWD=your_password
Once you do this, you can run any of the scripts without any prompts. Copy and paste the following scripts.
IMPORTANT! If you modified the DB name or any table name from my script (/tmp/temp.sql), you have to modify these scripts as well.
==================================================
add_domain
cat << 'EOF' > /usr/local/bin/add_domain
#!/bin/bash
usage () {
    echo "Usage: add_domain <domain_name>"
}

if [ $# -ne 1 ] ; then
    usage
    exit 1
fi

if [ -z "$MYSQL_PWD" ] ; then
    OPTION="-p"
else
    OPTION=""
fi

/usr/bin/mysql -u postfix db_postfix $OPTION -e "INSERT INTO db_postfix.virtual_domains (name) VALUES ('$1');"
EOF
add_user
cat << 'EOF' > /usr/local/bin/add_user
#!/bin/bash
if [ $# -ne 2 ] ; then
    echo "Usage: add_user <e-mail> <password>"
    exit 1
fi

if [ -z "$MYSQL_PWD" ] ; then
    OPTION="-p"
else
    OPTION=""
fi
regex="^[a-z0-9!#\$%&'*+/=?^_\`{|}~-]+(\.[a-z0-9!#$%&'*+/=?^_\`{|}~-]+)*@([a-z0-9]([a-z0-9-]*[a-z0-9])?\.)+[a-z0-9]([a-z0-9-]*[a-z0-9])?\$"

if [[ $1 =~ $regex ]] ; then
    DOMAIN=`echo $1 | cut -d'@' -f2`
else
    echo "Not a valid e-mail address."
    exit 1
fi
ID=$(/usr/bin/mysql -u postfix db_postfix -s $OPTION -N -e "SELECT id from db_postfix.virtual_domains WHERE NAME='$DOMAIN';")
if [ -z "$ID" ] ; then
    echo "The domain $DOMAIN is missing. Use add_domain $DOMAIN first."
else
   /usr/bin/mysql -u postfix db_postfix $OPTION -e "INSERT INTO db_postfix.virtual_users (domain_id, email, password) VALUES ($ID, '$1', ENCRYPT('$2', CONCAT('\$6\$', SUBSTRING(SHA(RAND()), -16))));"
fi
EOF
ls_domains
cat << 'EOF' > /usr/local/bin/ls_domains
#!/bin/bash
if [ -z "$MYSQL_PWD" ] ; then
    OPTION="-p"
else
    OPTION=""
fi
/usr/bin/mysql -u postfix db_postfix $OPTION -e "SELECT * FROM virtual_domains;"
EOF
ls_users
cat << 'EOF' > /usr/local/bin/ls_users
#!/bin/bash

if [ -z "$MYSQL_PWD" ] ; then
    OPTION="-p"
else
    OPTION=""
fi

/usr/bin/mysql -u postfix db_postfix $OPTION -e "SELECT * FROM virtual_users;"

EOF
rmall_domains
cat << 'EOF' > /usr/local/bin/rmall_domains
#!/bin/bash
if [ -z "$MYSQL_PWD" ] ; then
    OPTION="-p"
else
    OPTION=""
fi

while true; do
    read -p "All domain records will be deleted. Please confirm [yn] " yn
    case $yn in
        [Yy]* ) /usr/bin/mysql -u postfix db_postfix $OPTION -e "DELETE FROM db_postfix.virtual_domains"; break;;
        [Nn]* ) exit;;
        * ) echo "Answer yes(y) or no(n).";;
    esac
done
EOF
rmall_users
cat << 'EOF' > /usr/local/bin/rmall_users
#!/bin/bash
if [ -z "$MYSQL_PWD" ] ; then
    OPTION="-p"
else
    OPTION=""
fi

while true; do
    read -p "All user records will be deleted. Please confirm [yn] " yn
    case $yn in
        [Yy]* ) /usr/bin/mysql -u postfix db_postfix $OPTION -e "DELETE FROM db_postfix.virtual_users"; break;;
        [Nn]* ) exit;;
        * ) echo "Answer yes(y) or no(n).";;
    esac
done

EOF
rm_domain
cat << 'EOF' > /usr/local/bin/rm_domain
#!/bin/bash
if [ $# -ne 1 ]
  then
    echo "Usage: rm_domain <domain_name>"
    exit
fi
if [ -z "$MYSQL_PWD" ] ; then
    OPTION="-p"
else
    OPTION=""
fi

/usr/bin/mysql -u postfix db_postfix $OPTION -e "DELETE FROM db_postfix.virtual_domains WHERE name = '$1';"

EOF
rm_user
cat << 'EOF' > /usr/local/bin/rm_user
#!/bin/bash
if [ $# -ne 1 ]
  then
    echo "Usage: rm_user <e-mail>"
    exit
fi
if [ -z "$MYSQL_PWD" ] ; then
    OPTION="-p"
else
    OPTION=""
fi

/usr/bin/mysql -u postfix db_postfix $OPTION -e "DELETE FROM db_postfix.virtual_users WHERE email = '$1';"
EOF
==================================================
Make the scripts executable.
cd /usr/local/bin
chmod +x add_domain ls_domains rmall_domains rm_domain add_user ls_users rmall_users rm_user
Now that we have the scripts let’s create our first domain and first disposable e-mail address. It’s very easy.
Log as regular user or add /usr/local/bin in the PATH if you run these as root.
export MYSQL_PWD=pwd_for_postfix_user
add_domain cloudranger.live
add_user [email protected] some_pwd
Check what you did.
ls_domains
+----+------------------+
| id | name             |
+----+------------------+
|  1 | cloudranger.live |
+----+------------------+
ls_users
+----+-----------+----------------------------------------------------------+---------------------------+
| id | domain_id | password                                                 | email                     |
+----+-----------+----------------------------------------------------------+---------------------------+
|  1 |         1 | $6$4asdfasdfadsfasdfasdfadsfasdfadsfasdfasdfadsfa3qw8sF/ | [email protected] |
+----+-----------+----------------------------------------------------------+---------------------------+
The password is hashed. Use the other commands if you want to remove a domain, user, all domains or all users.
postfix Part II
Now that we have MySQL ready, you should create two files that will tell postfix how to tie with MySQL. If you look at the postfix main.cf file, lines 2 and 3 specify exactly that info. Here are the files. Just copy and paste these, but make sure you change the password in line 2. Log as root or sudo.
cat << 'EOF' > /etc/postfix/virtual_domains.cf
user = postfix
password = password_for_db_user_postfix
hosts = 127.0.0.1
dbname = db_postfix
query = SELECT 1 from virtual_domains WHERE name='%s'
EOF
And the same file for the e-mails.
cat << 'EOF' > /etc/postfix/virtual_users.cf
user = postfix
password = password_for_db_user_postfix
hosts = 127.0.0.1
dbname = db_postfix
query = SELECT 1 from virtual_users WHERE email='%s'
EOF
dovecot
We’ll use dovecot so we can get the received e-mails as POP3 or IMAP. I’ll enable both protocols but I’ll use IMAP later with the squirrelmail. We need to install it first and enable it to boot.
yum -y install dovecot dovecot-mysql
systemctl enable dovecot
Now, we’ll configure it. dovecot has one main config file which /etc/dovecot/dovecot.conf and separate config files for each functionality under /etc/dovecot/conf.d directory. Make a copy of both.
cd /etc/dovecot
cp dovecot.conf dovecot.conf.ORIG
cp -R conf.d conf.d.ORIG
Edit /etc/dovecot/dovecot.conf and uncomment the following line.
protocols = imap pop3 lmtp
Then, copy the template dovecot-sql file. You might have to check the directory where this file is, because the dovecot version number is part of the name.
cd /etc/dovecot
cp /usr/share/doc/dovecot-2.2.36/example-config/dovecot-sql.conf.ext .
Edit this file and search for these directives, uncomment them and configure them properly.
#driver =
…should become
driver = mysql
Then…
#connect =
…should become
connect = host=127.0.0.1 dbname=db_postfix user=postfix password=pwd_for_db_postfix_user
Again…
#default_pass_scheme = MD5
…should become
default_pass_scheme = SHA512-CRYPT
Scroll down and finally change this.
#password_query = \
#  SELECT username, domain, password \
#  FROM users WHERE username = '%n' AND domain = '%d'
…to this.
password_query = \
  SELECT email as user, password \
  FROM virtual_users WHERE email = '%u'
But it’s not over. We have to make some changes in the other files as well.
Edit each of these files and make these changes under /etc/dovecot/conf.d.
====================================================
10-master.conf
Look for this snippet and make sure…
service lmtp {
  unix_listener lmtp {
    #mode = 0666
  }
…it’s like this. The first occurrence for user/group is postfix, the rest are vpostfix. It’s not a typo.
service lmtp {
  unix_listener /var/spool/postfix/private/dovecot {
    #mode = 0666
    mode = 0600
    user = postfix
    group = postfix
  }
Same further down.
  unix_listener auth-userdb {
    #mode = 0666
    #user =
    #group =
  }

  # Postfix smtp-auth
  #unix_listener /var/spool/postfix/private/auth {
  #  mode = 0666
  #}
Should look like this.
  unix_listener auth-userdb {
    mode = 0600
    user = vpostfix
    group =  vpostfix
  }

  # Postfix smtp-auth
  unix_listener /var/spool/postfix/private/auth {
    mode = 0666
    user = vpostfix
    group = vpostfix
  }
10-auth.conf
Uncomment these 3 lines.
disable_plaintext_auth = yes
auth_mechanisms = plain
!include auth-sql.conf.ext
Then modify auth_mechanisms = plain and add login so it looks like this.
auth_mechanisms = plain login
auth-sql.conf.ext
Comment these lines.
userdb {
  driver = sql
  args = /etc/dovecot/dovecot-sql.conf.ext
}
So it’s like this.
#userdb {
#  driver = sql
#  args = /etc/dovecot/dovecot-sql.conf.ext
#}
…and all the way at the bottom.
#userdb {
  #driver = static
  #args = uid=vmail gid=vmail home=/var/vmail/%u
#}
should be…Don’t just uncomment. Change the args line.
userdb {
  driver = static
  args = uid=vpostfix gid=vpostfix home=/var/mail/virtual_domains/%d/%n
}
10-logging.conf
Uncomment the log_path line and specify a log file for dovecot.
log_path = /var/log/dovecot.log
10-mail.conf
Uncomment the mail_location and specify where the e-mails will be stored. %d/%n means the domain name and the login name, so the path will be something like /var/mail/virtual_domains/cloudranger.live/klimenta. dovecot will take care of the directory creation, so don’t worry about that.
mail_location = maildir:/var/mail/virtual_domains/%d/%n
====================================================
Test e-mail delivery
At this point we should be able to test our solution. Restart both daemons, so all the changes take effect.
systemctl restart mariadb
systemctl restart postfix
systemctl restart dovecot
Check the logs for both postfix and dovecot. They should look similar to this.
tail /var/log/maillog
Jan 13 16:21:08 ip-172-31-72-148 postfix/postfix-script[27817]: stopping the Postfix mail system
Jan 13 16:21:08 ip-172-31-72-148 postfix/master[2774]: terminating on signal 15
Jan 13 16:21:08 ip-172-31-72-148 postfix/postfix-script[27897]: starting the Postfix mail system
Jan 13 16:21:08 ip-172-31-72-148 postfix/master[27899]: daemon started -- version 2.10.1, configuration /etc/postfix
…and
tail /var/log/dovecot.log
Jan 13 16:21:14 master: Info: Dovecot v2.2.36 (1f10bfa63) starting up for imap, pop3, lmtp (core dumps disabled)
From another computer send an e-mail to your disposable e-mail account. You’ll see that it’s recorded in the postfix log.
This is my /var/log/maillog.
Jan 13 23:34:26 ip-172-31-86-23 postfix/smtpd[23108]: connect from something.domain.com[114.102.113.201]
Jan 13 23:34:26 ip-172-31-86-23 postfix/smtpd[23108]: ACB334065F8: client=something.domain.com[114.102.113.201]
Jan 13 23:34:26 ip-172-31-86-23 postfix/cleanup[23116]: ACB334065F8: message-id=<[email protected]>
Jan 13 23:34:26 ip-172-31-86-23 postfix/smtpd[23108]: disconnect from something.domain.com[114.102.113.201]
Jan 13 23:34:26 ip-172-31-86-23 postfix/qmgr[23052]: ACB334065F8: from=<[email protected]>, size=2814, nrcpt=1 (queue active)
Jan 13 23:34:26 ip-172-31-86-23 postfix/lmtp[23117]: ACB334065F8: to=<[email protected]>, relay=ip-172-31-86-23.ec2.internal[private/dovecot], delay=0.09, delays=0.02/0.01/0.01/0.04, dsn=2.0.0, status=sent (250 2.0.0 <[email protected]> gDpGLIL+HF5OWgAAbmziKA Saved)
Jan 13 23:34:26 ip-172-31-86-23 postfix/qmgr[23052]: ACB334065F8: removed
Look at line 6 (scroll to the right). SMTP code 250 means all went well.
And if you go to /var/mail/virtual_domains/your_domain/your_email, you’ll see a bunch of folders created. The e-mail that just arrived is under new directory. You can cat the file and see your e-mail.
pwd
/var/mail/virtual_domains/cloudranger.live/klimenta/new
ls -l
total 4
-rw-------. 1 vpostfix vpostfix 2993 Jan 13 23:34 1578958466.M778127P23118.ip-172-31-86-23.ec2.internal,S=2993,W=3076
At this point, you can use some IMAP/POP3 client to get the e-mail (see notes at the end). Specify the hostname of the server as your mail server, if asked for port, put 110 for POP and 143 for IMAP and your disposable e-mail/password as username and password. In my case, I don’t want to deal with constant e-mail client configuration for these temp e-mails, so I installed squirrelmail. You can use Roundcube Mail if you like sleeker interface, but there is more configuration involved.
squirrelmail (optional)
In order to install squirrelmail, you have to install epel-release repo. It also installs Apache and PHP for you. Bear this in mind and if you are not comfortable, stop.
yum -y install epel-release
Then install squirrelmail.
yum -y install squirrelmail
Enable Apache on boot.
systemctl enable httpd
Go to /etc/httpd/conf.d and replace the squirrelmail.conf file. Keep the original file. Just copy and paste.
cd /etc/httpd/conf.d
mv squirrelmail.conf squirrelmail.conf.ORIG
cat << 'EOF' > /etc/httpd/conf.d/squirrelmail.conf
#
# SquirrelMail is a webmail package written in PHP.
#

Alias /webmail /usr/share/squirrelmail

<Directory "/usr/share/squirrelmail">
        Options None
        AllowOverride none
        Require all granted
</Directory>
EOF
Let’s configure it.
cd /usr/share/squirrelmail/config/
./conf.pl
Go to #2, then #3. Switch to #2 (SMTP). Go back with R and then go to option D and type dovecot. Finally type S to Save data. Q to quit.
Start Apache.
systemctl start httpd
…and go to your server’s IP or hostname if you have it in DNS as http://ip_or_hostname/webmail. Log with the disposable e-mail and you’ll see your mailbox.
Note about POP3/IMAP clients
If you want to access your mailbox from a GUI client from another computer, you won’t be able to do so because of the dovecot configuration. That’s because dovecot considers localhost connections secure, but any other subnet rather than that is considered unsecure.
In order to make this work, you’ll have to make changes. But mind that if you make these changes, your password will be sent as a plain text across the network. If you are fine with this, proceed.
Change this line to = no in /etc/dovecot/conf.d/10-auth.conf
disable_plaintext_auth = yes
Change ssl = required in /etc/dovecot/conf.d/10-ssl.conf to ssl = no.
ssl = no
Restart dovecot and you should be able to access your mailbox remotely.