
In this post, I’ll explain how to create an EKS cluster in AWS and add an Ingress Controller. We’ll use GitLab as a repo and execute the CI/CD pipeline from there.
For this you’ll need:
- GitLab and AWS account
- Terraform, AWS CLI, helm installed
Table of Contents
AWS
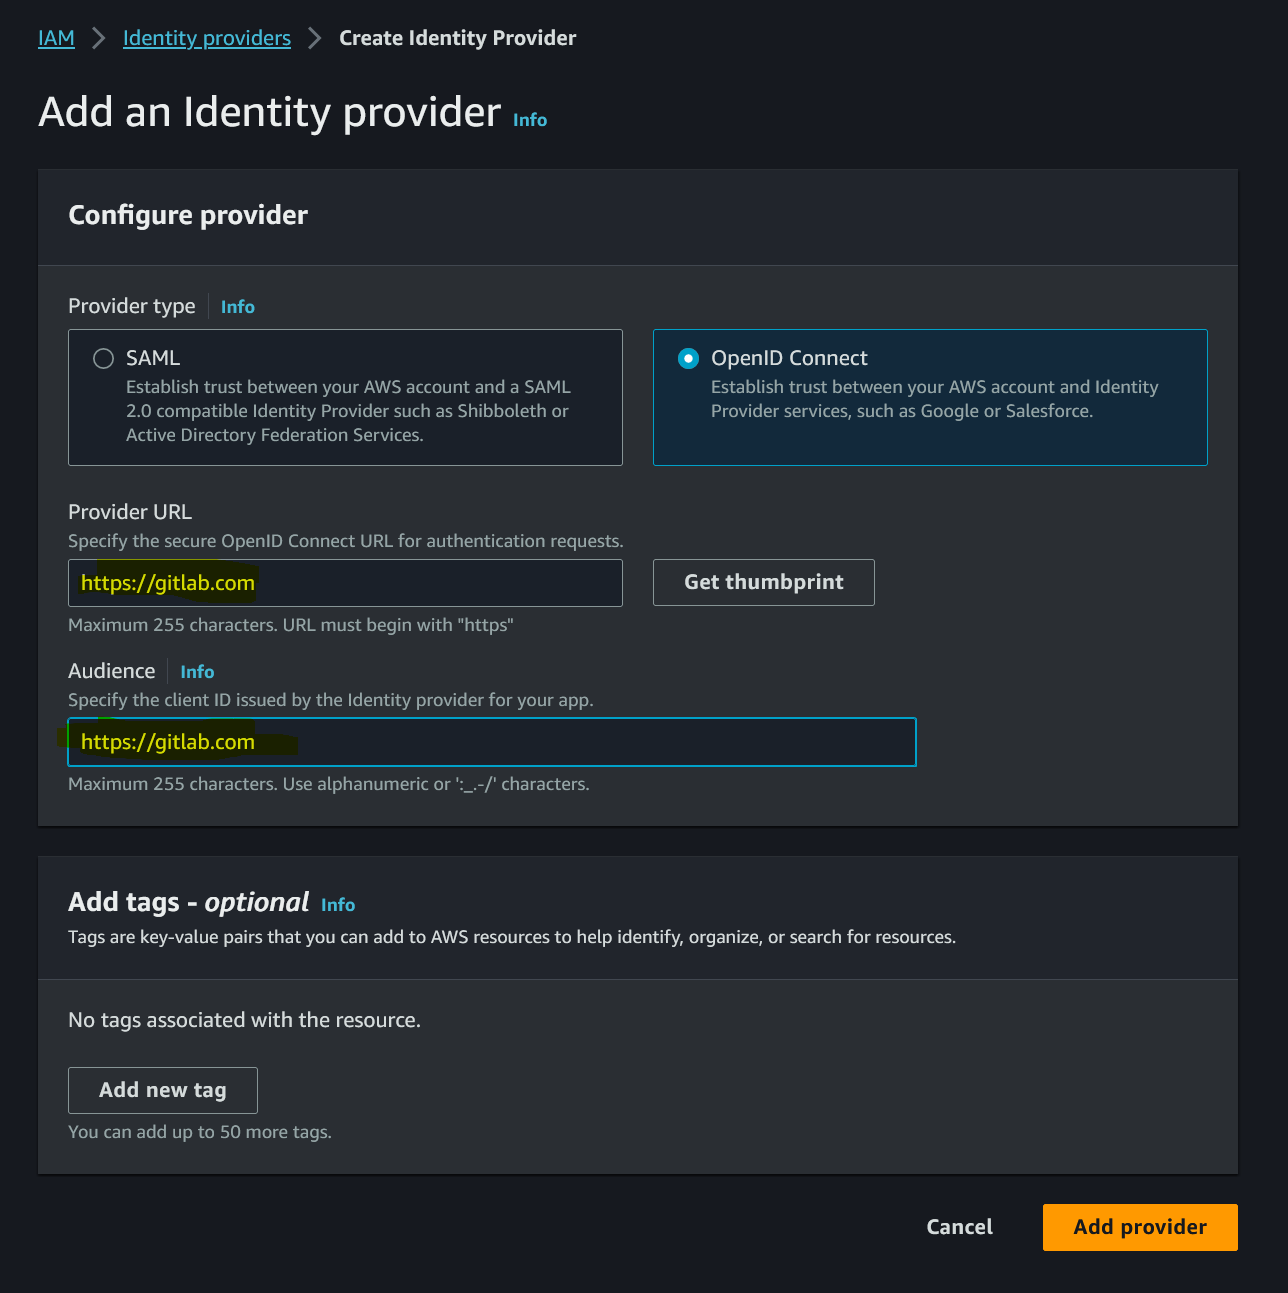
From the IAM console, create a new Identity Provider in AWS and use https://gitlab.com for both Provider URL and Audience. For self hosted GitLab use gitlab.domain.com or whatever is your GitLab URL.
Click on Get thumbprint before clicking on Add provider.
In the IAM console, create a role. I’ll name the role rolGitLab, name it whatever you like. When you create the policy, choose Custom trust policy.
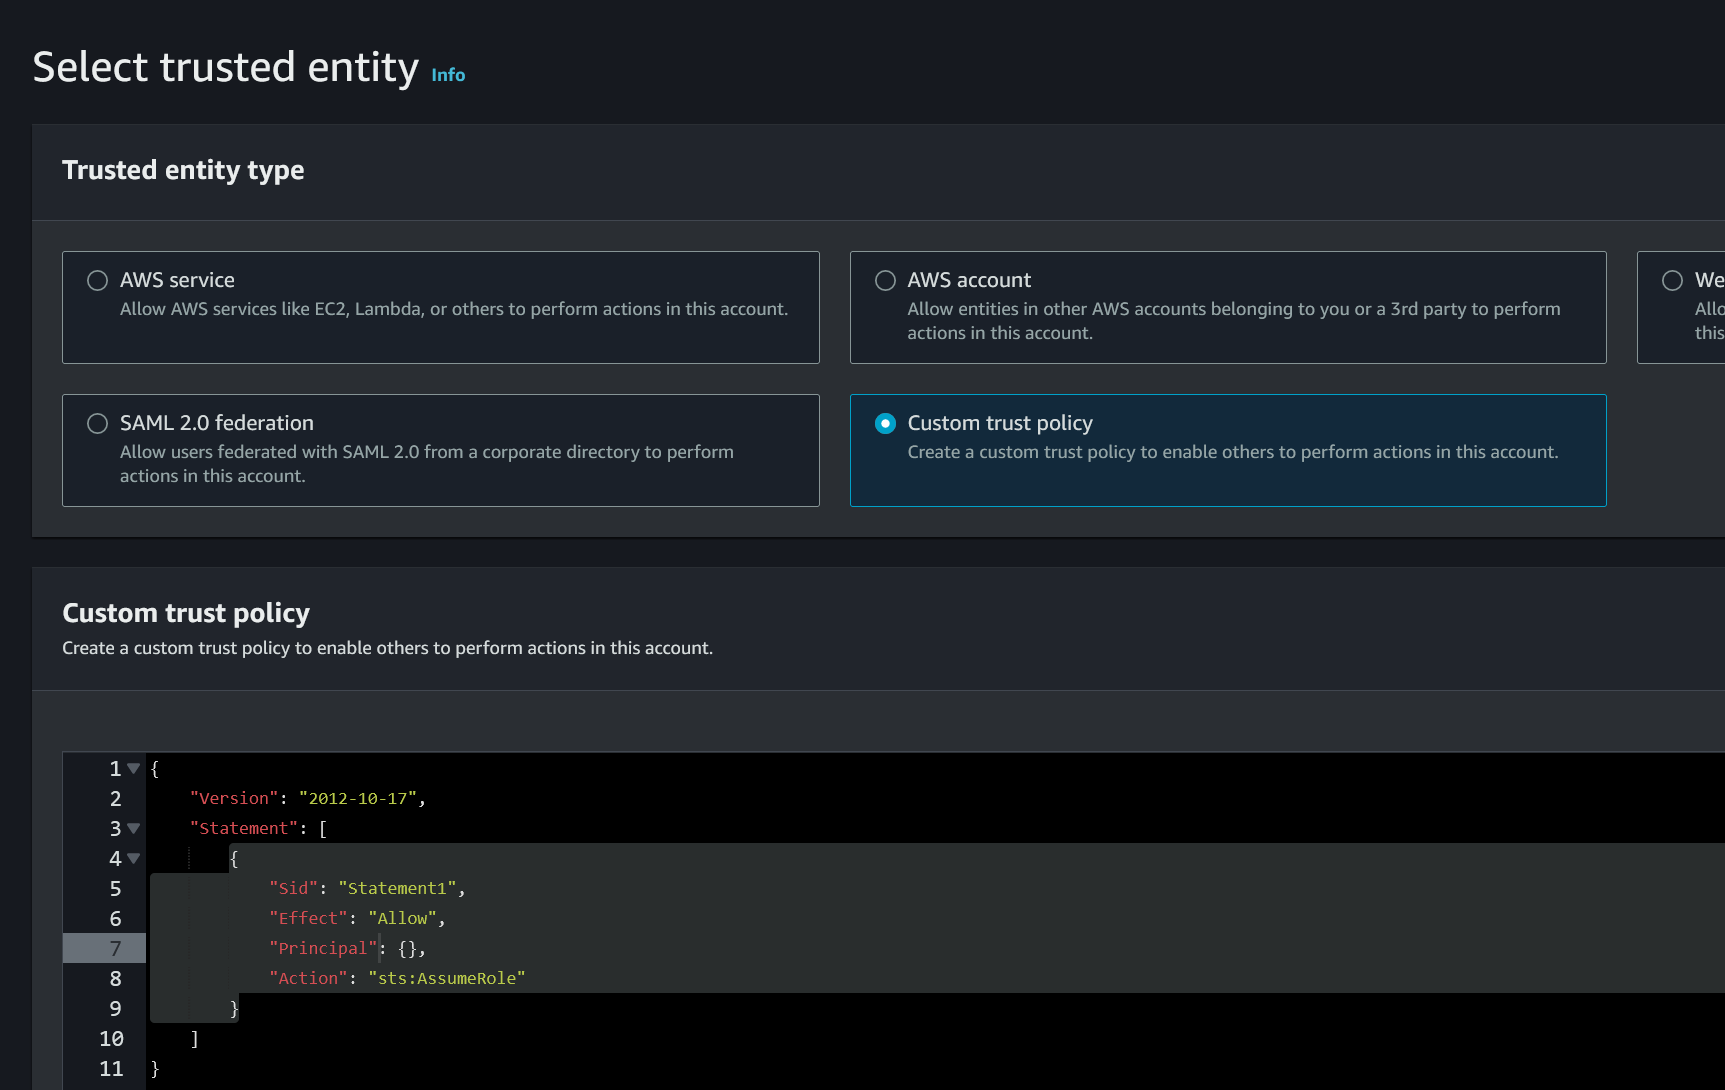
Now, here is what you have to decide. If you want to manage the cluster from GitLab only, you can ommit lines 16-23 where I allow the IAM user called gitlab to assume this role. But if you want some IAM user to manage the cluster using aws cli or kubectl, add the ARN of that IAM user in line 20. Add AdministratorAccess to that gitlab user but you can fine-tune those policies later. If you want to manage the cluster from GitLab, you have to register an agent and provide a config file. You can read how to do that here.
Replace the default custom trust policy with this JSON.
{
	"Version": "2012-10-17",
	"Statement": [
		{
			"Effect": "Allow",
			"Principal": {
				"Federated": "arn:aws:iam::123456789012:oidc-provider/gitlab.com"
			},
			"Action": "sts:AssumeRoleWithWebIdentity",
			"Condition": {
				"StringLike": {
					"gitlab.com:sub": "project_path:*/eks-gitlab:ref_type:branch:ref:main"
				}
			}
		},
		{
			"Sid": "",
			"Effect": "Allow",
			"Principal": {
				"AWS": "arn:aws:iam::123456789012:user/gitlab"
			},
			"Action": "sts:AssumeRole"
		}
	]
}
In line 7 and 20, change the 123456789012 with your account number and in line 7 change gitlab.com with however you named the Identity Provider (IdP). In line 12 replace eks-gitlab with how you plan to name your GitLab project. In line 20 change the gitlab user to however you named your IAM user to access the EKS cluster. Click Next and when asked for a permission policy, choose AdministratorAccess. Best practice is to limit access to only what’s needed, but EKS has so many policies, it will take a lot to list them all.
In case you created the gitlab IAM user, attach the AdministratorPolicy (fine tune later) and this inline policy. Change the ARN in line 7. Name this inline policy something like polAssumeGitLabRole.
{
    "Version": "2012-10-17",
    "Statement": [
        {
            "Effect": "Allow",
            "Action": "sts:AssumeRole",
            "Resource": "arn:aws:iam::123456789012:role/rolGitLab"
        }
    ]
}
GitLab
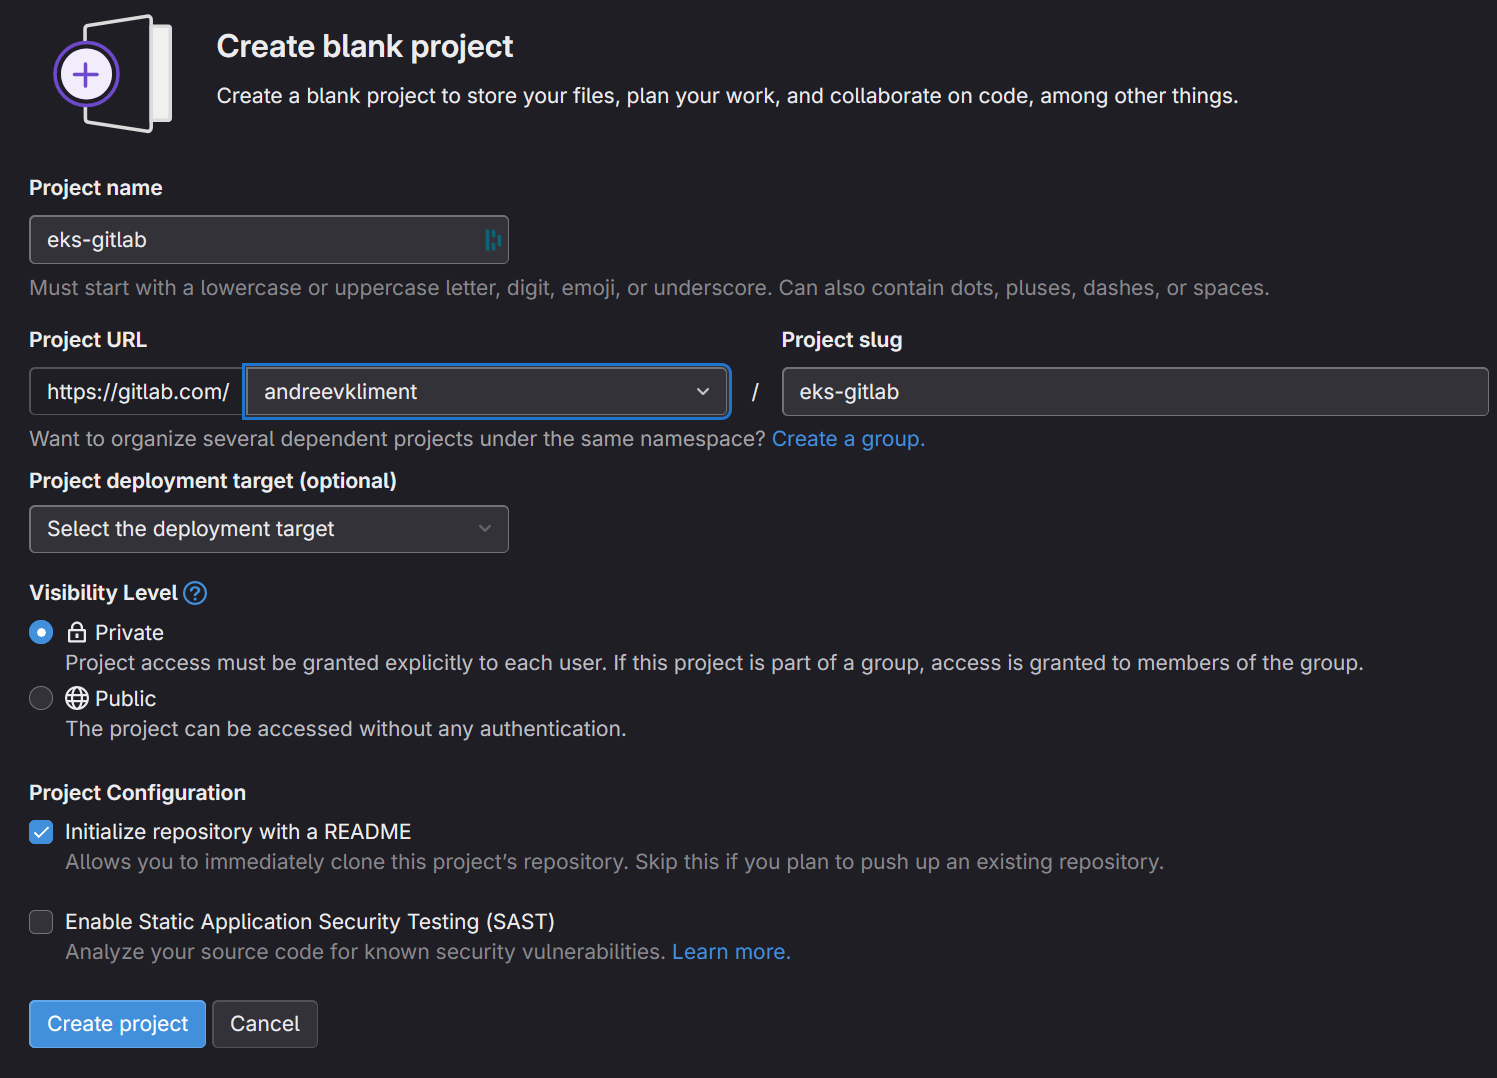
Create a new blank project in Gitlab with the default settings. In my case the project name is called eks-gitlab.
Go to Settings on the left, then CI/CD and then Variables. Add these two variables.
- AWS_PROFILE and a value of oidc. Yes, the value is oidc. Just type these 4 characters for the value.
- ROLE_ARN and a value of the role ARN from the role you just created for rolGitLab
Create a .gitlab-ci.yml file with the following content. Change the domain for gitlab.com at line 7 if you use self-hosted GitLab.
assume role:
  image:
    name: amazon/aws-cli:latest
    entrypoint: [""]
  id_tokens:
    GITLAB_OIDC_TOKEN:
      aud: https://gitlab.com
  before_script:
    - mkdir -p ~/.aws
    - echo "${GITLAB_OIDC_TOKEN}" > /tmp/web_identity_token
    - echo -e "[profile oidc]\nrole_arn=${ROLE_ARN}\nweb_identity_token_file=/tmp/web_identity_token" > ~/.aws/config
  script:
      - aws sts get-caller-identity
      - aws s3 ls
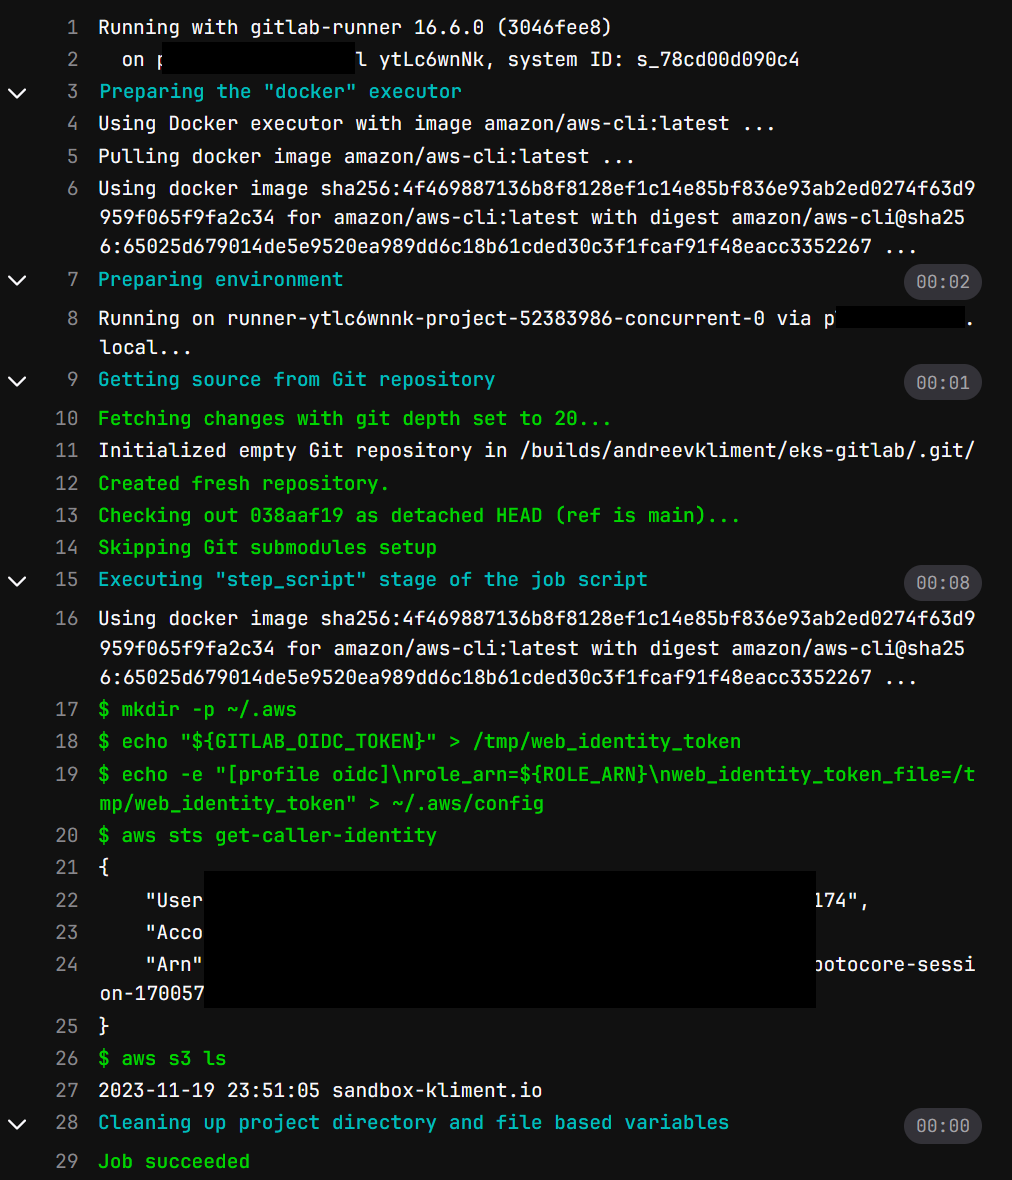
By the time you commit changes, the pipeline will start and if everything is OK, you’ll see your S3 buckets in the logs of the job if you go to Build | Jobs.
One more thing related to Terraform state as we’ll keep the state in GitLab is that we have to create an Access Token. If you have a self-hosted or paid GitLab account, create an Access Token from the Project | Settings | Access Tokens.
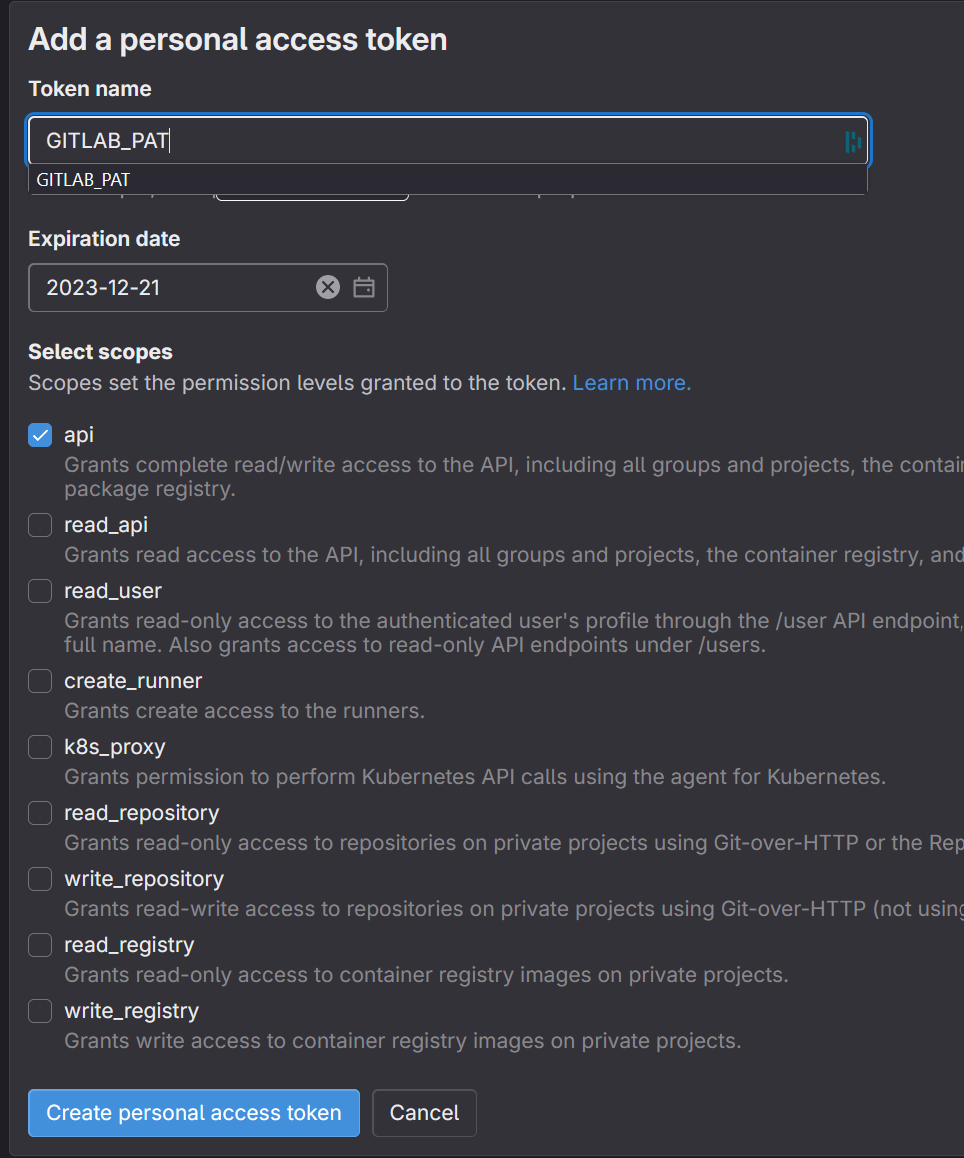
If you have a free GitLab account, you have to create a Personal Access Token and you do that if you click on your avatar in the upper left corner, then select Edit Profile and then click Access Tokens on the left. Click Add new token, name it GITLAB_PAT and select API only. Click Create personal access token. Once the token has been created click on the eye icon where it says Your new personal access token and copy & paste somewhere safe.
Go to the project settings and add these 2 variables.
- TF_USERNAME which is your username, click on the avatar, look at the @ under your name, your username is without the @ sign
- TF_PASSWORD which is the value of your personal access token you just created
Local machine
Now that we know the pipeline is working properly, let’s clone the project on our local machine.
If you plan to manage the cluster from your local machine, now it’s time to configure the gitlab IAM user on your local machine using access keys.
You need to have a valid key in order to clone your private repo.
Upload your .pub key to GitLab by clicking your avatar, then Edit Profile, click SSH Keys and then Add new key.
Finally, check the connection with the following command. It doesn’t matter what your local Linux user is, just use [email protected] as the username@hostname. Type as is.
ssh -T [email protected]
Welcome to GitLab, @[your_gitlab_username_here]
Once you clone the repo add the following files locally.
FILE: .gitignore
# Local .terraform directories
**/.terraform/*

# .tfstate files
*.tfstate
*.tfstate.*

# Crash log files
crash.log
crash.*.log

# Exclude all .tfvars files, which are likely to contain sensitive data, such as
# password, private keys, and other secrets. These should not be part of version
# control as they are data points which are potentially sensitive and subject
# to change depending on the environment.
*.tfvars
*.tfvars.json

# Ignore override files as they are usually used to override resources locally and so
# are not checked in
override.tf
override.tf.json
*_override.tf
*_override.tf.json

# Include override files you do wish to add to version control using negated pattern
# !example_override.tf

# Include tfplan files to ignore the plan output of command: terraform plan -out=tfplan
# example: *tfplan*

# Ignore CLI configuration files
.terraformrc
terraform.rc
FILE: LICENSE
This is free and unencumbered software released into the public domain.

Anyone is free to copy, modify, publish, use, compile, sell, or
distribute this software, either in source code form or as a compiled
binary, for any purpose, commercial or non-commercial, and by any
means.

In jurisdictions that recognize copyright laws, the author or authors
of this software dedicate any and all copyright interest in the
software to the public domain. We make this dedication for the benefit
of the public at large and to the detriment of our heirs and
successors. We intend this dedication to be an overt act of
relinquishment in perpetuity of all present and future rights to this
software under copyright law.

THE SOFTWARE IS PROVIDED "AS IS", WITHOUT WARRANTY OF ANY KIND,
EXPRESS OR IMPLIED, INCLUDING BUT NOT LIMITED TO THE WARRANTIES OF
MERCHANTABILITY, FITNESS FOR A PARTICULAR PURPOSE AND NONINFRINGEMENT.
IN NO EVENT SHALL THE AUTHORS BE LIABLE FOR ANY CLAIM, DAMAGES OR
OTHER LIABILITY, WHETHER IN AN ACTION OF CONTRACT, TORT OR OTHERWISE,
ARISING FROM, OUT OF OR IN CONNECTION WITH THE SOFTWARE OR THE USE OR
OTHER DEALINGS IN THE SOFTWARE.

For more information, please refer to <https://unlicense.org>
FILE: alb_ingress_iam_policy.json
{
    "Version": "2012-10-17",
    "Statement": [
        {
            "Effect": "Allow",
            "Action": [
                "iam:CreateServiceLinkedRole"
            ],
            "Resource": "*",
            "Condition": {
                "StringEquals": {
                    "iam:AWSServiceName": "elasticloadbalancing.amazonaws.com"
                }
            }
        },
        {
            "Effect": "Allow",
            "Action": [
                "ec2:DescribeAccountAttributes",
                "ec2:DescribeAddresses",
                "ec2:DescribeAvailabilityZones",
                "ec2:DescribeInternetGateways",
                "ec2:DescribeVpcs",
                "ec2:DescribeVpcPeeringConnections",
                "ec2:DescribeSubnets",
                "ec2:DescribeSecurityGroups",
                "ec2:DescribeInstances",
                "ec2:DescribeNetworkInterfaces",
                "ec2:DescribeTags",
                "ec2:GetCoipPoolUsage",
                "ec2:DescribeCoipPools",
                "elasticloadbalancing:DescribeLoadBalancers",
                "elasticloadbalancing:DescribeLoadBalancerAttributes",
                "elasticloadbalancing:DescribeListeners",
                "elasticloadbalancing:DescribeListenerCertificates",
                "elasticloadbalancing:DescribeSSLPolicies",
                "elasticloadbalancing:DescribeRules",
                "elasticloadbalancing:DescribeTargetGroups",
                "elasticloadbalancing:DescribeTargetGroupAttributes",
                "elasticloadbalancing:DescribeTargetHealth",
                "elasticloadbalancing:DescribeTags"
            ],
            "Resource": "*"
        },
        {
            "Effect": "Allow",
            "Action": [
                "cognito-idp:DescribeUserPoolClient",
                "acm:ListCertificates",
                "acm:DescribeCertificate",
                "iam:ListServerCertificates",
                "iam:GetServerCertificate",
                "waf-regional:GetWebACL",
                "waf-regional:GetWebACLForResource",
                "waf-regional:AssociateWebACL",
                "waf-regional:DisassociateWebACL",
                "wafv2:GetWebACL",
                "wafv2:GetWebACLForResource",
                "wafv2:AssociateWebACL",
                "wafv2:DisassociateWebACL",
                "shield:GetSubscriptionState",
                "shield:DescribeProtection",
                "shield:CreateProtection",
                "shield:DeleteProtection"
            ],
            "Resource": "*"
        },
        {
            "Effect": "Allow",
            "Action": [
                "ec2:AuthorizeSecurityGroupIngress",
                "ec2:RevokeSecurityGroupIngress"
            ],
            "Resource": "*"
        },
        {
            "Effect": "Allow",
            "Action": [
                "ec2:CreateSecurityGroup"
            ],
            "Resource": "*"
        },
        {
            "Effect": "Allow",
            "Action": [
                "ec2:CreateTags"
            ],
            "Resource": "arn:aws:ec2:*:*:security-group/*",
            "Condition": {
                "StringEquals": {
                    "ec2:CreateAction": "CreateSecurityGroup"
                },
                "Null": {
                    "aws:RequestTag/elbv2.k8s.aws/cluster": "false"
                }
            }
        },
        {
            "Effect": "Allow",
            "Action": [
                "ec2:CreateTags",
                "ec2:DeleteTags"
            ],
            "Resource": "arn:aws:ec2:*:*:security-group/*",
            "Condition": {
                "Null": {
                    "aws:RequestTag/elbv2.k8s.aws/cluster": "true",
                    "aws:ResourceTag/elbv2.k8s.aws/cluster": "false"
                }
            }
        },
        {
            "Effect": "Allow",
            "Action": [
                "ec2:AuthorizeSecurityGroupIngress",
                "ec2:RevokeSecurityGroupIngress",
                "ec2:DeleteSecurityGroup"
            ],
            "Resource": "*",
            "Condition": {
                "Null": {
                    "aws:ResourceTag/elbv2.k8s.aws/cluster": "false"
                }
            }
        },
        {
            "Effect": "Allow",
            "Action": [
                "elasticloadbalancing:CreateLoadBalancer",
                "elasticloadbalancing:CreateTargetGroup"
            ],
            "Resource": "*",
            "Condition": {
                "Null": {
                    "aws:RequestTag/elbv2.k8s.aws/cluster": "false"
                }
            }
        },
        {
            "Effect": "Allow",
            "Action": [
                "elasticloadbalancing:CreateListener",
                "elasticloadbalancing:DeleteListener",
                "elasticloadbalancing:CreateRule",
                "elasticloadbalancing:DeleteRule"
            ],
            "Resource": "*"
        },
        {
            "Effect": "Allow",
            "Action": [
                "elasticloadbalancing:AddTags",
                "elasticloadbalancing:RemoveTags"
            ],
            "Resource": [
                "arn:aws:elasticloadbalancing:*:*:targetgroup/*/*",
                "arn:aws:elasticloadbalancing:*:*:loadbalancer/net/*/*",
                "arn:aws:elasticloadbalancing:*:*:loadbalancer/app/*/*"
            ],
            "Condition": {
                "Null": {
                    "aws:RequestTag/elbv2.k8s.aws/cluster": "true",
                    "aws:ResourceTag/elbv2.k8s.aws/cluster": "false"
                }
            }
        },
        {
            "Effect": "Allow",
            "Action": [
                "elasticloadbalancing:AddTags",
                "elasticloadbalancing:RemoveTags"
            ],
            "Resource": [
                "arn:aws:elasticloadbalancing:*:*:listener/net/*/*/*",
                "arn:aws:elasticloadbalancing:*:*:listener/app/*/*/*",
                "arn:aws:elasticloadbalancing:*:*:listener-rule/net/*/*/*",
                "arn:aws:elasticloadbalancing:*:*:listener-rule/app/*/*/*"
            ]
        },
        {
            "Effect": "Allow",
            "Action": [
                "elasticloadbalancing:ModifyLoadBalancerAttributes",
                "elasticloadbalancing:SetIpAddressType",
                "elasticloadbalancing:SetSecurityGroups",
                "elasticloadbalancing:SetSubnets",
                "elasticloadbalancing:DeleteLoadBalancer",
                "elasticloadbalancing:ModifyTargetGroup",
                "elasticloadbalancing:ModifyTargetGroupAttributes",
                "elasticloadbalancing:DeleteTargetGroup"
            ],
            "Resource": "*",
            "Condition": {
                "Null": {
                    "aws:ResourceTag/elbv2.k8s.aws/cluster": "false"
                }
            }
        },
        {
            "Effect": "Allow",
            "Action": [
                "elasticloadbalancing:AddTags"
            ],
            "Resource": [
                "arn:aws:elasticloadbalancing:*:*:targetgroup/*/*",
                "arn:aws:elasticloadbalancing:*:*:loadbalancer/net/*/*",
                "arn:aws:elasticloadbalancing:*:*:loadbalancer/app/*/*"
            ],
            "Condition": {
                "StringEquals": {
                    "elasticloadbalancing:CreateAction": [
                        "CreateTargetGroup",
                        "CreateLoadBalancer"
                    ]
                },
                "Null": {
                    "aws:RequestTag/elbv2.k8s.aws/cluster": "false"
                }
            }
        },
        {
            "Effect": "Allow",
            "Action": [
                "elasticloadbalancing:RegisterTargets",
                "elasticloadbalancing:DeregisterTargets"
            ],
            "Resource": "arn:aws:elasticloadbalancing:*:*:targetgroup/*/*"
        },
        {
            "Effect": "Allow",
            "Action": [
                "elasticloadbalancing:SetWebAcl",
                "elasticloadbalancing:ModifyListener",
                "elasticloadbalancing:AddListenerCertificates",
                "elasticloadbalancing:RemoveListenerCertificates",
                "elasticloadbalancing:ModifyRule"
            ],
            "Resource": "*"
        }
    ]
}
FILE: backend.tf
terraform {
  backend "http" {
  }
}
FILE: data.tf
data "aws_availability_zones" "available" {
}

data "aws_eks_cluster" "cluster" {
  name = module.eks.cluster_name
  depends_on = [module.eks.cluster_name]
}

data "aws_eks_cluster_auth" "cluster" {
  name = module.eks.cluster_name
  depends_on = [module.eks.cluster_name]
}
FILE: main.tf NOTE: Make sure you add lines 40-41 and specify the rolGitlab role created earlier. If you don’t do this when you destroy the cluster, the KMS key for EKS will stay there and there is no way you can delete it unless you call AWS support.
# Create a VPC
module "vpc" {
  source  = "terraform-aws-modules/vpc/aws"
  version = "5.0.0"

  name = var.vpcName

  cidr = var.vpcCIDR
  azs  = slice(data.aws_availability_zones.available.names, 0, 3)

  private_subnets = var.privateSubnets
  public_subnets  = var.publicSubnets

  enable_nat_gateway   = var.enable_nat_gateway
  single_nat_gateway   = var.single_nat_gateway
  enable_dns_hostnames = var.enable_dns_hostnames

  public_subnet_tags = {
    "kubernetes.io/cluster/${var.cluster_name}" = "shared"
    "kubernetes.io/role/elb"                    = 1
  }

  private_subnet_tags = {
    "kubernetes.io/cluster/${var.cluster_name}" = "shared"
    "kubernetes.io/role/internal-elb"           = 1
  }
}

# Create an EKS cluster
module "eks" {
  source  = "terraform-aws-modules/eks/aws"
  version = "19.15.3"

  cluster_name    = var.cluster_name
  cluster_version = var.cluster_version

  vpc_id                         = module.vpc.vpc_id
  subnet_ids                     = module.vpc.private_subnets
  cluster_endpoint_public_access = var.cluster_endpoint_public_access
  kms_key_administrators         = ["arn:aws:iam::123456789012:role/rolGitLab"]
  kms_key_enable_default_policy  = true

  eks_managed_node_group_defaults = {
    ami_type = var.ami_type
  }

  eks_managed_node_groups = {
    one = {
      name = var.nodeGroup

      instance_types = var.instanceTypes

      min_size     = var.minSize
      max_size     = var.maxSize
      desired_size = var.desiredSize
    }
  }
}

# Create an IAM policy for the ALB ingress
resource "aws_iam_policy" "worker_policy" {
  name        = "worker-policy"
  description = "Worker policy for the ALB Ingress"

  policy = file(var.iamALBIngressPolicyFileName)
}

resource "aws_iam_role_policy_attachment" "additional" {
  for_each = module.eks.eks_managed_node_groups

  policy_arn = aws_iam_policy.worker_policy.arn
  role       = each.value.iam_role_name
}

# Crete the Ingress using Helm chart from AWS
resource "helm_release" "ingress" {
  name       = "ingress"
  chart      = "aws-load-balancer-controller"
  repository = "https://aws.github.io/eks-charts"
  version    = "1.6.1"

  set {
    name  = "autoDiscoverAwsRegion"
    value = "true"
  }

  set {
    name  = "autoDiscoverAwsVpcID"
    value = "true"
  }

  set {
    name  = "clusterName"
    value = module.eks.cluster_name
  }
}
FILE: outputs.tf
output "cluster_endpoint" {
  description = "Endpoint for EKS control plane"
  value       = module.eks.cluster_endpoint
}

output "cluster_security_group_id" {
  description = "Security group ids attached to the cluster control plane"
  value       = module.eks.cluster_security_group_id
}

output "region" {
  description = "AWS region"
  value       = var.region
}

output "cluster_name" {
  description = "Kubernetes Cluster Name"
  value       = module.eks.cluster_name
}
FILE: providers.tf
provider "aws" {
  region = var.region

  shared_config_files      = ["~/.aws/config"]
  profile                  = "oidc"
}

provider "helm" {
  kubernetes {
    host                   = data.aws_eks_cluster.cluster.endpoint
    token                  = data.aws_eks_cluster_auth.cluster.token
    cluster_ca_certificate = base64decode(data.aws_eks_cluster.cluster.certificate_authority.0.data)
  }
}
FILE: variables.tf
variable "region" {
  type    = string
  default = "us-east-2"
}

variable "vpcName" {
  type    = string
  default = "vpcFromGitLab"
}

variable "vpcCIDR" {
  type    = string
  default = "10.0.0.0/16"
}

variable "privateSubnets" {
  type    = list(string)
  default = ["10.0.1.0/24", "10.0.2.0/24", "10.0.3.0/24"]
}

variable "publicSubnets" {
  type    = list(string)
  default = ["10.0.4.0/24", "10.0.5.0/24", "10.0.6.0/24"]
}

variable "enable_nat_gateway" {
  type    = bool
  default = true
}

variable "single_nat_gateway" {
  type    = bool
  default = false
}

variable "enable_dns_hostnames" {
  type    = bool
  default = true
}

variable "cluster_name" {
  type    = string
  default = "eksFromGitLab"
}

variable "cluster_version" {
  type    = string
  default = "1.27"
}

variable "cluster_endpoint_public_access" {
  type    = bool
  default = true
}

variable "ami_type" {
  type    = string
  default = "AL2_x86_64"
}

variable "nodeGroup" {
  type    = string
  default = "ngFromGitLab"
}

variable "instanceTypes" {
  type    = list(string)
  default = ["t3.small"]
}

variable "minSize" {
  type    = number
  default = 1
}

variable "maxSize" {
  type    = number
  default = 3
}

variable "desiredSize" {
  type    = number
  default = 3
}


variable "iamALBIngressPolicyFileName" {
  type    = string
  default = "alb_ingress_iam_policy.json"
}
…and finally your .gitlab-ci.yml file.
FILE: .gitlab-ci.yml. NOTE: Remove line 38 if you don’t use it, don’t keep it with a comment or you’ll get an error in the pipeline.
stages:
  - validate
  - plan
  - apply
  - destroy

image:
  name: hashicorp/terraform:1.6
  entrypoint:
    - "/usr/bin/env"
    - "PATH=/usr/local/sbin:/usr/local/bin:/usr/sbin:/usr/bin:/sbin:/bin"

variables:
  TF_DIR: ${CI_PROJECT_DIR}
  TF_STATE_NAME: "eks-tf-state"
  TF_ADDRESS: "https://gitlab.com/api/v4/projects/${CI_PROJECT_ID}/terraform/state/${TF_STATE_NAME}"

default:
  id_tokens:
    GITLAB_OIDC_TOKEN:
      aud: https://gitlab.com

  before_script:
    - terraform --version
    - cd ${TF_DIR}
    - terraform init
      -reconfigure
      -backend-config="address=${TF_ADDRESS}"
      -backend-config="lock_address=${TF_ADDRESS}/lock"
      -backend-config="unlock_address=${TF_ADDRESS}/lock"
      -backend-config="username=${TF_USERNAME}"
      -backend-config="password=${TF_PASSWORD}"
      -backend-config="lock_method=POST"
      -backend-config="unlock_method=DELETE"
      -backend-config="retry_wait_min=5"
    - mkdir -p ~/.aws
    - echo "${GITLAB_OIDC_TOKEN}" > /tmp/web_identity_token
    - # echo "${GITLAB_OIDC_TOKEN}" | base64 - If you want to see the token, reveal it this way and then use base64 --decode to get the real one
    - echo -e "[profile oidc]\nrole_arn=${ROLE_ARN}\nweb_identity_token_file=/tmp/web_identity_token" > ~/.aws/config

job-validate:
  stage: validate
  script:
    - terraform validate

job-plan:
  stage: plan
  script:
    - terraform plan -out "tf_plan"
  dependencies:
    - job-validate
  artifacts:
    paths:
      - tf_plan

job-apply:
  stage: apply
  script:
    - terraform apply "tf_plan"
  dependencies:
    - job-plan
  allow_failure: true

job-destroy:
  stage: destroy
  script:
    - terraform destroy  -auto-approve
  dependencies:
    #- job-plan
    #- job-apply
  when: manual
Push the code back to Gitlab (git add, git commit, git push) and once everything completes successfully, you’ll have a working EKS cluster after 10-15 mins.
If you choose to manage the EKS from GitLab, you can skip to the next section. If you decide to manage the cluster outside GitLab and you already have another IAM user added to the role rolGitLab as described above, then do the following. Replace account # in line 1.
aws eks update-kubeconfig --region us-east-2 --name eksFromGitLab --role-arn arn:aws:iam::123456789012:role/rolGitLab
aws eks list-clusters
eksctl get cluster --name=eksFromGitLab --region us-east-2
kubectl get svc
Manage EKS from GitLab
Generally, you would want this to be in another project. Our first project was to build the cluster, but our second project builds on top of that and manages the cluster. In addition, the second project also uses the CI/CD pipeline file .gitlab-ci.yml so in order to avoid a single complex project – just create a new project. I’ll name my new project – project1. Clone the project on your local machine using git clone.
Create an empty config file for the agent on your local machine. It has to be under this folder structure.
mkdir -p .gitlab/agents/eks-agent && touch .gitlab/agents/eks-agent/config.yaml
In my case the name of the agent is eks-agent. Use whatever name you want but follow DNS naming convention.
Push the local changes to GitLab.
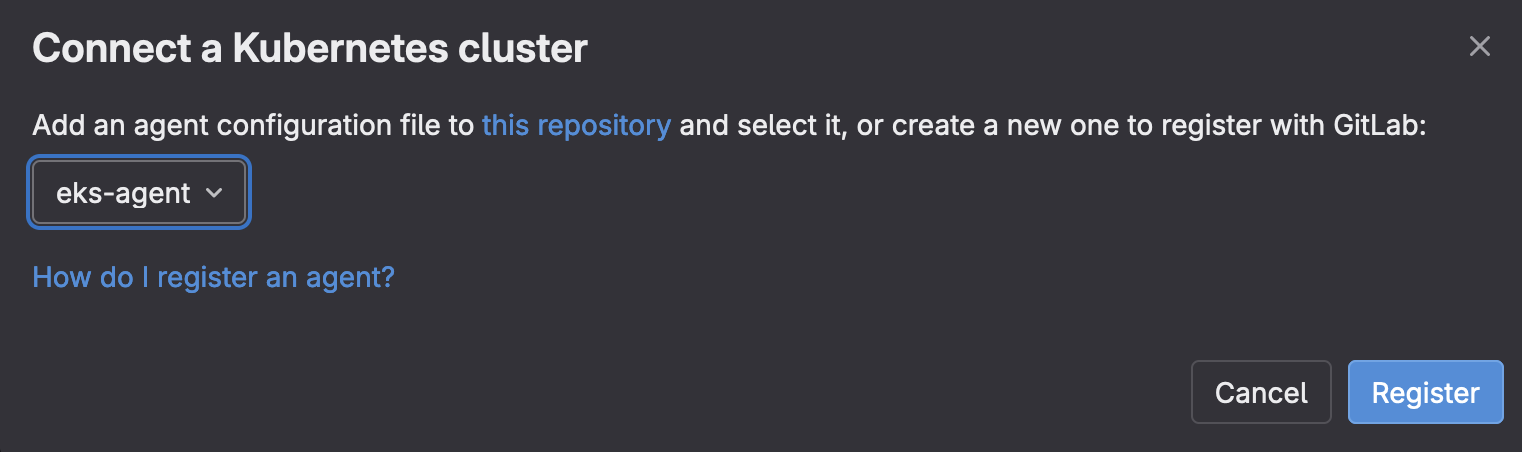
On the left side in GitLab, go to Operate | Kubernetes clusters and then click Connect a cluster from the upper right corner.
Select the agent from the drop down and click Register.
You’ll get an access token and a bunch of helm commands to install the agent on the cluster. Copy and paste and run those commands.
helm repo add gitlab https://charts.gitlab.io
helm repo update
helm upgrade --install eks-agent gitlab/gitlab-agent \
    --namespace gitlab-agent-eks-agent \
    --create-namespace \
    --set image.tag=v16.9.0-rc2 \
    --set config.token=glagent-2r_uW63e1w_mkNzR_keU2hmaNhhcKauSpujg8OdLQG74wrF73g \
    --set config.kasAddress=wss://kas.gitlab.com
Refresh the GitLab screen after the helm chart has been installed and you’ll see your cluster connected.

Now you need to authorize the agent to access our project.
In the blank config.yaml file on the local machine under .gitlab/agents/eks-agent/ directory, add these lines. Change the path the project in line 3 (look at the URL, that’s your project name after gitlab.com) and change the manifest file if you want in line 6. You can also change the namespace in line 5 as well.
gitops:
  manifest_projects:
  - id: andreevkliment/project1
    default_namespace: default
    paths:
      - glob: 'manifest.yaml'
Then create the manifest file under the root of the project. Save it as manifest.yaml or however you referenced it in line 6 in the previous file.
apiVersion: apps/v1
kind: Deployment
metadata:
  name: nginx-deployment
spec:
  selector:
    matchLabels:
      app: nginx
  replicas: 2
  template:
    metadata:
      labels:
        app: nginx
    spec:
      containers:
      - name: nginx
        image: nginx:1.14.2
        ports:
        - containerPort: 80
If you push this code back to GitLab, the agent will execute it and you’ll (with kubect get pods) see the nginx pods running on your cluster.
Another way of managing the EKS cluster is using .gitlab-ci.yml file.
Create .gitlab-ci.yml with these lines. Replace your username, project and the agent name in line 7.
deploy:
  image:
    name: bitnami/kubectl:latest
    entrypoint: ['']
  script:
    - kubectl config get-contexts
    - kubectl config use-context andreevkliment/project1:eks-agent
    - kubectl get pods
If you push this back to GitLab, the pipeline will start and you’ll see the pods from the cluster in the logs. This example doesn’t execute manifest.yaml. You can have both ways of interacting with the cluster or you can use them separately.