
If you have some instances running in AWS, most likely they are in the private subnet and to access Internet they use the Internet Gateway. By default, they can access everything and that’s a big no-no. You don’t want to be an open SMTP relay or a Bitcoin node if your instance is compromised. But the Internet Gateway can’t do the filtering for you. You are able to access everything. Granted, you can modify the rules in the Network ACL, but you can only deny access to IPs, not URLs. The problem with this scenario is that many update sites have IPs that change from time to time or they use CDN networks with a tons of IPs behind. If you whitelist these IPs, then technically you are whitelisting every single site that’s behind the CDN network such as akamai.
One of the solutions is to use squid. squid can act as a cache server and transparent proxy. Transparent proxy means that the instances that are accessing the Internet are not aware that they are behind a proxy, you don’t have to specify any settings on the instance that’s accessing the Internet. A transparent proxy is much more easier for the end user/client, they don’t have to configure anything on their end.
I’ll show you how to configure a squid transparent proxy that sits in a public subnet in AWS and the instances that are in the private subnets will use squid to access Internet. I’ll implement whitelisting ACL which means that only allowed sites will be reachable. The rest is blocked. This solution is not for your home/lab network where you want to access everything. With this solution most sites will not show properly unless you whitelist all the dependencies. For example, some sites have their CSS scripts in a separate domain, so if you whitelist amazon.com, you’ll be able to access it, but it will look garbled because their CSS is on awsstatic.com. So, you have to whitelist this site. I’ll explain how to find that as well if you encounter these problems.
Before I begin, these are the pre-requisites and the expectations. We’ll use CentOS 7 (with SELinux disabled) as a squid server that runs in a public subnet and the instances that want to access the Internet are in a private subnet. squid constantly evolves, so whatever works now might not work tomorrow, because of the nature of how we access SSL sites (related to TLS 1.3). I’ll use CentOS 7 and squid 4.9. If you use a different version, this might not work. Also, subsequent updates might break this solution. If you want an Enterprise solution, you might want to look somewhere else.
Here is my architectural diagram. I’ll explain every detail. If you have your VPCs, subnets, routes ready, you might want to skip this, but pay attention on the routing.
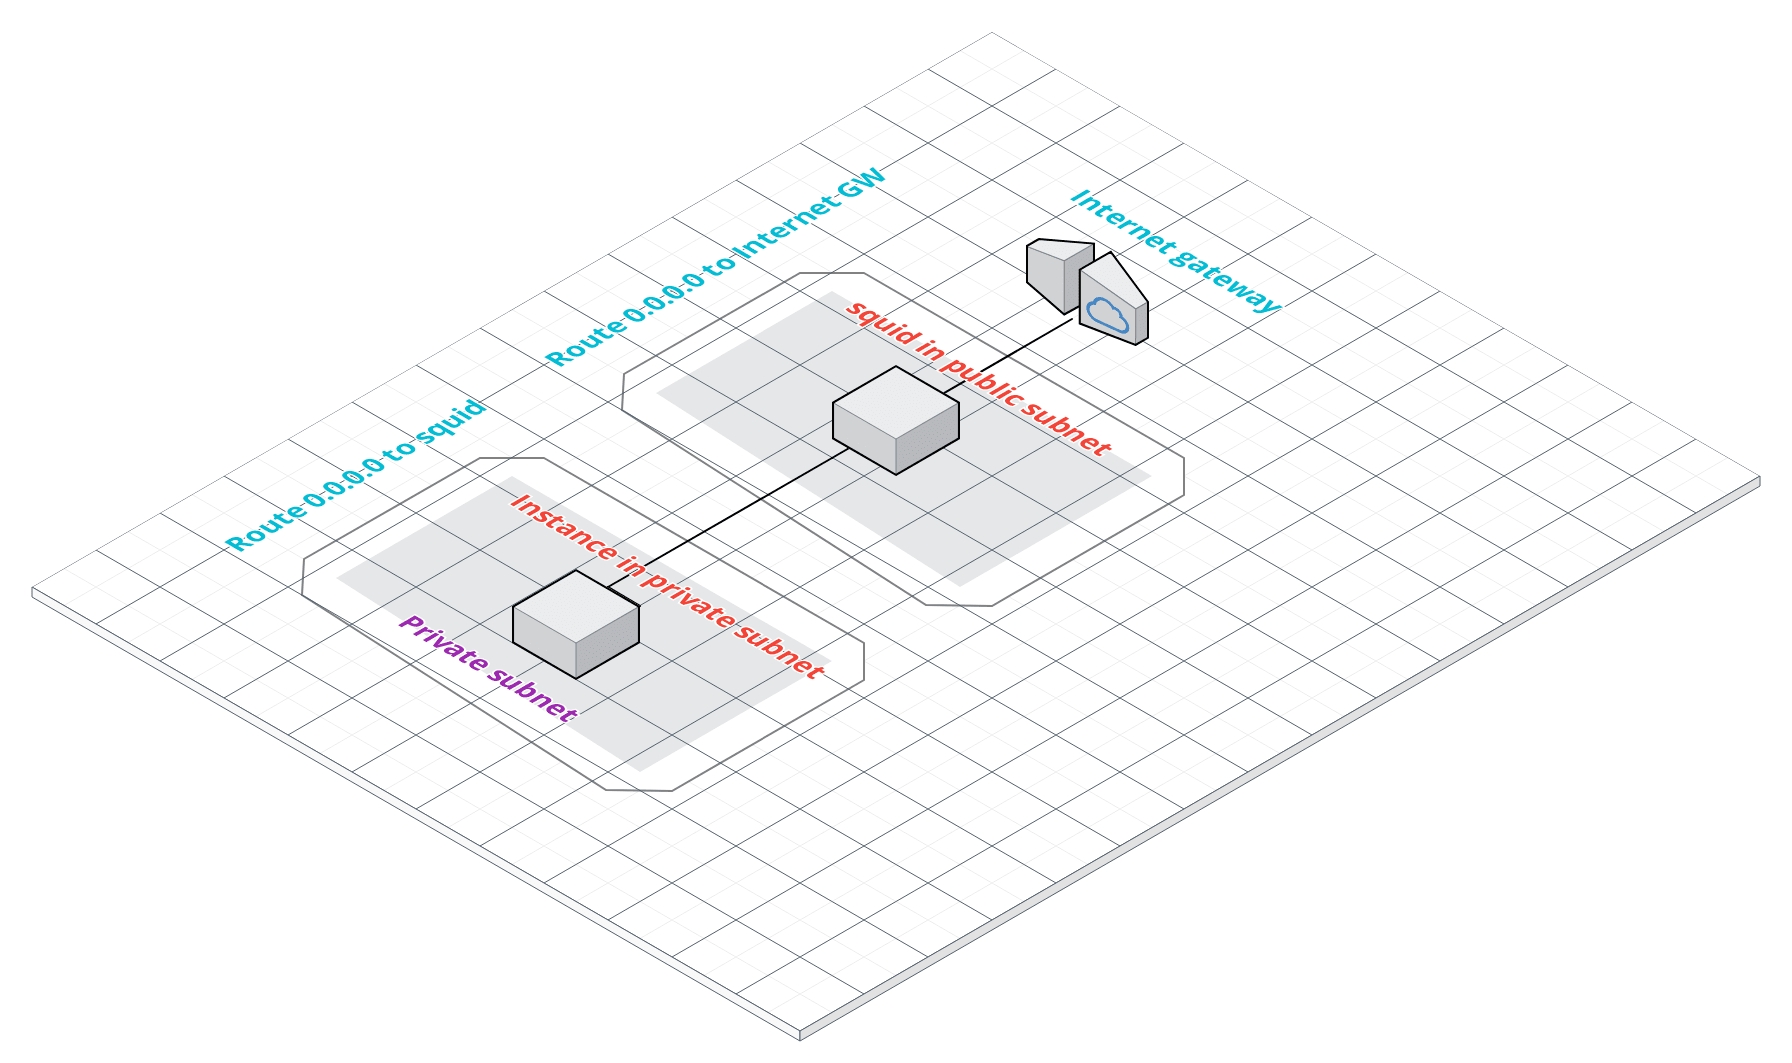
Table of Contents
VPC, subnets, public route and Internet Gateway
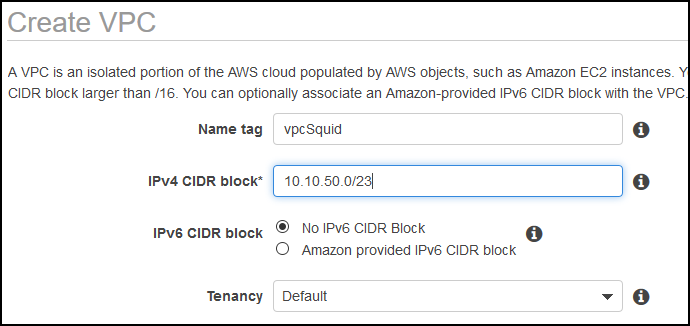
I’ll create a new VPC called vpcSquid and I’ll carve that VPC with two subnets, one private and one public. Each will accommodate 256 hosts.
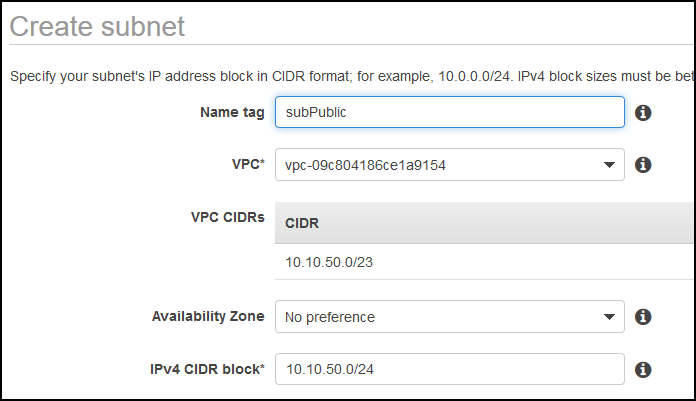
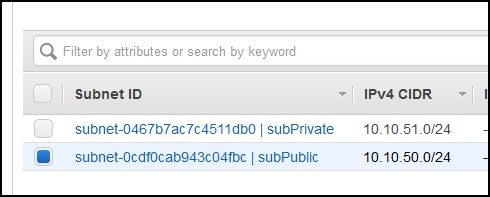
Let’s create the two subnets. Go to the VPC menu and from the Subnets submenu click on Create subnet.
The first one is the public subnet where squid server will reside.
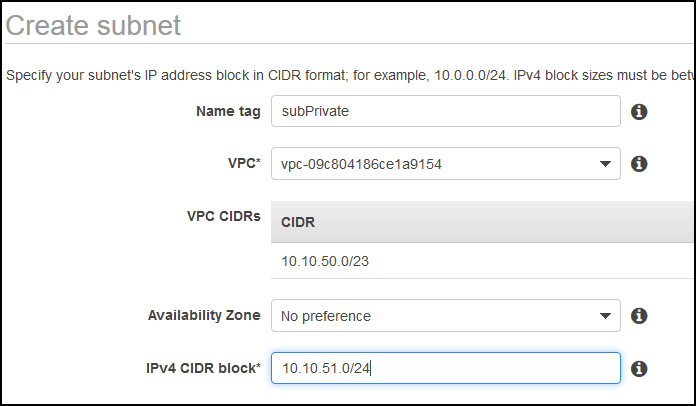
Create the private subnet.
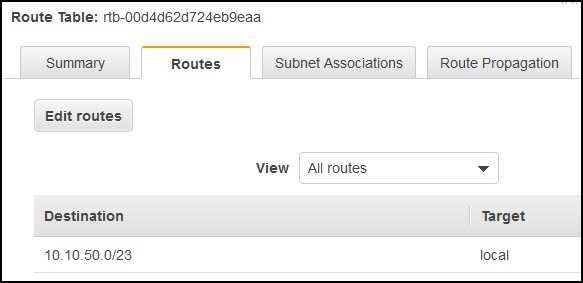
Now go to the Route tables menu and you’ll see that you have a route there already. This route was created when you created the VPC. It refers to the public subnet, but it’s not associated yet.
Click one the Subnet associations tab and then click on Edit subnet assications button. Select the public subnet and click Save.
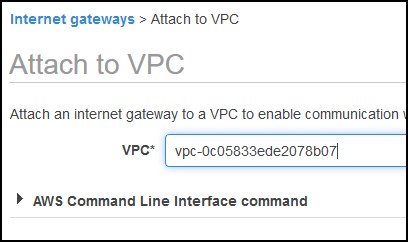
Before we create a route to the Internet for the public subnet, we need an Internet Gateway. Click on the Internet Gateways menu on the left and click Create Internet Gateway. I named mine gwSquid. Select the newly created Internet Gateway and then click on the Actions button and click on Attach to VPC. Assign the VPC that we created.
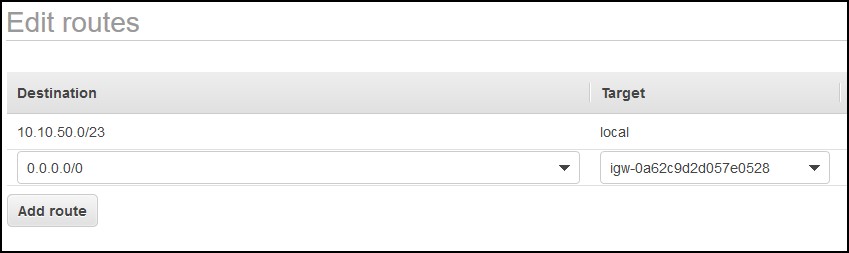
Now, go back to the Route tables, then select the public route again and click on the Routes tab. Click on Edit routes button, then click on Add route.
Add a route to the Internet (0.0.0.0/0) over the Internet gateway that we just created. Click on Save routes.
squid instance
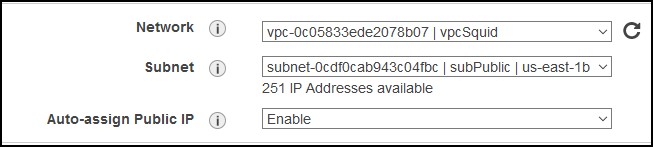
Let’s create the instance now. Choose CentOS 7 image, deploy it in the VPC that we just created. Make sure it’s in the public subnet and that you have a public IP.
For storage, choose whatever you like. If you want to use squid as a cache server, then choose more than the default 8GB. For example, if you choose 20GB disk, you can also restrict squid to keep only 12GB of cache for example. Your choice.
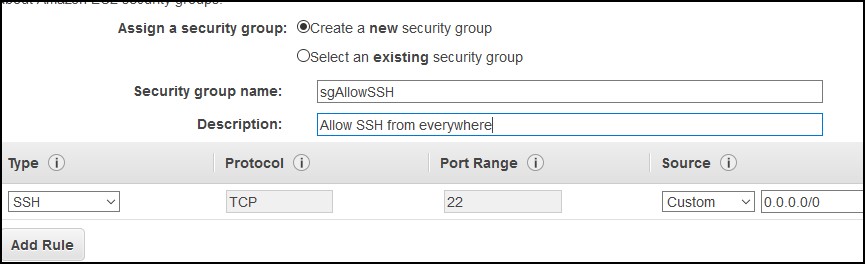
Assign a security group that allows port 22 (SSH). In my case I allowed access from everywhere (0.0.0.0/0), but it’s wisely to choose only certain IPs or subnets. This is a test instance, so I’ll proceed with 0.0.0.0/0.
Finally choose your key and launch the instance. While the instance spins up, go back to the VPC | Route tables menu.
Private route
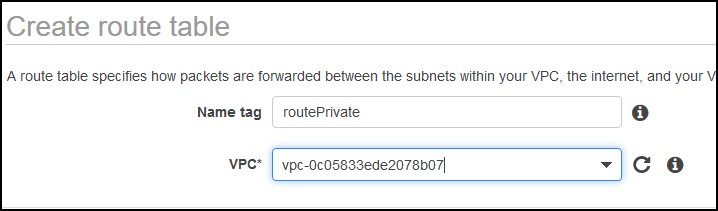
Click on Create Route table button and enter the name of the private route and associate it the the VPC. Click the Create button.
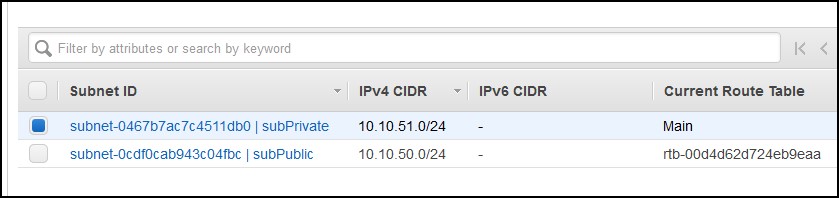
Select the private route and click on the Subnet Associations tab. Click Edit subnet associations button and select the private subnet.
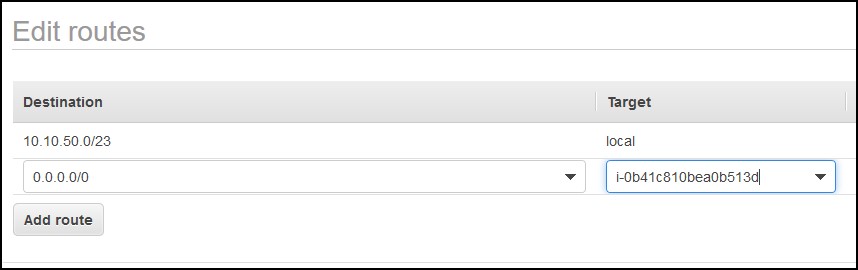
Then click on the Routes tab and click on Edit routes. Click Add route. For Destination type 0.0.0.0/0, for the target select Instance and select the instance that we just created. Click Save routes button. What we just did is we told AWS to route the Internet request in the private subnet through our squid instance. So, the Internet request will go to the instance first and then through the Internet gateway.
Source/Destination Check
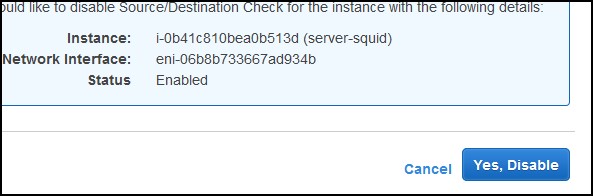
At this point, the only thing remaining is to go to the instance and change the Source/Destination Check setting. Select the instance, click the Actions button, then select Networking and then Select Source/Dest. Check. Click on Yes, Disable.
Install squid from source
SSH to the instance using centos as user and your key as password. Type sudo su to get the root prompt. CentOS comes with squid 3.5, but we’ll install squid 4.9 from the source.
First, install the pre-requisites.
yum install -y perl gcc-c++ autoconf automake make wget
yum install -y libxml2-devel libecap-devel openssl-devel openldap-devel pam-devel libdb-devel
Then, create a user that will run the squid daemon.
adduser squid -r -s /sbin/nologin -m
Go to the /tmp folder, download the squid tarball, extract it and go to that directory.
cd /tmp
wget http://www.squid-cache.org/Versions/v4/squid-4.9.tar.gz
tar xzvf squid-4.9.tar.gz
cd squid-4.9
Configure the squid with all helpers. Click the plus sign to expand the source.
./configure --build=x86_64-redhat-linux-gnu --host=x86_64-redhat-linux-gnu \
--program-prefix= --prefix=/usr --exec-prefix=/usr \
--bindir=/usr/bin --sbindir=/usr/sbin --sysconfdir=/etc \
--datadir=/usr/share --includedir=/usr/include \
--libdir=/usr/lib64 --libexecdir=/usr/libexec \
--sharedstatedir=/var/lib --mandir=/usr/share/man \
--infodir=/usr/share/info \
--exec_prefix=/usr --libexecdir=/usr/lib64/squid \
--localstatedir=/var --datadir=/usr/share/squid \
--sysconfdir=/etc/squid --with-logdir=/var/log/squid \
--with-pidfile=/var/run/squid.pid --enable-auth \
--enable-auth-basic=DB,LDAP,NCSA,NIS,PAM,POP3,RADIUS,SASL,SMB,getpwnam,fake \
--enable-auth-ntlm=fake --enable-auth-digest=file,LDAP,eDirectory \
--enable-auth-negotiate=kerberos,wrapper \
--enable-external-acl-helpers=file_userip,LDAP_group,time_quota,delayer,SQL_session,session,unix_group,wbinfo_group,kerberos_ldap_group \
--enable-cache-digests --enable-cachemgr-hostname=localhost \
--enable-delay-pools --enable-epoll --enable-icap-client --enable-ident-lookups \
--enable-linux-netfilter --enable-removal-policies=heap,lru \
--enable-snmp --enable-storeio=aufs,diskd,rock,ufs --enable-wccpv2 \
--enable-esi --enable-ecap --with-aio \
--enable-security-cert-generators --enable-security-cert-validators \
--enable-icmp --with-filedescriptors=16384 --disable-arch-native --without-nettle \
--disable-dependency-tracking --enable-eui --enable-follow-x-forwarded-for \
--with-default-user=squid --enable-ssl-crtd --with-included-ltdl \
--with-dl --with-openssl --with-pthreads --disable-arch-native
Compile and install. It takes about 20 mins on 2 CPU, 2GB RAM t3 instance.
make && make install
While the installation runs, open up a new session and sudo su again as root. We have to create the systemd startup scripts. Just copy and paste these three commands. It will create three files.
cat << 'EOF' > /usr/lib/systemd/system/squid.service
[Unit]
Description=Squid caching proxy
After=syslog.target network.target nss-lookup.target

[Service]
Type=forking
LimitNOFILE=16384
EnvironmentFile=/etc/sysconfig/squid
ExecStartPre=/usr/libexec/squid/cache_swap.sh
ExecStart=/usr/sbin/squid $SQUID_OPTS -f $SQUID_CONF
ExecReload=/usr/sbin/squid $SQUID_OPTS -k reconfigure -f $SQUID_CONF
ExecStop=/usr/sbin/squid -k shutdown -f $SQUID_CONF
TimeoutSec=0

[Install]
WantedBy=multi-user.target
EOF
cat << 'EOF' > /etc/sysconfig/squid
# default squid options
SQUID_OPTS=""

# Time to wait for Squid to shut down when asked. Should not be necessary
# most of the time.
SQUID_SHUTDOWN_TIMEOUT=100

# default squid conf file
SQUID_CONF="/etc/squid/squid.conf"
EOF
mkdir /usr/libexec/squid
cat << 'EOF' > /usr/libexec/squid/cache_swap.sh
#!/bin/bash
if [ -f /etc/sysconfig/squid ]; then
        . /etc/sysconfig/squid
fi

SQUID_CONF=${SQUID_CONF:-"/etc/squid/squid.conf"}

CACHE_SWAP=`sed -e 's/#.*//g' $SQUID_CONF | \
        grep cache_dir | awk '{ print $3 }'`

for adir in $CACHE_SWAP; do
        if [ ! -d $adir/00 ]; then
                echo -n "init_cache_dir $adir... "
                squid -N -z -F -f $SQUID_CONF >> /var/log/squid/squid.out 2>&1
        fi
done
EOF
chmod +x /usr/libexec/squid/cache_swap.sh
Once the compilation and installation ends, execute these lines to allow the squid user to access the log directory and enable the auto-start on boot. Also, make sure SELinux is disabled and change /etc/selinux/config file to SELINUX=permissive or SELINUX=disabled.
chown -R squid:squid /var/log/squid
systemctl enable squid
setenforce 0
Feel free to start squid, but it will run with the default config and in non-transparent proxy mode.
# Optional
systemctl start squid
systemctl status squid -l
tail /var/log/squid/cache.log
If you like you can test. Log to an instance in a private subnet and set the proxy. Change the IP below to the IP of your squid server and make sure the squid server has a security group that allows port 3128 from 10.10.51.0/24 subnet.
# Optional, do this on the client instance
export http_proxy=10.10.50.235:3128
export https_proxy=10.10.50.235:3128
If you do curl -v https://wordpress.org you’ll get their page back in HTML/CSS.
unset http_proxy
unset https_proxy
If you reset the proxy settings to nothing and if you do culr again, you’ll see that it will time-out. Even with the proxy set, you can’t use yum because yum uses proxy settings specified in /etc/yum.conf. That’s why a transparent proxy is much more superior. You don’t have to worry about configuring the proxy on the instances.
NOTE: Make sure you unset the proxy settings if you already exported them.
Now that we have pretty-much everything ready, let’s create the config file. It’s using SSLBump peek and splice config. For more info click here.
Just copy and paste the snippet below. It will create the config for you.
cat << 'EOF' > /etc/squid/squid.conf
cache deny all
# HTTP
http_port 3128
http_port 3129 intercept
acl http-whitelist dstdomain "/etc/squid/whitelist.txt"
http_access allow http-whitelist

# HTTPS
https_port 3130 cert=/etc/squid/ssl/squid.pem ssl-bump intercept
acl sslport port 443
http_access allow sslport
acl https-whitelist ssl::server_name "/etc/squid/whitelist.txt"
acl step1 at_step SslBump1
acl step2 at_step SslBump2
acl step3 at_step SslBump3
ssl_bump peek step1 all
ssl_bump peek step2 https-whitelist
ssl_bump splice step3 https-whitelist
ssl_bump terminate step2 all
http_access deny all
EOF
And for the whitelist file, create a file with your allowed domains. Everything else will be blocked. You can put IPs here as well.
cat << 'EOF' > /etc/squid/whitelist.txt
.amazon.com
.amazonaws.com
.wordpress.org
.api.google.com
EOF
If squid is running, stop it with systemctl stop squid and execute these lines to create an internal self-signed certificate. More info on why this is needed, in the link that I’ve presented above.
mkdir /etc/squid/ssl
cd /etc/squid/ssl
openssl genrsa -out squid.key 4096
openssl req -new -key squid.key -out squid.csr -subj "/C=US/ST=NJ/L=squid/O=squid/CN=squid"
openssl x509 -req -days 3650 -in squid.csr -signkey squid.key -out squid.crt
cat squid.key squid.crt >> squid.pem
Initialize the SSL database.
/usr/lib64/squid/security_file_certgen -c -s /var/cache/squid/ssl_db -M 4MB
…otherwise you’ll receive these errors in /var/log/squid/cache.log.
2019/11/17 15:44:19 kid1| WARNING: /usr/lib64/squid/security_file_certgen -s /var/cache/squid/ssl_db -M 4MB #Hlpr1 exited
2019/11/17 15:44:19 kid1| Too few /usr/lib64/squid/security_file_certgen -s /var/cache/squid/ssl_db -M 4MB processes are running (need 1/32)
Change the permission of this file…
chmod 4755 /usr/lib64/squid/pinger
…otherwise you’ll receive these errors in /var/log/squid/cache.log.
2019/11/17 15:38:47| pinger: Initialising ICMP pinger ...
2019/11/17 15:38:47| Open  icmp_sock: (1) Operation not permitted
2019/11/17 15:38:47| pinger: Unable to start ICMP pinger.
If you start squid now, you’ll get something like this in /var/log/squid/cache.log. If you still get errors like the ones above (pinger: Unable to start ICMP pinger), reboot one more time.
2019/11/17 15:49:17| Created PID file (/var/run/squid.pid)
2019/11/17 15:49:17 kid1| Current Directory is /
2019/11/17 15:49:17 kid1| Starting Squid Cache version 4.9 for x86_64-redhat-linux-gnu...
2019/11/17 15:49:17 kid1| Service Name: squid
2019/11/17 15:49:17 kid1| Process ID 3705
2019/11/17 15:49:17 kid1| Process Roles: worker
2019/11/17 15:49:17 kid1| With 16384 file descriptors available
2019/11/17 15:49:17 kid1| Initializing IP Cache...
2019/11/17 15:49:17 kid1| DNS Socket created at [::], FD 5
2019/11/17 15:49:17 kid1| DNS Socket created at 0.0.0.0, FD 9
2019/11/17 15:49:17 kid1| Adding domain ec2.internal from /etc/resolv.conf
2019/11/17 15:49:17 kid1| Adding nameserver 10.10.50.2 from /etc/resolv.conf
2019/11/17 15:49:17 kid1| helperOpenServers: Starting 5/32 'security_file_certgen' processes
2019/11/17 15:49:17 kid1| Logfile: opening log daemon:/var/log/squid/access.log
2019/11/17 15:49:17 kid1| Logfile Daemon: opening log /var/log/squid/access.log
2019/11/17 15:49:17 kid1| Local cache digest enabled; rebuild/rewrite every 3600/3600 sec
2019/11/17 15:49:17 kid1| Store logging disabled
2019/11/17 15:49:17 kid1| Swap maxSize 0 + 262144 KB, estimated 20164 objects
2019/11/17 15:49:17 kid1| Target number of buckets: 1008
2019/11/17 15:49:17 kid1| Using 8192 Store buckets
2019/11/17 15:49:17 kid1| Max Mem  size: 262144 KB
2019/11/17 15:49:17 kid1| Max Swap size: 0 KB
2019/11/17 15:49:17 kid1| Using Least Load store dir selection
2019/11/17 15:49:17 kid1| Current Directory is /
2019/11/17 15:49:17 kid1| Finished loading MIME types and icons.
2019/11/17 15:49:17 kid1| HTCP Disabled.
2019/11/17 15:49:17 kid1| Pinger socket opened on FD 26
2019/11/17 15:49:17 kid1| Squid plugin modules loaded: 0
2019/11/17 15:49:17 kid1| Adaptation support is off.
2019/11/17 15:49:17 kid1| Accepting HTTP Socket connections at local=[::]:3128 remote=[::] FD 22 flags=9
2019/11/17 15:49:17 kid1| Accepting NAT intercepted HTTP Socket connections at local=[::]:3129 remote=[::] FD 23 flags=41
2019/11/17 15:49:17 kid1| Accepting NAT intercepted SSL bumped HTTPS Socket connections at local=[::]:3130 remote=[::] FD 24 flags=41
2019/11/17 15:49:17| pinger: Initialising ICMP pinger ...
2019/11/17 15:49:17| pinger: ICMP socket opened.
2019/11/17 15:49:17| pinger: ICMPv6 socket opened
2019/11/17 15:49:18 kid1| storeLateRelease: released 0 objects
If you see my squid.conf, you’ll see that I am not using squid as cache server (cache deny all). If you want to cache your responses, replace that line with this one. 100 means 100MB. See here for more explanation.
cache_dir ufs /var/cache/squid 100 16 256
In order to run in transparent proxy mode, we have to make some firewall changes and redirect the traffic on ports 80 and 443 to squid which will listen on 3129 and 3130 (for https). Do this on the squid server. You don’t have to do anything on the clients.
iptables -t nat -A PREROUTING -p tcp --dport 80 -j REDIRECT --to-port 3129
iptables -t nat -A PREROUTING -p tcp --dport 443 -j REDIRECT --to-port 3130
If we reboot the server, the iptables changes will be lost, so we have to save them.
yum -y install iptables-services
systemctl enable iptables
systemctl start iptables
service iptables save
Reboot to make sure everything comes back. Check the redirects. Lines 4 and 5 should be as below.
iptables --table nat --list
Chain PREROUTING (policy ACCEPT)
target     prot opt source               destination
REDIRECT   tcp  --  anywhere             anywhere             tcp dpt:http redir ports 3129
REDIRECT   tcp  --  anywhere             anywhere             tcp dpt:https redir ports 3130

Chain INPUT (policy ACCEPT)
target     prot opt source               destination

Chain OUTPUT (policy ACCEPT)
target     prot opt source               destination

Chain POSTROUTING (policy ACCEPT)
target     prot opt source               destination
MASQUERADE  all  --  anywhere             anywhere
Test
In order to test, we’ll build a small Linux instance in the private subnet and test from there. Do not assign a public IP to this instance. If you don’t have a VPN or Direct Connect to your private subnets, you’ll have to use the squid server to access the instance. Copy the key (PEM) file to the squid instance and SSH to the private instance using ssh -i key.pem internal_IP_of_test_instance. You have to chmod 600 key.pem first. The key file is the one that you use to connect to the squid instance. That’s in my case. If you have multiple key files, then copy the key file that you used when you created the instance in the private subnet. Assign a security group that allows SSH from the squid server instance, or use the same one that I used when created the squid server which allows access from everywhere on port 22. You have to rectify this later. Don’t allow access from everywhere in any circumstances. This is just for test.
Make sure that you have a new security group created for the squid server instance. This security group should allow ports 80 and 443 from the private subnet only (10.10.51.0/24). Attach this security group to the squid server so it allows HTTP/HTTPS ports from the client instances.

On the client instance, make sure you have unset http_proxy and https_proxy variables. If you try to access a site that’s not listed in the whitelist.txt, you’ll get an Access Denied page from squid or sometimes you’ll get some SSL errors. For the sites that are listed, you might get them to show properly, but sometimes they’ll be garbled. If you look at the source of the page, you’ll see what URLs is the main site trying to access. Most likely there are some JavaScripts hosted on different domains. You’ll have to whitelist these as well if you want proper rendering. But sometimes, you might want to connect to an update server and you won’t be able to see the HTML rendering, e.g. CentOS update sites. In those cases Fiddler might be able to help.