
You probably have some development, even production servers that you don’t need running during the off-hours and weekends. The easiest method of powering them down and up is using some CLI tools and a regular Windows/cron scheduler. For example, you can install Azure CLI on a Windows server and then using the built-in Task Scheduler, you can execute something like az vm stop --resource-group MyResourceGroup --name VM1. Or, you can install AWS CLI and then using the cron scheduler in a Linux instance, you can do something like aws ec2 stop-instances --instance-ids i-1234567890abcdef0. In both cases, you’ll need a server that will run 24/7 and execute these commands. No matter how small the server is, you still need to manage it (patches, updates, backups etc).
Fortunately, both AWS and Azure provide some sort of automating this solution, AWS with Lambda functions and Azure with Azure Automation and also Azure functions. I’ll explain two scenarios, both in AWS (Lambda) and Azure (Azure Automation) where you shutdown/power-up a set of predefined servers at a regular interval using their ids or names and using tags. For example, we’ll power-off servers VM1, VM2 and VM3 or power-up server where the tag ENV equals Dev. In Azure, the solution will have the tags predetermined. You won’t be able to choose what the tags are, e.g ENV=Dev. The tags will have to be stopsqequence=some_number and startsequence=somenumber.
Table of Contents
AWS Lambda
The first scenario is when we want to specify the names of the servers to be powered-up and down. In AWS you can have two servers with the same name, but you can’t have two servers with the same id. We’ll use the id as reference. In both scenarios, we’ll need an IAM policy and an IAM role that will be used when Lambda script is executed. Go to IAM service and click on Policies from the left. Click on Create policy and then on the JSON tab. Copy and paste the following policy.
{
  "Version": "2012-10-17",
  "Statement": [
    {
      "Effect": "Allow",
      "Action": [
        "logs:CreateLogGroup",
        "logs:CreateLogStream",
        "logs:PutLogEvents"
      ],
      "Resource": "arn:aws:logs:*:*:*"
    },
    {
      "Effect": "Allow",
      "Action": [
        "ec2:Start*",
        "ec2: DescribeInstances",
        "ec2:Stop*"
      ],
      "Resource": "*"
    }
  ]
}
Name the policy, add an optional description and click on Create policy. In my case, I’ve named my policy polStartStopEC2. Once the policy is created, click on Roles on the left and click on Create role. Leave the AWS service type selected, then click on Lambda and then click on Next: Permissions at the bottom right. In the next screen, under Filter policies, start typing polStart or whatever you named your policy and select it. Proceed with the tags (optional) and then name the role (in my case rolStartStopEC2).

AWS Lambda – use server’s id
This scenario is already covered in this AWS blog, but I’ll go over it.
Go to Lambda console and click on Create function. Select the first option Author from scratch. Name your function (in my case lamStopEC2), select Python 3.7 for Runtime, expand the Permissions, select Use an existing role and select the role we just created.

Click Create function and copy and paste this code.
import boto3
# Specify the region here
region = 'us-east-1'
# Specify the instance(s) here
instances = ['id-instance1', 'id-instance2'...]
ec2 = boto3.client('ec2', region_name=region)

def lambda_handler(event, context):
    ec2.stop_instances(InstanceIds=instances)
    print('Stopped instance: ' + str(instances))
Under Basic settings, change the Timeout to 10 minutes. Click Save. If you already put the real instance IDs in line 5, you can click Test. Be careful when testing because this action will shut-down the instances.
Now, repeat the same Lambda process again, but this time create a new function, lamStartEC2. Use the same exact settings, except for the function, you paste this code.
import boto3
# Specify the region here
region = 'us-east-1'
# Specify the instance(s) here
instances = ['id-instance1', 'id-instance2'...]
ec2 = boto3.client('ec2', region_name=region)

def lambda_handler(event, context):
    ec2.start_instances(InstanceIds=instances)
    print('Started instance: ' + str(instances))
In order to schedule these functions, we’ll use CloudWatch. Go to CloudWatch, then Events and Rules submenu. Click on Create rule. Under Event Source, click on Schedule then Cron expression. If you are unfamiliar with the cron syntax, there is a link right below where it says (Learn more). Unlike regular cron which allows you to specify seconds, CloudWatch can schedule only in 1 minute increments and more. In my case, I want my servers to be powered up at 7:30AM from Monday to Friday and to be powered off at 6PM on the same days. Logically, Saturday and Sunday, the servers will be off. Once the server goes off on Friday at 6PM, it will power up on Monday at 7:30AM. The schedule looks like this : 30 7 ? * MON-FRI * and CloudWatch is nice enough to give you a preview. Click on Add target and select the Lambda start script. Then click on Configure details and name the rule, in my case rulStartEC2. Enter an optional description and then Create rule. Create another rule for the stop sequence. And you are done with the first scenario.
AWS Lambda – use tags
The first case works perfectly fine, but you have to maintain the script in case you need to add or remove some servers. And you have to do that in both scripts. A better solution is to tag the servers that you want to have a scheduled stop/start and let the Lambda script worry about the servers. All you have to do when you build a server is to tag it. In my case, I’ll tag a server with a Key ENV and a Value of Dev. And i’ll specify that in the script, so only those servers are affected.
Here is the script to shut down the servers based on a tag.
import boto3
# Specify the region here
region = 'us-east-1'
ec2 = boto3.resource('ec2', region)
# You can filter the instance by using multiple tags here. I am using only one tag.
def lambda_handler(event, context):
    filters = [{'Name':'tag:ENV', 'Values':['Dev']}]

    instances = ec2.instances.filter(Filters=filters)

    MyInstances = [instance.id for instance in instances]
    if len(MyInstances) > 0:
        ec2.instances.filter(InstanceIds=MyInstances).stop()
The script to start the instances is exactly the same, just change the method .stop() to .start() in line 13. And, you can use the same process in CloudWatch that we used for the 1st scenario to schedule your script.
Logs
You can even check the logs for our Lambda functions. Go to CloudWatch, Log groups and under the Filter type /aws/lambda/ or /aws/lambda/lamStartEC2 in my case. If you click on any of those entries, you’ll see the logs where it tells you the id of the instances that were affected.
Azure Automation
We’ll cover the same scenarios in Azure. A case where we want to start/stop a bunch of VMs in a resource group and a case where we want to start/stop VMs based on a tag. In order to do that, we need to install a specific solution in our subscription. From the Azure portal’s main page, start typing solution in the search resource bar in the top-middle part of the screen and then click on Solutions. Click Add on the left or Create solution in the middle. When the new blade shows up, type start in the search the marketplace bar and choose Start/Stop VMs during off-hours. Click Create. You’ll have to create three different resources for this solution: A workspace, an automation account and parameters. Create a new log analytics workspace (the name must be unique), choose a subscription and a resource group (where the VMs are) and a location. The location of the workspace and the VMs can be in different location. Choose the default pricing tier. For the automation account, just enter a name. The subscription, the resource group and the location will be automatically populated. And finally, you can accept the defaults for the Parameters section. Choose if you want to receive e-mails or not and click Create.
Azure Automation – use server names
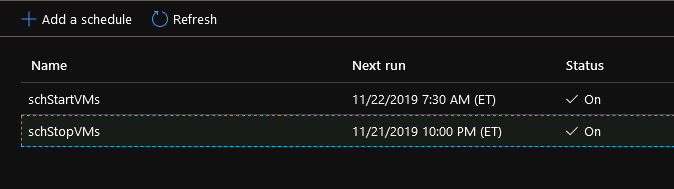
Once completed (after 5-10 minutes), if you go to your resources, you’ll see a bunch of runbooks. Just wait for the deployment to complete even if you see the runbooks. Find the one that says ScheduledStartStop_Parent… and click on it. Click on Schedules from the blade that shows up and then you’ll see these two schedules.

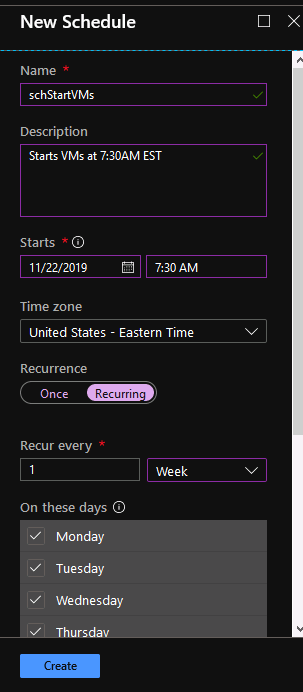
You have to click on each one and click Unlink. This action will delete the schedules. Now click on Add a schedule. The first option is to link a schedule to your runbook. Click on it and click on Create a new schedule. This is how my start schedule looks like.
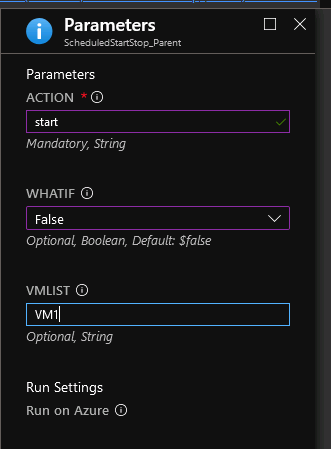
Click on Create and then click on Configure parameters and run settings. For the Parameters, type start in the ACTION filed, select False in the WHATIF drop-down and enter a comma-separated list of the VM names that you want to start/stop. Click OK once done.
Add similar schedule to stop the instances so you have two. The only difference should be the ACTION parameter. It should be stop instead of start.
Azure Automation – use tags
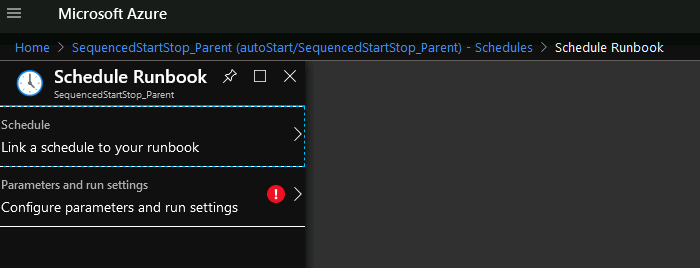
In order to use tags to start/stop the VMs in Azure, we’ll have to use a different runbook. In this case, select the SequencedStartStop_Parent runbook. Click on Schedules and then select each runbook. Click Unlink to delete both schedules. Then click on Add a schedule. Click on the first option Link a schedule to your runbook and then Create a new schedule.
In my case the schedule to stop a VM looks like this.
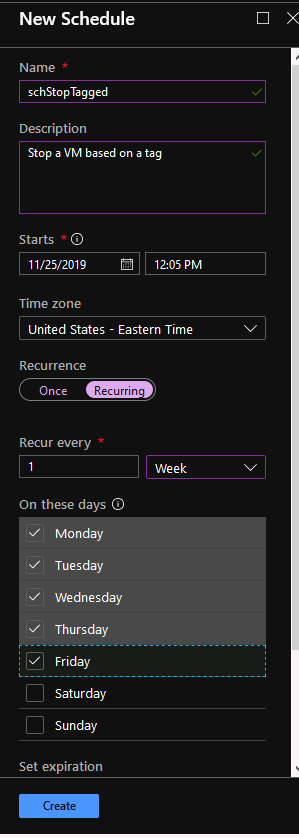
Create two schedule, one to stop and one to start your VMs. Once you are done creating both schedules, click on Configure parameters and run settings for each schedule. For each of these options, specify start or stop in the ACTION field. For the WHATIF option, select False. For CONTINUEONERROR choose True and skip the VMLIST. The runbook script will iterate through all VMs in your resource group. But, how does Azure knows what instances to start/stop if we didn’t specify the tags? Well, unlike AWS, this default runbook just looks for instances that are tagged with a tag name sequencestart or sequencestop and some value.
Here is an example of a VM properly tagged.

If you have another VM tagged with the same nametags, but the value is 2, that VM will be powered on/off after the one that’s tagged with Value 1. If you analyze the source of the runbook, you can see it there.
$startSequences = $startSequences | Sort-Object -Unique
$stopSequences = $stopSequences | Sort-Object -Unique
Is it possible to have the same solution like in Azure, where you can specify custom tags? Yes, it is. You have to create your own runbook and modify the PowerShell of one of the existing runbooks. Look at lines 650 and below if you want to make a custom runbook with custom tags.
Logs
If you want to see the logs of the execution, click on the runbook and then Jobs from the menu. Click on any entries there and then click on the Output tab and you’ll see the logs.