
Here is the deal. Our vendor wants to access our Aurora database. We can’t do VPC peering because our CIDRs overlap. On top of that, we don’t want peering with 3rd party vendors and we don’t want to host our data in the vendor’s account. So, we have to use PrivateLink.
In this post I’ll guide you through creating an RDS database in one account and accessing it from another account over PrivateLink. In order to do this, we’ll need:
-
– Two AWS accounts (Provider and Customer). We are the provider, the vendor is the customer.
– One VPC with 2 public/private subnets in each account. The vendor’s (customer) VPC config doesn’t really matter.
– One EC2 instance in each account (public subnet) for testing access
We will create an endpoint service in the Provider VPC and an endpoint in the Customer VPC. The endpoint service requires a network load balancer as well. Here is a problem. When we create a NLB, the target of the NLB are IP addresses. The RDS database has DNS entries as endpoints. Technically, we can resolve the DNS URLs in IPs and use them as targets. But these IPs can change. So we have to put something in between the RDS and NLB. That’s the job of the RDS proxy. The DNS URLs of an RDS Proxy always resolve to the same IPs. Another problem is that RDS proxy can be deployed for MySQL and PostgreSQL databases only. So keep this in mind.
Table of Contents
VPC
I’ll create two VPCs in each account. The first VPC will have a 192.168.100.0/22 CIDR and the second VPC will have 192.168.200.0/22 CIDR with 4 x /24 private and public subnets. Here is the breakdown of the subnets. It’s a standard build with two NAT gateways and one Internet gateway.
The first VPC is called vpc-Provider.

The second VPC is called vpc-Consumer.

Security groups
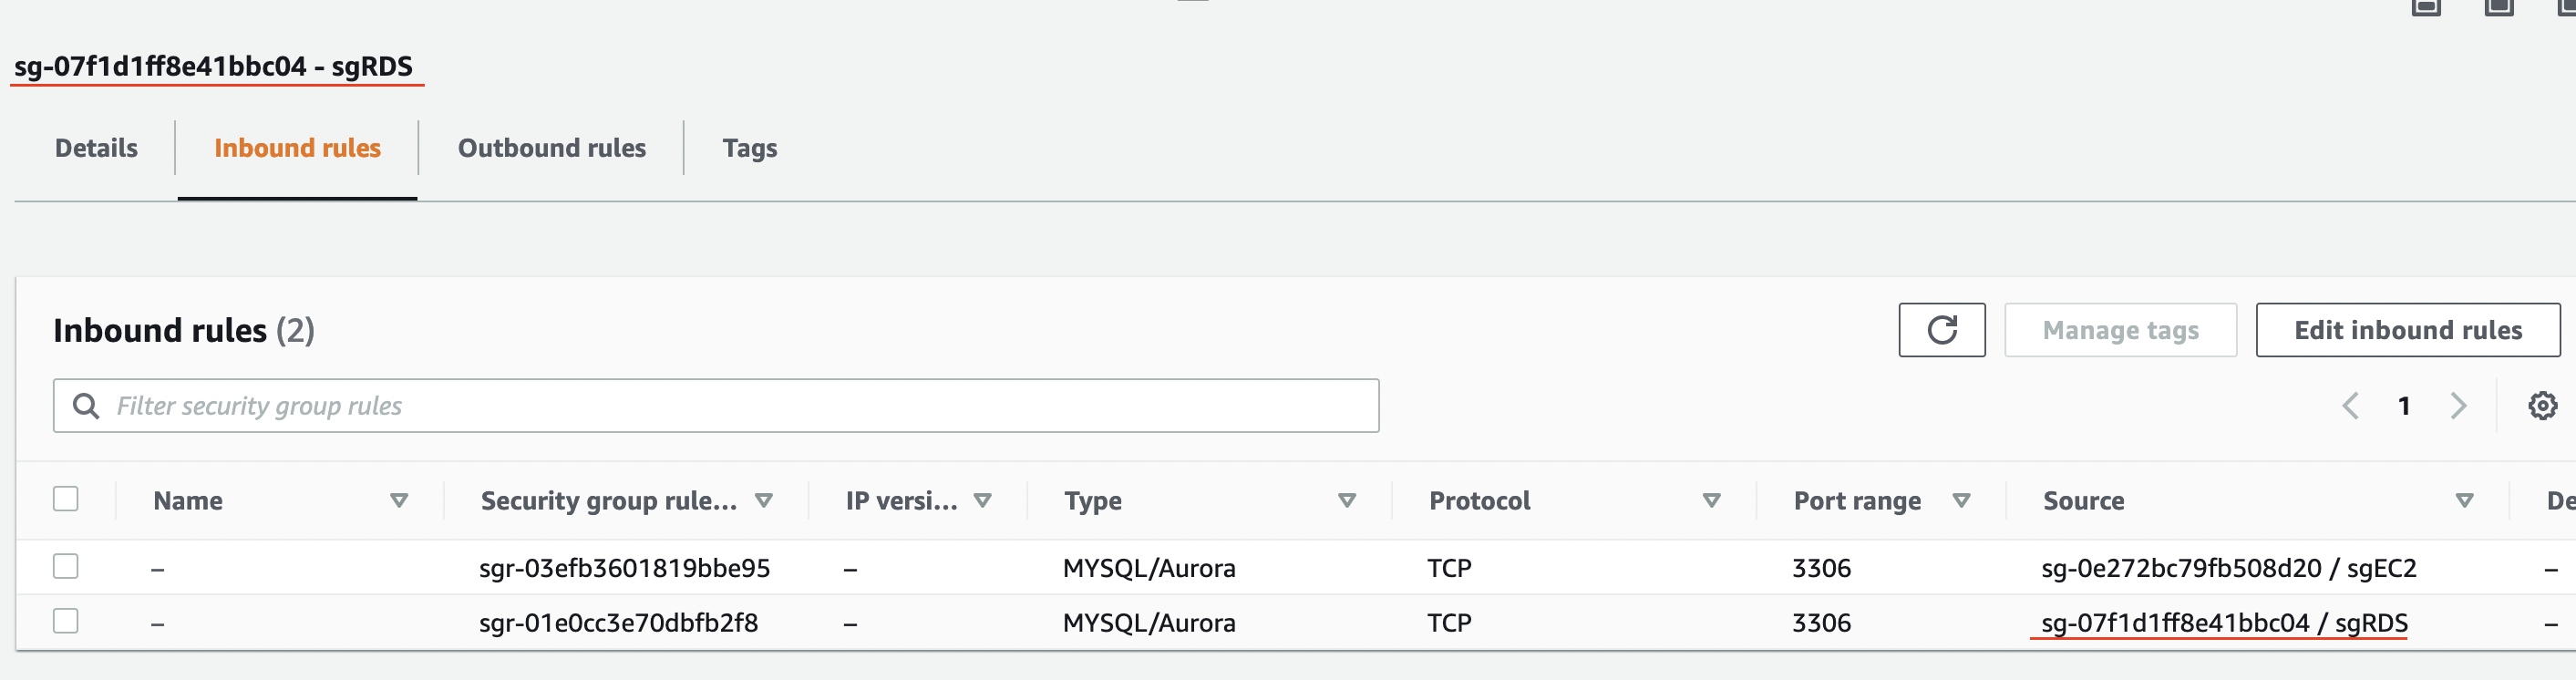
Create two security groups under vpc-Provider VPC, one called sgEC2 and the other called sgRDS.
For the sgEC2 group, allow SSH from some IP, e.g. your IP from work/home. The EC2 instance that we’ll create will be in a public subnet.
For the sgRDS group, allow port 3306 (MySQL) from the actual subnet ID for sgEC2 group and another rule to allow access to 3306 from itself. This is how the rules for sgRDS look like.
Now, do the same for the vpc-Consumer account, but create only the sgEC2 group.
RDS
For the RDS, use pretty much default settings. In my case, I used:
-
– Standard create
– Amazon Aurora
– Amazon Aurora MySQL-Compatible Edition
– Capacity type: Provisioned
– Aurora (MySQL 5.7) 2.07.2
– Templates: Dev/Test
– Name the cluster and enter your admin credentials (remember these)
– Burstable db.t3.small
– Don’t create an Aurora Replica
– Choose the VPC that we created
– Public access: No
– Security group: sgRDS
– Availability Zone: No preference
Then click to Create database.
EC2
While the database is creating, go to EC2 and create an instance that we’ll use for testing. It can be any Linux and any size. I’ve used t2.micro Amazon Linux with telnet/MySQL client installed (sudo yum install telnet mysql) in a public subnet. I’ve named the instance ec2Provider. Create another instance in the second account with the same specs as ec2Provider and name it ec2Customer.
Test 1
Go to the RDS and get the DNS record for the Aurora cluster. It’s at the bottom.

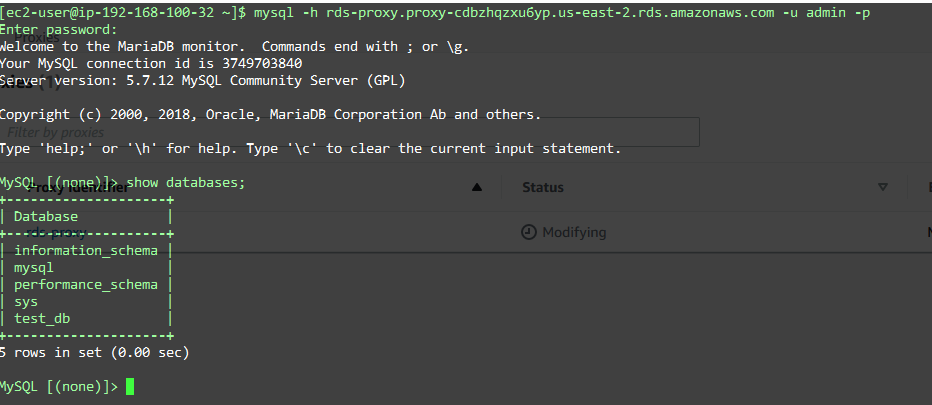
Log to the instance in the same account (ec2Provider) and try to telnet to that port. You should be able to. CTRL-C to get out of there and log to MySQL using the client.
mysql -h database-1.cluster-cdbzhqzxu6yp.us-east-2.rds.amazonaws.com -u admin -p
Replace the hostname with yours. This the output of my connection.
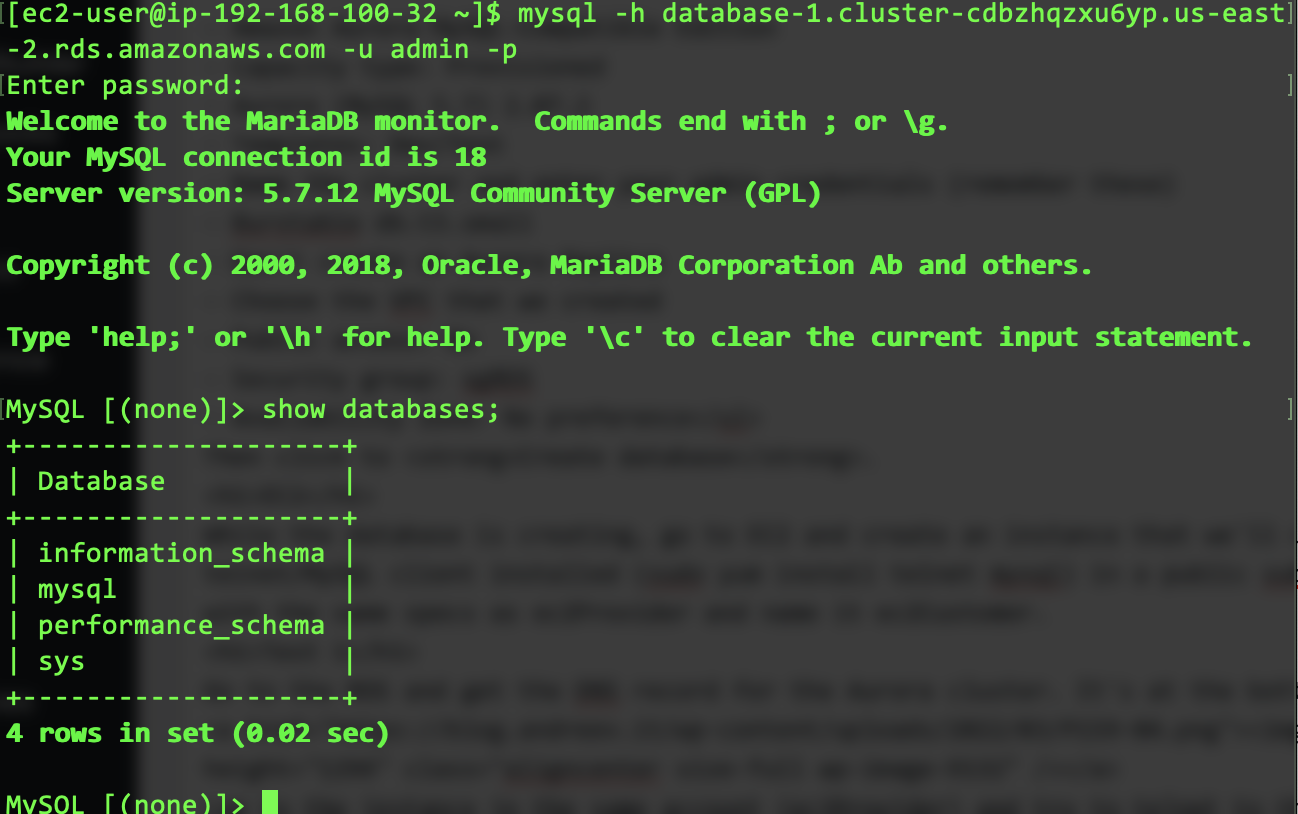
I’ll create a database while I am there.
create database test_db;
AWS Secrets Manager
In order to deploy an RDS proxy, we need a secret (user/password combo) stored in the AWS Secrets Manager. Use the same username and password that you used for the RDS database, which is admin and whatever password you used. Make sure you select the database that is listed at the bottom of the first screen.
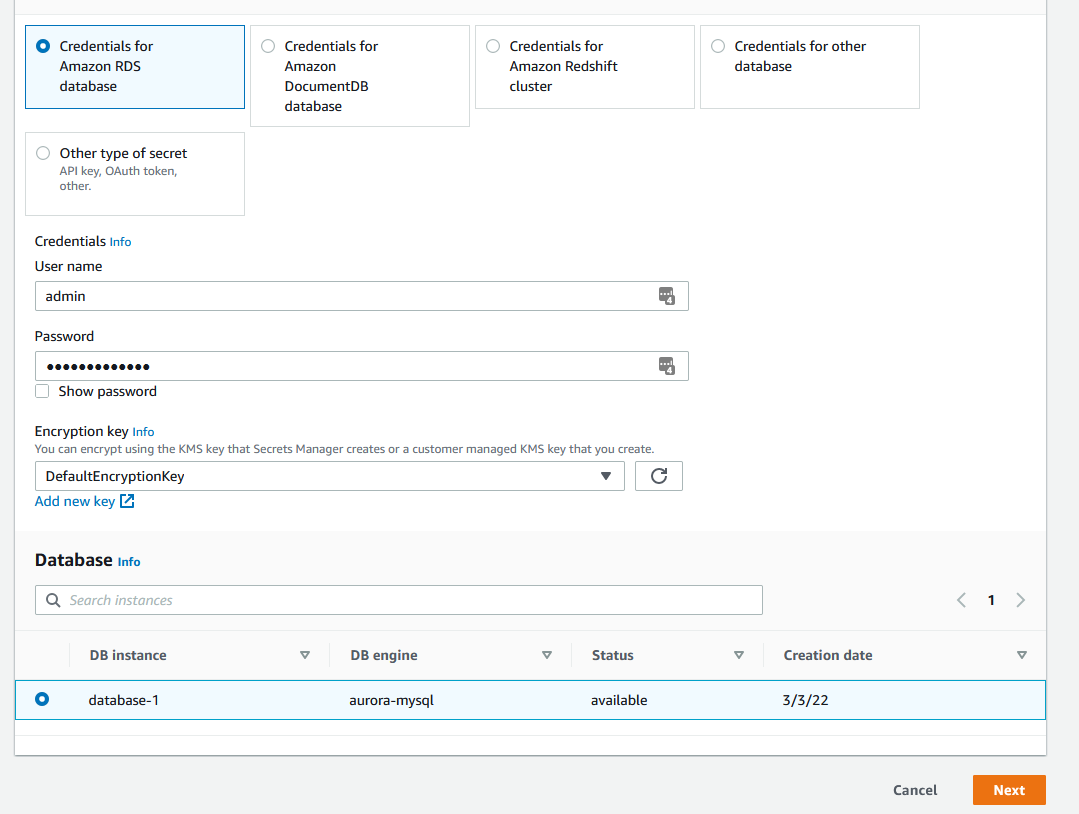
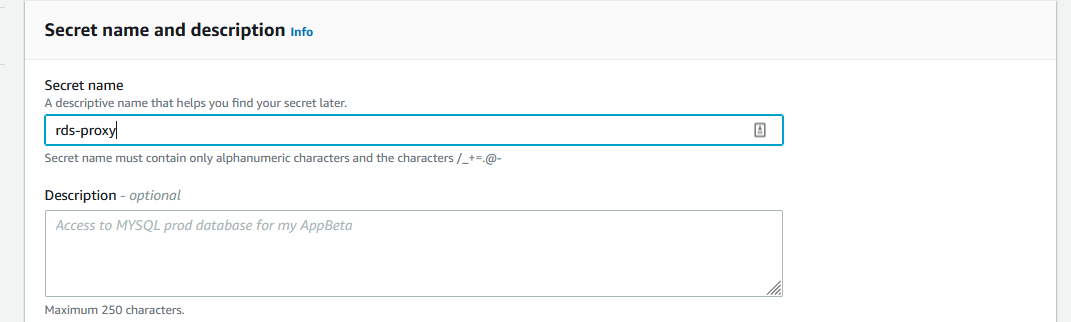
Name the secret and proceed with the defaults.
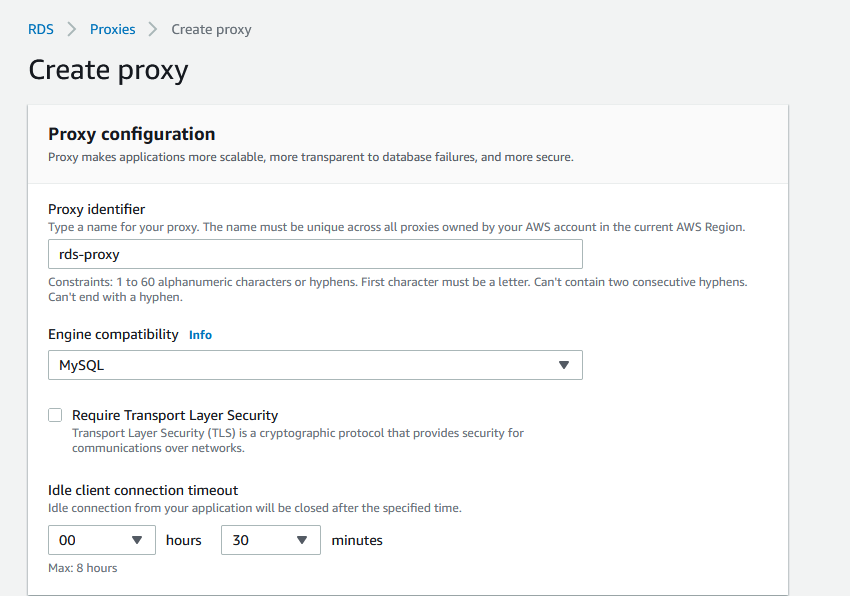
RDS Proxy
Go to the RDS menu and select and click on the database cluster. Scroll all the way down to the RDS Proxy section. Click on Create proxy.

-
– Name the proxy (Proxy identifier)
– Engine – MySQL
– Choose the database
– Uncheck the Add reader point.
– Choose the secret that you created before and specify two private subnets
– Leave AWS to create the IAM role.
– Under Additional connectivity configuration make sure you assign the sgRDS security group and remove the default.
Click on Create proxy.
Test 2
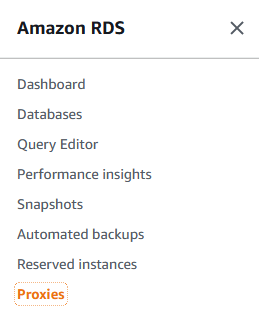
Let’s try to access our database through the proxy now. In the main menu for the RDS, click on the Proxies on the left.
Click on the proxy and scroll down to see the proxy endpoint. Copy that value.

Go to the EC2 instance in the vpc-Provider, which is in the same account as the RDS and try to access the database over proxy.
Great job if you made it so far!
Network Load Balancer (NLB)
OK, so if everything works, we need to create an NLB so we can create the endpoint service. The NLB that we’ll create requires the IP targets of the RDS proxy. You got the DNS for the RDS proxy, the one that you just tested right above. Do an nslookup on it and get the IPs.
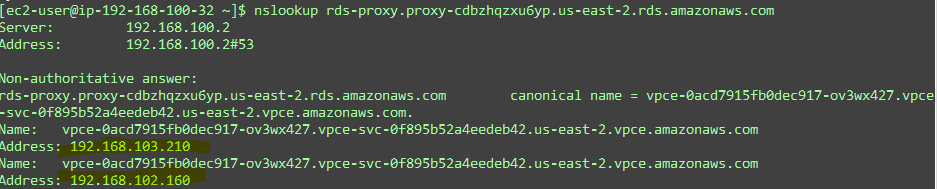
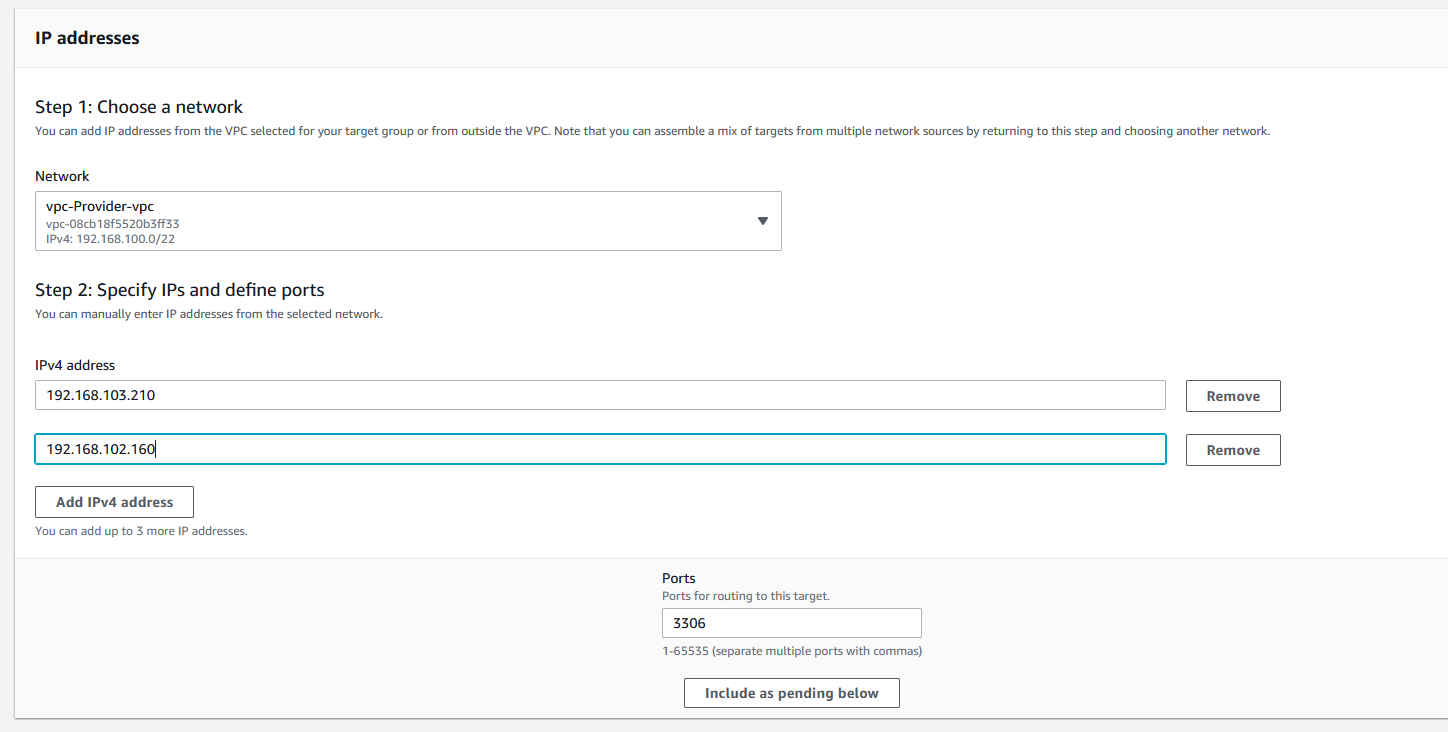
In my case the proxy RDS returns 192.168.103.210 and 192.168.102.160, which tells me they are in the private availability zones (AZs). Good.
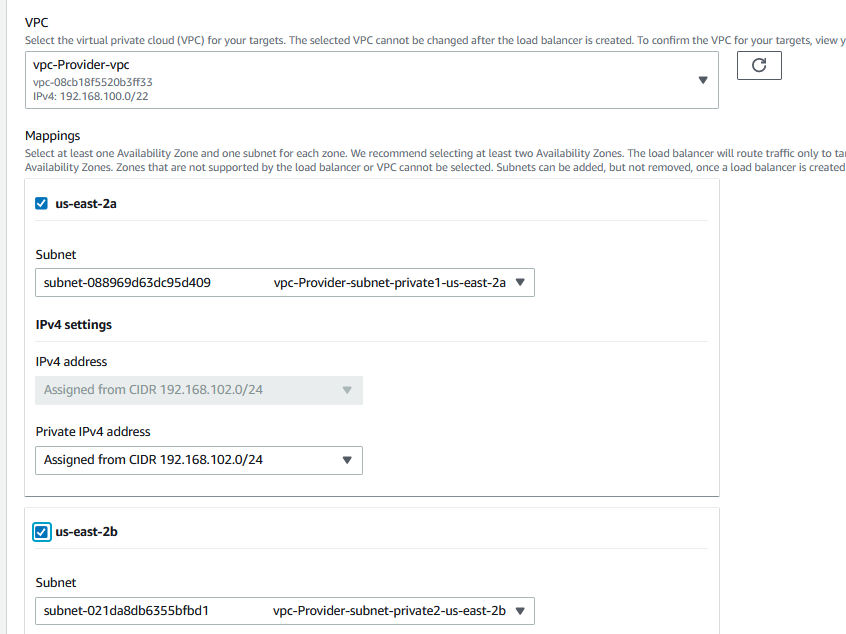
Create an NLB, name it and make sure it’s internal.
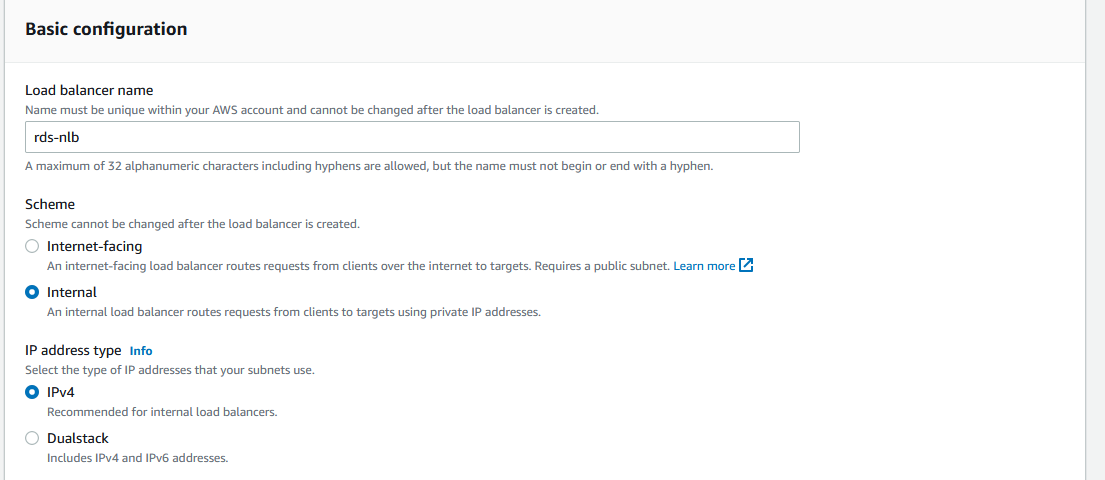
Choose the VPC and the two internal subnets.
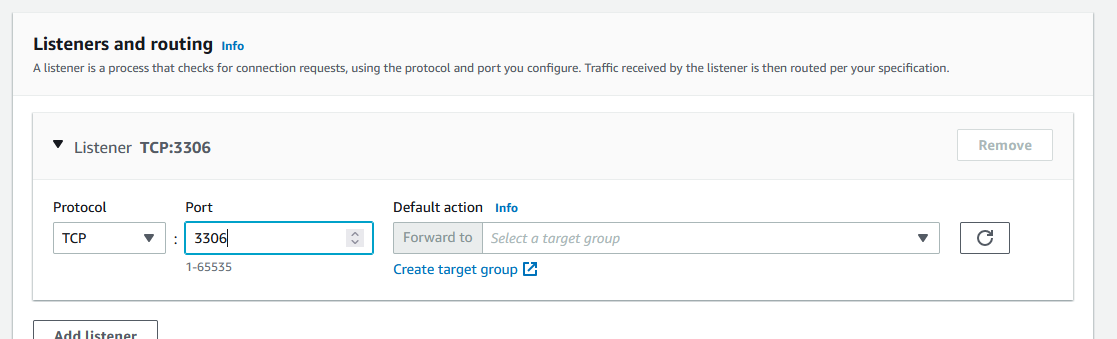
When you reach the Listeners and routing, change the port to 3306 and click on Create target group.
Choose IP addresses, name the Target group name and change the port to 3306. The correct VPC should be selected.
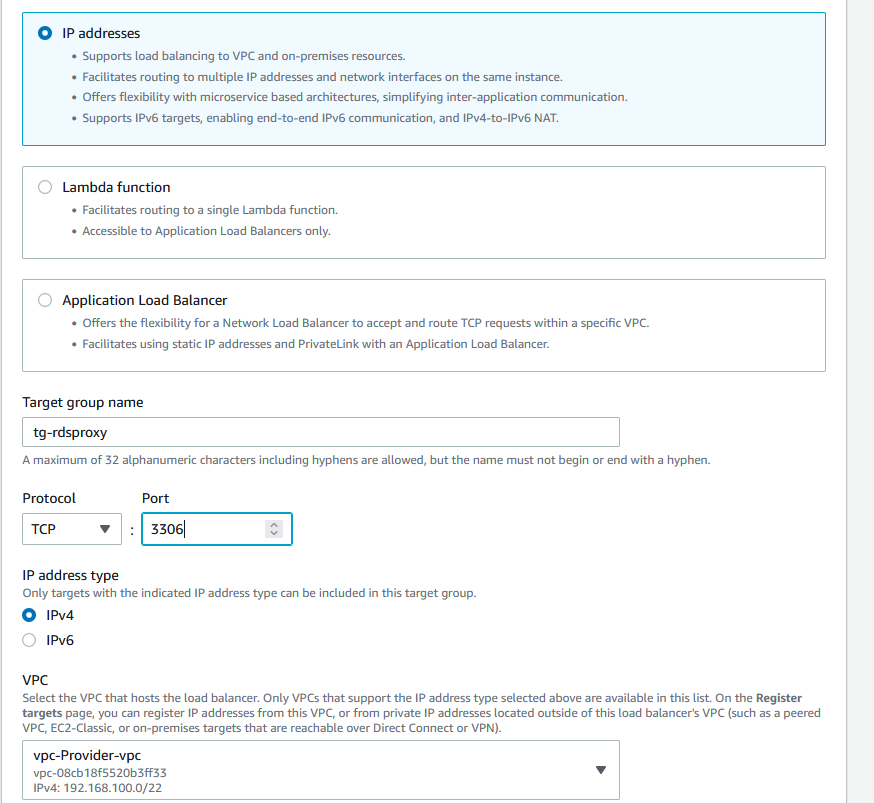
Leave the health checks, they are automatically populated for the right port and click Next.
On the next screen below, enter the IPs that you got from the nslookup for the RDS proxy. In my case it looks like this. Make sure the port is 3306 and click on Include as pending below and finally click on Create target group.
Go back to the original browser tab where you create the NLB and click the refresh button. You’ll be able to select the target group now.
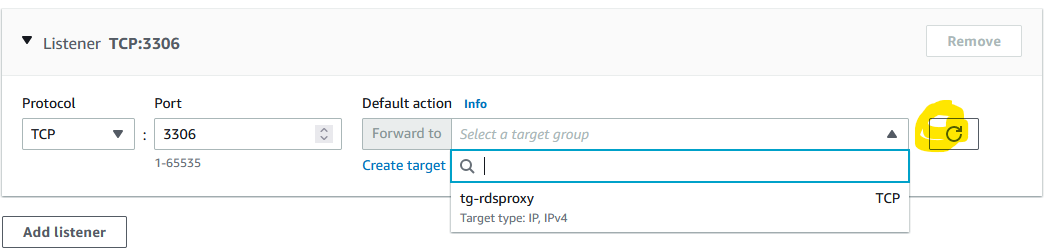
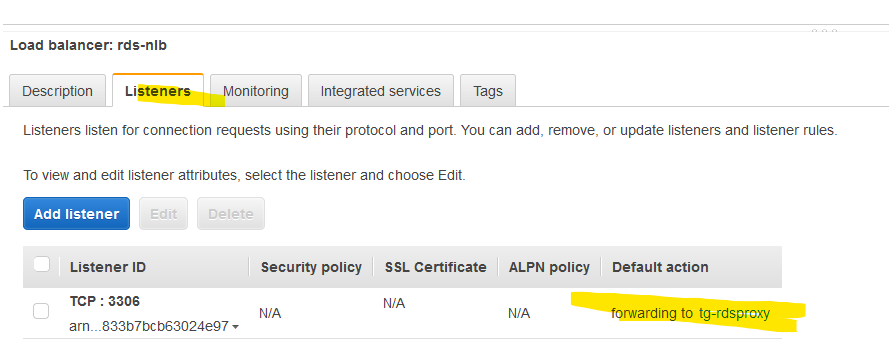
Click on Create load balancer at the bottom. It takes a couple of minutes to provision the NLB. Once done, click on the Listeners tab and then the target group.
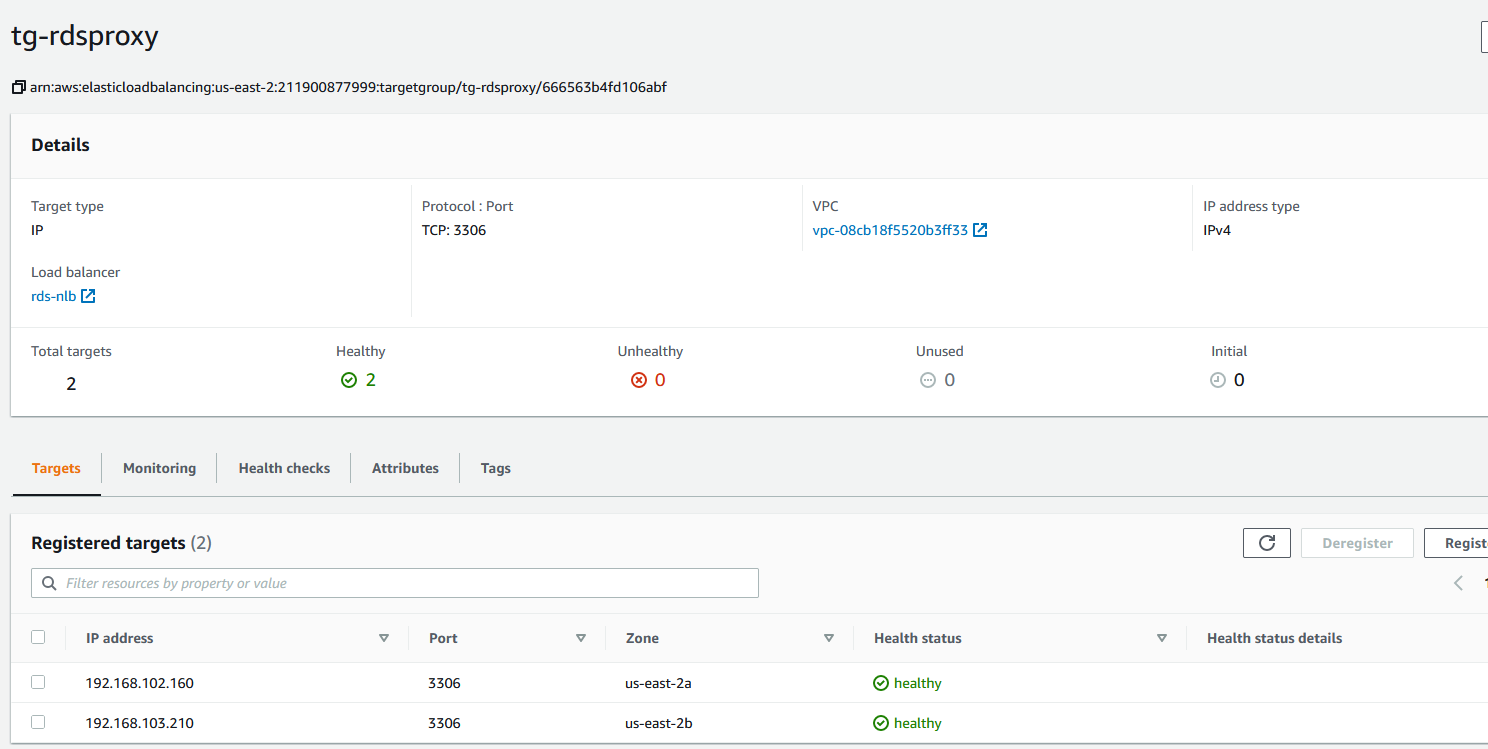
It will take another couple of minutes, but you should see that the targets are unhealthy. Why is that? Because our RDS proxy can get requests from the EC2 instances only. Thе NLB can’t access the RDS proxy. Per AWS, we have to allow the CIDRs of the NLB to access the RDS proxy. That’s easy. We created an internal NLB with 192.168.102.0/24 and 192.168.103.0/24 subnets, so we have to modify the sgRDS security group. Do the same. This is how my security group sgRDS looks like now.

And if you check the target group, you should see both RDS proxy instance as healthy.
Test 3
Let’s check the access on the NLB. Get the DNS name. In my case it’s rds-nlb-40d1b9bfc867b2fb.elb.us-east-2.amazonaws.com.
Go back to the EC2 instance in the same account and try to access the database.

Yep, we are doing great. Let’s recap. We can’t access the RDS directly from another account because – well, it’s another account that we don’t trust and our RDS DB is in a private subnet. So, we have to create an endpoint service that requires a network load balancer. But, the NLB requires IP targets and our RDS endpoints are DNS names. Which means that the DNS names can change its IPs, so we used an RDS proxy DNS names converted to IPs which AWS claims that they won’t change.
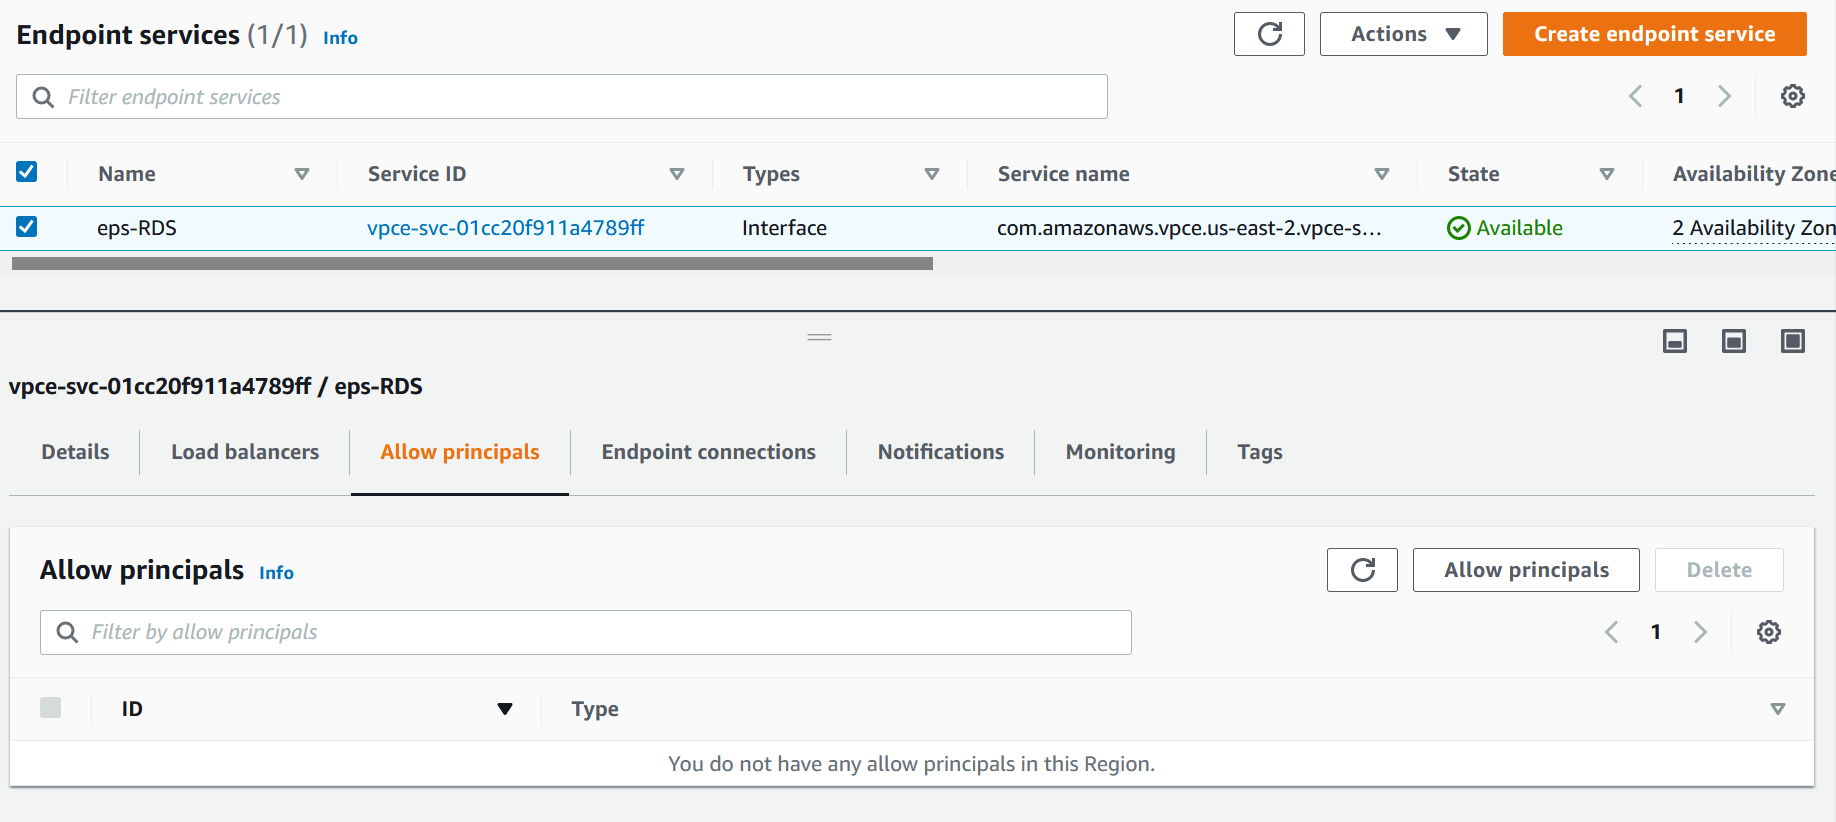
Endpoint service
The Provider (we) creates an Endpoint service, the Customer (the vendor) creates the Endpoint. Simple as that. It doesn’t have to be a vendor. Maybe the proper term is the Consumer. So, we (the provider) expose some service as Endpoint Service and someone else tries to access it.
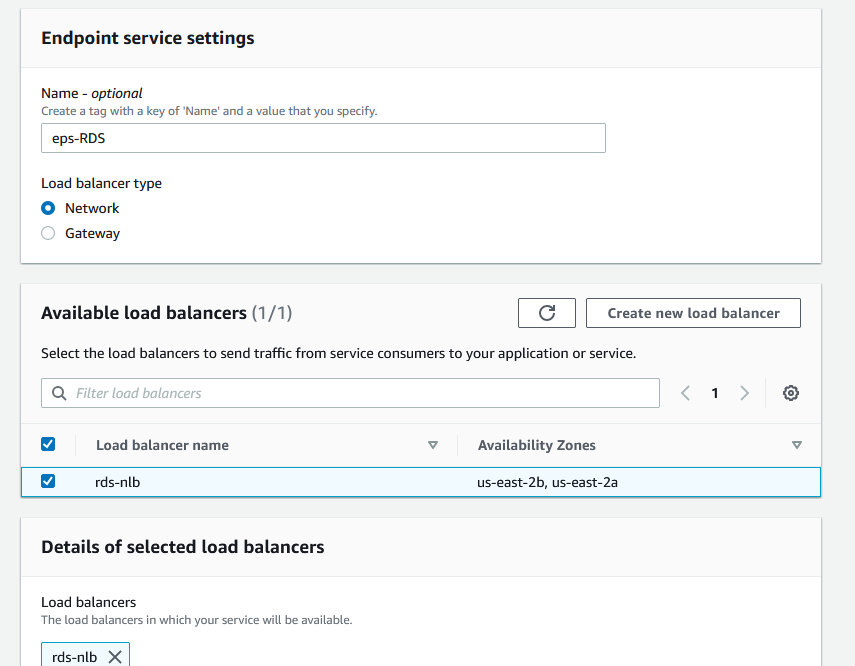
An Endpoint service requires a network load balancer. We did that. So let’s create the endpoint service. It’s under the VPC menu.
Click on Endpoint Services and then Create endpoint service.
Name the endpoint service and check the network load balancer. Make sure that the Acceptance required is checked.
Once created (in a second), get the service name. Copy that URL highlighted.
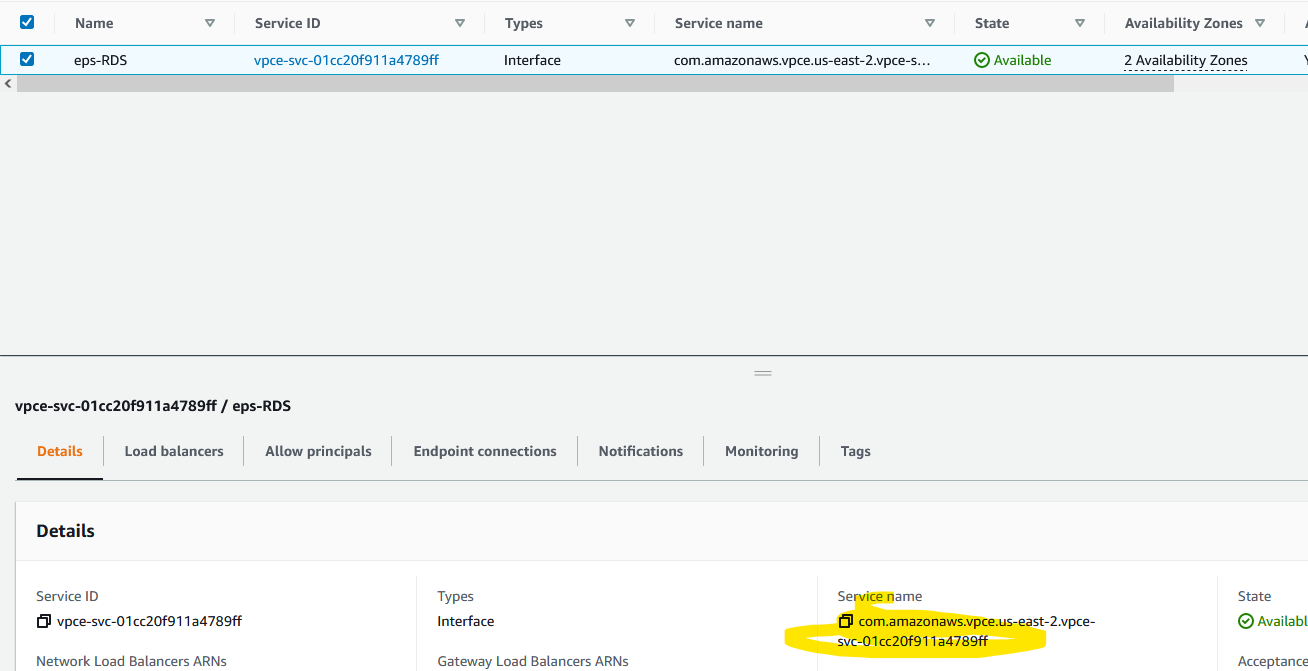
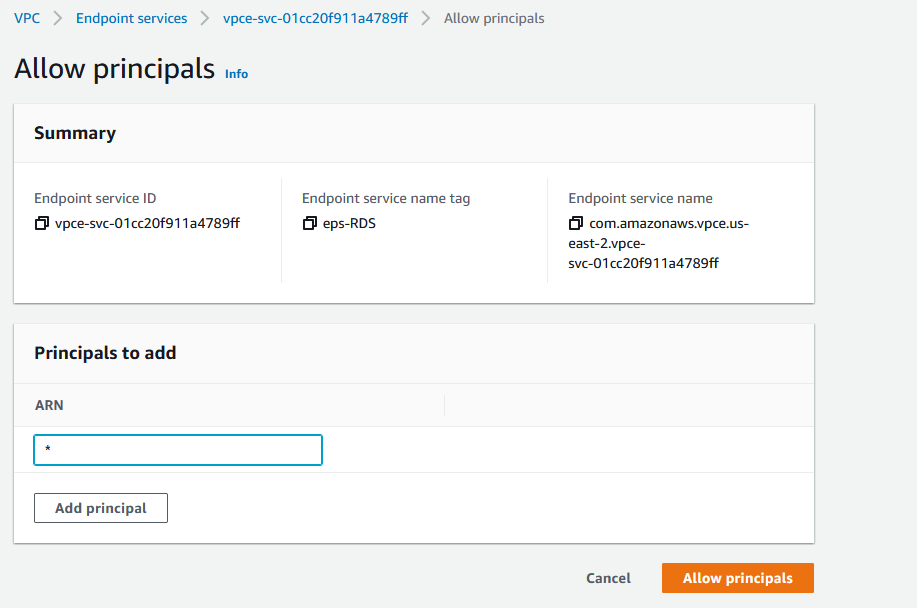
Select the endpoint service and from the Actions menu, choose Allow principals. Add * for ARN which means everyone. Now this is really bad. For the sake of simplicity, I’ve added * (everyone) but you want to add an ARN role from the other account.
Endpoint
The endpoint is the Consumer, the vendor or some other VPC. Go to that account. We are no longer working on the original account, log to the second account and go to the Endpoint under VPC menu. Click on Create endpoint. Enter the name for endpoint, click on Other endpoint services and paste the endpoint that you got in the previous step. Click on Verify service and you should see that it’s OK.

Scroll down and choose the VPC where you want to create the endpoint. In our case, we want to use the EC2 instance that’s in the public subnet. Add the two public subnets.
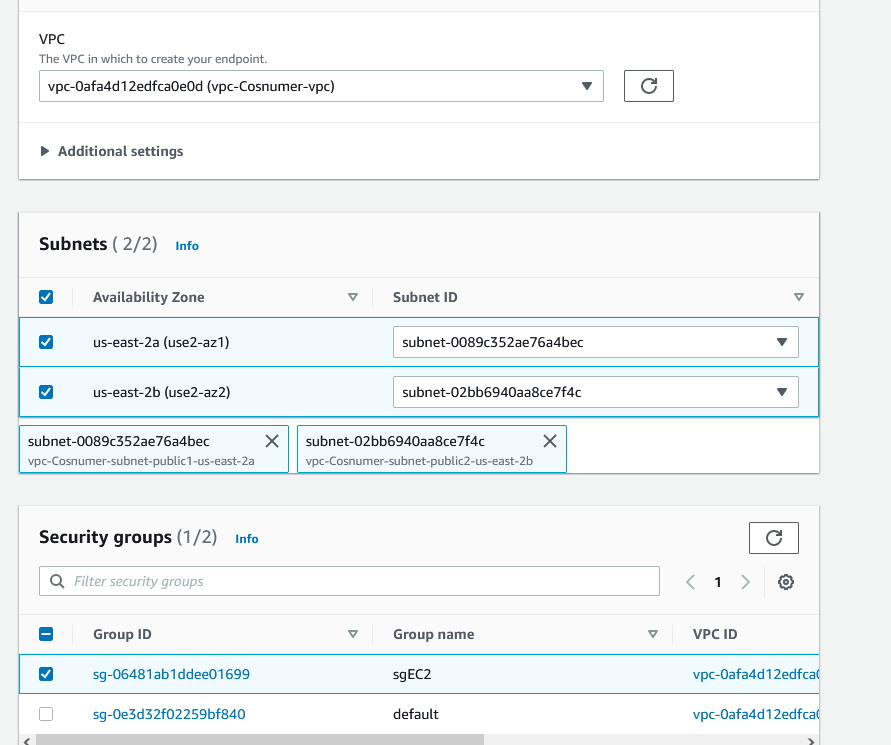
And for the security group, add the EC2 security group.

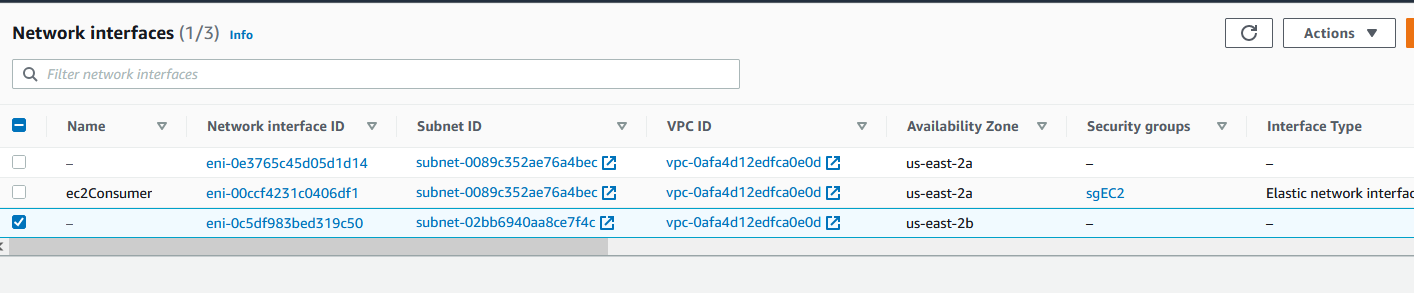
NOTE: If you go to the Interfaces section under EC2, you’ll see three NICs. One is for the EC2 instance that we’ve created, the other two are the endpoints.
Anyway, once you create the endpoint, you’ll see this.
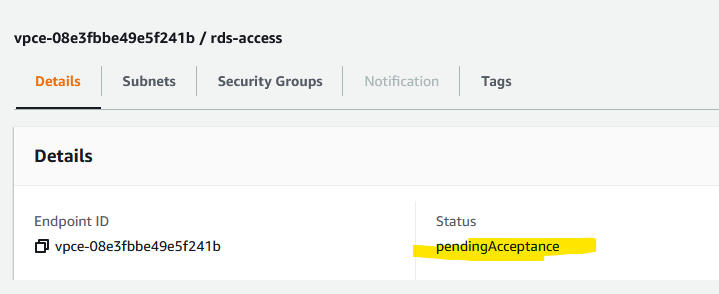
Go to the other account (Provider) and under the endpoint services (VPC menu, Endpoint connections tab), you’ll see a request for the connection. That’s what Accepance required means when we created the Endpoint Service. Accept the connection. It takes about 30 seconds to complete the acceptance.
Test 4
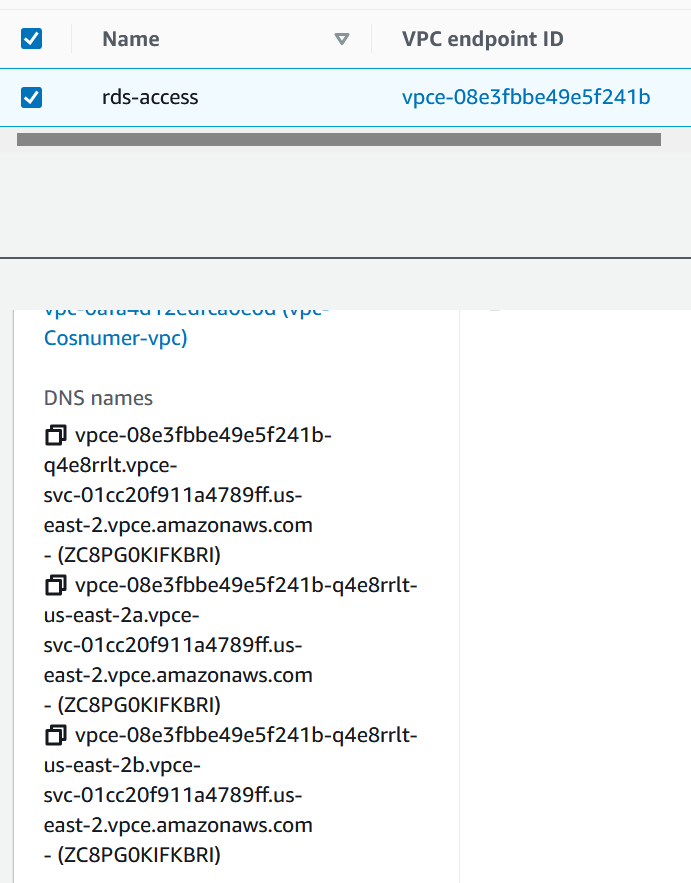
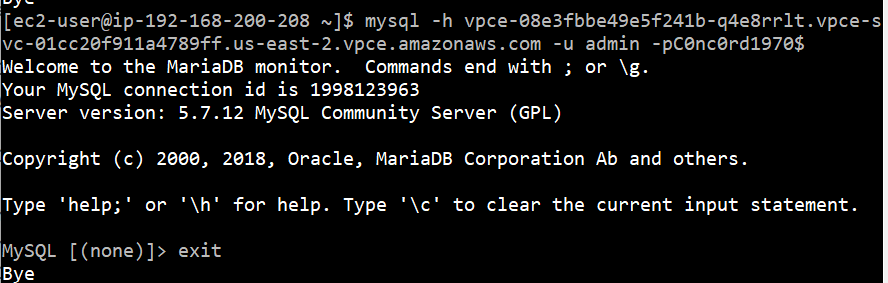
Go to the Consumer account and click on Endpoint and then select the endpoint. Under the Details tab you’ll see three DNS entries.
Copy one of them and log to the EC2 instance in that account and try to access the RDS.
mysql -h vpce-08e3fbbe49e5f241b-q4e8rrlt.vpce-svc-01cc20f911a4789ff.us-east-2.vpce.amazonaws.com -u admin -p
You won’t be able to do so. Finally, edit the security group sgEC2 that we assigned to the endpoint and add a reference to itself for port 3306. It looks like this.

And if you try to access the RDS now, you’ll be able to do so.
Endpoint service
You can also go the the Provider account and delete the principal under Allowed principals.
It’s not needed anymore.
10 comments
Hi, 2 questions.
1. Are RDS proxy IPs looked up from DNS fixed? So far I cannot find any documents stating they are fixed or not. If not, need another mechanism to update the IPs in target group timely.
2. Note there are 2 IPs got back from nslookup. Let’s assume there are 2 logical proxies behind 2 IPs respectively, they are hosting their own connection pool separately. Min 1 app connects to proxy 1 and min 2 the app connects to proxy 2, will it be an issue? I mean the app needs to stick to a proxy? Maybe it’s a dumb question, but hope you can advise.
Thank you.
1. They are supposed to be fixed. I followed this article and they mention “according to AWS” (https://docs.rivery.io/docs/creating-an-rds-proxy)
I asked our company AWS rep, he wasn’t sure, he was supposed to ask but never came back. For now, let’s assume the IPs are fixed. I have them running for more than a month and they’ve stayed the same.
2. I am not quite sure what are you asking, but from what I get it, it’s a load balanced proxy on their side. They take care of the HA and sync, so i don’t think this would be an issue.
Hi,
I followed the steps from your article and everything worked as expected, I was able to connect to the RDS database using the user and password, over TLS. ( I am running an RDS Aurora PostgreSQL DB behind the RDS proxy)
After that, I enabled IAM Authentication on the RDS proxy, I created and attached the IAM role to the Consumer ec2 instance(the one with rds-db:connect action), but connecting to the RDS proxy, from the Consumer account, fails each time with ‘SSL connection was closed unexpectedly’.
IAM authentication works in the Provider account (I configured a similar role and attached it to the ec2 instance in the Provider account).
Do you have any idea what might cause this issue?
Thank you.
Ilie
Hi,
I found the cause for my issue. The SSL error was returned because the psql was not using the proper encoding. Setting PGCLIENTENCODING=’UTF8′
Another issue was the incorrect roles configuration: the rds-db:connect policy for the DB user must be configured on the Provider account, with a trust policy for the Consumer account to assume it. Once the Consumer account assumes this role, IAM authentication started to work.
Thx again for your article.
I’ve followed the tutorial, the targets in the lb target group are healthy, VPC endpoint and VPC Endpoint Service are available
When I attempt to connect to the DB via VPCE, the connection itself is successful, but any command inside psql that attempt to actually do something against the DB fails
“`
psql -h vpce-02a70695b9c4ea212-zafhuhod.vpce-svc-0ac12131212121.eu-central-1.vpce.amazonaws.com -p 5432 -U postgres_user -d cdc_health_monitoring
Password for user postgres_user:
psql (12.12 (Ubuntu 12.12-0ubuntu0.20.04.1), server 13.4)
WARNING: psql major version 12, server major version 13.
Some psql features might not work.
SSL connection (protocol: TLSv1.3, cipher: TLS_AES_256_GCM_SHA384, bits: 256, compression: off)
Type “help” for help.
cdc_health_monitoring=> \dt;
FATAL: Unknown error.
SSL connection has been closed unexpectedly
The connection to the server was lost. Attempting reset: Succeeded.
psql (12.12 (Ubuntu 12.12-0ubuntu0.20.04.1), server 13.4)
WARNING: psql major version 12, server major version 13.
Some psql features might not work.
SSL connection (protocol: TLSv1.3, cipher: TLS_AES_256_GCM_SHA384, bits: 256, compression: off)
cdc_health_monitoring=> \l
FATAL: Unknown error.
SSL connection has been closed unexpectedly
The connection to the server was lost. Attempting reset: Succeeded.
psql (12.12 (Ubuntu 12.12-0ubuntu0.20.04.1), server 13.4)
WARNING: psql major version 12, server major version 13.
Some psql features might not work.
SSL connection (protocol: TLSv1.3, cipher: TLS_AES_256_GCM_SHA384, bits: 256, compression: off)
cdc_health_monitoring=> help
You are using psql, the command-line interface to PostgreSQL.
Type: \copyright for distribution terms
\h for help with SQL commands
\? for help with psql commands
\g or terminate with semicolon to execute query
\q to quit
cdc_health_monitoring=>
“`
Any idea what could it be ?
Note: it has nothing to do with the psql client (as per warning: psql major version 12, server major version 13) If I create a publicly available DB the connection and queries against the DB are successful
If I register the RDS (and not RDS Proxy Endpoint) IPs into the target group, and then connect to via vpce then it works. So the issue is somewhere on the RDS Proxy closing the connection
Not sure, try this. See if it works.
Look at your postgresql.conf, sudo vim /etc/postgresql/9.3/main/postgresql.conf
Add this line: listen_addresses = ‘*’
Restart the service sudo /etc/init.d/postgresql restart
Thanks, I already had it listen_addresses = “*”
Under https://docs.aws.amazon.com/AmazonRDS/latest/AuroraUserGuide/rds-proxy.troubleshooting.html, it’s suggested that in case of ‘Unknown error.’ (which is exactly what I am getting) to contact AWS Support. I’ll do so :) Thanks for the excellent article