In this post I’ll describe how to have a HA web app in Azure using Azure App Services. Currently, you can’t create an HA web app from the portal and you have to use an ARM template. It’s actually an HA config for the App Service Plan, not the App Service. So, in order to create an HA Web App, we’ll create an HA App Service Plan using ARM template and then create the app from the portal. Then, we’ll put the app behind an App Gateway. You can check this link for more info on HA for the App Service Plan.
There are two ways to accomplish this. An Azure App with a service endpoint and with a private endpoint. With the service endpoint, the App will have a public IP, but you can still restrict the access from the App Gateway. This case doesn’t require a VNET. The second option is to use a private endpoint. In this case, you’ll need a dedicated VNET, but your app won’t have a public IP. Actually, there will be a public URL, but it won’t be accessible. This dedicated VNET can be used for Azure Apps only. We’ll go with this scenario using a web app and a MySQL server (this is optional).
Table of Contents
Resource group
Create a resource group in some subscription and name it. In my case I’ll name my rgWebAppHA.
Virtual Network (VNET)
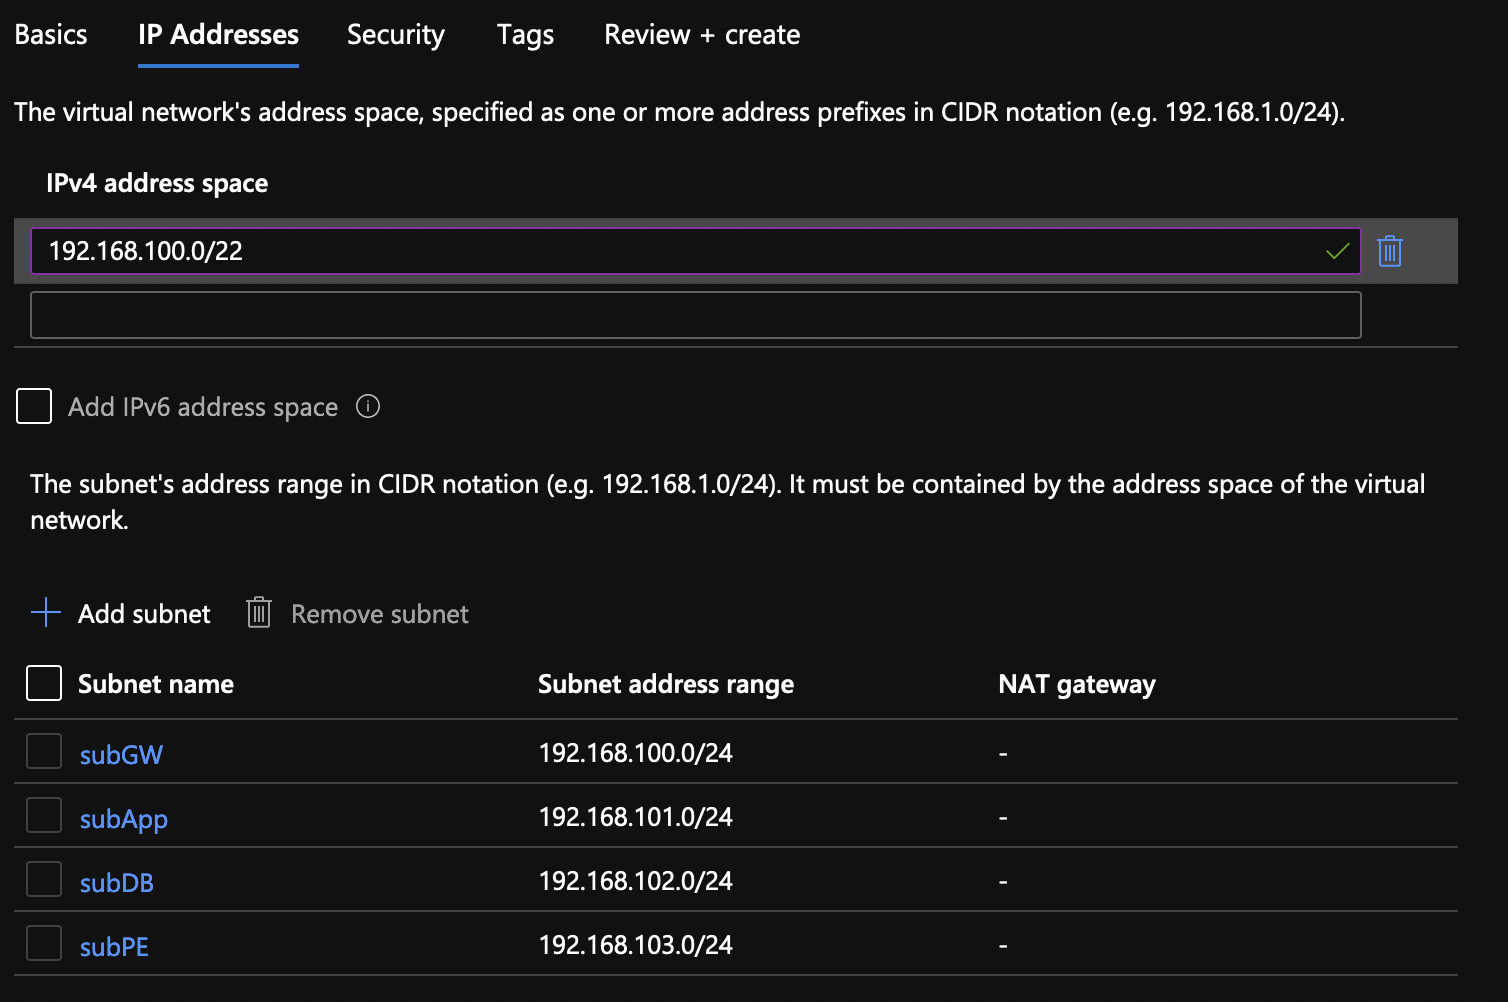
Create a new VNET called vnetWebAppHA (/22) with 4 subnets (/24). Name the subnets: subGW, subApp, subDB and subPE. In my case, I’ll choose 192.168.100.0/22 for the VNET CIDR and 192.168.100/101/102/103/.0/24 for subGW, SubApp, subDB and subPE respectively.
App Service Plan
You will need Azure CLI to be able to deploy an ARM template. From Azure CLI, log to Azure and set the default subscription where you created your resource group.
az login
az account set --subscription <name or id>
Now, you can create the App Service Plan using ARM. Copy and paste these two files. Name the first one deploy.json and the second as deploy.params.json.
{
    "$schema": "https://schema.management.azure.com/schemas/2019-04-01/deploymentTemplate.json#",
    "contentVersion": "1.0.0.0",
    "parameters": {
        "asp_name": {
            "type": "String"
        },
        "loc_name": {
            "type": "String"
        }
    },
    "variables": {},
    "resources": [
        {
            "type": "Microsoft.Web/serverfarms",
            "apiVersion": "2021-02-01",
            "name": "[parameters('asp_name')]",
            "location": "[parameters('loc_name')]",
            "sku": {
                "name": "P1v2",
                "tier": "PremiumV2",
                "size": "P1v2",
                "family": "Pv2",
                "capacity": 3
            },
            "kind": "linux",
            "properties": {
                "perSiteScaling": false,
                "elasticScaleEnabled": false,
                "maximumElasticWorkerCount": 1,
                "isSpot": false,
                "reserved": true,
                "isXenon": false,
                "hyperV": false,
                "targetWorkerCount": 0,
                "targetWorkerSizeId": 0,
                "zoneRedundant": true
            }
        }
    ]
}
The params file.
{
  "$schema": "https://schema.management.azure.com/schemas/2019-04-01/deploymentParameters.json#",
  "contentVersion": "1.0.0.0",
  "parameters": {
    "asp_name": {
      "value": "aspWebAppHA"
    },
    "loc_name": {
      "value": "East US"
    }
  }
}
Change the values in lines 6 and 9 to suit your needs. Line 6 is the name of the service plan and line 9 specifies the location. Once completed deploy the ARM template.
az deployment group create --name depWebAppHA --resource-group rgWebAppHA --template-file deploy.json --parameters deploy.params.json
If everything is OK, you’ll see Succeeded code in the output.
  "provisioningState": "Succeeded",
    "templateHash": "6541057887484946146",
    "templateLink": null,
    "timestamp": "2021-12-09T21:07:41.083656+00:00",
    "validatedResources": null
If you click on the Overview for the App Service plan, you’ll see that Zone redundant is enabled.

App Services
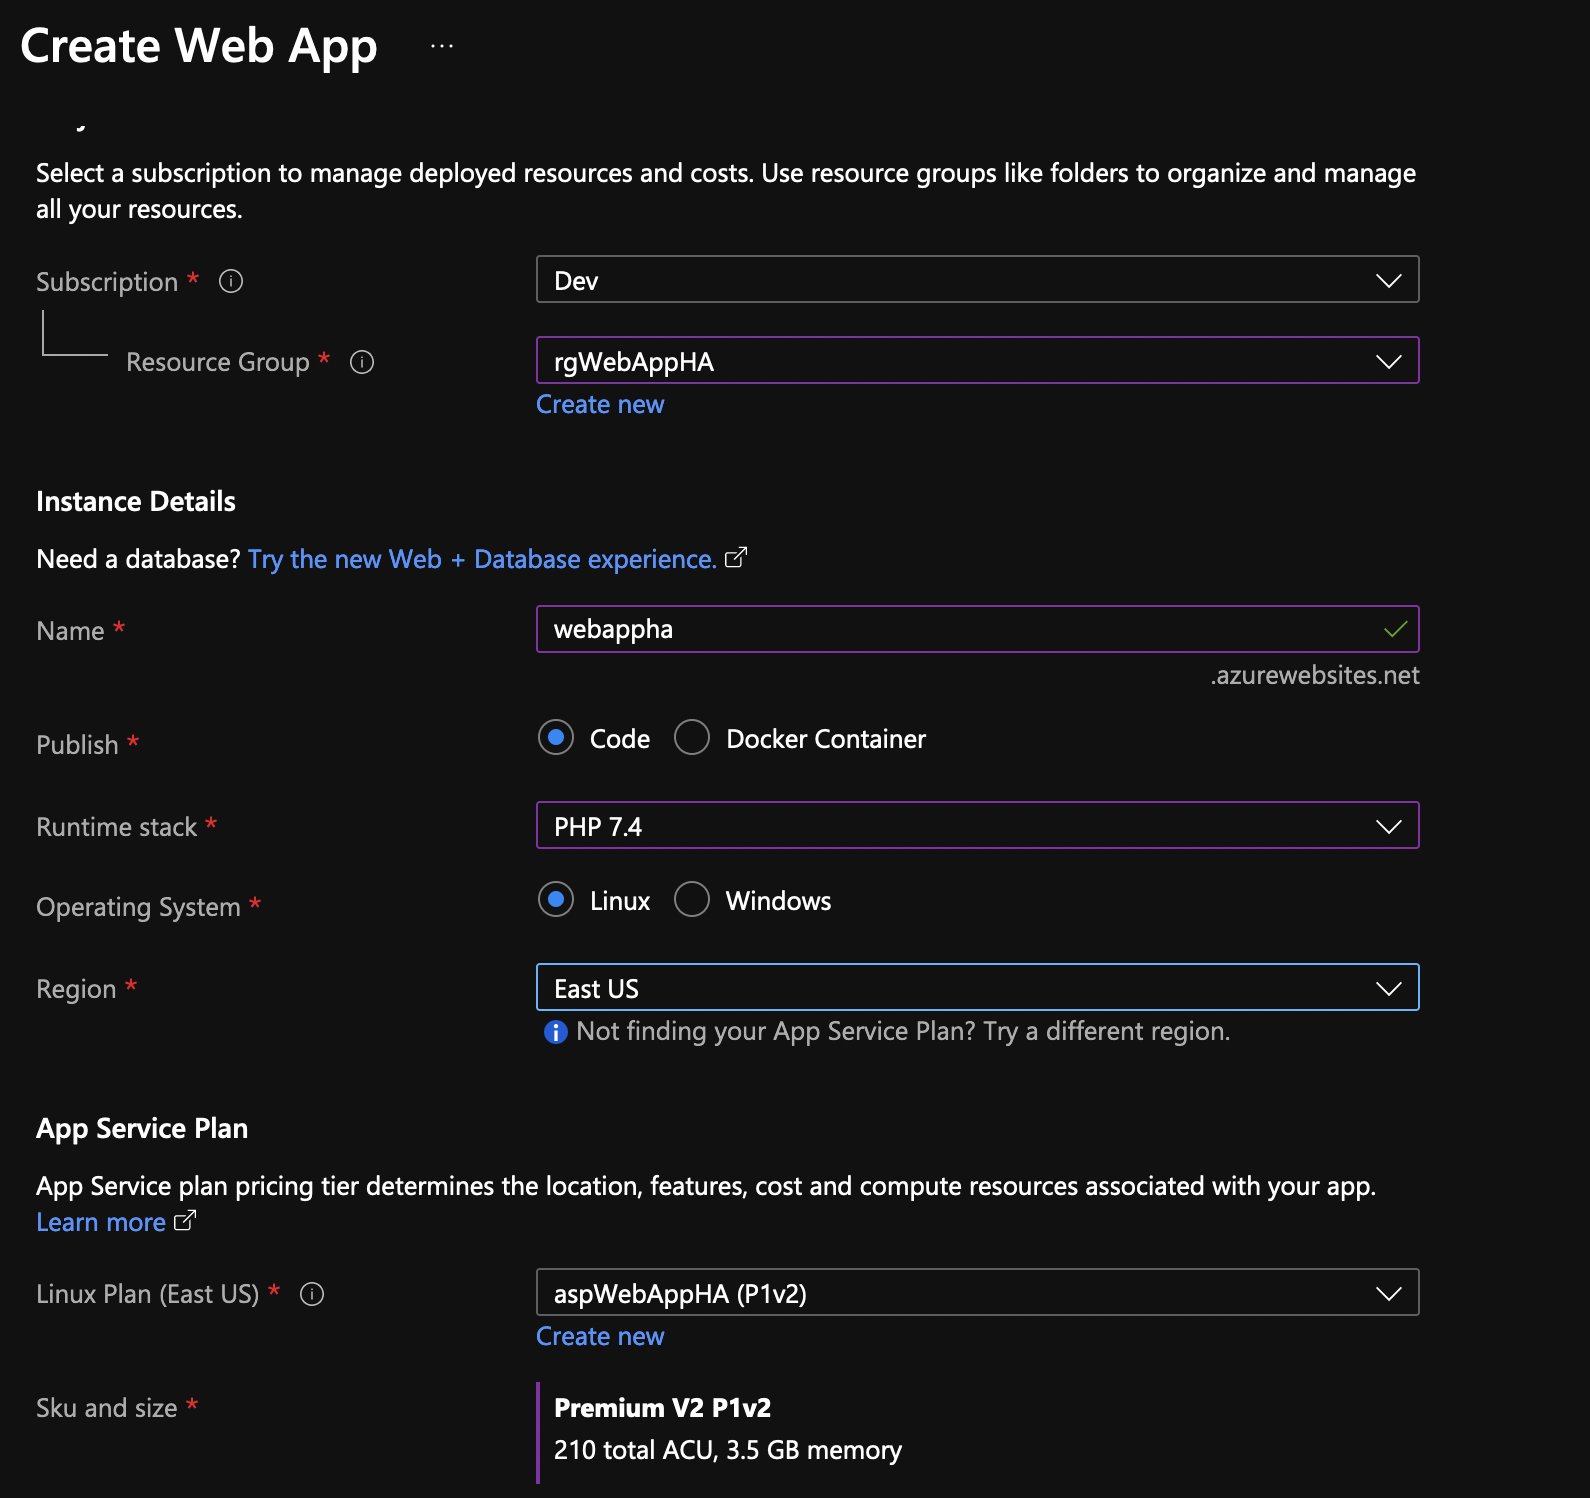
Now that you have the plan ready, it’s time to create the web app. Go to App Services and create a new one. In my case, it looks like this. Notice at the bottom that I am using the app service plan that we just created. We’ll use Linux instance and PHP 7.4.
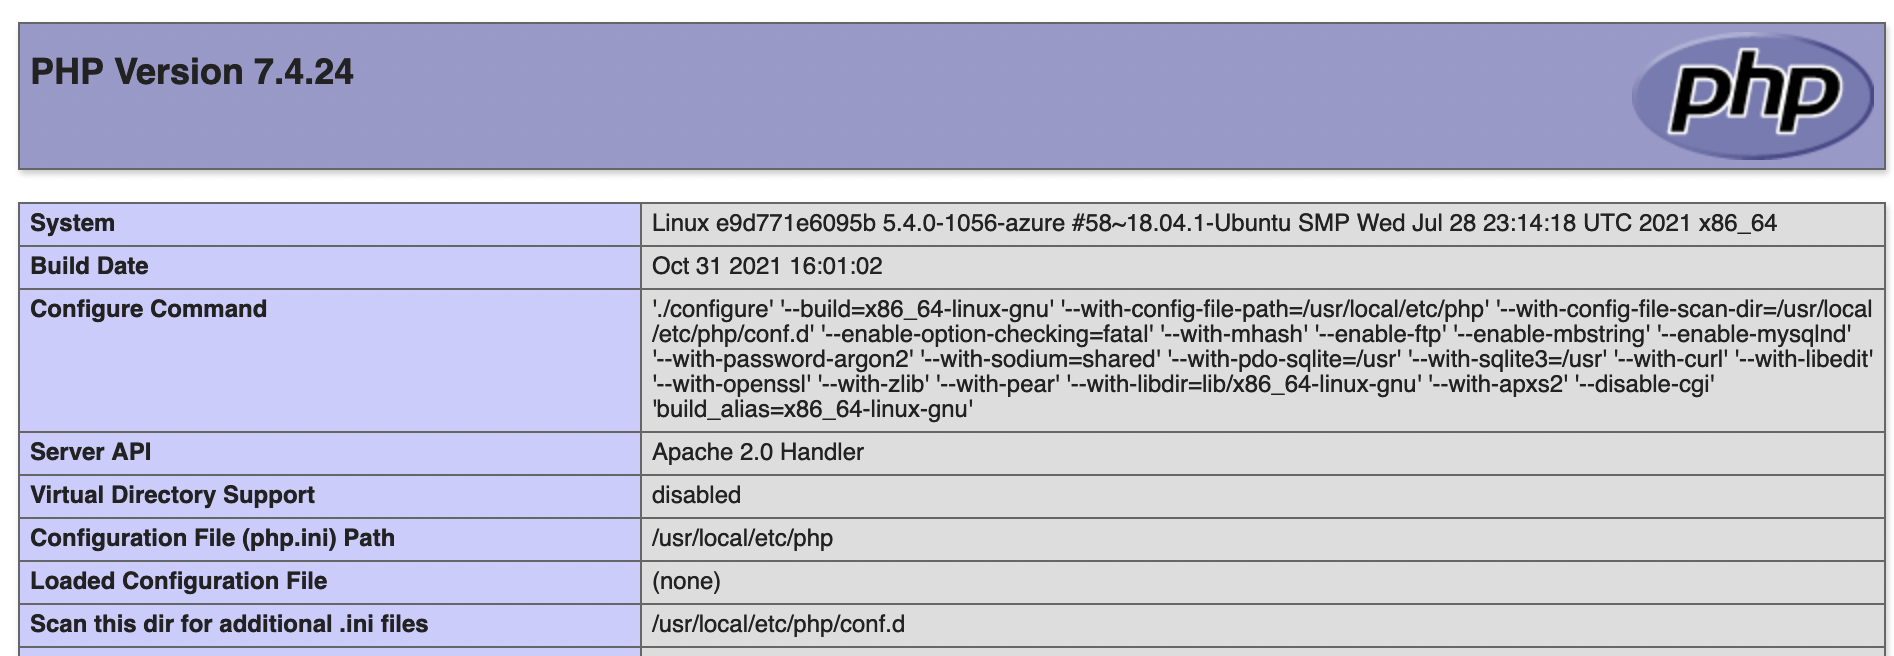
Once the app is created, click on the Overview and you’ll see the URL for the app. You’ll get some generic web page if you click on the URL.

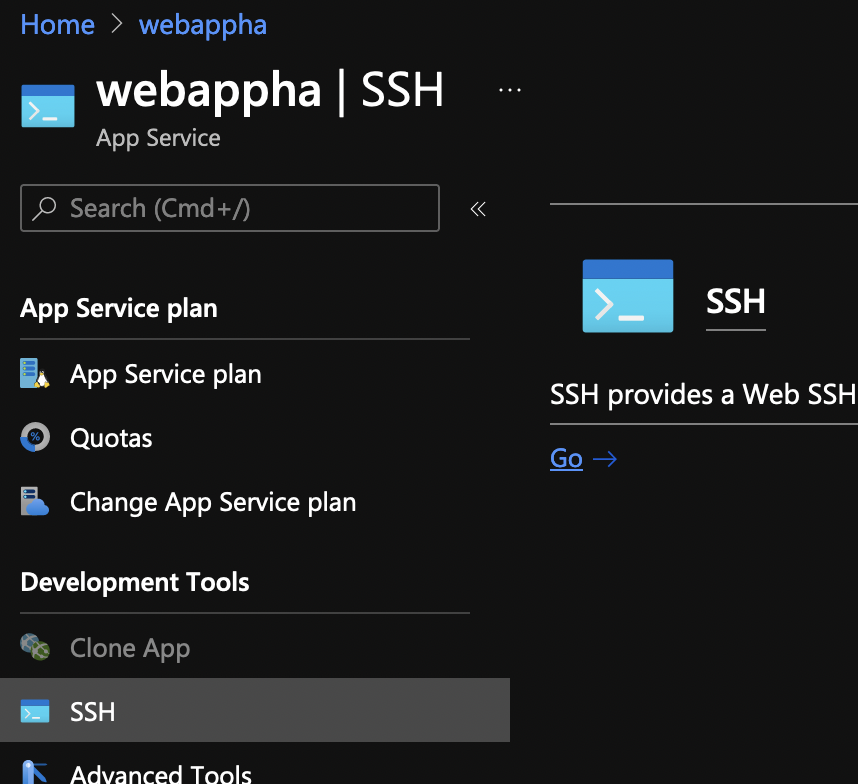
On the left side, under Development Tools, click on SSH and it will open up a new browser window with SSH access.
Once there, run this command that. It creates an index.php file that gives you all info about the webserver, PHP and PHP modules.
echo "<?php phpinfo(); ?>" > /home/site/wwwroot/index.php
If you go to the URL of your site again, instead of the generic page, you’ll see something like this…plus more.
Application Gateway
Let’s provision the application gateway. In my case, the first screen looks like this. I’ll name the gateway agwWebAppHA and I’ll use the subnet subGW for it. For the availability zone, choose all three.
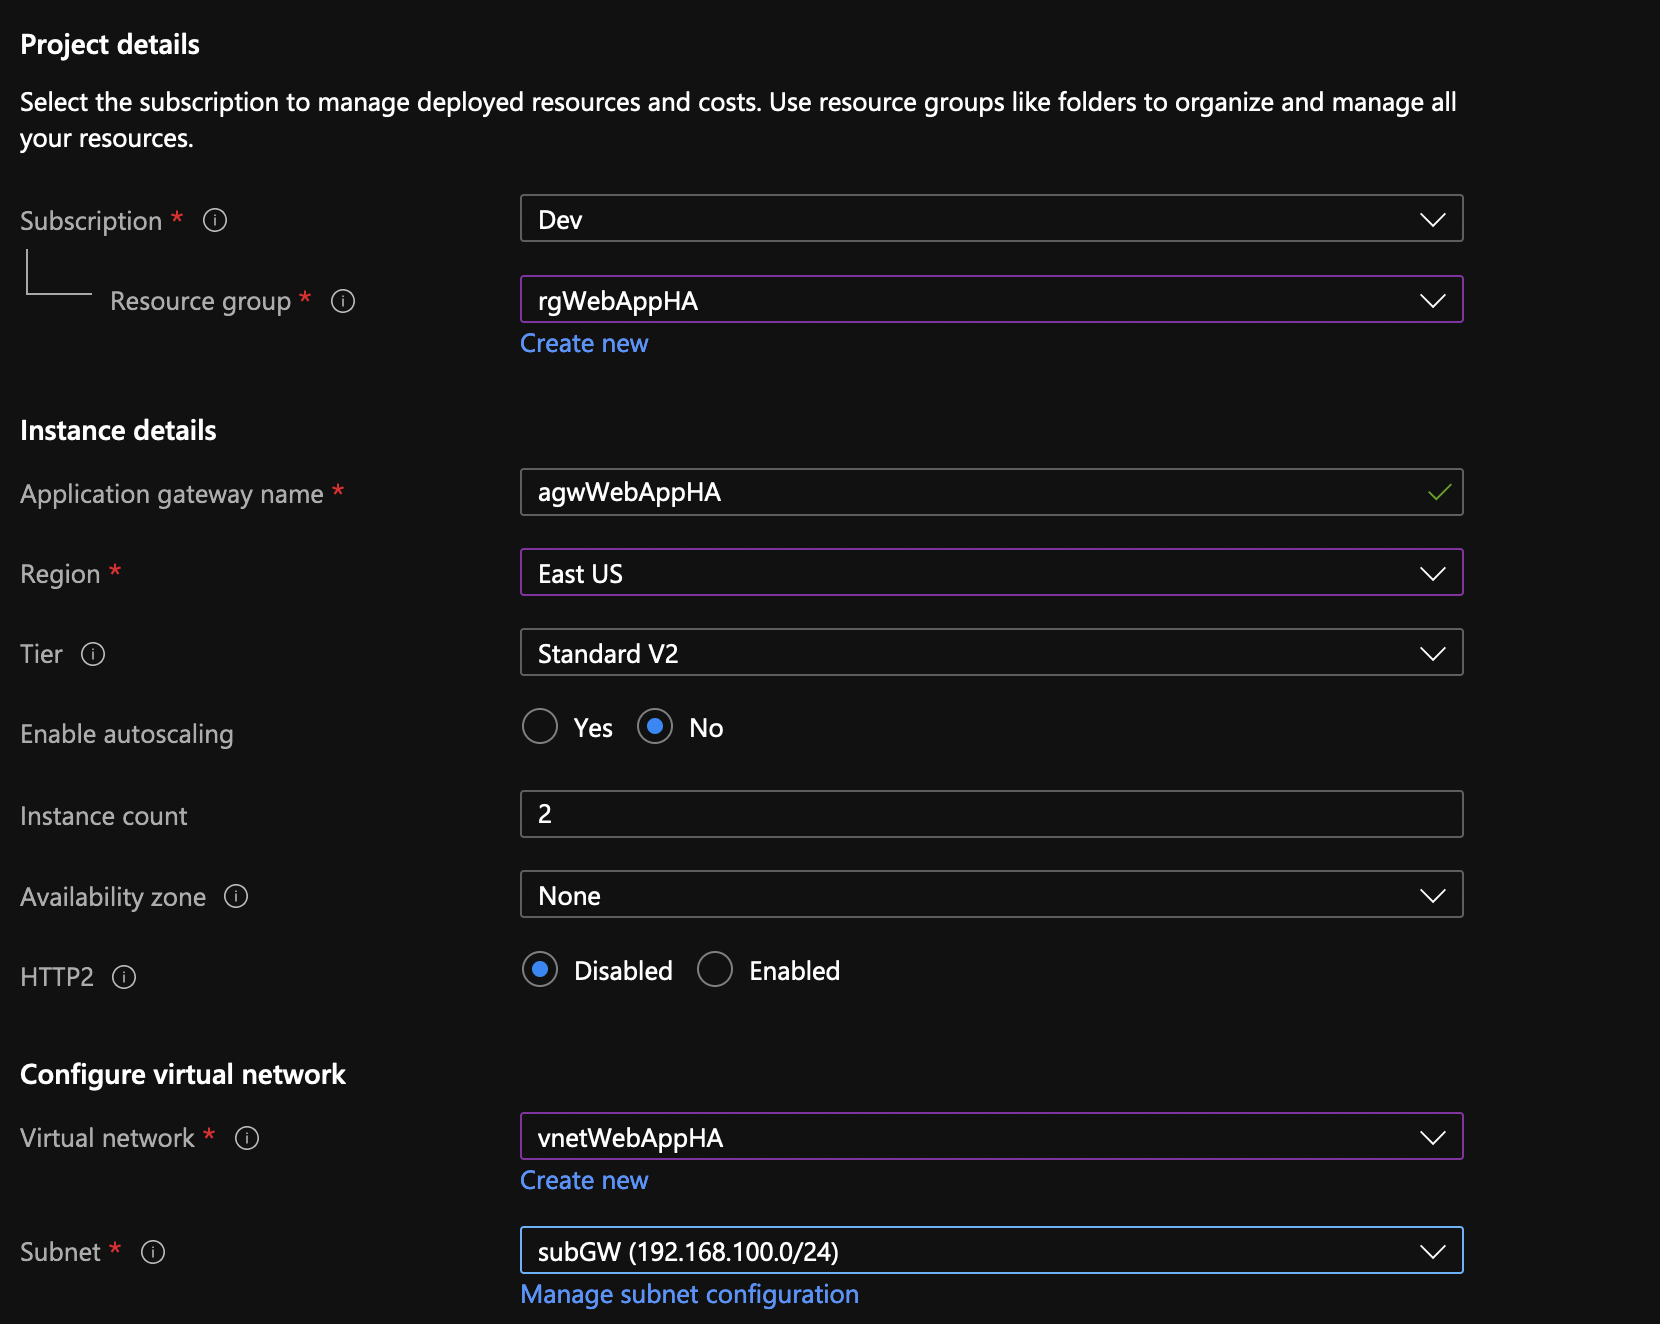
Create a new public IP for the gateway.

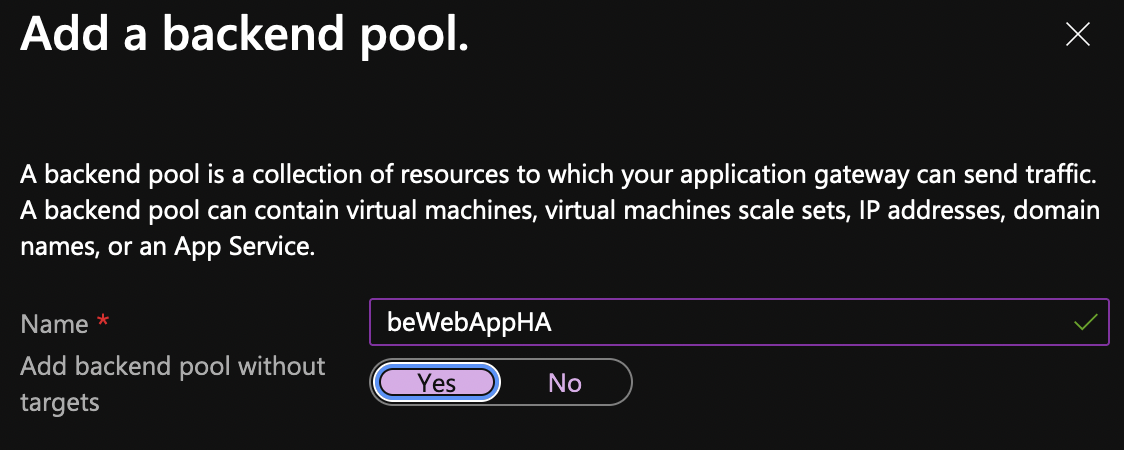
Add a new backend pool but click on Yes to add the backend pool without the targets.
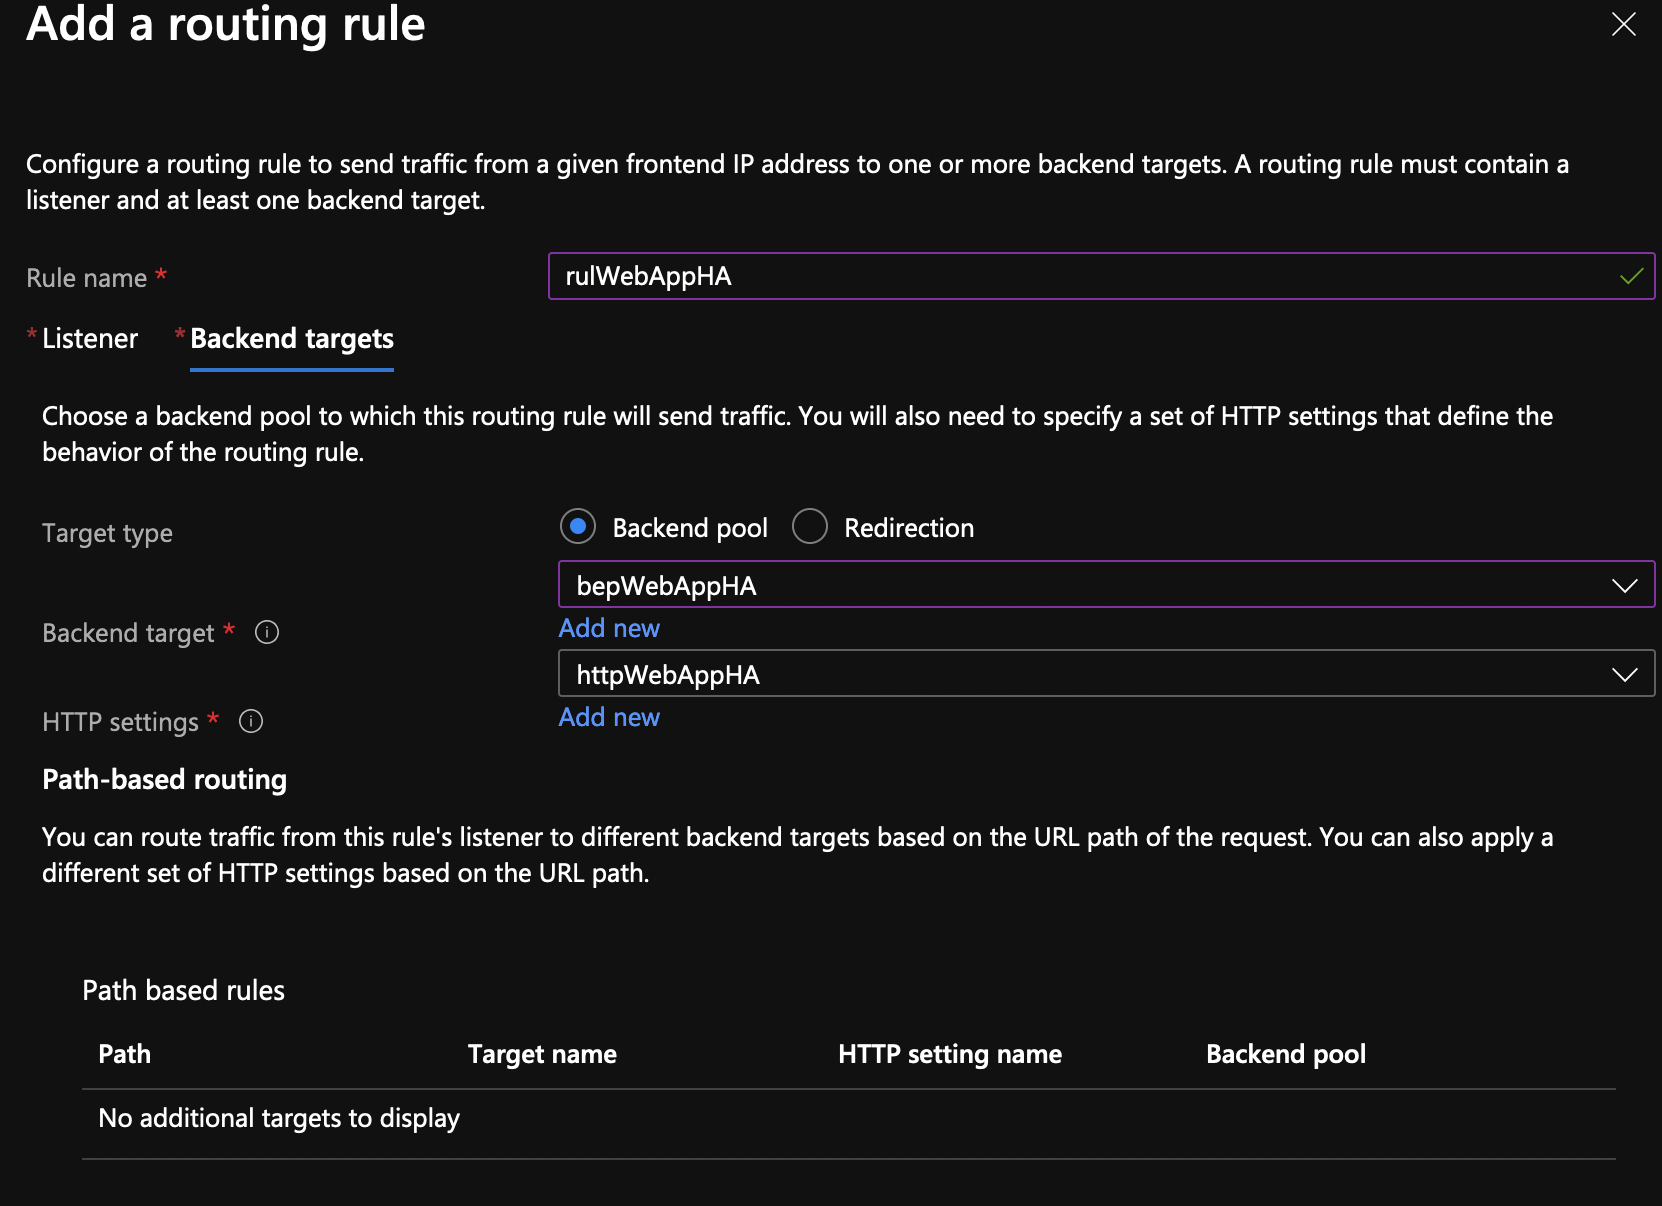
Click on Add a routing rule.

Create a new rule and a listener as described. Don’t click add after. There is another tab.

Click on the second tab Backend targets after. Choose the backend target that we created from the dropdown. For HTTP settings, click to Add new. Make sure you change the settings as below for the host headers.
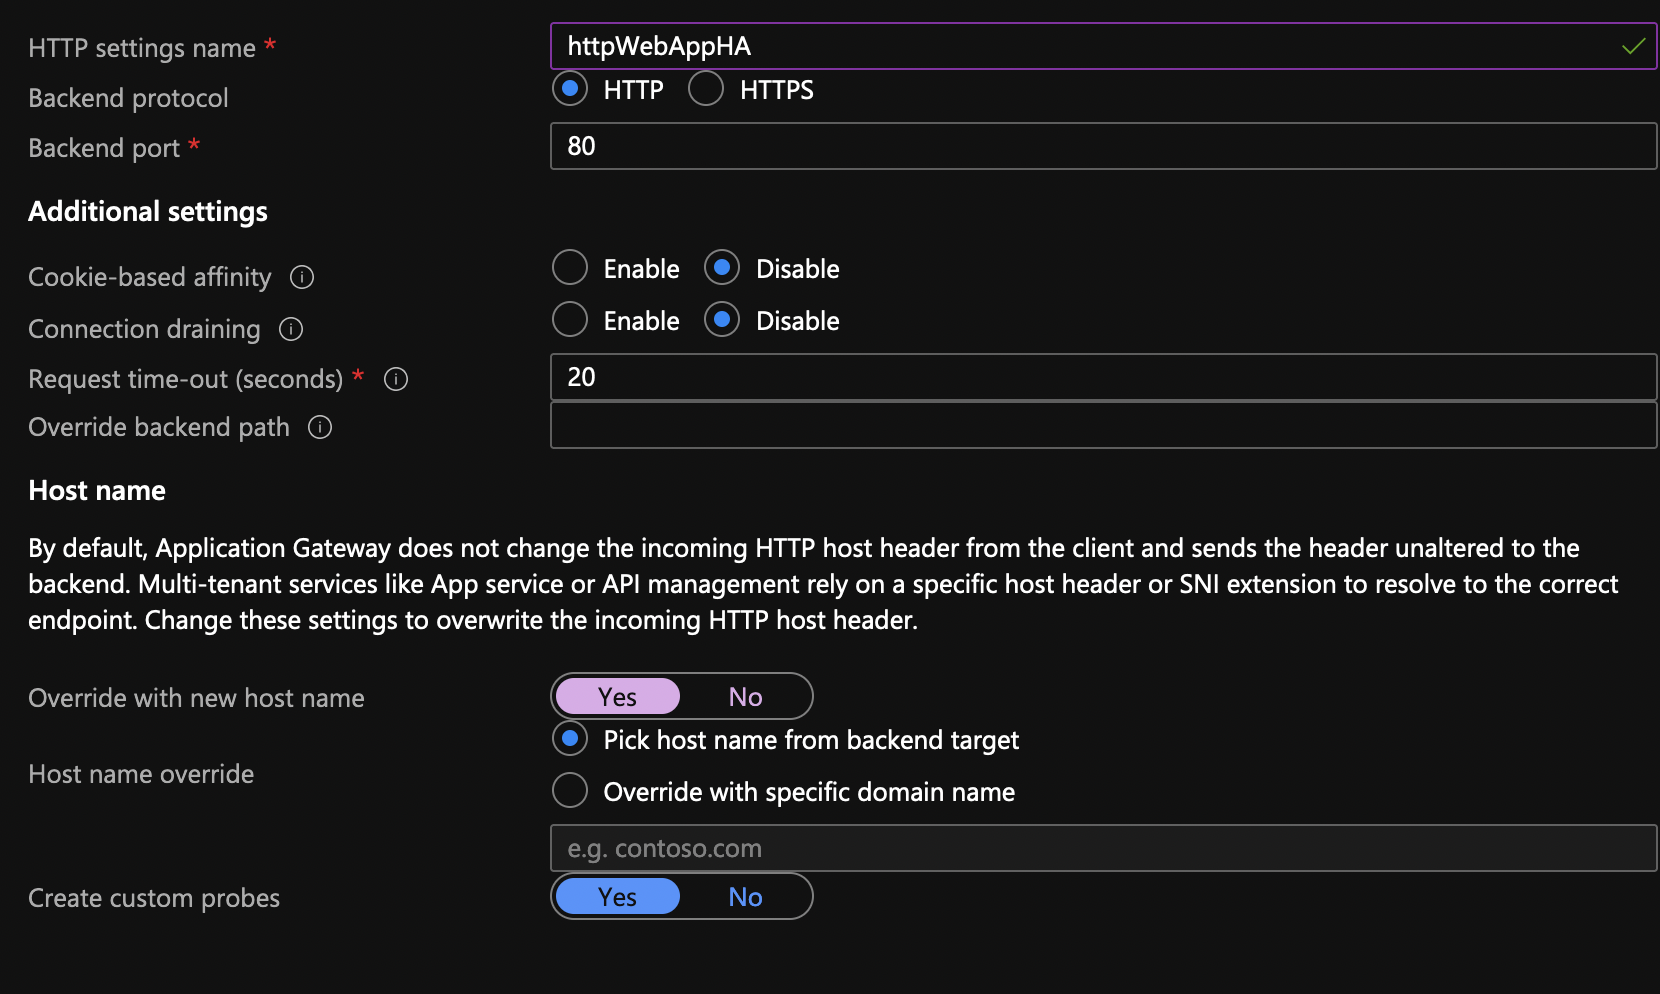
Click add and this is how the backend tab should look like.
Move to the other options (tags, review) and create the application gateway. Once created, you’ll see a public IP under the Overview for the app gateway. Copy or write down this IP somewhere.
Private endpoint
So, we have a Web App with a public URL, but we want to put the app behind an App Gateway. We can do that later when we specify the backend target, but then the Web App can be accessed equally from the Web App URL and the App Gateway IP. We don’t want this. We want the app to be accessible from the App Gateway only. For that we need a private endpoint.
NOTE: Once you enable the private endpoint, you won’t be able to SSH to the Web App from your browser that uses a public SSH URL. You just can’t. The solution is to use DevOps pipelines with self-hosted agents or use Deployment Slots and swap them. I’ll use Deployment Slots for this demo, but you need automation and Azure DevOps for the deployment in real world.
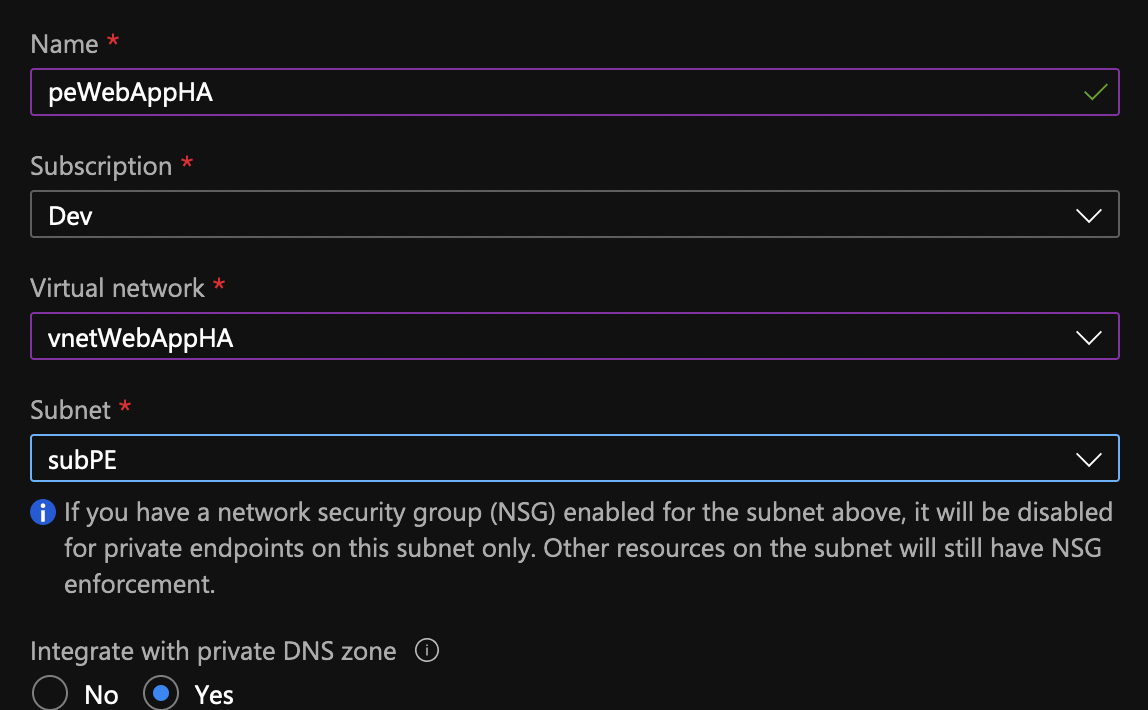
Go to the App Services, click on the Networking from the blade and then click on Private endpoints. Click Add.

Name the private endpoint, make sure it’s in its own subnet (subPE) and make sure that it’s integrated with the private DNS zone.
Now, what we did is created the private endpoint which means we are making the Web App accessible from the internal network only. This also disables the public URL that was assigned to the app. If you go to the URL, you’ll get Error 403 – forbidden. That’s good, that’s what we wanted anyway.
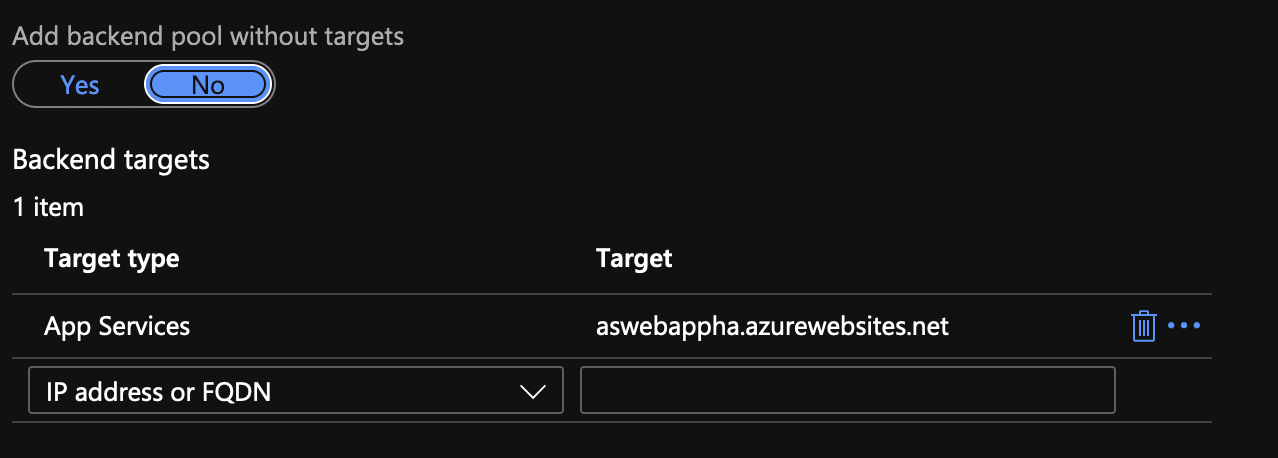
Go to the Application Gateway, click on the Backend pools from the menu and click on the actual backend pool. Add the target and click Save. The target is obviously the App Service.
At this point, the App Gateway IP should show you the PHP info site, the App Service URL should give you Error 403 and the SSH for the App Service should also give you Error 403. So, how do I make changes in the app? Well, Azure DevOps, but for now, use Deployment Slots.
Deployment Slots
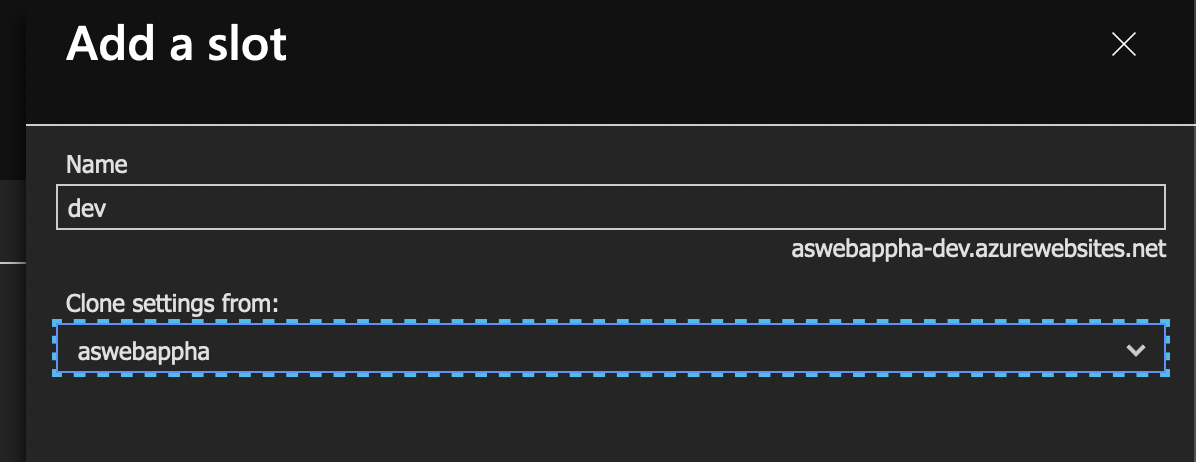
Go to the App Service and under Deployment click on Deployment slots. Click Add Slot. Name the slot, in my case dev and copy the settings from the existing app service. The new slot won’t get the private endpoint and that’s what we want. The new slot is just a new app service environment. It’s accessible from outside using the URL with a -dev (in my case) suffix and it’s not accessible over the App Gateway.
Click on the app slot that you just created and go to the SSH menu under the Development Tools. You’ll be able to access the SSH shell in a browser. Once there, download a TLS certificate that we’ll use to connect to the MySQL database server.
cd /home
wget --no-check-certificate https://dl.cacerts.digicert.com/DigiCertGlobalRootCA.crt.pem
We’ll also replace the initial PHP info page from our current web app. Instead we’ll try to connect to a MySQL server (that doesn’t exist at this point), but you’ll get an idea how to make changes. Just copy & paste this code, it will create the file for you.
cat << 'EOF' > /home/site/wwwroot/index.php
<?php
$conn = mysqli_init();

$host='mysqlwebappha.mysql.database.azure.com';
$user='dbadmin';
$pass='Pa$$w0rd';
$db='mysql';

mysqli_ssl_set($conn,NULL,NULL, "/home/DigiCertGlobalRootCA.crt.pem", NULL, NULL);
mysqli_real_connect($conn, $host, $user, $pass, $db, 3306, MYSQLI_CLIENT_SSL);
if (mysqli_connect_errno($conn)) {
    die('Failed to connect to MySQL: '.mysqli_connect_error());
} else {
    if($result = $conn->query('SHOW TABLES')) {
        while($row = $result->fetch_array()) {
            $tables[] = $row[0];
        }
    }
    print_r($tables);
}
?>
EOF
Now, if you go to the Overview menu for the dev Deployment Slot, you’ll see a different URL. Go to this URL and you should see an error “Failed to connect to MySQL: php_network_getaddresses: getaddrinfo failed: Name or service not known“. That’s OK, the database doesn’t exist. The URL for the dev slot is from the web app, it doesn’t go through the Application Gateway. All we have to do is swap the deployment slots now.

Click on Swap. This will put the dev slot under the Application Gateway.
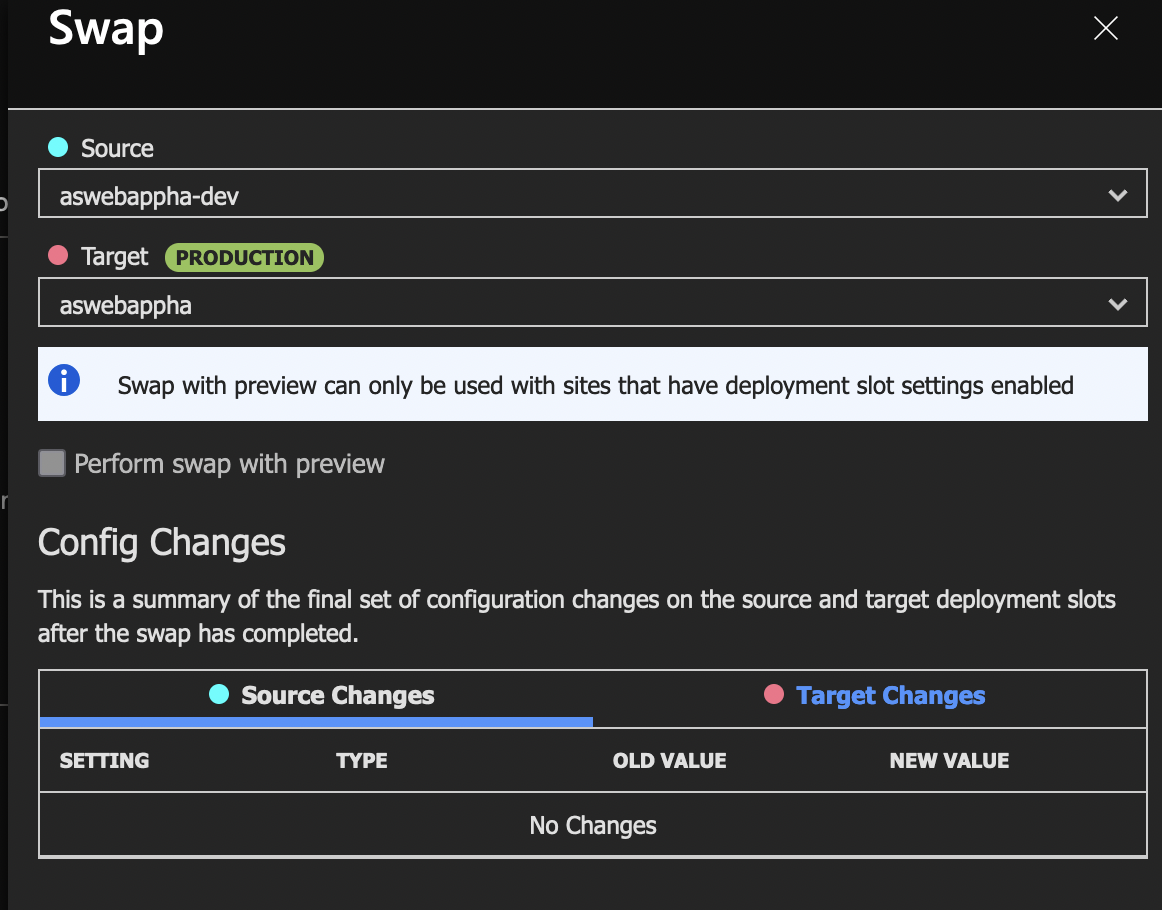
Once the swap is complete (about a minute), if you go to the App Gateway URL (the IP address), you’ll see the same error about the database connection. Let’s do the database now.
Database
Look at the PHP code for index.php slightly above. The highlighted lines is how we’ll name the database mysqlwebappha, with admin called dbadmin and the password on line 7. There are two types of MySQL databases, Flexible and Single Server MySQL database. Read about them here. We’ll go with flexible MySQL server.
Look at the parameters that I’ve used. Make sure you use the same name or you have to modify the code in index.php file. Use General Purpose server and version 5.7.
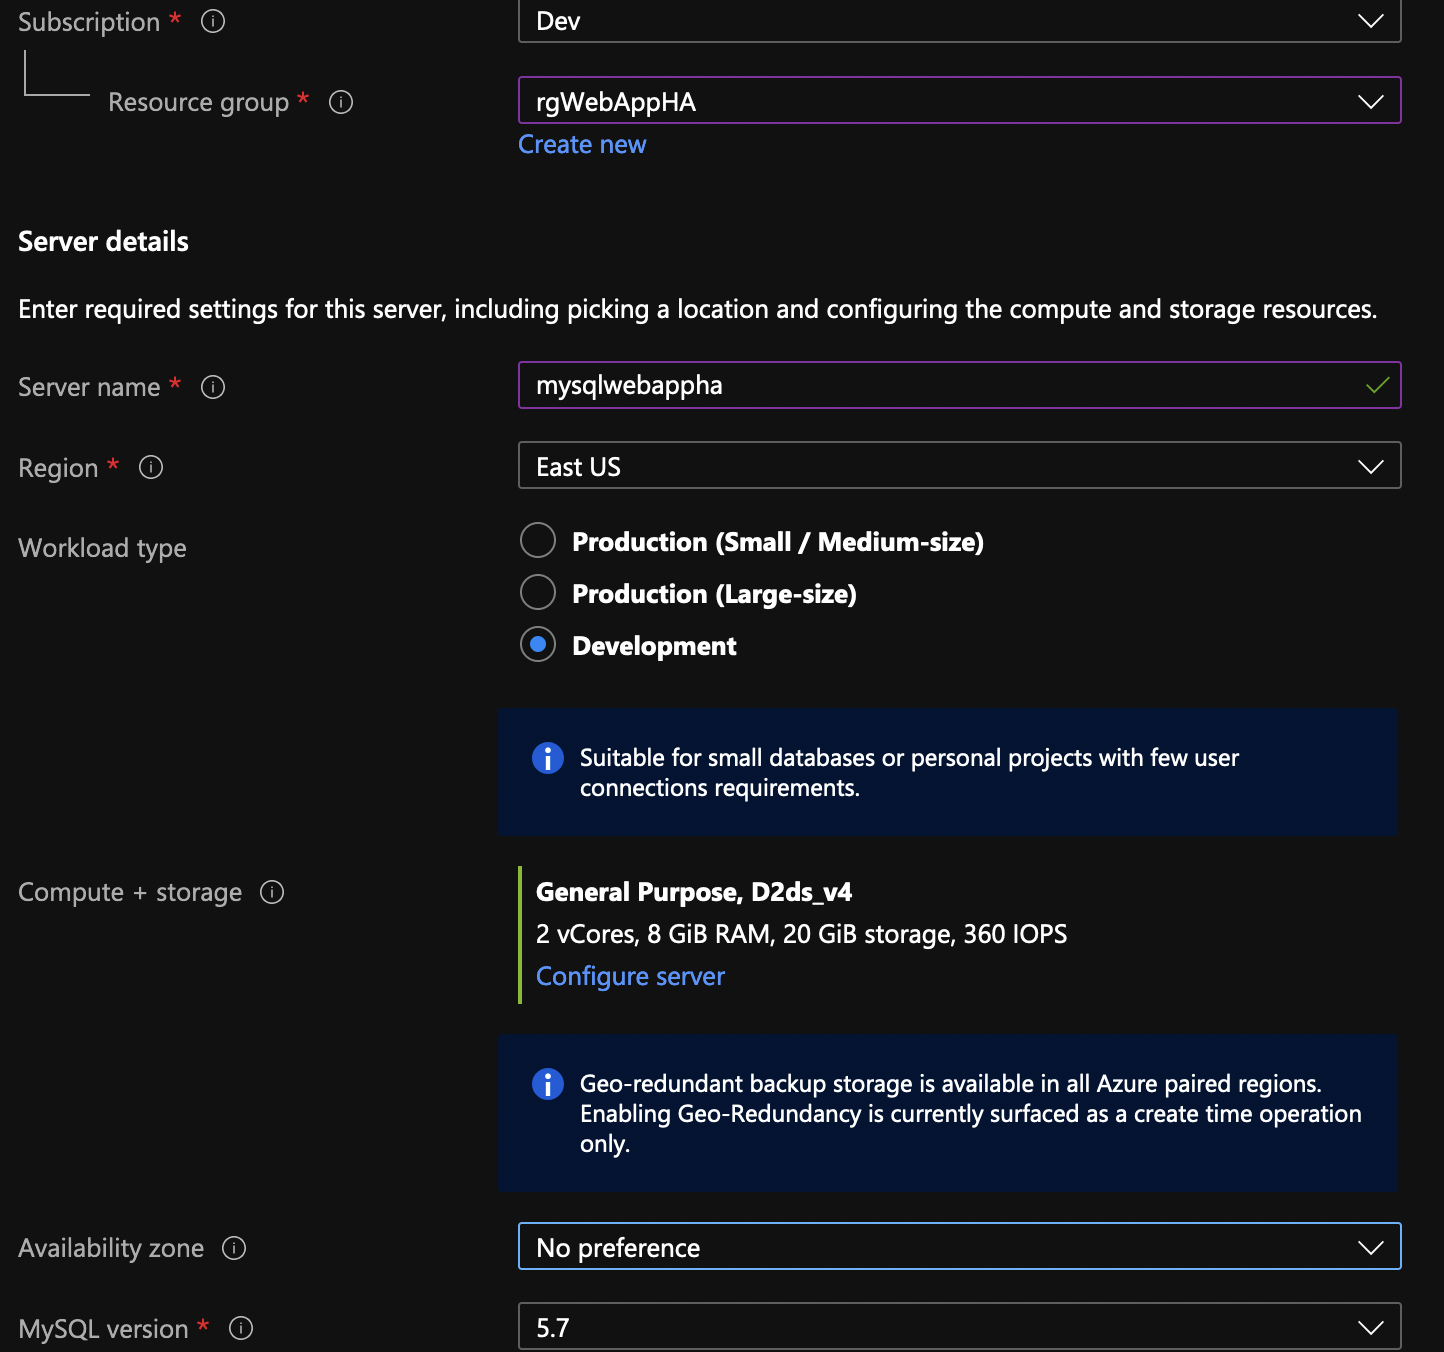
Enable HA and use the username and password as in the index.php file.

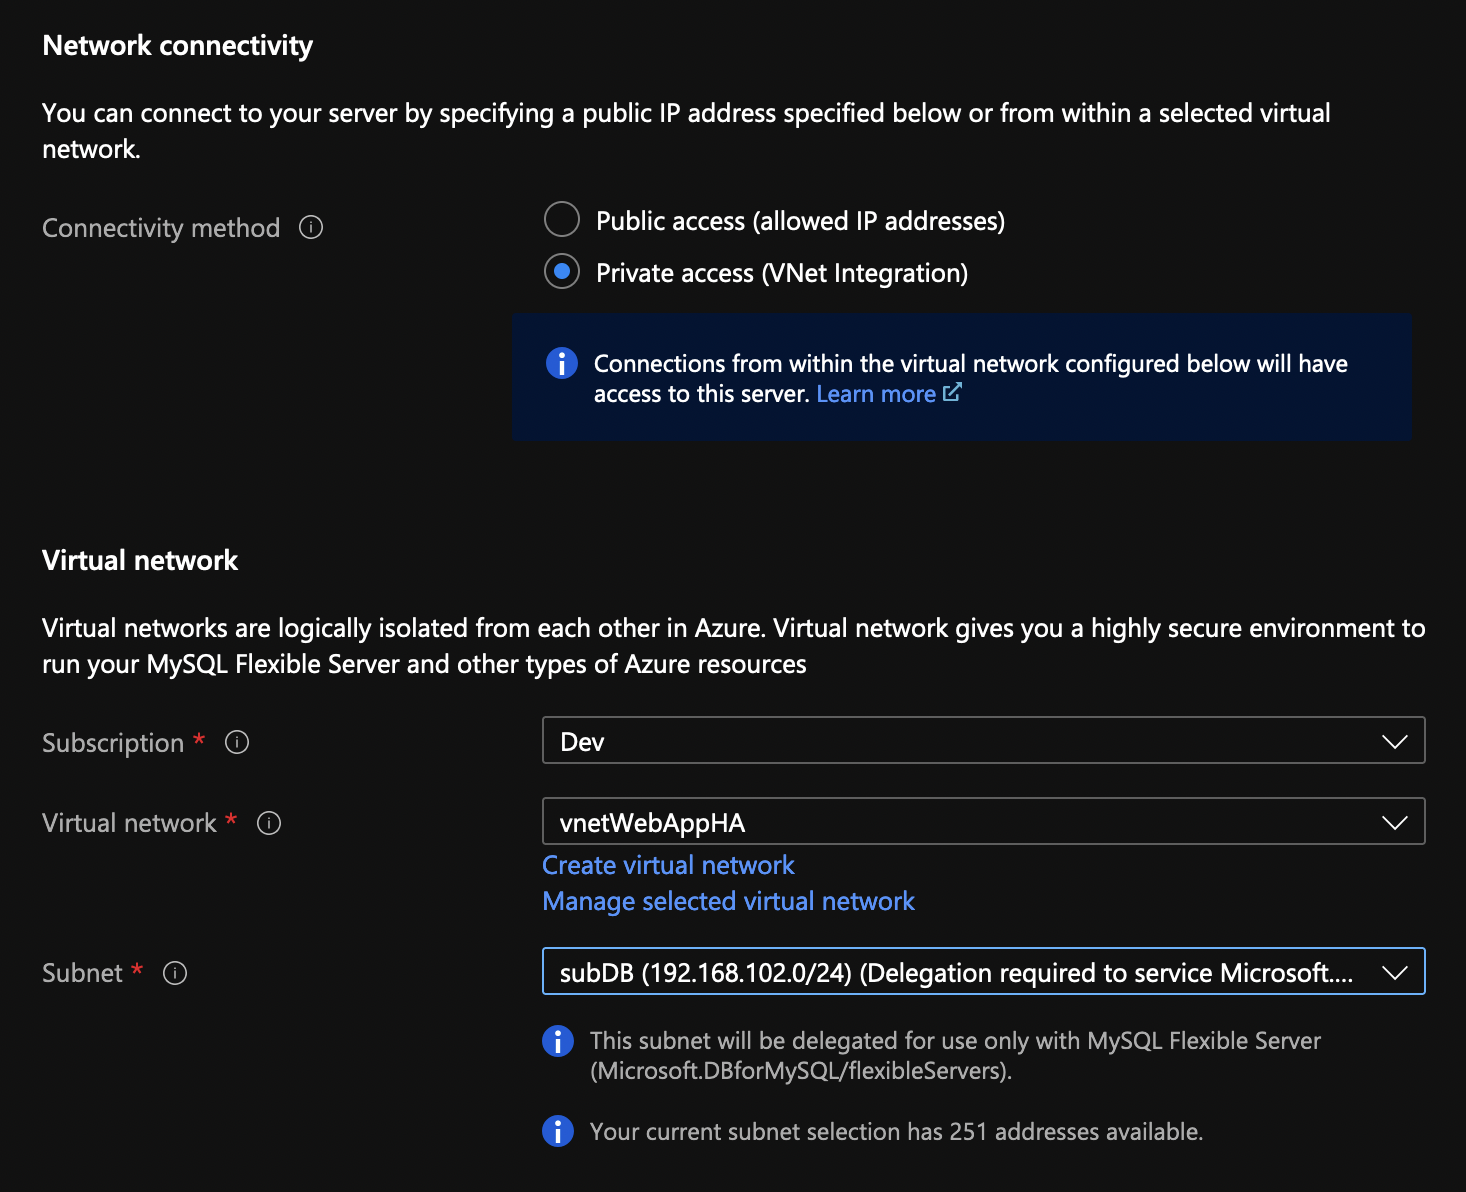
Choose a VNET integrated access and specify subDB for the subnet.
Finish with the remaining settings (use default) and click Create. While the database is being created (it takes about 20 mins), go to the App Services and click on the Networking from the menu. Click on VNET integration.
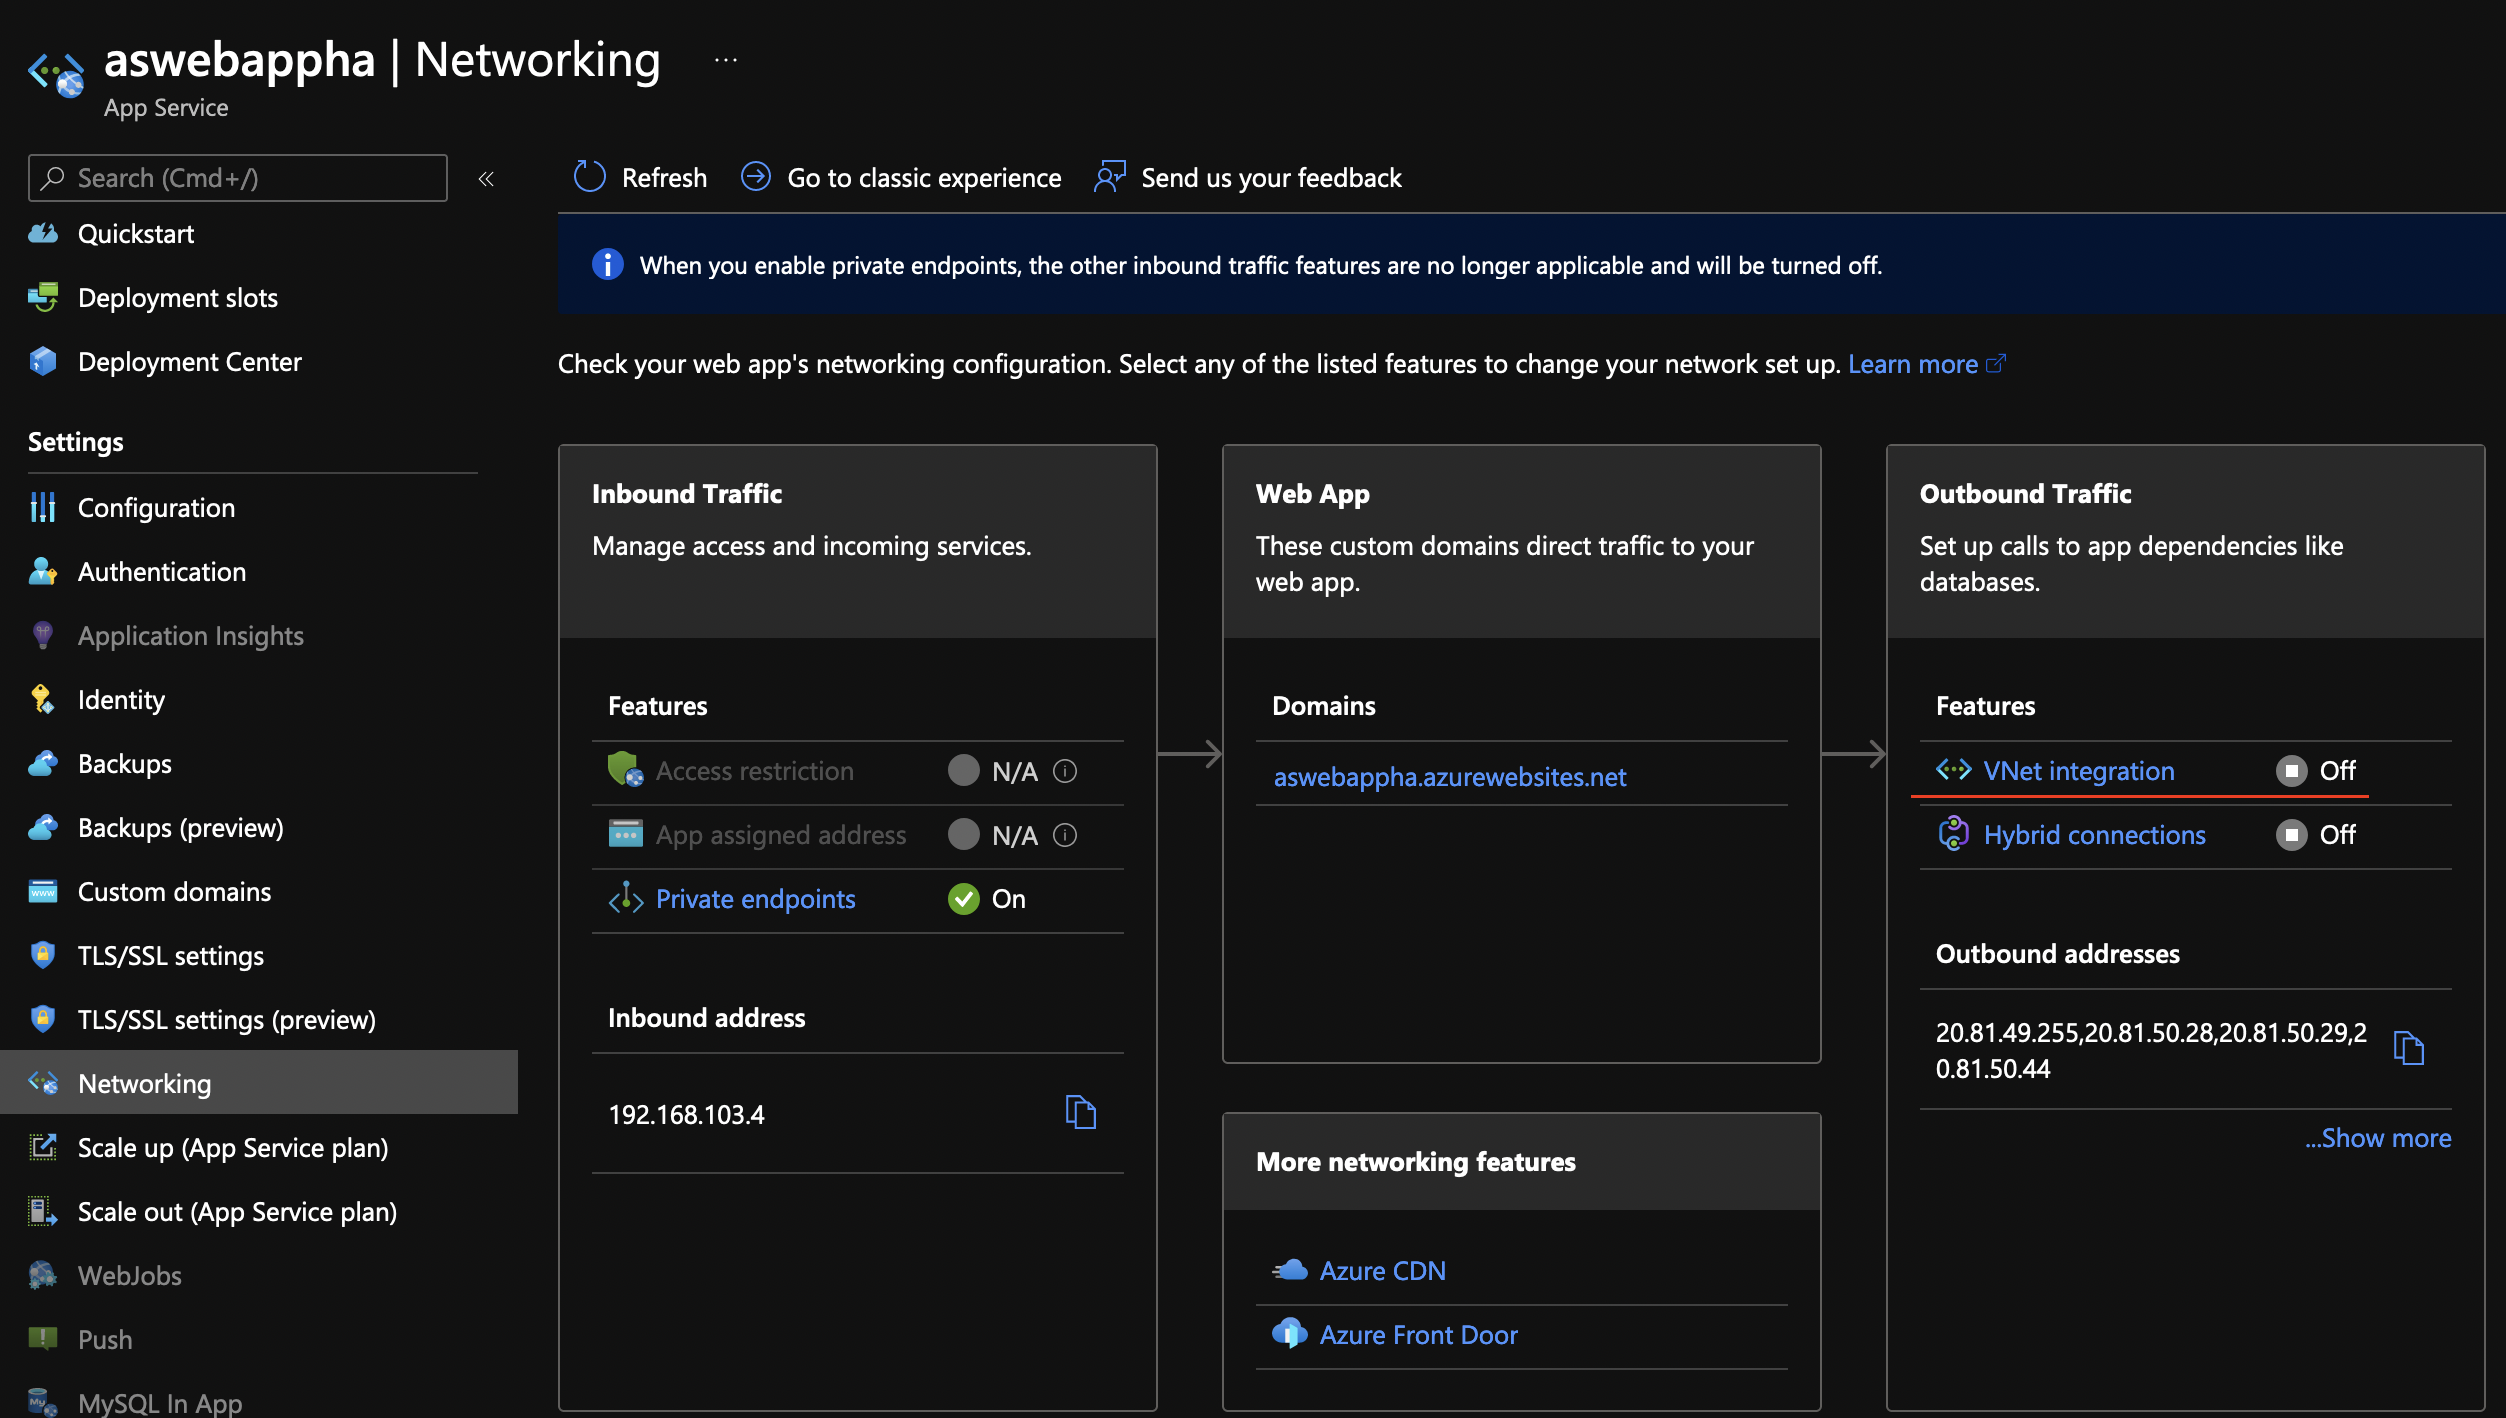
Click on Add VNET from the new blade and choose subApp for the subnet.

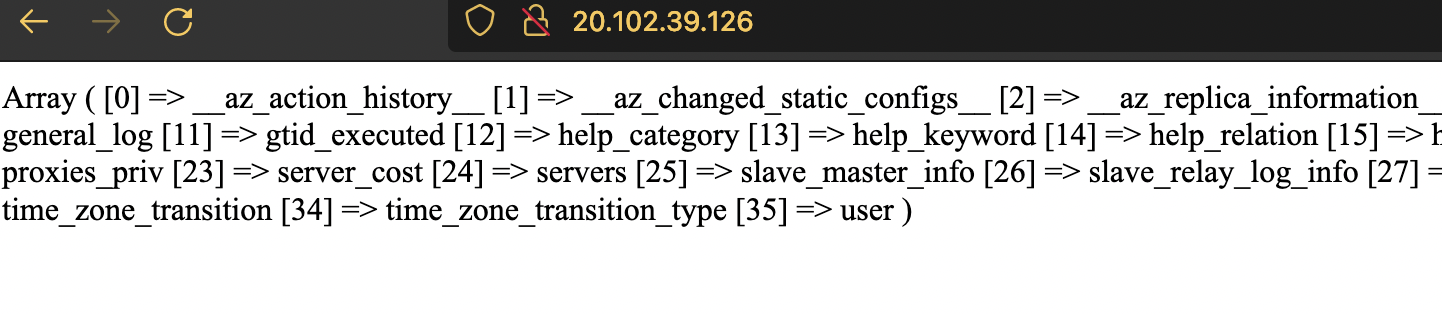
…and if you go to the website, you’ll see a dumb of all the tables for the mysql database.