
There are many articles on how to failover a site to S3 bucket or failover a site to different servers using Route 53 health checks and ELBs, but a failover from an S3 bucket in one region to an S3 bucket in a different region is a little bit more complex. The reason being that if you want to host a site in S3, the bucket name must be the same as the your site. E.g. if you plan to host a site named something.com, your bucket name must be something.com. There are other restrictions. First and foremost, your domain must be hosted in Route 53. Also, the site name that you will use for your bucket can’t be the APEX domain (e.g. something.com), because Route 53 can’t create a CNAME for the apex domain. On top of that, there were some recent changes in CloudFront so if you want to host a site in S3 behind a CloudFront distribution using an alternate domain name, you must have a valid SSL certificate.
This is my scenario. I have a site called bucket.nanocloud.org that serves static content in the east region. I’ll create another bucket in the west region and I’ll use the cross region replication, so the bucket content is exactly the same. Then, I’ll use CloudFront to be on top of my original bucket (I’ll need a valid SSL certificate for this). The backup bucket in west region won’t be behind a CloudFront distribution, but I’ll still be able to fail over using the Route 53 failover health checks.
Again, make sure you host your domain in Route 53, have a valid certificate for your domain, the domain that you’ll host can’t be the apex domain (e.g. no something.com, it has to be anything.something.com) and hopefully you can create the bucket with your domain name (e.g. if I create a bucket called www.yourdomain.com, you won’t be able to create the failover because the S3 buckets are unique).
And this is how that looks like step-by-step.
Table of Contents
S3 buckets
Go to S3 console and create a bucket. I’ll name mine bucket.nanocloud.org-primary. Don’t use the original domain, you’ll see later why. As a matter of fact, you can name this bucket whatever you want, it will be behind a CloudFront distribution. Choose a region and click Next. Make sure you check the Versioning, it is required for bucket replication.

On the next screen, uncheck Block all public access and click Next and then proceed to create the bucket.

Select the bucket, click on the Properties tab and click on Static website hosting.
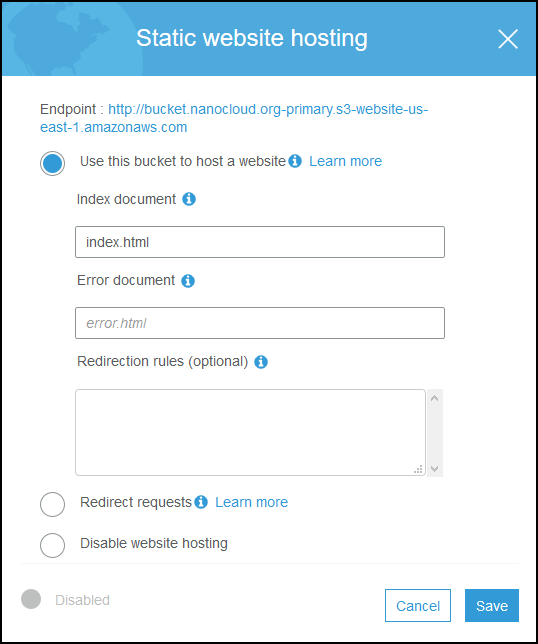
Click on Use this bucket to host a website and under Index document type index.html. Before you click Save copy the endpoint URL, in my case it is http://bucket.nanocloud.org-primary.s3-website-us-east-1.amazonaws.com. Copy this URL in notepad or somewhere.
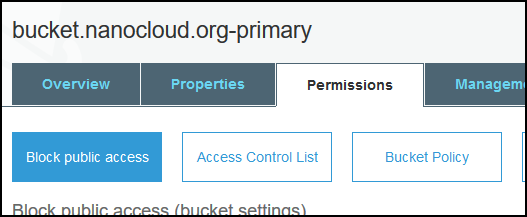
Click on Permissions tab and then Bucket Policy button.
Paste the following JSON file. Make sure you replace your bucket name in line 12.
{
    "Version": "2012-10-17",
    "Statement": [
        {
            "Sid": "PublicReadGetObject",
            "Effect": "Allow",
            "Principal": "*",
            "Action": [
                "s3:GetObject"
            ],
            "Resource": [
                "arn:aws:s3:::bucket.nanocloud.org-primary/*"
            ]
        }
    ]
}
Click Save and AWS will warn you that you have a public access to this bucket. It’s OK.
Now from the Overview tab, Upload an index.html file like this. Please follow up the tutorial as it will be easier to troubleshoot later. You can dump your files once everything checks out. Just accept the defaults for the upload.
<html>
	<head>
		<title>Region 1</title>
	</head>
	<body>
		<p>Current time is : <span id="datetime"></span></p>
	</body>
	<script>
		var dt = new Date();
		document.getElementById("datetime").innerHTML = dt.toLocaleTimeString();
	</script>
</html>
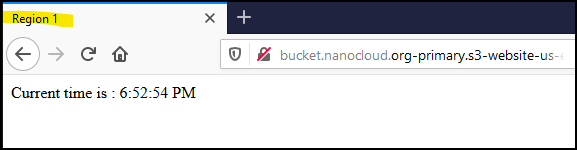
OK, now that we have everything in place, test the URL from the endpoint above. You wrote it down, didn’t you?
You should get something like this. The title of the tab says Region 1 and it prints the current time from your computer. The reason I am using JavaScript is that you can test the failover later. If the failover doesn’t work, make sure you get the current time and not a cached page because you are behind a bad proxy.
If everything checks out, proceed with the creation of the second bucket. You have to take the same steps, but this time make sure the bucket’s name is your domain name, in my case bucket.nanocloud.org. It should be exactly as your domain name but in a different region. Also, you have to modify the same properties, enable Versioning, uncheck Block all public access, enable Static website hosting, get the endpoint URL, paste it in notepad, add a Bucket Policy but remember to change line 12 so it says bucket.nanocloud.org or whatever your domain is. Also, upload a slightly modified index.html file. Just change line 3 to say Region 2. If you done all these steps, go to the endpoint URL and you’ll see your current time but with a different title.

SSL certificate
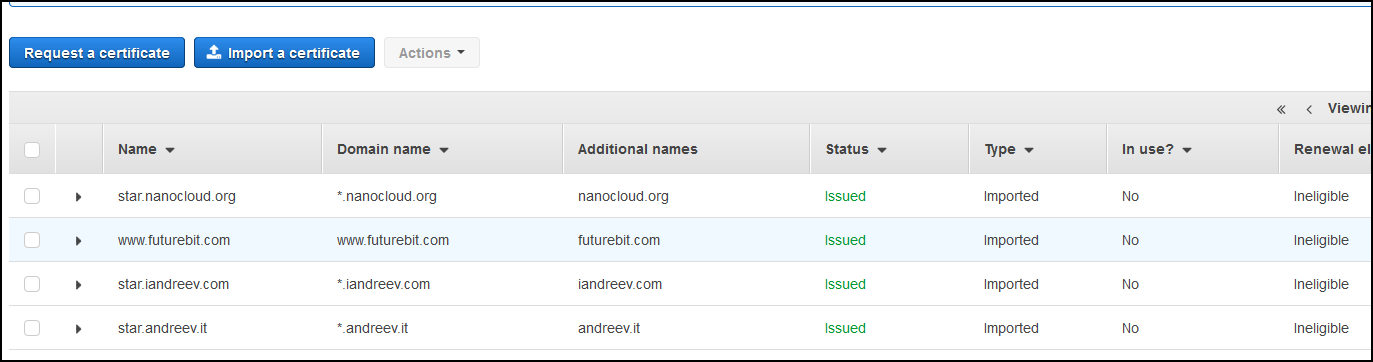
Go to Certificate Manager console and here you can either buy a cert from AWS or if you like something cheaper, go to any cheap cert sites and get your certificate. In my case, I imported a certificate that I’ve purchased from one of the cheap SSL resellers. It doesn’t matter, just import a certificate so it looks similar to this. A valid certificate in AWS certificate manager.
CloudFront distribution
Go to the CloudFront console and click on Create Distribution. Choose the first one that says Web, click Get Started. Once you click on the first field, Origin Domain Name, AWS will give you an option to choose the bucket name. STOP!!!
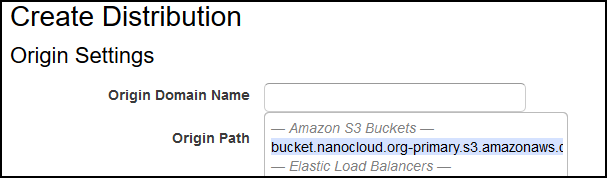
Ignore what AWS offers, that’s for RTMP. Instead paste the URL for your original bucket but remove http://, so this is what you should paste (in my case) – bucket.nanocloud.org-primary.s3-website-us-east-1.amazonaws.com. Scroll down and ignore until you reach Compress Objects Automatically. Select Yes, but it’s optional. It’s pretty much mod_gzip, it compresses the content on the server level, but it’s not beneficial if you serve a lot of JPG/PNG images. It’s up to you. Also, you can change the Price Class if you don’t want to pay the full price. Strictly optional, this is just for demo purposes only.
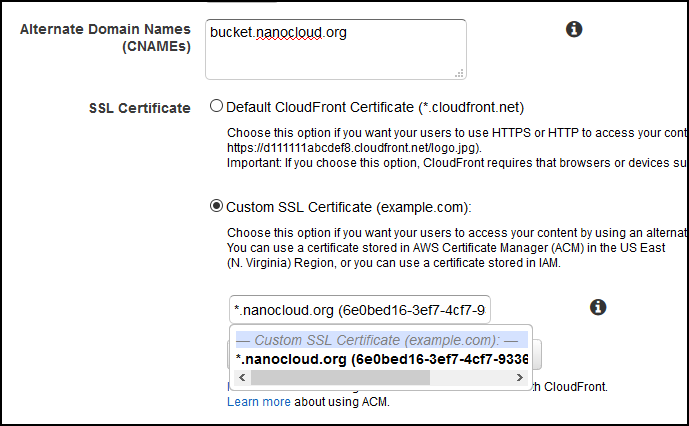
What’s important is the field where it says Alternate Domain Names (CNAMEs).
Enter your domain here in my case bucket.nanocloud.org, then click on Custom SSL Certificate and select the cert that you just imported/requested from AWS.
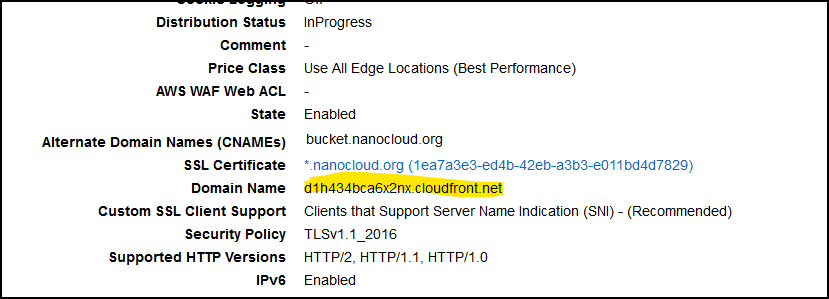
Scroll all the way down and click Create Distribution. Once the CF distribution is created click on it and from the General tab look for Domain Name. Copy this value as you will need it now.
Route 53
Go to Route 53 console and create a CNAME record for your domain. In my case, I am creating a CNAME record for bucket.nanocloud.org. This is how it looks like.
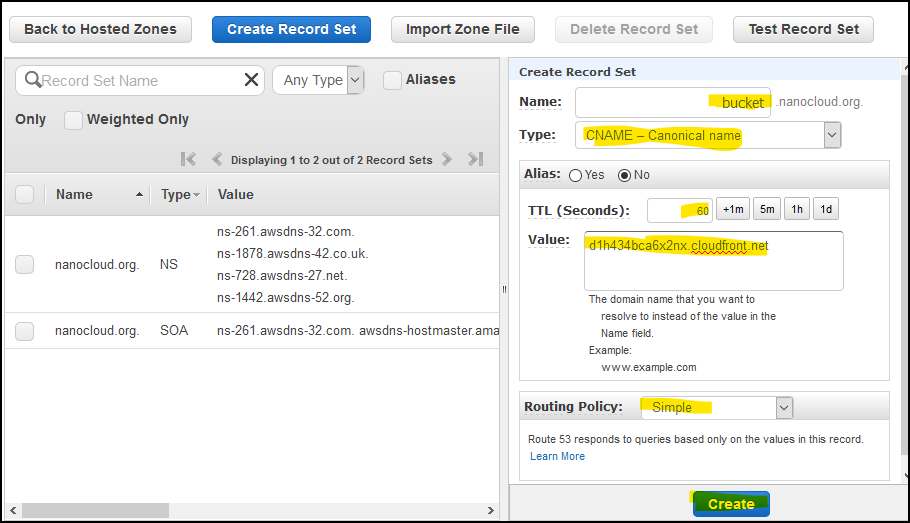
Try to access bucket.nanocloud.org or whatever.domain.youhave. You should get the current time and Region 1 as a title in the browser. If everything is OK, let’s proceed to the health checks.

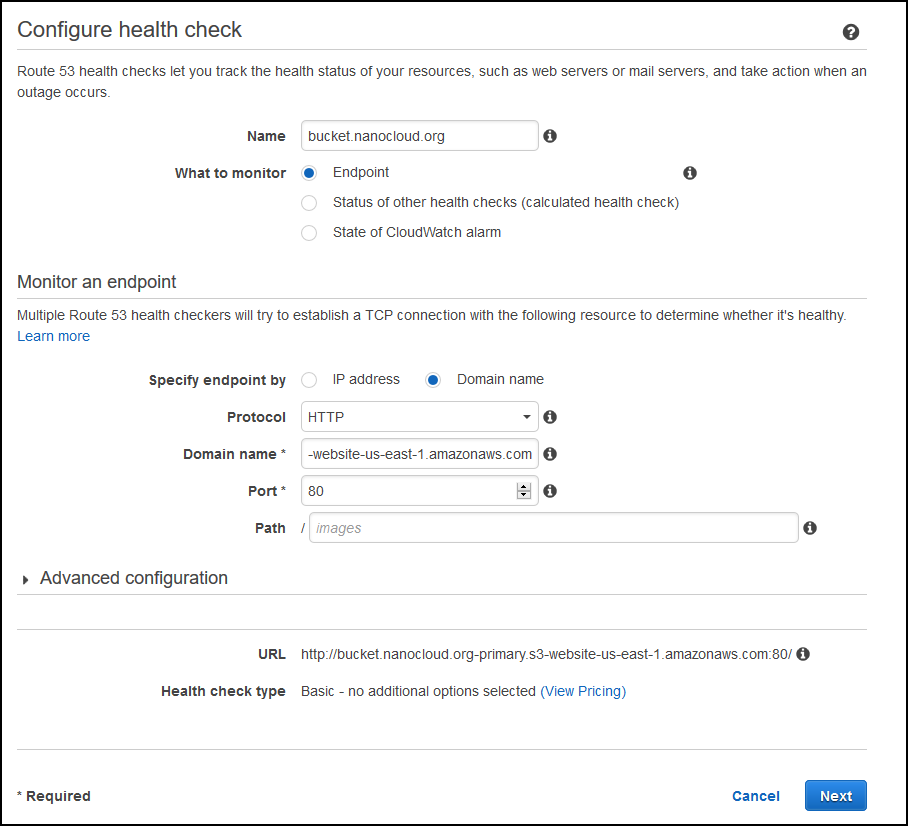
Just below the Hosted zones on the right side, click on Health checks. Click on Create health check. Enter some description for the Name field and under Specify endpoint by click on Domain name, HTTP for Protocol and paste the S3 domain name for the primary bucket. Remove http://, just the endpoint URL, in my case bucket.nanocloud.org-primary.s3-website-us-east-1.amazonaws.com. Under Advanced configuration you can change the Request interval from 30 to 10 seconds, but I wouldn’t recommend that. You’ll get bombarded with health checks every second. Just leave it as-is, but you’ll have to wait about 1 min 30 seconds for the failover.
This is how my config looks like.
On the next screen, you can create an SNS notification so you’ll get alerted when a failover occurs. I strongly recommend this in production environment, but I’ll skip it so we can focus on the actual failover. Your health-check will look like this. Wait for about 30 seconds and the status will change to healthy.
Then create another health check. Name this health-check bucket.nanocloud.org-backup or however you like and for the domain name enter the S3 bucket name in the west region, in my case it’s bucket.nanocloud.org.s3-website-us-west-2.amazonaws.com. You can add an alarm as well if you want. So, the only difference between the checkups are the names (of course) and the domain names. Both should be in healthy state.

Go back to the Hosted zones and select the CNAME record that you’ve just created. Change the TTL (Seconds) to 60 so you have a faster failover, then Routing Policy to Failover, Failover Record Type should be Primary and click Yes under Associate with Health Check. Then select bucket.nanocloud.org or whatever you named your health-check under Health Check to Associate. Looks like this.
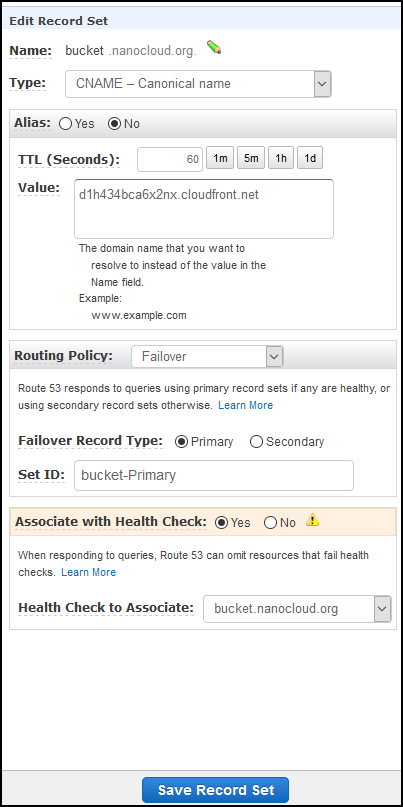
Click on Save Record Set once done.
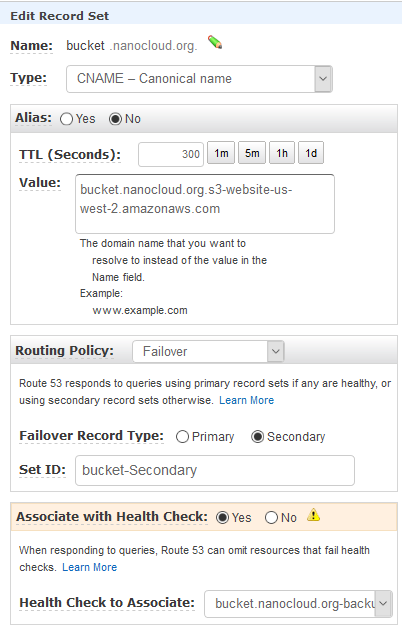
Now, click on Create Record Set button again. This time we are creating the backup record. Use the same name under Name, Type is CNAME, TTL (Seconds) is again 60, Routing Policy is Failover, but this time the Failover Record Type is Secondary. Associate the backup health check, not the primary one.
Looks like this.
This is how your DNS should look like for these two records.

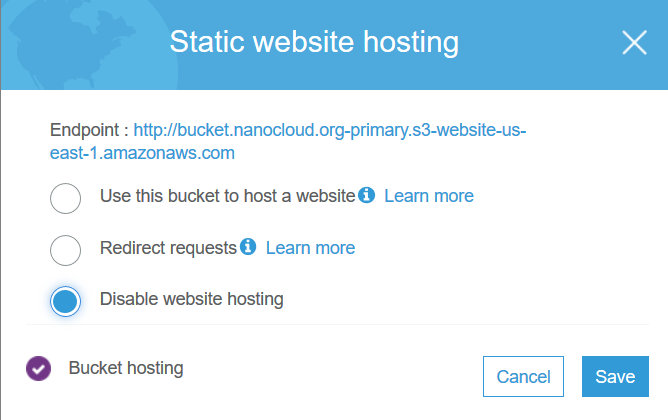
OK, you are good. Let’s test the failover. The easiest way to test it is to disable the Static website hosting in S3. For the primary bucket, disable it.
If you try to access the original S3 URL, you’ll get error 404. The bucket is down hard. But, if you go to your web site bucket.nanocloud.org, the site will be up. CloudFront will serve cached content. Once the health check is marked as unhealthy after 90 seconds, the DNS will failover. The easiest way is to go to your command prompt, do a couple of ipconfig /flushdns and nslookup bucket.nanoclod.org queries. You’ll see how the DNS will change. From the CloudFront URL to S3 west URL. At this point, your secondary bucket will serve the content. The only thing left is to make sure that the bucket content is exactly the same. We can use the Cross-Region Replication for this.
S3 Cross-Region Replication
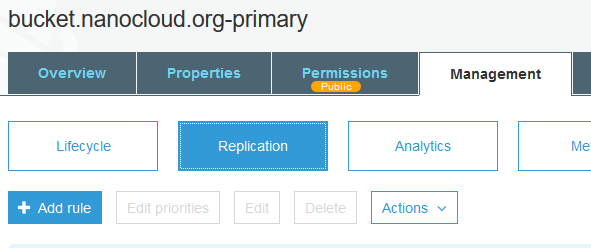
Go to your first primary bucket in the console and select the bucket. Click on the Management tab, then the Replication button and Add rule.
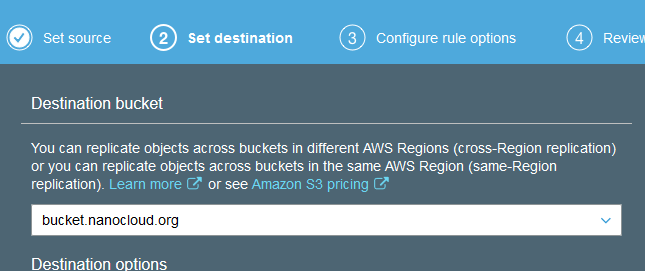
On the first screen (1 Set Source) click Entire bucket and then Next. Select the bucket in the west region. The backup bucket. Leave the other options as-is.
Create and name a new role and let AWS take care of the policy. Review and click Save.

If you try to access the second bucket, you’ll see that it still shows a different page than the first one. That’s because the replication works for the files that were added after it was created. If you want to sync the files before the replication was created, you’ll have to copy them manually using AWS CLI (aws s3 sync s3://source s3://destination).