
Table of Contents
Log with SSH keys only
Create the keys and allow it for the username test.
ssh-keygen -t rsa
ssh-copy-id test@localhost
Prevent the password login. Edit /etc/ssh/sshd_config and restart the SSH service.
PasswordAuthentication no
Transfer FSMO roles using PowerShell
Transfer FSMO roles to the domain controller named DC02.
Get-ADForest andreev.local | ft DomainNamingMaster, SchemaMaster
Get-ADDomain andreev.local | ft InfrastructureMaster, PDCEmulator, RIDMaster
Import-Module ActiveDirectory
Move-ADDirectoryServerOperationMasterRole -Identity "dc02" –OperationMasterRole DomainNamingMaster,PDCEmulator,RIDMaster,SchemaMaster,InfrastructureMaster
Get the external IP in Windows
$wc = new-object System.Net.WebClient
$wc.DownloadString("https://ip.andreev.it")
Synchronize domain controllers with external time source (NTP)
On the PDC of the domain execute:
w32tm /config /manualpeerlist:0.north-america.pool.ntp.org /syncfromflags:manual /reliable:yes /update
net stop w32time
net start w32time
where 0.north-america.pool.ntp.org is the external time source (NTP server). You can check the list of these servers here.
On non-PDC domain controllers execute:
w32tm /config /syncfromflags:domhier /update
net stop w32time
net start w32time
Prevent root login in SSH
To change this behavior, edit /etc/ssh/sshd_config and change from:
#PermitRootLogin yes
to ->
PermitRootLogin no
Now, restart the sshd daemon and log remotely using a regular user and then su – to switch to root.
Get BIOS serial number from command prompt
Works remotely.
wmic /node:[remote computer name] bios get serialnumber
Gnome on OpenBSD 4.2
Very simple…
export PKG_PATH=ftp://ftp.openbsd.org/pub/OpenBSD/4.2/packages/i386/
pkg_add gnome-desktop-2.18.2p0.tgz
pkg_add gnome-session-2.18.2p0.tgz
echo ‘exec gnome-session’ >> ~/.xinitrc
startx
Text/CSV file – Delete lines based on a value
I made a PowerShell script that scanned multiples subnets and generated about 130,000 lines of text. About 120,000 of these lines were not needed. Because the output was a CSV file, it was logical that I use Excel to delete these lines. But the macro that I used took forever and after one hour, it just stopped working. CSV is a text file, so I used Notepad++ to edit the file.
In order to delete the whole line that contained “NO RESPONSE” (in my case), I used Edit | Replace or Ctrl-H.
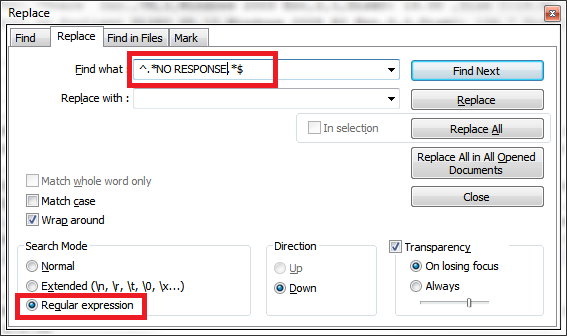
This replacement will delete all lines that contain the string “NO RESPONSE”. The syntax is ^.*YOUR_STRING.*$ and do not put nothing for “Replace with:” value. Make sure “Regular expression” is selected. The only problem is that these lines will be gone, but you’ll have empty lines now. In order to get rid of these lines, head to TextFX home page at SourceForge. Download this Notepad++ plugin, unzip the archive and put the DLL under C:\Program Files\Notepad++\plugins folder. Once you restart Notepad++, you’ll see a new menu called…TextFX. Select everything (Ctrl-A), then TextFX | TextFX Edit | Delete blank lines.
Upgrading VMware Tools fails on Windows Server 2008 with the message “Error 1316. A network error occured while attempting to read from the file C:\Windows\Installer\VMware Tools.msi”
I cloned one VM from an ESXi 4.0 host to an ESXi 5.0 U1. When I tried to upgrade the VM tools (interactively), I got an error saying “Error 1316. A network error occured while attempting to read from the file C:\Windows\Installer\VMware Tools.msi”.

At this point, just click OK, open a command prompt with Administrator’s privileges and type:
C:\users\username> D:
D:> setup /c
This command will delete some orphaned registry entries and after the command completes, which is less then a second, just do your standard VM tools upgrade by double-clicking the setup.exe icon.
Source: VMware KB 1012693
Fedora 18: Configure Wireless on Latitude E6400
I’ve installed the latest Fedora 18 64-bit on Dell Latitude E6400, but the wireless wasn’t working. After some research, I’ve found this website that explains how to install the drivers. In my case it was simple:
yum install kmod-wl
service NetworkManager restart
Of course, you need a wired connection to do that, othwerise you have to manually transfer the files manually. In addition, if downloading the dependency files is extremely slow, cancel the install and do:
yum install yum-plugin-fastestmirror
Find MAC address for the iLO NIC adapter
ssh to the iLO’s IP address and do:
show /map1/enetport1
This is how the output looks like.
status=0
status_tag=COMMAND COMPLETED


/map1/enetport1
  Targets
    lanendpt1
  Properties
    Autosense=yes
    PermanentAddress=00:1a:4b:e6:b0:ea
    LinkTechnology=Ethernet
    Speed=100 Mbits/s
    SystemName=your_host_name
    FullDuplex=yes
  Verbs
    cd version exit show set
Windows 2012R2 Upgrade fails with CRITICAL_STRUCTURE_CORRUPTION
I had to upgrade a Windows 2008R2 server to Windows 2012R2. The server was a VM running on a ESXi 5.0 Update 1 host. The upgrade failed with CRITICAL_STRUCTURE_CORRUPTION error.

The solution is to upgrade the ESXi host first to ESXi 5.0 Update 3 or use this workaround as described here.
1.Power down the virtual machine.
2.Right-click the virtual machine.
3.Click Edit Settings.
4.Click the Options tab.
5.Select CPUID Mask under Advanced.
6.Click Advanced.
7.Under the Register column, locate the edx register under Level 80000001.
8.Paste this into the Value field:
----:0---:----:----:----:----:----:----
9.Click OK.
10.Click OK to close the virtual machine properties.
Run PowerShell script as a scheduled task that uses Excel COM object
I made a small PowerShell script that reads an Excel file from SharePoint, converts it to CSV and does some calculations. The script was working fine, but when I tried to run the script as a scheduled task, the Excel->CSV conversion never happened. This is part of the code.
# Converts the Excel file. Excel must be installed. The output is MASTER-INVENTORY.csv
$xlCSV=6
$Excelfilename = $Path
$CSVfilename = "C:\Scripts\CheckIfBackupExists\MASTER-INVENTORY.csv"
$Excel = New-Object -comobject Excel.Application
$Excel.Visible = $False
$Excel.displayalerts=$False
$Workbook = $Excel.Workbooks.Open($ExcelFileName)
$Workbook.SaveAs($CSVfilename,$xlCSV)
$Excel.Quit()
If(ps excel){kill -name excel}
This code never executed properly when scheduled. I’ve found this solution to be the simplest.
For a 32 bit OS, create a folder called c:\Windows\System32\config\systemprofile\Desktop and for a 64-bit OS create both c:\Windows\System32\config\systemprofile\Desktop and c:\Windows\SysWOW64\config\systemprofile\Desktop.
Send SNMP trap to HP-SIM from command prompt
From time to time HP-SIM stops working and the only way to resolve this issue is to restart the HP-SIM service. In order to know when that’s going to happen, I am using this scheduled script to send a test trap to HP-SIM. If HP-SIM is properly configured, it will send an e-mail with “Generic Trap” in the subject. If something is wrong with HP-SIM, you won’t receive this email, which means it’s time to restart the HP-SIM service.
First, download trapgen from here. Then execute this command.
C:\> trapgen -d <servername> -c public -o 1.3.6.1.4.1.232 -g 6 -s 11003
If everything works fine, you can create a batch file and then do your scheduling tasks.
Power on/off HP servers remotely using plink
To be able to change the power state of the servers, we’ll use plink. plink allows you to SSH to the server and send a command, the one that you usually type in.
So, it’s really simple, just create a batch file and add one or more of these commands for multiple servers.
plink -pw ilo_pwd "ilo_username@ilo_ip_or_hostname" "power on"
or
plink -pw ilo_pwd "ilo_username@ilo_ip_or_hostname" "power off"
where ilo_pwd and ilo_username are the credentials that you use to log to iLO GUI and ilo_ip_or_hostname is the IP or the hostname of the iLO.
NOTE: The power off command will do hard power off, so the OS running won’t be aware of that. Make sure the OSes are properly shut down to avoid any corruption.
Powershell: Change SNMP settings on a remote server
Recently, I built a new HP-SIM server and I had to change the SNMP settings on 1000+ servers to send the traps to a new destination. Here is a script that I made. It should be self-explanatory.
# Powershell to configure SNMP - K.Andreev 20141117
# Usage: ./SetSNMP.ps1 -server <server_name> -community <community_string> -target <target_hostname> -test $true/$false
# Adds target_hostname as a SNMP target, community_string as SNMP string on the server server_name
# If parameter -test is $true, nothing is added to the registry. If you ommit the parameter, nothing is added as well

param(
[string]$server = "",
[string]$community = "",
[string]$target = "",
[bool]$test = $true
)

if (($server -eq "") -or ($community -eq "") -or ($target -eq "")){
	Write-Host "-------------------------------"
	Write-Host "Kliment Andreev - November 2014"
	Write-Host "-------------------------------"
	Write-Host "Usage: ./SetSNMP.ps1 -server <server_name> -community <community_string> -target <target_hostname> -test true/false"
	Write-Host "Adds target_hostname as a SNMP target, community_string as SNMP string on the server server_name"
	Write-Host "If parameter -test is $true, nothing is added to the registry"
	Write-Host ""
	exit
}
try {
	$check = Get-WMIObject Win32_Service -ComputerName $server -ErrorAction Stop | Where-Object {$_.name -eq "SNMP"}
}
catch {
	$Exception = $_
    Write-Host "SNMP not installed on" $server ", exception: $($_.Exception.Message)" -ForegroundColor Red
}
if ($check.Status -eq "OK") {
	Write-Host "SNMP installed on" $server", proceeding with configuration..." -ForegroundColor Green
	$objReg = [Microsoft.Win32.RegistryKey]::OpenRemoteBaseKey('LocalMachine', $server)

	# Tab Security, Accept SNMP packets from these hosts
	Write-Host "Accept packets from these hosts:" -ForegroundColor Yellow
	$Values_counter = 1
	$objRegKeyPM = $objReg.OpenSubKey("SYSTEM\\CurrentControlSet\\Services\\SNMP\\Parameters\\PermittedManagers",$true)
	$Duplicate = $false
	while ($true) {
		$value = $objRegKeyPM.GetValue($Values_counter.ToString())
		if ($value -eq $target) {
			$Duplicate = $true
			}
		if ($value -eq $null) {break}
		Write-Host `t $value -ForegroundColor White
		$Values_counter++
	}
	if (!$Duplicate) {
		Write-Host "===> Adding" $Values_counter $target "to HKLM\..\SNMP\Parameters\PermittedManagers"-ForegroundColor Green
		if (!$test) {$objRegKeyPM.SetValue($Values_counter.ToString(), $target)}
		} else {
		Write-Host $target "already exists." -ForegroundColor Red
		}
	$devnull = $objRegKeyPM.Close

	# Tab Security, Accepted Community Names
	Write-Host "Accepted Community Names:" -ForegroundColor Yellow
	$objRegKeyVC = $objReg.OpenSubKey("SYSTEM\\CurrentControlSet\\Services\\SNMP\\Parameters\\ValidCommunities",$true)
	$Duplicate = $false
	foreach($value in $objRegKeyVC.GetValueNames()){
		Write-Host `t $value, $objRegKeyVC.GetValue($value).ToString()
		if ($value -eq $community){
			$Duplicate = $true
		}
	}
	if (!$Duplicate) {
		Write-Host "===> Adding " $community "to HKLM\..\SNMP\Parameters\ValidCommunities" -ForegroundColor Green
		if (!$test) {$objRegKeyVC.SetValue($community, 8)}
		} else {
		Write-Host $community "already exists." -ForegroundColor Red
		}
	$devnull = $objRegKeyVC.Close

	# Tab Traps, Community Name
	$objRegKeyCN = $objReg.OpenSubKey("SYSTEM\\CurrentControlSet\\Services\\SNMP\\Parameters\\TrapConfiguration",$true)
	$devnull = $objRegKeyCN.CreateSubKey($community)
	$devnull = $objRegKeyCN.Close

	# Tab Traps, Trap Destinations
	Write-Host "Trap destinations:" -ForegroundColor Yellow
	$Values_counter = 1
	$strKey = "SYSTEM\\CurrentControlSet\\Services\\SNMP\\Parameters\\TrapConfiguration\\"
	$strKeyTD = $strKey + $community
	$objRegKeyTD = $objReg.OpenSubKey($strKeyTD,$true)
	$Duplicate = $false
	foreach($value in $objRegKeyTD.GetValueNames()){
		$value_name = $objRegKeyTD.GetValue($value).ToString()
		Write-Host `t $value, $value_name
		$Values_counter++
		if ($value_name -eq $target){
			$Duplicate = $true
		}
	}
	if (!$Duplicate) {
		Write-Host "===> Adding" $values_counter $target "to HKLM\..\SNMP\Parameters\TrapConfiguration\"$community -ForegroundColor Green
		if (!$test) {$objRegKeyTD.SetValue($Values_counter.ToString(), $target)}
		} else {
		Write-Host $target "already exists." -ForegroundColor Red
		}
	$devnull = $objRegKeyTD.Close
	$devnull = $objReg.Close
}
SSH public-key authentication for scp
I had to copy a file between two hosts using scp and it prompted me for a password. scp does not allow you to specify the password in a command line. So, here is a quick way to establish a trust between two hosts.
We’ll assume that user-A on host-A is copying a file to the home folder of user-B on host-B.
On host-A, logged as user-A create the private/public key pair.
ssh-keygen
You should see something like this. Do not enter a passphrase.
Generating public/private rsa key pair.
Enter file in which to save the key (/home/user-A/.ssh/id_rsa):
Enter passphrase (empty for no passphrase):
Enter same passphrase again:
Your identification has been saved in /home/user-A/.ssh/id_rsa.
Your public key has been saved in /home/user-A/.ssh/id_rsa.pub.
The key fingerprint is:
98:c4:fe:aa:ff:aa:bb:11:b4:3b:7a:94:1f:ac:c4:0f user-A@host-A
The key's randomart image is:
+--[ RSA 2048]----+
|                 |
|       .  .  . o |
|  AA  . . C . Y  |
|       + =   o o |
|      . X   . o  |
|         . & . . |
|        Y o B o  |
|         + o = . |
|          V . .  |
+-----------------+
You’ll have two files (/home/user-A/.ssh/id_rsa) which is your private key and (/home/user-A/.ssh/id_rsa.pub) which is your public key. Copy your public key to host-B.
cat ~/.ssh/id_rsa.pub | ssh user-A@host-B 'cat >> ~/.ssh/authorized_keys'
If you get access denied, just copy id_rsa.pub file to the home folder of user-B on host-B under the .ssh folder and append it to the authorized_keys file. If this file doesn’t exist, create it.
Once you are done, you can copy the files from host-A using:
scp somefiles.* user-B@host-B:
PowerShell, plink & HP c7000 chassis
Recently I was looking for a way to see how much memory I have installed on 16 blades that I have in a HP c7000 chassis. These blades are a mix of Windows and ESXi so a script that would cover both is not feasible. But, HP c7000 has a CLI that allows us to see how much memory each blade has.
We’ll use plink to sent this command to the chassis and run the whole thing from PowerShell so we can do string manipulation.
Open PowerShell, make sure that plink is in your PATH or specify the full path to plink and run:
$output = plink -pw "password_for_the_chassis" "username_for_the_chassis@chassis_hostname" "show server info all"
If everything is OK, you shouldn’t see any output. Do:
$output | select-string -pattern "Memory"
… and you should see this.

…or try this to see the IP addresses, CPUs, serial numbers etc…
$output | select-string -pattern "IP Address"
$output | select-string -pattern "CPU"
$output | select-string -pattern "Serial"
$output | select-string -pattern "FlexNIC"
mod_deflate on Apache 2.4
If you are using WordPress like I do, you’ll benefit if you have mod_deflate enabled. This module compresses the content that you specify and delivers it to the end user. Same technique as compressing text file using gzip. Apache 2.4 on FreeBSD already comes with mod_deflate precompiled, but it’s disabled by default.
First, edit /usr/local/etc/apache24/httpd.conf and uncomment the following line.
LoadModule deflate_module libexec/apache24/mod_deflate.so
Next, make sure that you have the following line in the same httpd.conf file.
Include etc/apache24/Includes/*.conf
This line enables httpd.conf to span in multiple files, so we can have our mod_deflate config parameters in a separate file. Go to /usr/local/etc/apache24/Includes and create a file called mod_deflate.conf. Add the following and save.
AddOutputFilterByType DEFLATE text/html text/plain
#Highest 9 - Lowest 1
DeflateCompressionLevel 9

#Optional
#Skip browsers with known problems
BrowserMatch ^Mozilla/4 gzip-only-text/html
BrowserMatch ^Mozilla/4\.0[678] no-gzip
BrowserMatch \bMSIE !no-gzip !gzip-only-text/html

#Optional
#Logging
DeflateFilterNote ratio
LogFormat '"%r" %b (%{ratio}n) "%{User-agent}i"' deflate
CustomLog /var/log/deflate_log deflate
You can see what each line means, here. Make sure you don’t compress JPG, PNG, MP3 or PDF files. These files are already compressed and you’ll just make your web page load slower.
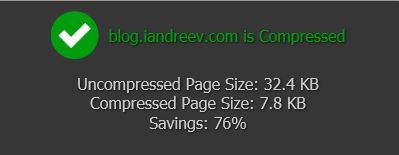
Restart apache with apachectl graceful and that’s it. If you want to see how much bandwidth you are saving, go to this page and enter your URL.
git – quick cheat sheet
Create a new repo at www.github.com called New-Project or Whatever. Install the git client on your local PC (e.g yum install git for CentOS/RedHat or pkg install git for FreeBSD). Download the client for Windows from https://git-scm.com/.
Once you have your project ready, type
git init
git add .
git commit -m "Final production code"
git remote add origin http://www.github.com/your_username/New-Project
git push origin master
If you get an error when you try to push, pull the changes from the master first.
git pull origin master