
Table of Contents
Install go (golang) on Rocky Linux 8
As the user developing in Go, remove if you have any old versions. On new installs, not needed.
sudo yum module -y remove go-toolset
Download the latest version and make it executable.
wget https://storage.googleapis.com/golang/getgo/installer_linux
chmod +x ./installer_linux
Run the installer.
./installer_linux
You’ll get a message …One more thing! Run source …. Do as it says, run the source command.
Test with go version.
Add entries under Windows 11 Terminal
Go to %LOCALAPPDATA%\Packages\Microsoft.WindowsTerminal_8wekyb3d8bbwe\LocalState folder and open settings.json file. Under the “list” section, add a new entry. Here is an example with opacity and background image for SSH access with a key. Go to this site, generate a GUID and replace the value.
            {
                "backgroundImage": "C:\\Some-Folder\\wallpaper.jpg",
                "backgroundImageOpacity": 0.25,
                "commandline": "ssh -i \"C:\\Random-Folder\\keys\\MyKeyPair.pem\" [email protected]",
                "guid": "{dee15512-fc2f-416d-ac0f-961378b46f6e}",
                "hidden": false,
                "name": "Name-in-the-dropdown-list"
            },
Install Office 365 using Office Deployment Tool
1) Download Office Deployment Tool
2) Run and extract somewhere
3) Go to this link and configure your settings
4) In my case I used:
-
– 64-bit Business Apps
– No Visio and Project
– Current channel
– Latest
5) Choose the apps that you want installed
6) Check the other settings, pretty much default
7) Click Export to download an XML file and put this file in the same folder as the Office Deployment Tool
8) From an admin command prompt type setup.exe /download <filename.xml>
9) The previous command will download the whole Office suite. You’ll see an Office folder in the same directory where ODT tool is installed.
10) Finally type setup.exe /configure <filename.xml>
Non-functional requirements
Non-functional requirements (NFRs), also known as quality attributes or system qualities, are essential aspects of software development that describe how a system should perform rather than what it should do. These requirements help ensure that the application meets certain performance, security, scalability, and usability standards. Here are some common categories of non-functional requirements for an application:
Performance:
- Response Time: Define the maximum allowable response times for different operations or transactions.
- Throughput: Specify the number of transactions or operations the system should handle per unit of time.
- Scalability: Describe how the application should scale to accommodate increased load.
Reliability:
- Availability: Define the percentage of time the system should be available for use.
- Fault Tolerance: Specify how the system should handle and recover from failures.
- Recovery: Describe the time and methods required to recover from failures or disasters.
Security:
- Authentication and Authorization: Define how users are authenticated and what actions they are authorized to perform.
- Data Encryption: Specify the encryption standards for data in transit and at rest.
- Access Control: Describe how sensitive data and system resources are protected from unauthorized access.
Usability:
- User Interface: Define the user interface design principles, accessibility standards, and usability guidelines.
- User Experience: Specify user interaction and navigation expectations.
Scalability and Capacity:
- Load Handling: Describe how the system should handle increasing loads, such as more users or data.
- Resource Utilization: Specify the maximum acceptable resource utilization, such as CPU, memory, and storage.
Maintainability:
- Modifiability: Describe how easily the system can be modified or extended.
- Code Quality: Specify coding standards, code documentation, and code review processes.
Interoperability:
- Integration Standards: Define how the application should interact with other systems or platforms.
- Data Format Compatibility: Specify data exchange formats and protocols.
Compliance and Legal Requirements:
- Regulatory Compliance: Ensure that the application complies with relevant laws and regulations.
- Data Privacy: Specify how sensitive data is handled to comply with data protection regulations.
Performance Metrics and Monitoring:
- Logging and Monitoring: Describe the logging and monitoring requirements for tracking system performance and errors.
- Alerting: Define the conditions that trigger alerts or notifications for system administrators.
Localization and Internationalization:
- Localization: Specify requirements for adapting the application to different languages and regions.
- Internationalization: Define design principles that enable easy adaptation to different languages and regions.
Operational Requirements:
- Deployment: Describe how the application should be deployed, including hardware and software requirements.
- Business Continuity: Specify backup and recovery procedures.
- RACI model: Define who is responsible, accountable, consulted and informed for the application components.
Documentation:
- User Documentation: Describe user manuals, help guides, and other user-facing documentation.
- Technical Documentation: Specify technical documentation for developers, including APIs and system architecture.
These non-functional requirements are crucial for defining the overall quality and performance of an application, and they help guide the development, testing, and deployment processes to ensure that the system meets its intended goals and functions effectively in its operational environment. The specific NFRs for an application will vary based on its unique requirements and context.
Reference your own public IP in Terraform group
If you want to add your own home IP to a security group, e.g. you want to restrict access to an instance for your home computer only, this is the Terraform script.
data "http" "myip" {
  url = "http://ipv4.icanhazip.com"
}

module "instance_security_group" {
  source  = "terraform-aws-modules/security-group/aws"
  version = "5.1.0"

  name    = "sgInstances"
  vpc_id  = module.vpc.vpc_id

  ingress_with_self = [{
    rule = "all-all"
  }]

  ingress_with_cidr_blocks = [
    {
      rule        = "ssh-tcp"
      cidr_blocks = "${chomp(data.http.myip.response_body)}/32"
    },
  ]
}
Update AWS EKS cluster in kubeconfig
aws eks update-kubeconfig --name <cluster_name>
AWS SSO token expiration
If you receive an e-mail that your IdP token expires (“We’re contacting you because you automatically provision users and groups from your corporate identity provider (IdP) to IAM Identity Center, a process which uses the SCIM protocol (System for Cross-domain Identity Management). The SCIM access token used to automatically provision users and groups from your IdP to IAM Identity Center expires in 82 days on Fri Jan 05 13:40:46 UTC 2024.”), do the following:
- Log to the Master Account for your Org
- Go to IAM Identity Center
- Click Settings on the left and Manage token on the right.
- Click Generate Token
Verify that the token works and then delete the old one.
Dynamic auto-provisioning of persistent volumes and claims on a bare-metal Kubernetes server
If you have a bare-metal or VM running Kubernetes and you need some dynamic provisioning of persistent volumes and persistent volume claims on an NFS server, read further.
Install NFS CSI driver for Kubernetes.
curl -skSL https://raw.githubusercontent.com/kubernetes-csi/csi-driver-nfs/v4.4.0/deploy/install-driver.sh | bash -s v4.4.0 --
Install the nfs-subdir-external-provisioner.
helm repo add nfs-subdir-external-provisioner https://kubernetes-sigs.github.io/nfs-subdir-external-provisioner/
helm install nfs-subdir-external-provisioner nfs-subdir-external-provisioner/nfs-subdir-external-provisioner \
    --set nfs.server=x.x.x.x \
    --set nfs.path=/exported/path
It creates a storage class for you.
kubectl get sc
NAME         PROVISIONER                                     RECLAIMPOLICY   VOLUMEBINDINGMODE   ALLOWVOLUMEEXPANSION   AGE
nfs-client   cluster.local/nfs-subdir-external-provisioner   Delete          Immediate           true                   2d3h
Check the docs.
You need the nfs-utils on nfs-tools installed on the underlying OS. Otherwise, you’ll get an error in the pods saying that mount nfs can not be found or something like that.
Anytime there is a need for storage, just specify the storageClass as nfs-client in the manifest. The volumes and claims will be provisioned for you automatically.
If you use NFSv4 use the root as exported path, e.g. –set nfs.path=/
NFSv4 on FreeBSD
Add these in /etc/rc.conf
rpcbind_enable="YES"
nfs_server_enable="YES"
mountd_enable="YES"
nfsv4_server_enable="YES"
nfsv4_server_only="YES"
This is the /etc/exports file
V4: /nfs -network 192.168.1.0/24
/nfs -network 192.168.1.0/24
Mount from Linux.
sudo mount -t nfs -o vers=4.0 192.168.1.26:/ /mnt
Install Kube Prometheus stack on NFS and behind ngninx ingress on MetalLB load balancer
You need MetalLB and nginx ingress for this. Read here.
helm install -f kps-custom.yaml kps prometheus-community/kube-prometheus-stack -n monitoring
File kps-custom.yaml.
prometheus:
  prometheusSpec:
    storageSpec:
     volumeClaimTemplate:
       spec:
         storageClassName: nfs-client
         accessModes: ["ReadWriteOnce"]
         resources:
           requests:
             storage: 10Gi
alertmanager:
  alertmanagerSpec:
      storage:
        volumeClaimTemplate:
          spec:
            storageClassName: nfs-client
            accessModes: ["ReadWriteOnce"]
            resources:
                requests:
                  storage: 10Gi
Create a MetalLB load balancer.
kubectl expose deployment kps-grafana --port 80 --target-port 3000 --name=grafana-lb --type=LoadBalancer -n monitoring
or with a manifest.
apiVersion: v1
kind: Service
metadata:
  name: example-service
  namespace: monitoring
spec:
  selector:
    app: kps-grafana
  ports:
    - port: 80
      targetPort: 3000
  type: LoadBalancer
Username and password: admin / prom-operator
If you want to use nginx ingress on already configured MetalLB load balancer, there is no need to do kubectl expose deployment kps-grafana…Just add these lines at the end of kps-custom.yaml and update the chart.
grafana:
  ingress:
    enabled: true
    ingressClassName: nginx
    annotations: {}
      # kubernetes.io/ingress.class: nginx
      # kubernetes.io/tls-acme: "true"
    labels: {}
    hosts:
      - grafana.iandreev.com

    ## Path for grafana ingress
    path: /

    ## TLS configuration for grafana Ingress
    ## Secret must be manually created in the namespace
    ##
    tls: []
    # - secretName: grafana-general-tls
    #   hosts:
    #   - grafana.example.com
Install KubeCost on NFS
Install KubeCost and MetalLB load balancer. You need MetalLB and nginx ingress for this. Read here.
helm install kubecost kubecost/cost-analyzer -n kubecost  --set kubecostToken="aGVsbUBrdWJlY29zdC5jb20=xm343yadf98" \
--set prometheus.server.persistentVolume.storageClass=nfs-client --set persistentVolume.storageClass=nfs-client
kubectl expose deployment kubecost-cost-analyzer --port 80 --target-port 9090 --name=kubecost-lb --type=LoadBalancer -n kubecost
The commands above are enough to create Kubecost deployment and a MetalLB load balancer. If you want nginx ingress read further.
If you already have nginx ingress, skip the last line and do the following. The username/password is optional, but if you are exposing kubecost publicly, then you want some type of authentication.
sudo dnf install httpd-tools
httpasswd -c auth admin
The commands above will download httpd-tools and then prompt you to create a password for the admin as user. The output is written in a file called auth.
Create a Kubernetes secret from that file. You can delete the file, it’s not needed anymore after the command below.
kubectl create secret generic kubecost-basic-auth --from-file=auth -n kubecost
Check if everything looks OK.
kubectl get secret kubecost-basic-auth -o yaml -n kubecost
apiVersion: v1
data:
  auth: YWW46Jsomethinghere!$#ASEDFdwasfasWESDCAVsdcewqEwyMAo=
kind: Secret
metadata:
  creationTimestamp: "2023-10-26T17:24:47Z"
  name: kubecost-basic-auth
  namespace: default
  resourceVersion: "3561042"
  uid: 8ad981c2-4a4d-4488-9a38-9873286f4efa
type: Opaque
Create this file. I named it kubecost-ingress-auth.yaml. Specify the secret name at line 8 and your FQDN at line 13.
apiVersion: networking.k8s.io/v1
kind: Ingress
metadata:
  name: kubecost
  namespace: kubecost
  annotations:
    nginx.ingress.kubernetes.io/auth-type: basic
    nginx.ingress.kubernetes.io/auth-secret: kubecost-basic-auth
    nginx.ingress.kubernetes.io/auth-realm: 'Authentication Required - kubecost'
spec:
  ingressClassName: nginx
  rules:
  - host: kubecost.iandreev.com
    http:
      paths:
      - path: /
        pathType: Prefix
        backend:
          service:
            name: kubecost-cost-analyzer
            port:
              number: 9090
#  tls:
#  - hosts:
#      - kubecost.your.com
#    secretName: kubecost-tls
# Use any cert tool/cert-manager or create manually: kubectl create secret tls kubecost-tls --cert /etc/letsencrypt/live/kubecost.your.com/fullchain.pem --key /etc/letsencrypt/live/kubecost.your.com/privkey.pem
Then create the ingress.
kubectl apply -f kubecost-ingress-auth.yaml
Connect to a remote Kubernetes cluster/Merge config files
- Make a backup of the current .kube/config file
- Transfer the config file from the remote cluster to the local machine and save it as config_new
-
Run this command:
KUBECONFIG=~/.kube/config:~/.kube/config_new kubectl config view --flatten > ~/.kube/config
- Install kubectx tool and run it without any parameters
- Switch to the remote cluster using kubectx some_name
Ubuntu 22 – Change from DHCP to static IP, change hostname
As root or sudo create or edit /etc/netplan/01-netcfg.yaml file.
Add these lines to specify the network card (line 5), IP and subnet mask (line 7), DNS (line 9) and the gateway (line 12).
network:
    version: 2
    renderer: networkd
    ethernets:
        eth0:
            addresses:
                - 192.168.1.212/24
            nameservers:
                addresses: [8.8.8.8, 8.8.4.4]
            routes:
                - to: default
                  via: 192.168.1.1
Change the hostname using:
sudo hostnamectl set-hostname pihole.homelab.local
Edit /etc/hosts and change the 2nd localhost line to specify FQDN.
127.0.0.1 localhost
127.0.1.1 pihole.homelab.local

# The following lines are desirable for IPv6 capable hosts
::1     ip6-localhost ip6-loopback
VMWare Tools on CentOS/Rocky Linux/Red Hat
dnf install open-vm-tools
For desktop use open-vm-tools-desktop
Passwordless login
- Do ssh-keygen on the client machine
- From the client machine do ssh-copy-id user@ip-hostname-of-the-server or copy id_rsa.pub to .ssh/authorized_keys on the SSH server
Resize FreeBSD ZFS partition
Find the disk from the pool.
zpool status
  pool: zroot
 state: ONLINE
config:

        NAME        STATE     READ WRITE CKSUM
        zroot       ONLINE       0     0     0
          da0p3     ONLINE       0     0     0

errors: No known data errors
In my case the disk is da0. The partition is da0p3.
Check the size of the disk. You should see the extra space added (4G).
gpart show
=>      40  25165751  da0  GPT  (12G)
        40      1024    1  freebsd-boot  (512K)
      1064       984       - free -  (492K)
      2048   4194304    2  freebsd-swap  (2.0G)
   4196352  12578816    3  freebsd-zfs  (6.0G)
  16775168   8390623       - free -  (4.0G)
If you see that the GPT says corrupt, execute gpart recover da0.
Resize the 3rd partition freebsd-zfs.
gpart resize -i 3 -s 10200M da0
Check the pools.
zpool list
If the size didn’t change, resize the pool where zroot is the name of the pool and da0p3 is the name of the partition. Get them with zpool status.
zpool online -e zroot da0p3
If you do zpool list this time, you’ll see that the partition was resized.
If you want for the pool to auto expand next time, you have to change the setting.
zpool set autoexpand=on zroot
If you this, next time you resize the partition with gpart, you won’t have to do zpool online command.
Node.js update on Ubuntu
Check all Node.js editions.
nvm list-remote
Check current running.
node --version
Also…
nvm list
Update from the remote-list. It automatically switches to default.
nvm install v20.11.0
Use specific version.
nvm use v20.10.0
Increase disk size on Ubuntu 22
Expand the disk space in vCenter or AWS Console. Boot up and type cfdisk.
Select the partition which size you want to increase and select Resize.
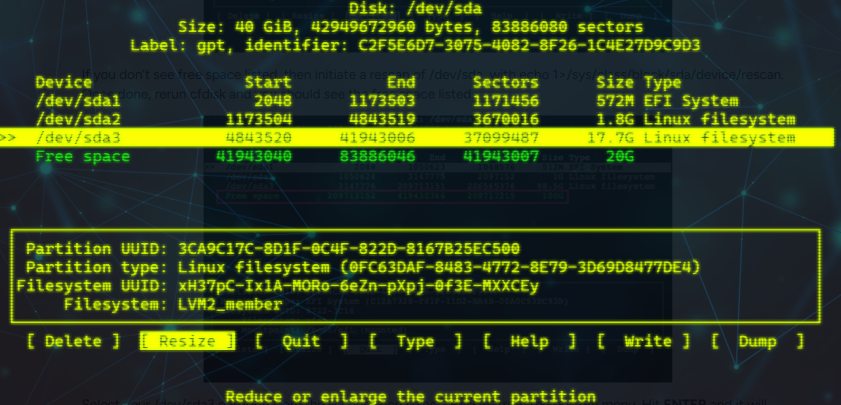
Then select Write and confirm. Exit the tool.
Because we added the free space to /dev/sda3, we have to resize the physical volume.
pvresize /dev/sda3
Type vgdisplay. You should see that you have extra space under Free PE/Size.
Extend the logical volume with all (100%) available free space.
lvextend -l +100%FREE /dev/mapper/ubuntu--vg-ubuntu--lv
Now resize the filesystem.
resize2fs /dev/mapper/ubuntu--vg-ubuntu--lv
Verify with df -h.
df -h
Filesystem                         Size  Used Avail Use% Mounted on
tmpfs                              197M  1.1M  196M   1% /run
/dev/mapper/ubuntu--vg-ubuntu--lv   37G   15G   21G  43% /
tmpfs                              982M     0  982M   0% /dev/shm
tmpfs                              5.0M     0  5.0M   0% /run/lock
/dev/sda2                          1.7G  253M  1.4G  16% /boot
/dev/sda1                          571M  6.1M  565M   2% /boot/efi
tmpfs                              197M  4.0K  197M   1% /run/user/1000
RDP to an AzureAD (Entra ID) joined computer
If the RDP client computer is also joined to AzureAD (Entra ID) then, most likely you’ll just get prompted for username and password or PIN. You might also want to disable NLA.
REM Disable the Network Level Authentication
reg add "HKLM\SYSTEM\CurrentControlSet\Control\Terminal Server\WinStations\RDP-Tcp" /v UserAuthentication /t REG_DWORD /d 0
If the RDP client is joined to another AD, then you have to add these two lines in the RDP file. Just edit it as a text file.
enablerdsaadauth:i:0
enablecredsspsupport:i:0
If you want to save the password in the RDP file, encrypt your password first.
("SuperSecretPassword01!" | ConvertTo-SecureString -AsPlainText -Force) | ConvertFrom-SecureString;
Then add this line at the end of the RDP file.
password 51:<the output of the previous PowerShell command>