
In this short article I’ll describe briefly how to stream/broadcast from your phone’s camera to the world. In order to do that, you’ll need the Larix Broadcaster app installed on your phone, you will need a server with a public IP and a Haivision Media Gateway installed and for the end users, they’ll need standard VLC Player install.
The Larix Broadcaster app and the VLC player are free, but Haivision Media Gateway is not. In addition, if you have your own server and want to install it as a VM, you’ll have to contact the vendor directly. I’ll use a much easier option and host it in AWS where it comes as a template from the AWS Marketplace.
Table of Contents
Haivision Media Gateway in AWS
In AWS, launch a new instance from the AWS Marketplace and search for SRT. You’ll see several options(SRT Gateway vs. Media Gateway and BYOL as PAYG license). I’ll choose Pay-as-You-Go Media Gateway.

As you can see, the software is not that cheap and you pay as much as you used. So if you are not streaming, just shut down the instance. Another important thing is the size of the instance, how much horse power you need. Is it 2 CPUs, 4 CPUs, 8? Well, nobody knows your needs, but it also depends on what type of stream are you sending, is it going to be a low-res or 1080p, how many users will consume that stream, etc. I strongly suggest that you go over this document. It describes how to size your environment and it gives you practical guidance on how to configure the Media Gateway. It’ not a necessary read to continue with this post, but it’s strongly recommended once you have everything up and running.
OK, in my case I’ll go with a t3.medium instance which is 2 CPUs and 4GB RAM. Create the instance as you normally do, make sure you have a public IP and the ports that are recommended in the security group given are open (22, 80 and 443). Once the instance boots up log with the default username haiadmin and the password is your instance id which is i-0123something.
I won’t go into details what each option does and what each keyword means, I’ll just guide you through creating a route for you to be able to broadcast. So, from the screen that you see, click on the button to add a route.

These are my parameters. For the Route Name, enter a description and make sure the checkmark is checked for Start Route. Further down, enter a description for the Source Name, in my case it’s Larix Cam or whatever you want to put here. The Protocol is TS Over SRT and the port is 50000. The Mode is Listener and the rest are the defaults. As I said earlier, if you want a better throughput, read the SRT deployment guide doc that I’ve sent earlier. It will tell you how to tweak these parameters. So, this tells the Media Gateway to listen on port UDP 50000 for any incoming broadcast.
Now, click on the Destination button.

The Destination is where the broadcast will be distributed. So, you got the point now. A camera on your phone sends the video to our instance in AWS and this instance (Media Gateway) distributes the feed to numerous viewers. You can’t stream from your phone directly, because your phone’s bandwidth and horse power are minuscule, so you need a gateway.
Here is how the Destination looks like.
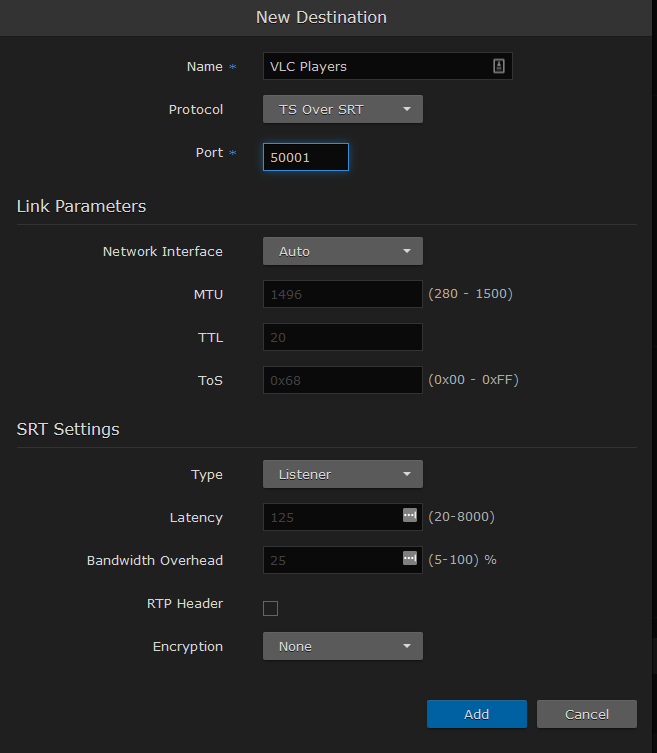
Name the destination however you like, make sure the Protocol is TS over SRT and the Port is 50001. The Media Gateway passes the signal from UDP 50000 (source) to UDP 50001 (destination). Can you use some other ports? Yes, you can as long as they are not the same and greater than 1024 and less than 65535. Change the Type to Listener and leave the rest of the parameters as-is. Again, read the SRT Deployment Guide. Click Add and once you go back, click Create to create the route.
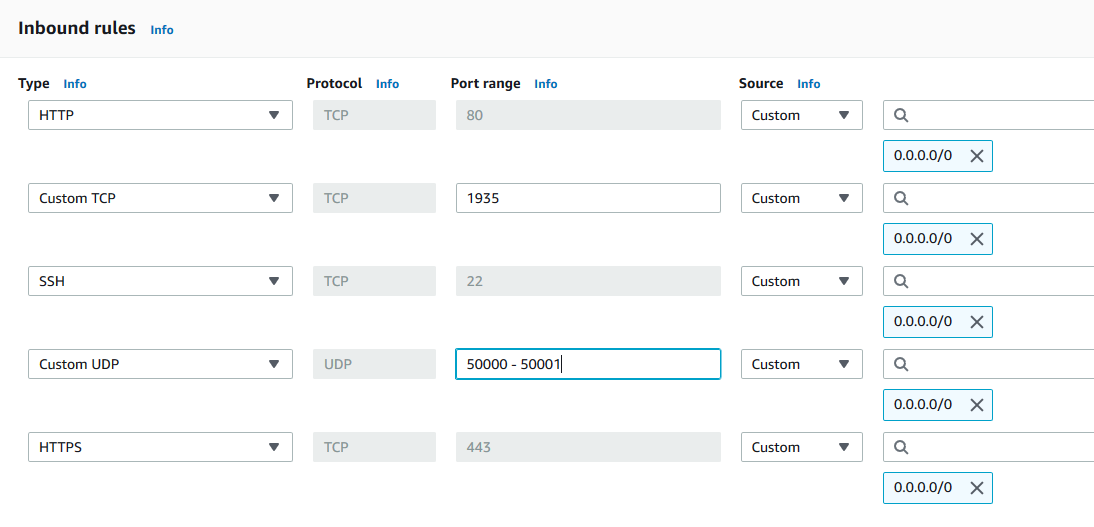
SUPER IMPORTANT: Make sure you edit the security group for this instance and open the ports for the source and destination. In my case, you have to add UDP ports 50000 and 50001 to the rules of the security group.
Larix Broadcaster app
On your phone download this app from Google Play or App Store. Go to Settings (the gear icon), Connections and click on the (+) sign to add a connection.
Enter a name for your connection, and for the URL enter the public IP of your instance and the port of the listener, so it looks like srt://public_IP:port. Make sure you specify srt:// as prefix. The defaults are 640×480 with audio, but you can change that in the settings for the app. Now, that you have a connection, make sure it’s active by selecting it and after that just hit the Record button. If something is not right, you’ll see it right away on your camera. It will tell you that the app can’t connect to the server. And if everything is OK after about 8-10 seconds you’ll see a green dot next to your source in the Media Gateway.

VLC PLayer
There is really nothing much to say here. Go to this website, download and install VLC and from the menu click on Media | Open Network Stream. Enter the IP address of the AWS instance and specify the destination port like srt://public_IP:port. Make sure you specify the destination port, not the source port and the protocol should be srt.
Stream a video file (optional)
In case you want your source to be a video file instead of a camera stream, reconfigure the source or add another route with new source and destination of which the source is RTMP. Configure the source so it looks like this.

From another server send the video stream to the Media Gateway using this command (you need ffmpeg installed).
ffmpeg -re -i video-file.mp4 -c copy -f flv rtmp://media_gateway_ip/live/stream
In VLC, use the srt://media_gateway_ip:port to watch the stream.