
I have written a lot about pfSense and different types of VPN scenarios (AWS, Azure), but never created a post about a site-to-site VPN tunnel with FreeBSD running strongswan and pfSense. The scenario described here works with FreeBSD, but it will work with any other Linux distribution with some small OS dependand changes. The syntax for strongswan is the same, it’s just the configuration file names and locations that are different across distributions. For CentOS, see my other post.
Table of Contents
Prerequisites
Both the pfSense box and FreeBSD need to have public IPs. While it’s possible to have them behind NAT, this scenario only covers configurations with public IPs. You should disable the firewall on FreeBSD. Both of pfSense and FreeBSD box need two network interfaces. In my case this is how it looks like.
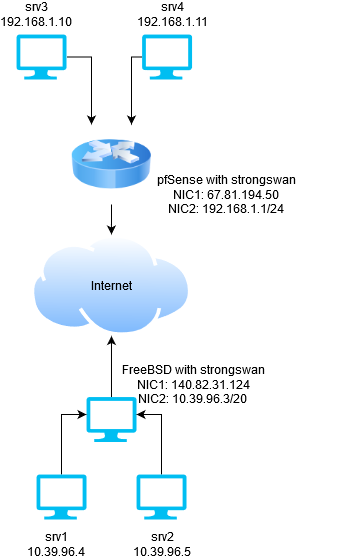
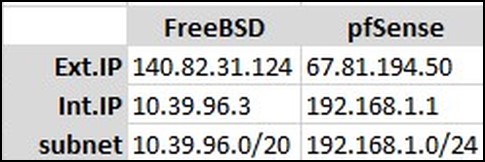
It’s much easier if you enter these values in a small spreadsheet so you don’t get confused later.
FreeBSD configuration
First, we have to install strongswan, configure the 2nd internal NIC if it’s not configured and allow FreeBSD to act as a gateway for other servers behind it (e.g. servers srv1 and srv2).
Install strongswan from packages.
pkg install strongswan
Edit /etc/rc.conf and add this line, so strongswan starts on boot.
strongswan_enable="YES"
While editing that file, add this line too.
gateway_enable="YES"
…and if your internal NIC is not configured, you can assign the IP there too.
ifconfig_vtnet1="inet 10.39.96.3 netmask 255.255.240.0"
where vtnet1 is the name of the NIC. You can see the name of your NIC by doing ifconfig -a.
Next, we’ll configure strongswan. The config files are under /usr/local/etc. Edit ipsec.conf and delete everything then paste these lines.
config setup

conn %default
        ikelifetime=60m
        keylife=20m
        rekeymargin=3m
        keyingtries=1
        authby=secret
        keyexchange=ikev2
        mobike=no

conn net-net
        left=140.82.31.124
        leftsubnet=10.39.96.0/20
        leftid=140.82.31.124
        leftfirewall=no
        right=67.81.194.50
        rightsubnet=192.168.1.0/24
        rightid=67.81.194.50
        ike=aes256-sha256-modp2048!
        esp=aes256-sha256!
        auto=start
        lifetime=1h
If you look at lines 13, 14 and 15 you’ll see that line 13 is the external IP of our FreeBSD box, line 14 is the internal subnet for FreeBSD and line 15 is just a description for this connection. In my case I used the IP. The same applies for lines 17, 18 and 19. Line 17 is the external IP of the pfSense, line 18 is the internal subnet for the resources behind pfSense and line 19 is just an ID for this connection.
NOTE: if you change the IDs, e.g. lines 15 and 19, then you have to change the same in the secrets file.
The secrets file is a password that will be used to communicate between FreeBSD and pfSense. Another option is to use certificates and it’s not that difficult to reconfigure that, but that’s not in this scope. So, edit /usr/local/etc/ipsec.secrets and add this line.
140.82.31.124 67.81.194.50 : PSK "supersecretpassword"
Don’t use tabs. Spaces only or it won’t work. As you can see you are specifying the leftid, then the rightid and some password. PSK means pre-shared key or password. The parameter leftid and rightid in ipsec.conf must be the same with the parameters here. So, if I change the line 14 to be leftid=@freebsd, I have to do the same in ipsec.secrets. I have to specify @freebsd instead of 140.82.31.124.
pfSense
Now that the FreeBSD strongswan box is configured, we can configure pfSense. In pfSense, go to VPN | IPSec from the menu and click on Add P1 button. Fill out the General Information section, so it looks like this.
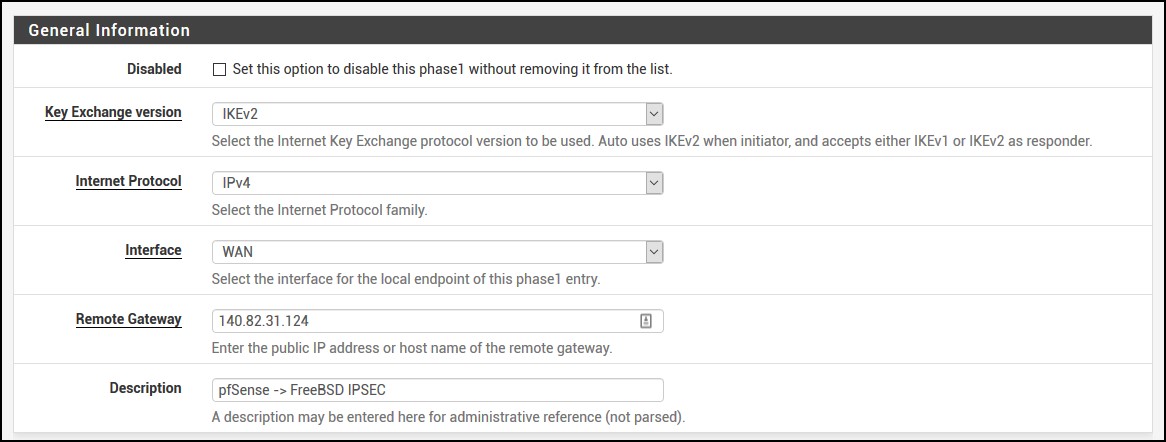
As you can see, we use IKEv2 and our remote gateway is 140.82.31.124 which is the FreeBSD strongswan box.
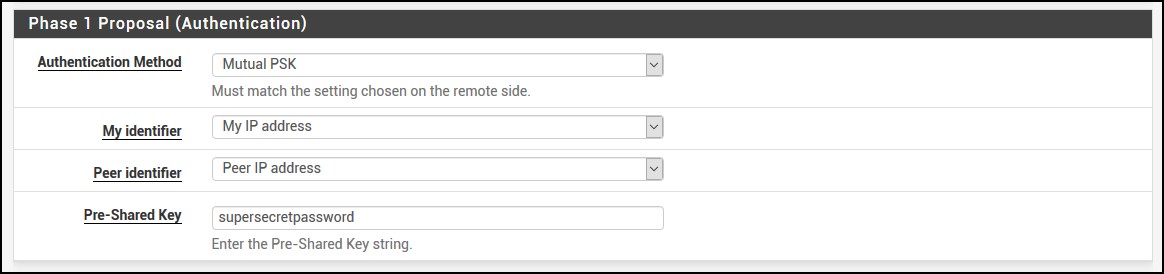
For Phase 1 Proposal (Authentication and Algorithms), fill out the section so it looks like this. The Pre-Shared Key is what you put in /usr/local/etc/ipsec.secrets file, remember?
Then for Phase 1 Proposal (Algorithms), use these values. If you look at your ipsec.conf, you’ll see how they match.

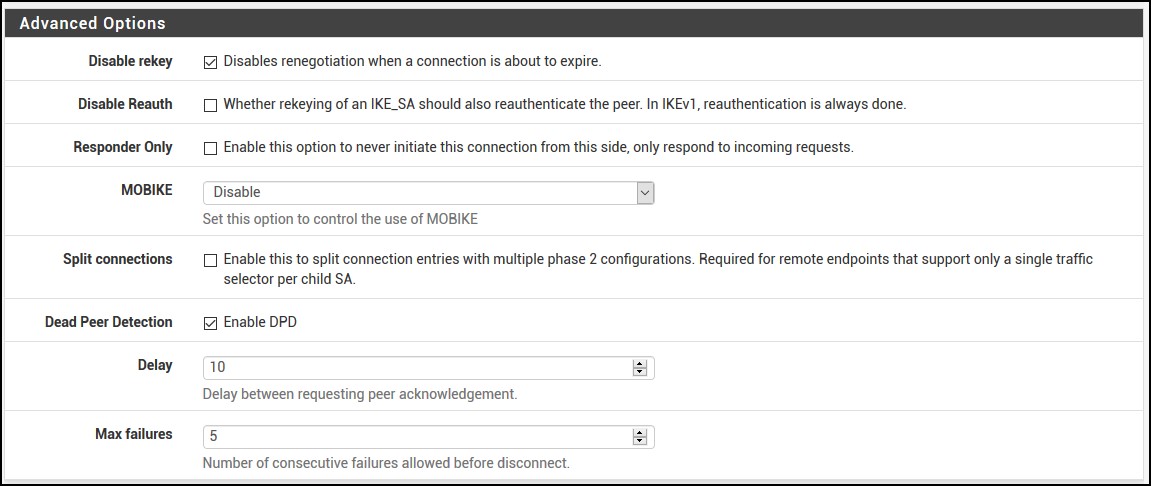
…and use the defaults for the Advanced Options.
Once you click Save at the bottom, pfSense will bring you back. Just click Apply Changes.
Do the phase 2 now, click on Show Phase 2 Entries and then click Add P2.

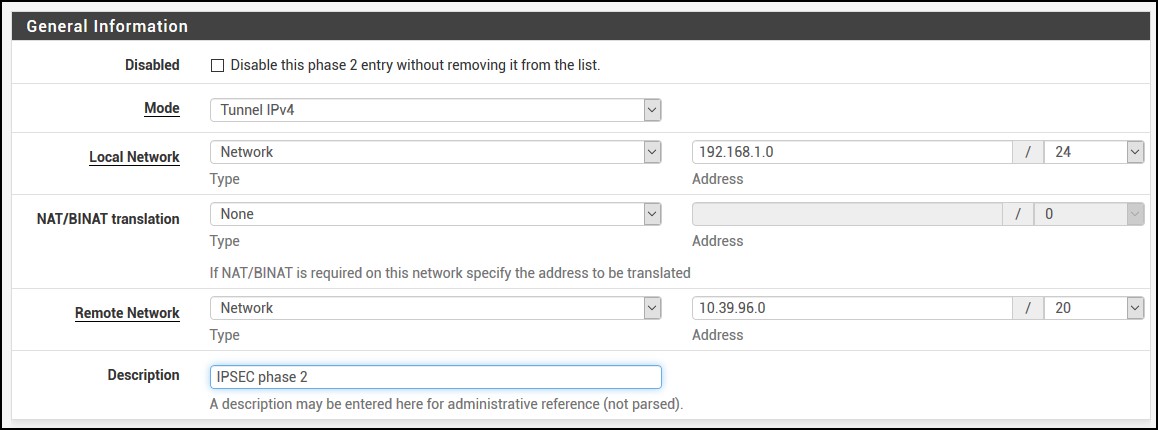
For the phase 2, enter the following information. Choose Network instead of LAN and add the subnets for both pfSense and FreeBSD. In my case it looks like this. Phase 2 is very important because you have to make sure you enter the proper values. One extra checkmark and you’ll be endlessly troubleshooting why it’s not working. So, pay attention please!
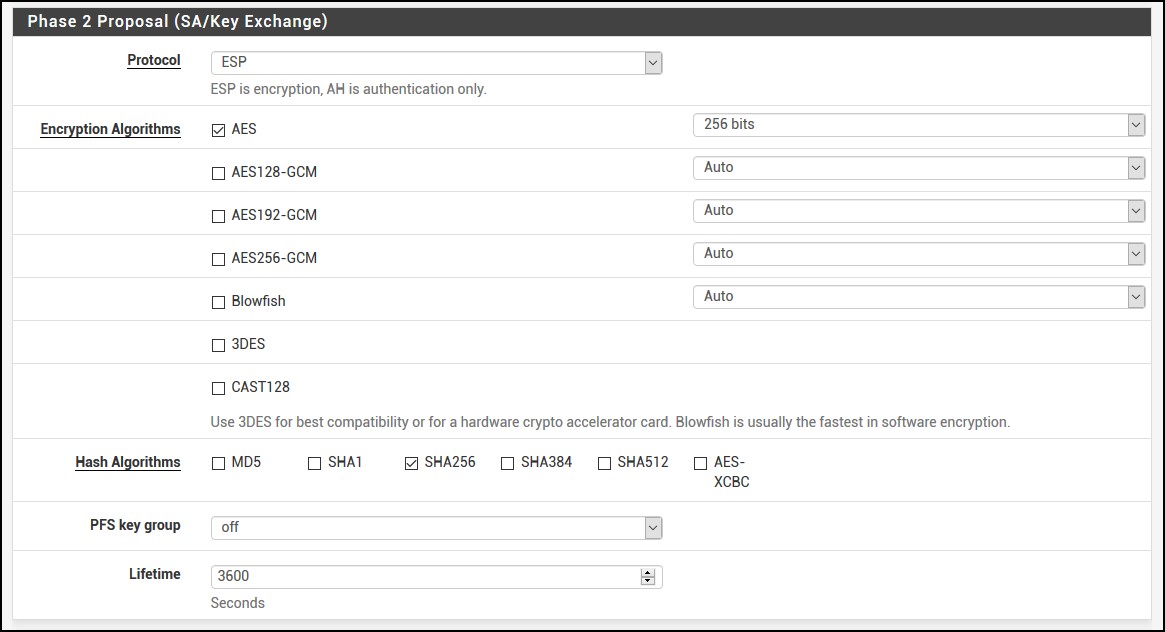
For the Phase 2 Proposal (SA/Key Exchange) i have AES 256 bit instead of Auto and SHA256 instead of SHA1. Lifetime is also 3600.
And you can leave the Advanced Configuration as is. If you notice that your tunnel drops because there is 0 activity, you can enter the IP address of the FreeBSD box or an IP for a server that’s behind FreeBSD. This will send ping ICMP packets to the destination so it keeps the tunnel alive. It’s not necessary, but you never know. Click Save then Apply Changes again.
By default, pfSense will block the IPsec traffic, so you have to enable it. From the menu go to Firewall | Rules and click on IPSec submenu. Click Add and fill out the form so it looks like this.

…and this.

Click Save and go back to the FreeBSD box. Reboot the FreeBSD.
Site-to-site VPN tunnel
Once FreeBSD comes back up, do:
ipsec status
Security Associations (1 up, 0 connecting):
     net-net[1]: ESTABLISHED 8 seconds ago, 140.82.31.124[140.82.31.124]...67.81.194.50[67.81.194.50]
     net-net{1}:  INSTALLED, TUNNEL, reqid 1, ESP SPIs: ca009d9e_i cc8a8b76_o
     net-net{1}:   10.39.96.0/20 === 192.168.1.0/24
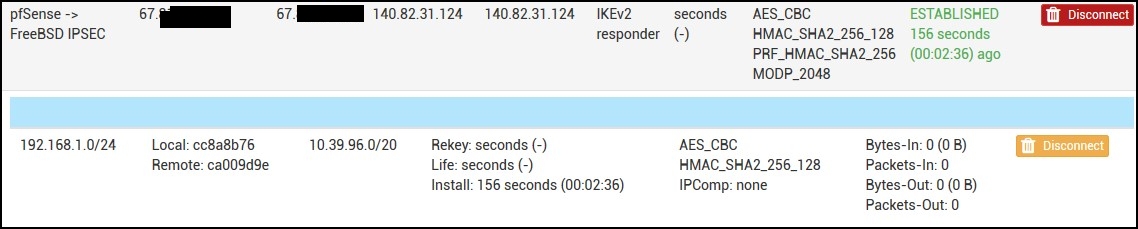
…and if you go to pfSense, under Status | IPsec you can see the tunnel established.
If you try to ping the FreeBSD from a server behind your pfSense, you’ll get a response. But if you try to ping something behind pfSense from the FreeBSD box, it won’t work.
Check the routes in FreeBSD.
netstat -nr | grep 192
192.168.1.0/24     140.82.30.1        US       vtnet0
This is a wrong route that strongswan injected. Delete the route and add the proper one.
route delete 192.168.1.0
delete net 192.168.1.0
route add -net 192.168.1.0/24 10.39.96.3
add net 192.168.1.0: gateway 10.39.96.3
Now if you ping something, it will work. But wait! Once we reboot, everything will be messed up again? Correct!
First, add this line in /etc/rc.conf. It creates a permanent static route.
route_vpn="-net 192.168.1.0/24 10.39.96.3"
Second, prevent strongswan to mess up with the routes. Edit /usr/local/etc/strongswan.conf and above line load_modular = yes, add install_routes = no. It looks like this.
......
charon {
        install_routes = no
        load_modular = yes
        plugins {
                include strongswan.d/charon/*.conf
        }
}
......
After this change, restart strongswan.
service strongswan restart
NOTE: For any resource behind FreeBSD, you have to add a static route for the 192.168.1.0/24 network. For example, for Windows type route add 192.168.1.0/24 10.39.96.3 -p otherwise that resource will use the default gateway.