
I have written a lot about pfSense and different types of VPN scenarios (AWS, Azure), but never created a post about a site-to-site VPN tunnel with CentOS running strongswan and pfSense. The scenario described here works with CentOS, but it will work with any other Linux of BSD distribution. The syntax for strongswan is the same, it’s just the configuration file names and locations that are different across distributions.
Table of Contents
Prerequisites
Both the pfSense box and CentOS need to have public IPs. While it’s possible to have them behind NAT, this scenario only covers configurations with public IPs. You should disable the firewalld on CentOS (initially). Both of them need two network interfaces. In my case this is how it looks like.

It’s also easier if you create a small spreadsheet so you don’t loose track of the IPs and subnets.

CentOS configuration
I am using CentOS 7. First, we have to install strongswan and disable the firewall temporarily.
yum -y install epel-release
yum -y install strongswan
systemctl enable strongswan
systemctl stop firewalld
systemctl disable firewalld
Once installed, change these system variables so you allow IP forwarding and prevent ICMP redirects.
echo "net.ipv4.ip_forward=1" >> /etc/sysctl.conf
echo "net.ipv4.conf.all.accept_redirects=0" >> /etc/sysctl.conf
echo "net.ipv4.conf.all.send_redirects=0" >> /etc/sysctl.conf
sysctl -p /etc/sysctl.conf
strongswan on CentOS places its config under /etc/strongswan directory. We’ll use a config with pre-shared key because it’s easier to implement. So, edit the /etc/strongswan/ipsec.conf file, remove everything there and paste this config. Of course, this assumes that you don’t have any working configs there. Now, look at the highlighted lines. That’s where you have to replace the IPs and the subnets with your values. E.g. line 13 is the private IP of the CentOS server, 14 is the subnet, 15 is the ID of the server (IP or hostname), 17 is the external IP of the pfSense server, 18 is its subnet and line 19 is the ID of the pfSense server (IP or hostname). This is where the small spreadsheet above comes handy.
config setup

conn %default
        ikelifetime=60m
        keylife=20m
        rekeymargin=3m
        keyingtries=1
        authby=secret
        keyexchange=ikev2
        mobike=no

conn net-net
        left=148.27.56.195
        leftsubnet=10.1.96.0/20
        leftid=148.27.56.195
        leftfirewall=no
        right=23.183.125.249
        rightsubnet=192.168.1.1/24
        rightid=23.183.125.249
        ike=aes256-sha256-modp2048!
        esp=aes256-sha256!
        pfs=no
        auto=start
        lifetime=1h
Then, edit the /etc/strongswan/ipsec.secret file and specify the pre-shared key. This is a password that the servers will use to authenticate. Make sure it’s something more complex in production. In my case, the password is “secret“.
# ipsec.secrets - strongSwan IPsec secrets file
148.27.56.195 23.183.125.249 : PSK "secret"
pfSense
Now that the CentOS strongswan box is configured, we can configure pfSense. In pfSense, go to VPN | IPSec from the menu and click on Add P1 button. Fill out the General Information section, so it looks like this.
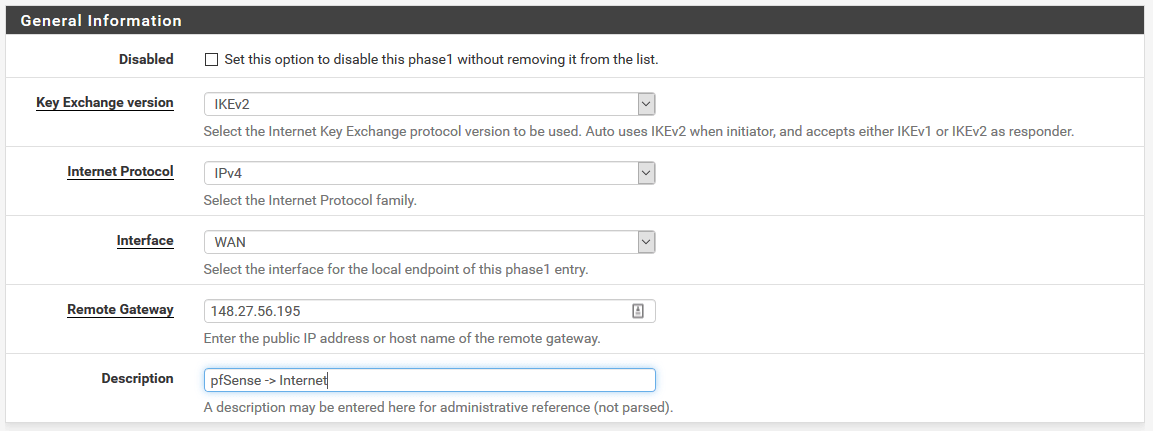
As you can see, we use IKEv2 and our remote gateway is 148.27.56.195 which is the CentOS strongswan box.
For Phase 1 Proposal (Authentication and Algorithms), fill out the section so it looks like this.
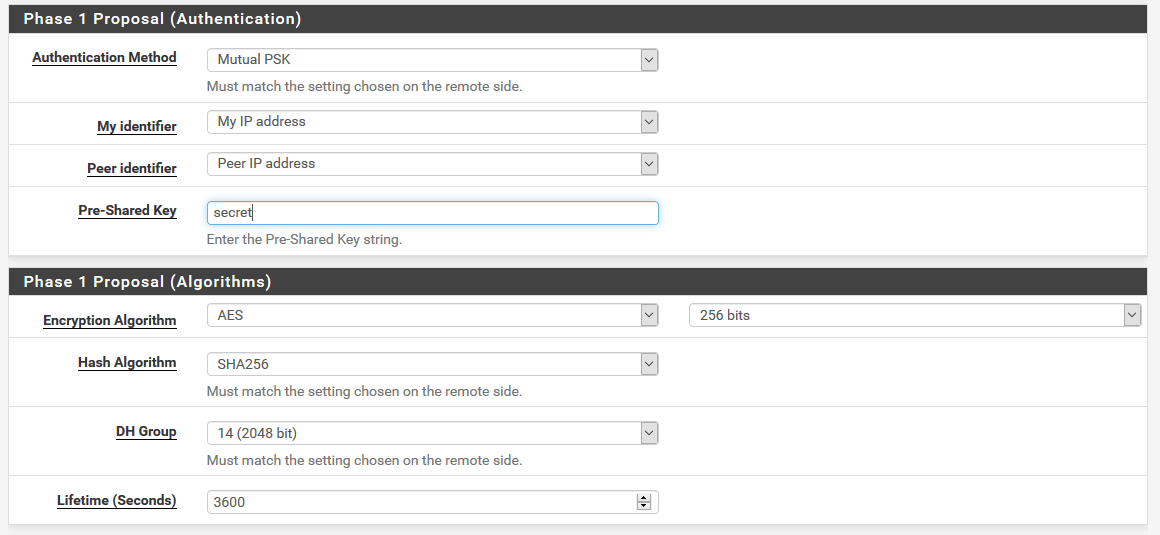
From the screenshot above, you can see that the values correspond to what we have in ipsec.conf file.
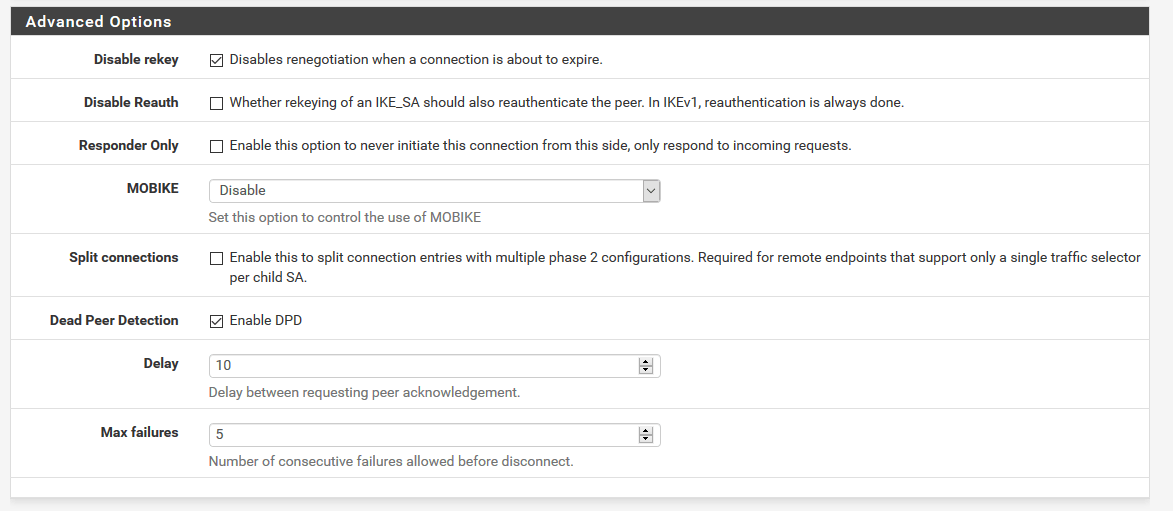
For the Advanced Options section, use the defaults.
Click Save and then from the main IPSec | Tunnels menu, click on Add P2 button.
For Phase 2, fill out these values for the General Information section.
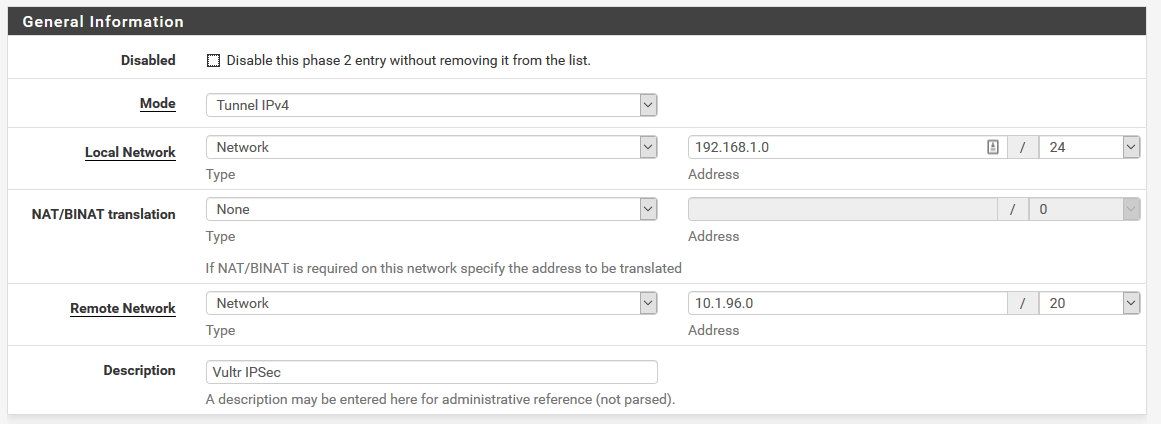
Change the values for Local Network and Remote Network to suit your needs. These are the local subnets behind pfSense and strongswan.
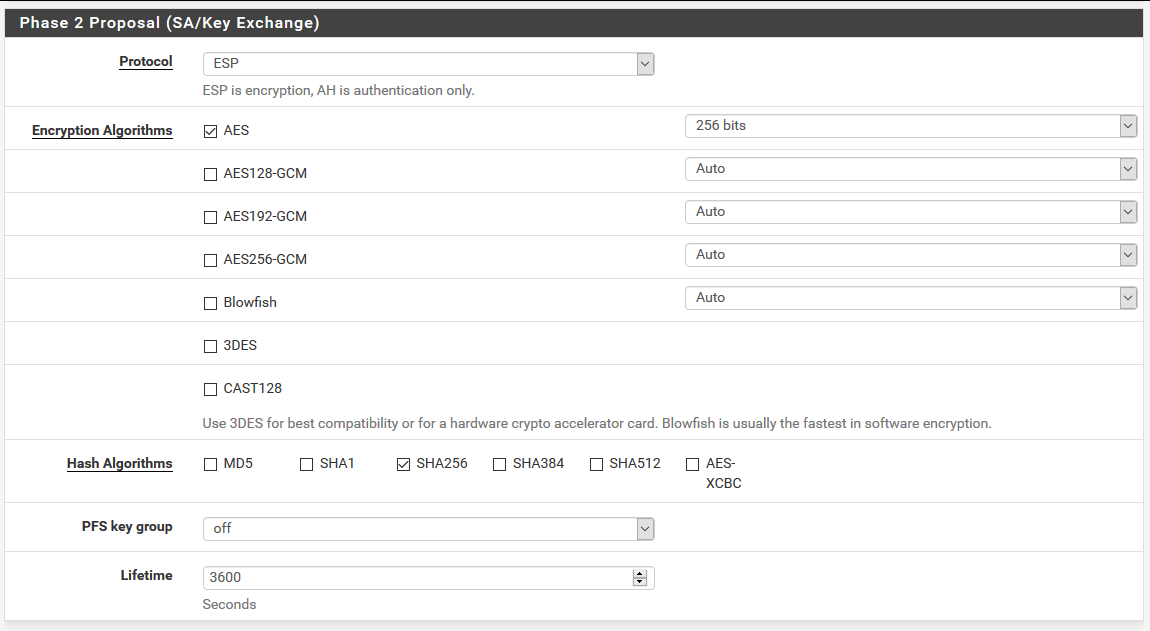
For Phase 2 Proposal (SA/Key Exchange) section, choose these values.
For the Advanced Configuration section, you can leave it as is, or put the private IP of the CentOS box so the IPSec protocol sends keep-alive pings. It’s not mandatory, but if your tunnel fails frequently, you can configure this field.

Click Save and the VPN config is done. But, we have to tell pfSense to allow IPSec traffic. So, from the menu go to Firewall | Rules and click on IPSec submenu. Click Add and fill out the form so it looks like this.

…and this.

Click Save and go back to the CentOS box.
Site-to-site VPN tunnel
At this point you can start the VPN.
systemctl start strongswan
If everything is OK, the log will look like this.
tail -f /var/log/messages
Mar  9 16:15:00 titan charon: 09[NET] sending packet: from 148.27.56.195[500] to 23.183.125.249[500] (256 bytes)
Mar  9 16:15:00 titan charon: 10[NET] received packet: from 23.183.125.249[500] to 148.27.56.195[500] (224 bytes)
Mar  9 16:15:00 titan charon: 10[ENC] parsed IKE_AUTH response 1 [ IDr AUTH N(ESP_TFC_PAD_N) SA TSi TSr ]
Mar  9 16:15:00 titan charon: 10[IKE] authentication of '23.183.125.249' with pre-shared key successful
Mar  9 16:15:00 titan charon: 10[IKE] IKE_SA net-net[1] established between 148.27.56.195[148.27.56.195]...23.183.125.249[23.183.125.249]
Mar  9 16:15:00 titan charon: 10[IKE] scheduling reauthentication in 3350s
Mar  9 16:15:00 titan charon: 10[IKE] maximum IKE_SA lifetime 3530s
Mar  9 16:15:00 titan charon: 10[IKE] received ESP_TFC_PADDING_NOT_SUPPORTED, not using ESPv3 TFC padding
Mar  9 16:15:00 titan charon: 10[CFG] selected proposal: ESP:AES_CBC_256/HMAC_SHA2_256_128/NO_EXT_SEQ
Mar  9 16:15:00 titan charon: 10[IKE] CHILD_SA net-net{1} established with SPIs c82fdbae_i ce57b856_o and TS 10.1.96.0/20 === 192.168.1.0/24
Check the status.
strongswan status
Security Associations (1 up, 0 connecting):
     net-net[3]: ESTABLISHED 3 minutes ago, 148.27.56.195[148.27.56.195]...23.183.125.249[23.183.125.249]
     net-net{3}:  INSTALLED, TUNNEL, reqid 2, ESP SPIs: c818e2d7_i c34c4c3d_o
     net-net{3}:   10.1.96.0/20 === 192.168.1.0/24
If the current CentOS box is not your Internet gateway for the servers behind, you have to add a static route to the pfSense subnet. So, on each server behind CentOS, do something like this.
route add 192.168.1.0 mask 255.255.255.0 10.1.96.3 -p
Check the documentation for other OSes. You have to tell the OS to use 10.1.96.3 (internal strongswan IP) as a gateway to 192.168.1.0 subnet. Because my pfSense box is also my gateway, I don’t have to make these changes.
Firewall
Now, everything is up and running, but we have the firewall disabled and the CentOS box is exposed to Internet. Not good. In order to fix that, we have to make some changes and allow the IPSec protocol to flow through the firewall.
systemctl enable firewalld
systemctl start firewalld
firewall-cmd --set-default-zone=dmz
firewall-cmd --zone=dmz --permanent --add-rich-rule='rule protocol value="esp" accept'
firewall-cmd --zone=dmz --permanent --add-rich-rule='rule protocol value="ah" accept'
firewall-cmd --zone=dmz --permanent --add-port=500/udp
firewall-cmd --zone=dmz --permanent --add-port=4500/udp
firewall-cmd --permanent --add-service="ipsec"
firewall-cmd --zone=dmz --permanent --add-masquerade
firewall-cmd --permanent --direct --add-rule ipv4 nat POSTROUTING 0 -m policy --pol ipsec --dir out -j ACCEPT
firewall-cmd --reload
…and you are all set.
4 comments
Hi,
thank you for this tutorial. I have a question. On my centos I have just one NIC (eth0, public IP) . How can I connect to pfsense network?
Thnx
Hi, this is for site to site VPN tunnel. What you need is a VPN tunnel for mobile clients.
See my other post for that.
hi, I followed your instructions and Tunnel was up, but I can not reach any encriptions domains, so my question is, do I have to add any route in pfsense? I have 1 centos 7.5 with swtrongswan and in the other DC 1 pfesense and I need to build an IPsec site to site.. as I mentioned tunnel is up with no problem but there not way that traffic pass from one side to other. What I am missing?
Many thanks
Kind Regards
No, you don’t need any routes in pfSense. You just need the firewall change to allow IPSec traffic. Try with the firewall disabled on the CentOS side. Also, try to disable the firewall on the instance behind CentOS and see if you can ping it from the pfSense.