
In this post I’ll explain how to run a WordPress site using Azure services for managed MySQL and App Services for a PHP application.
The basic offerings for MySQL and App Services create these resources in a public subnet, so in order to integrate them with your VNETs, you’ll have to use the more expensive options. In this post, we’ll use just that. We’ll create the MySQL database without any public access and integrate the App Services to connect to the SQL database internally.
Table of Contents
VNET/subnets
First, we’ll create a VNET with three subnets. When you integrate an App Services in a VNET, the subnet where the App Services will reside must be empty. The same applies for Flex MySQL servers. You can have multiple Apps in the same dedicated subnet. So, you need a dedicated subnet for both App Service and MySQL Flex, but not for MySQL single server. Single MySQL server can share the subnet with other resources.
For MySQL, there are two options. We can use a private endpoint or a VNET integration. We’ll go with a private endpoint first. We don’t need a dedicated subnet for this.
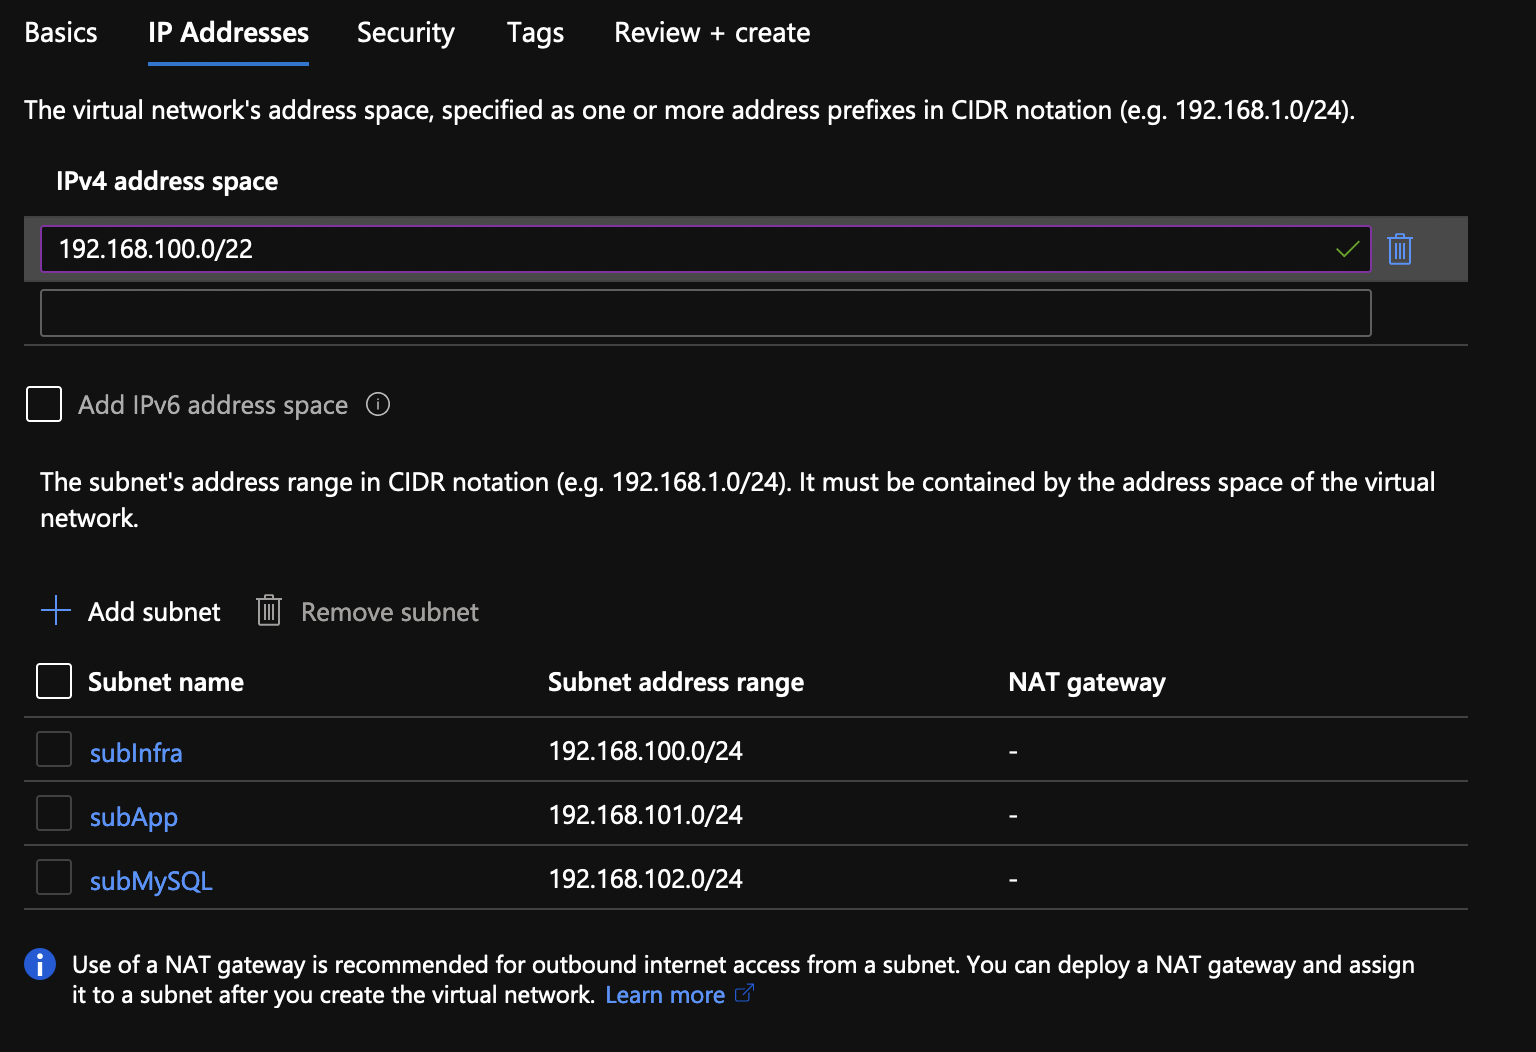
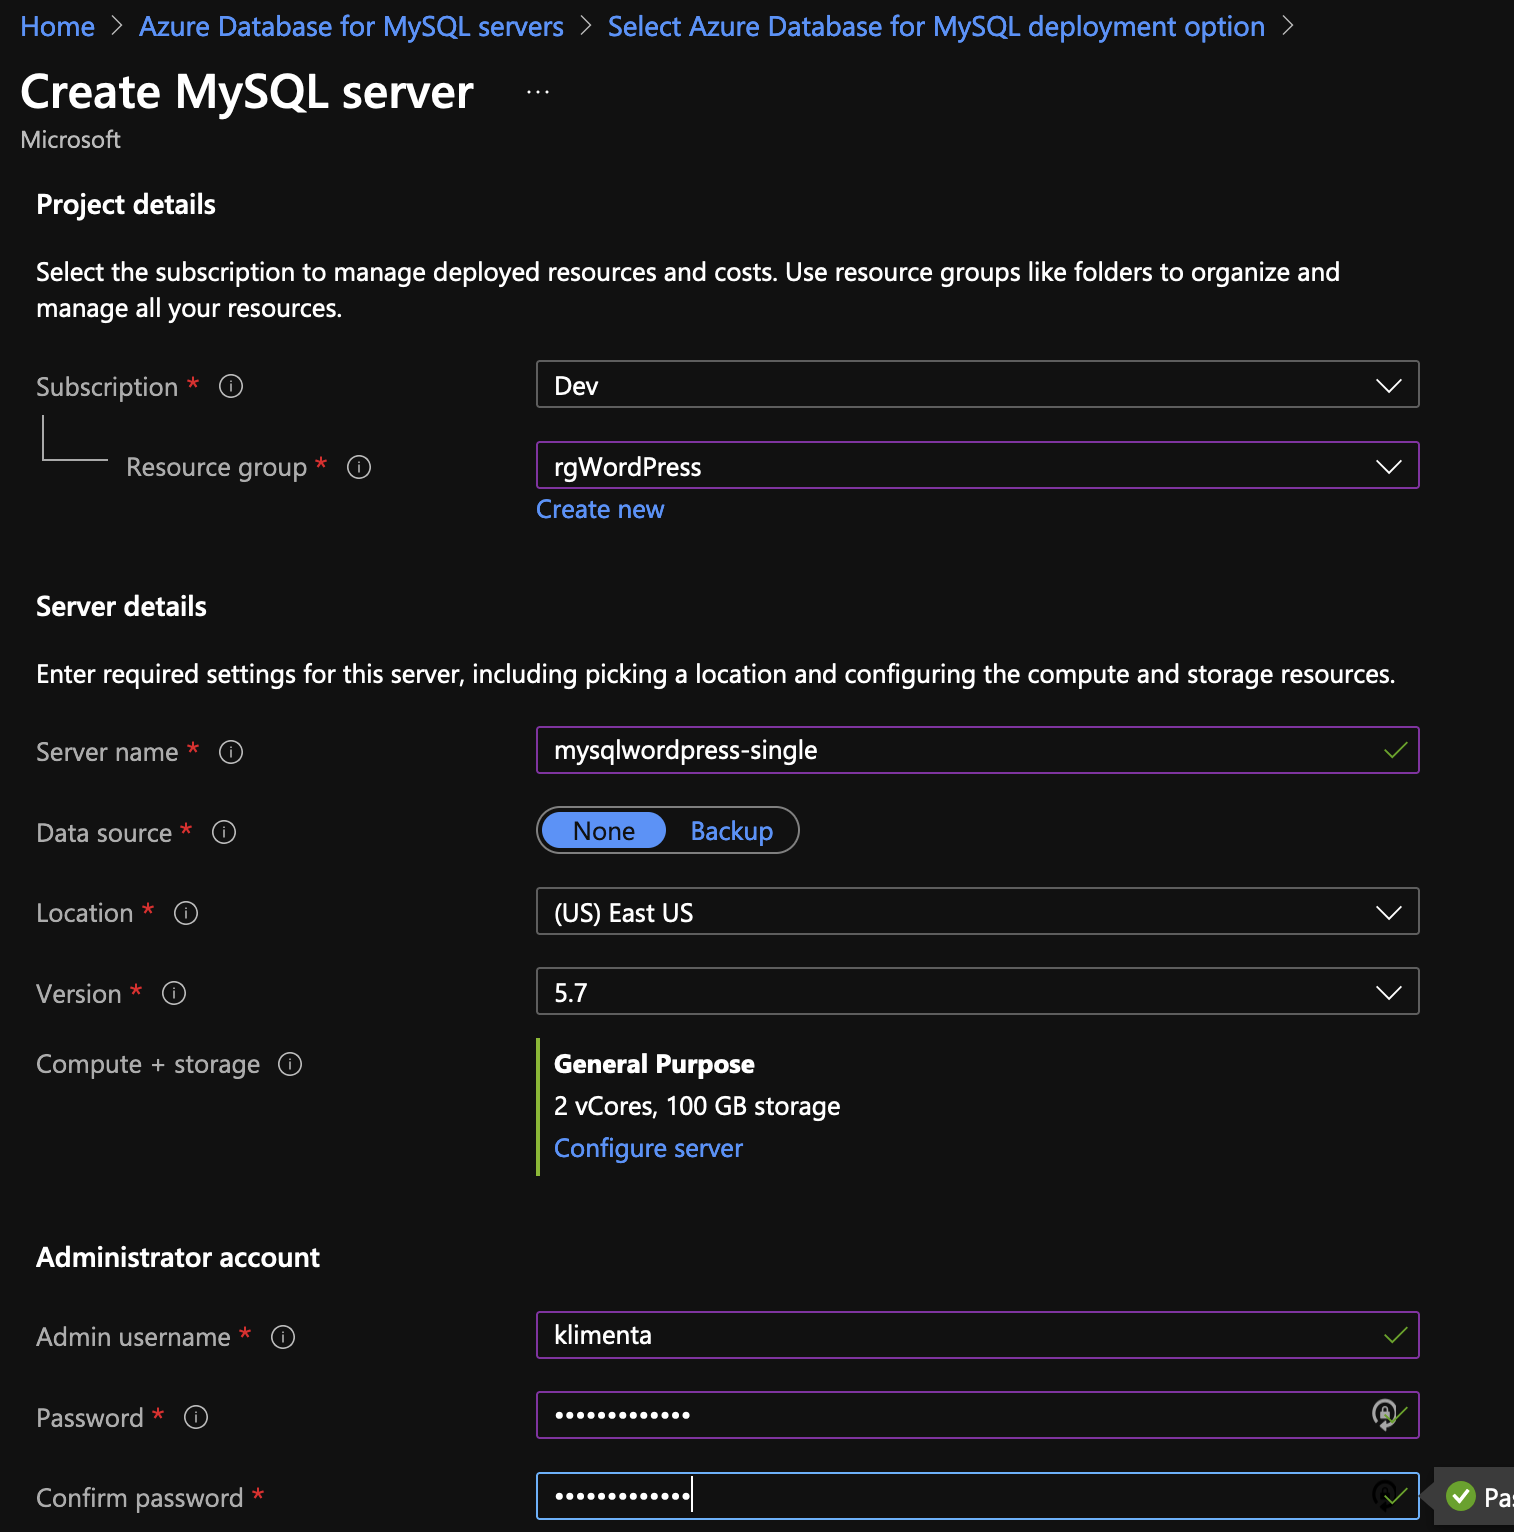
In my case, I’ll create a VNET with 192.168.100.0/22 CIDR and three subnets, 192.168.100.0/24 for some Infra/MySQL stuff, 192.168.101.0/24 for the App Services and 192.168.102.0/24 for Flex MySQL. I’ll use a new resource group called rgWordPress. The VNET will be called vnetWordPress and the subnets, subInfra, subApp and subMySQL respectively.
VM
I will also create a VM in the subInfra subnet. This VM is not needed at all, it will be used to test connectivity. In my case, I’ll spin a new Debian 1CPU, 1GB VM and I’ll install the MySQL client.
sudo apt install default-mysql-client
Managed Single server MySQL
When it comes to MySQL, there are two options: Flexible server and Single server. Look at this link to determine what you want to use. In most of the cases, you’ll use a Flexible server. But there are some limitations in both use cases. For example, a Flexible server can’t use private endpoints. You are limited to VNET integration and Single server can’t be VNET integrated. On top of that, only General Purpose and Memory Optimized servers can have private endpoints. The basic single server can be public only. Flex VNET integrated servers require dedicated and empty subnets. There are other limitations as well, so take a look at the link above.
In my case, I am using a General Purpose server.
Once you create the server, it will be public. As you can see from the Overview for the server, there is a public DNS record.

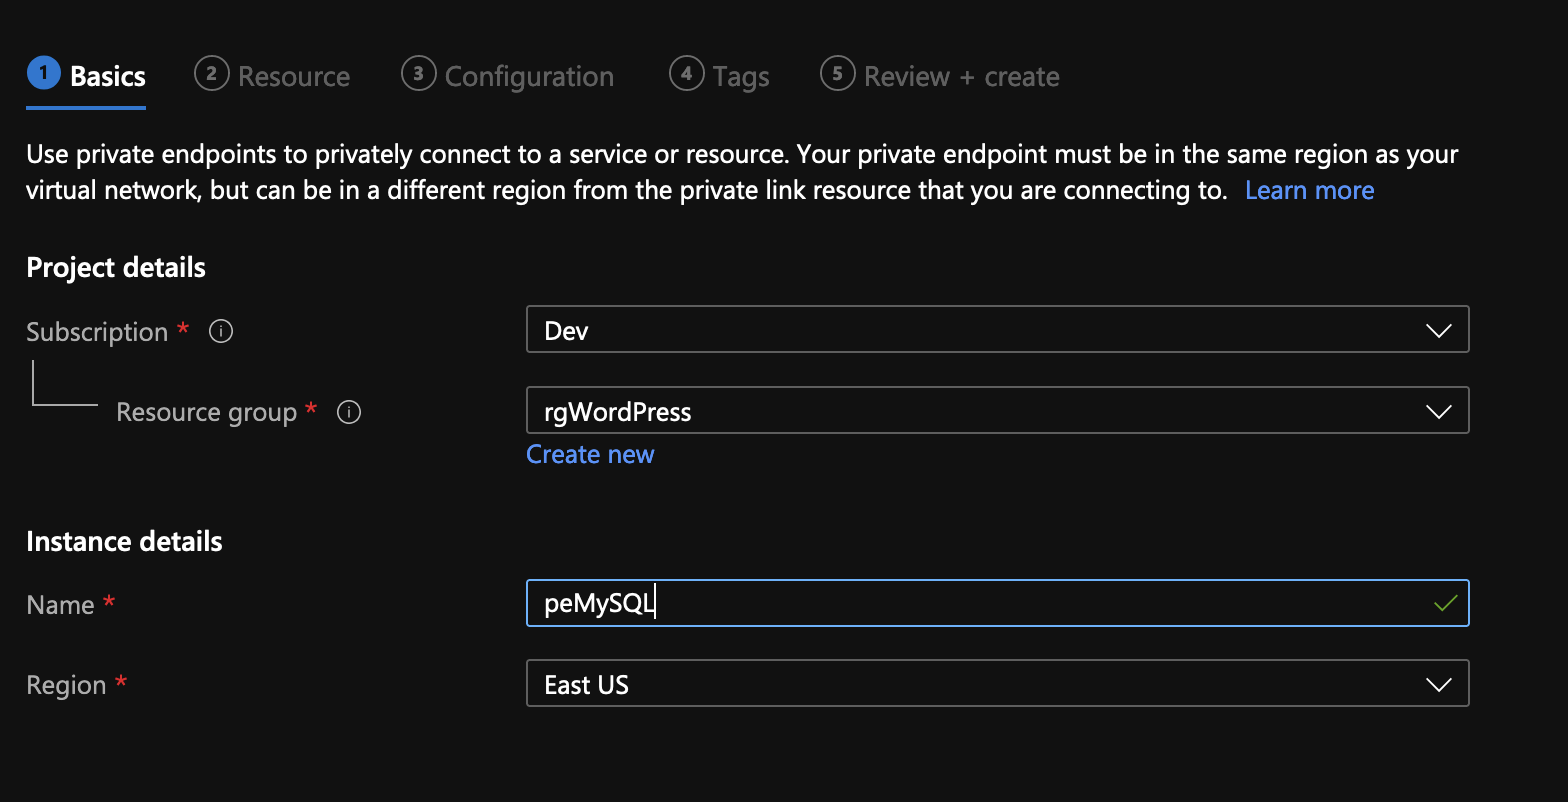
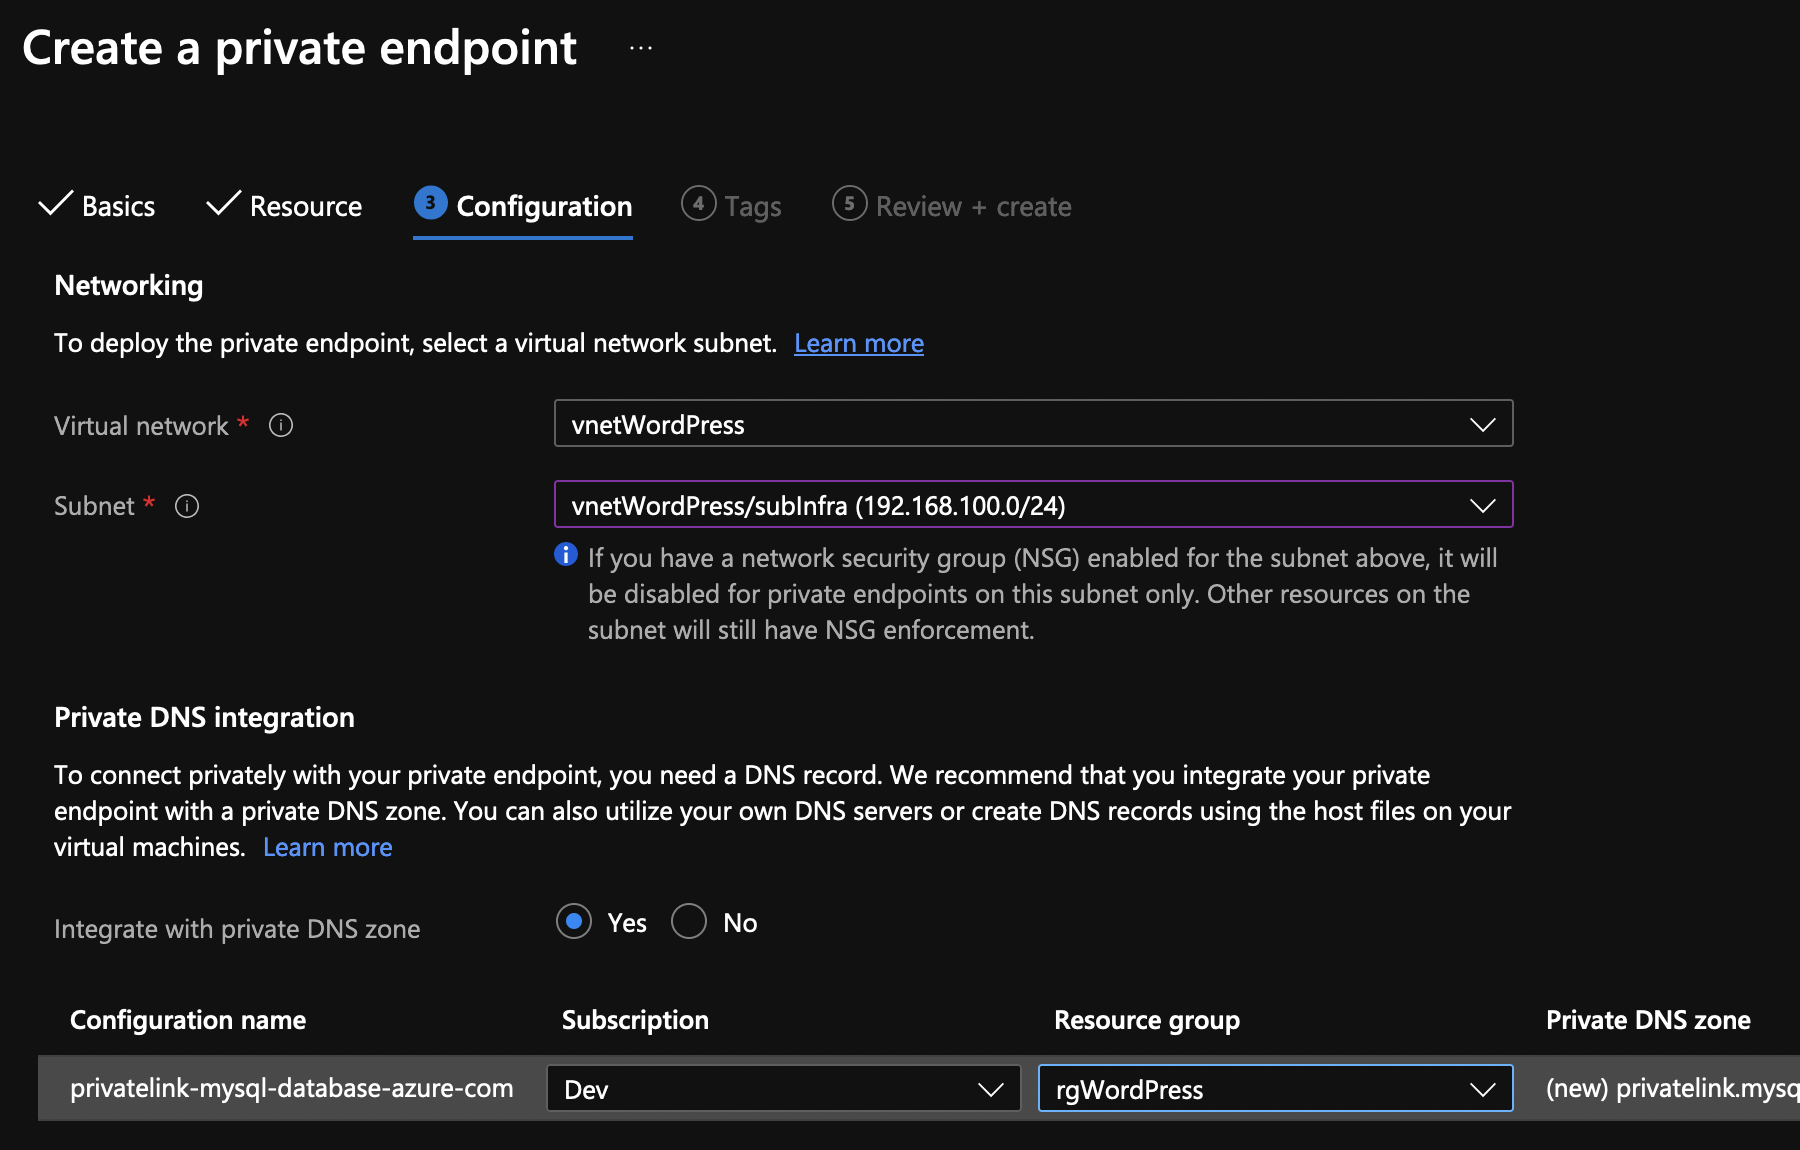
On the left side/blade, under Security, click on Private endpoint connections and create one.
Name the private link and put it in the same resource group as the other resources.
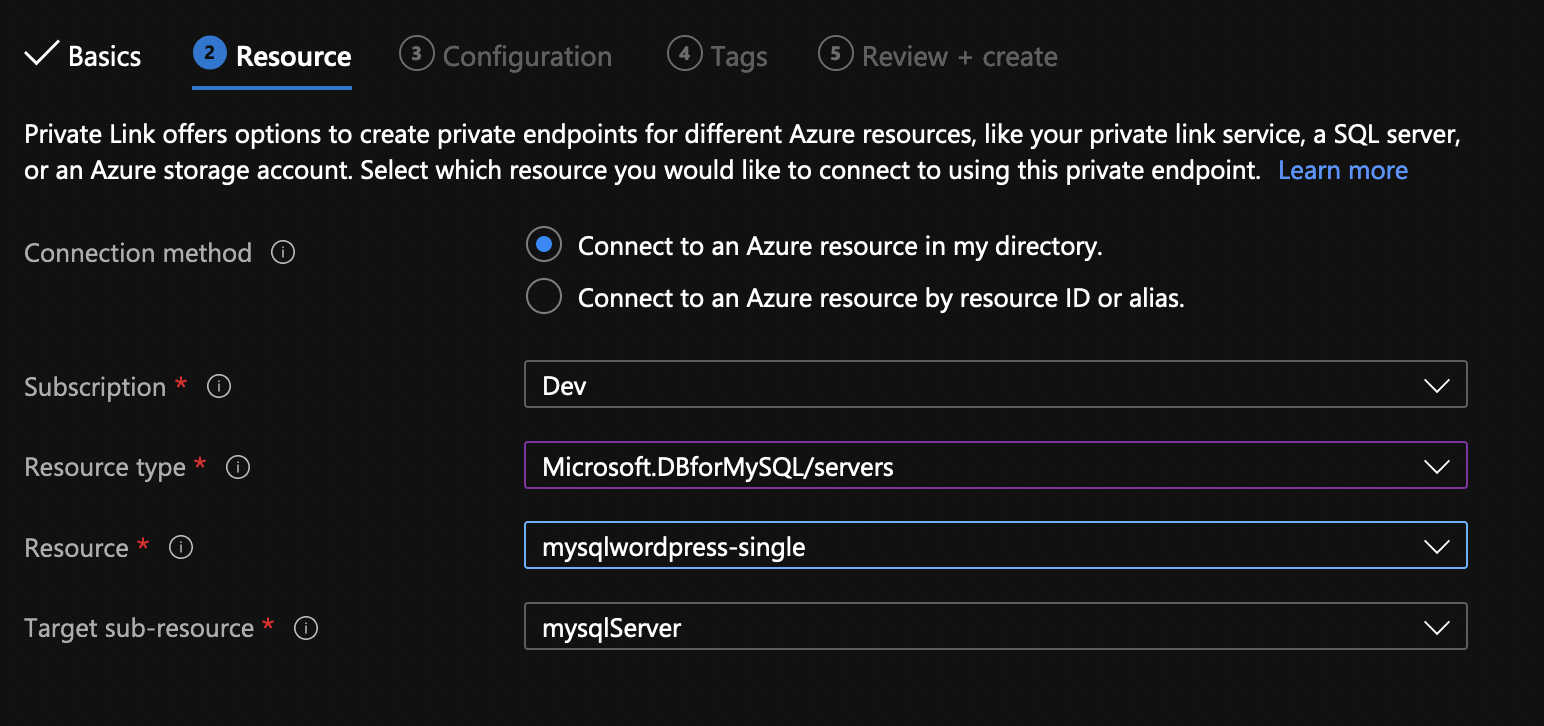
For the resource type Microsoft.DBforMySQL/servers and you’ll be able to select the newly created MySQL server from the dropdown under Resource.
Finally, choose the virtual network and subnet where you want to put the private link. Do not use the subnet for App Services. In addition, make sure that the integration with the private DNS zone is set to Yes.
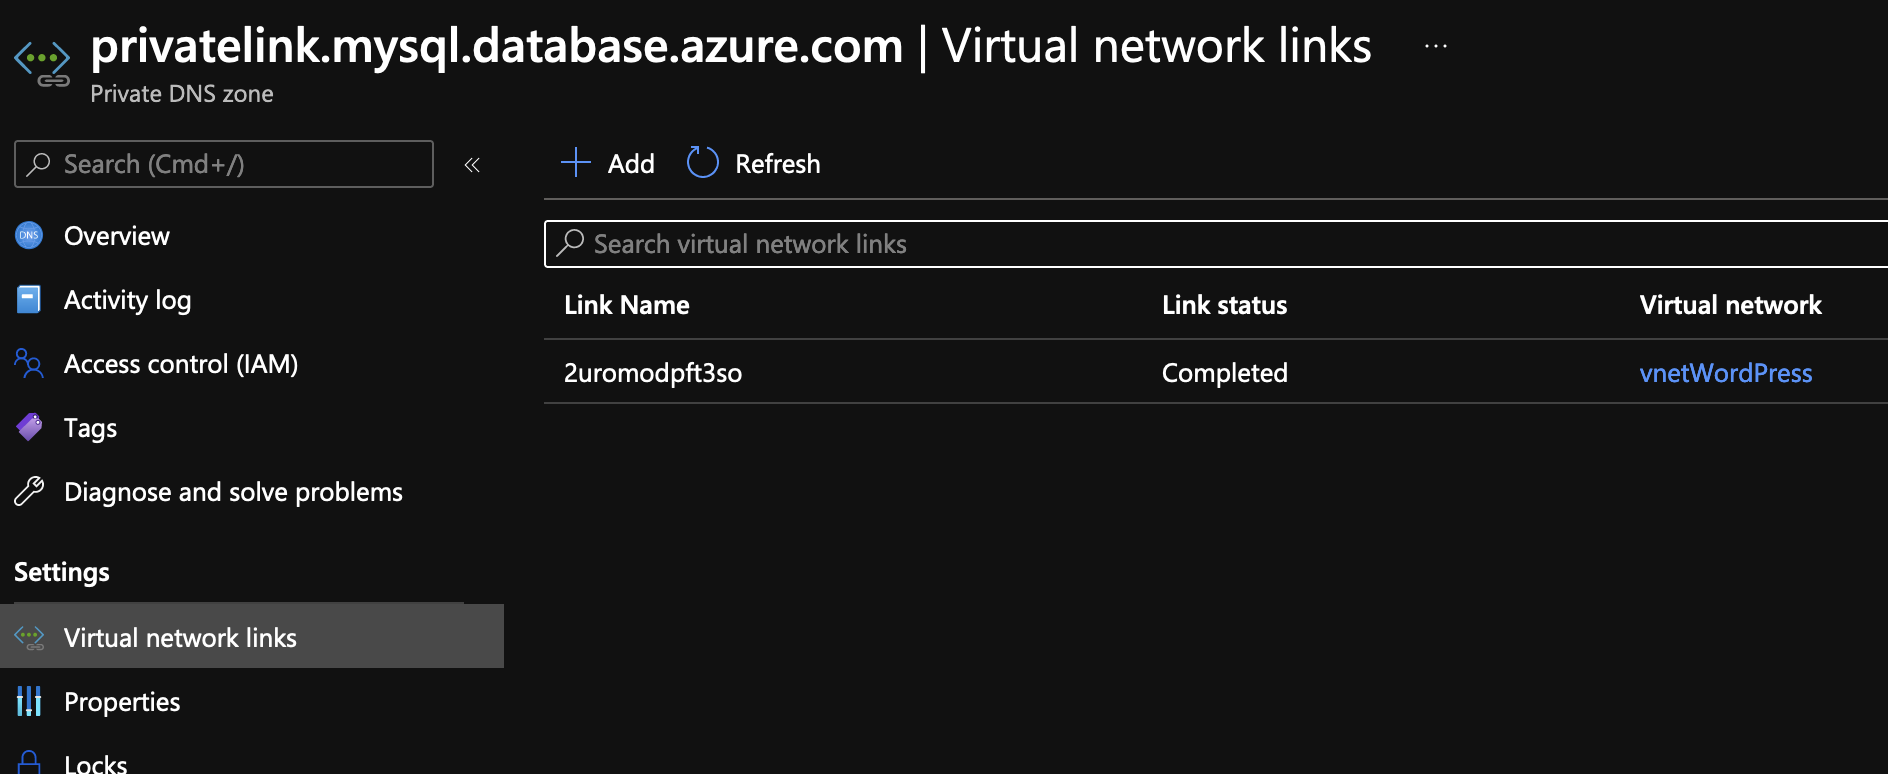
If you log to the server that we just built and try to resolve the public DNS for the MySQL server, you’ll see that it resolves as a private IP. That’s because you have a private DNZ zone that takes precedence over the public DNS.

In case, you are still getting the public IP, go to the Private DNS zone and make sure that it’s linked to the actual VNET.
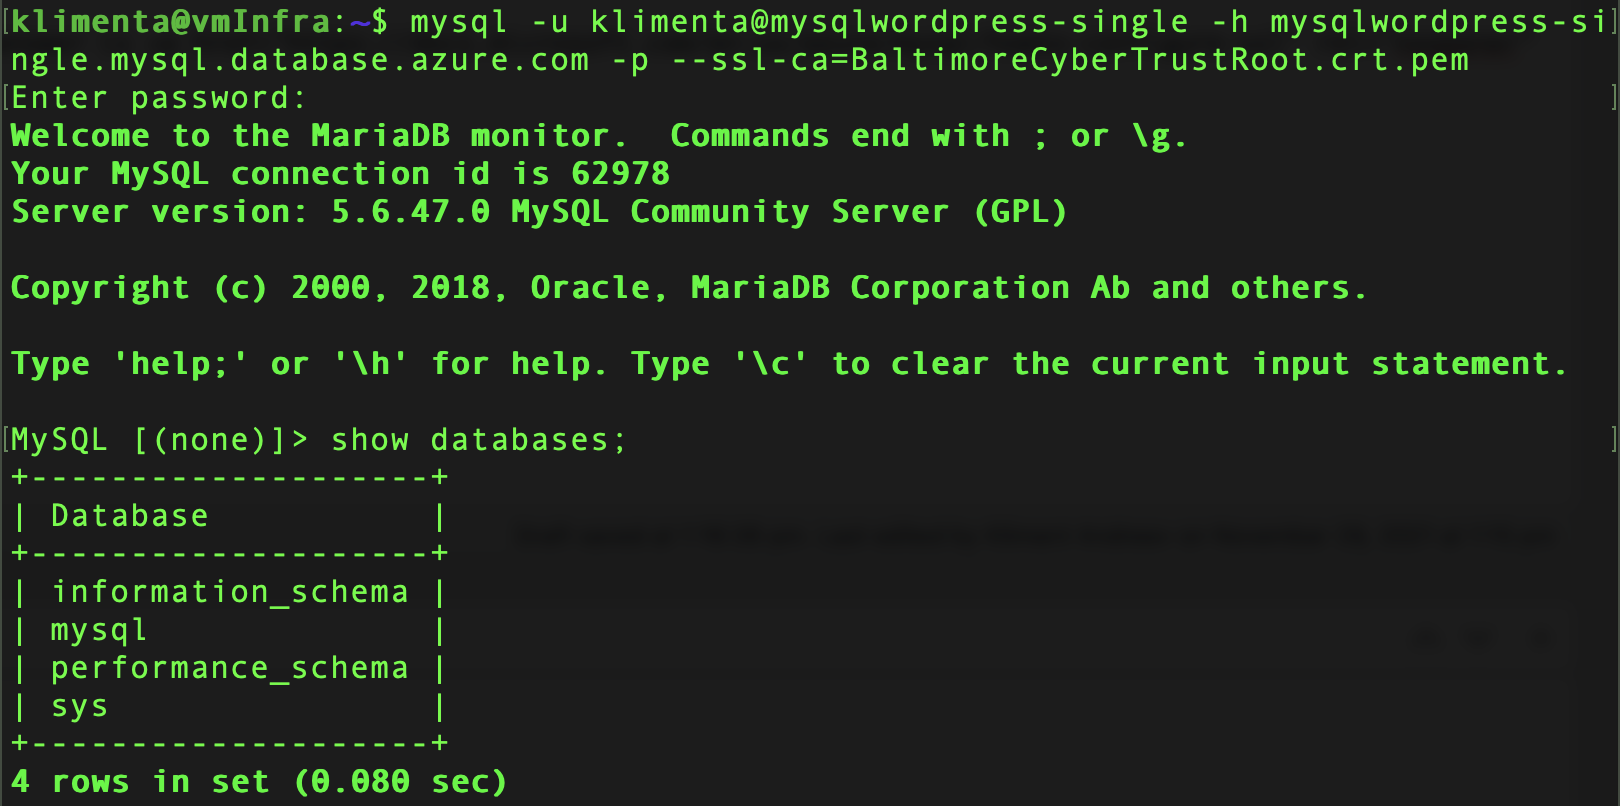
Now you can try to connect to the MySQL database.
mysql -u klimenta@mysqlwordpress-single -h mysqlwordpress-single.mysql.database.azure.com -p
Where -u specifies the username and the -h is the host. These parameters are under Overview on the right side. See the screenshot above.
You might get the following error. ERROR 9002 (28000): SSL connection is required. Please specify SSL options and retry.
In that case, download the SSL certificate and try again.
wget https://www.digicert.com/CACerts/BaltimoreCyberTrustRoot.crt.pem
mysql -u klimenta@mysqlwordpress-single -h mysqlwordpress-single.mysql.database.azure.com -p --ssl-ca=BaltimoreCyberTrustRoot.crt.pem
In case you are wondering, wait, why this cert? – The answer is here.
As you can see, I am able to connect now.
It is also recommended to disable the public access. Go to Connection security under Settings and select Yes for Deny public network access.
App Services
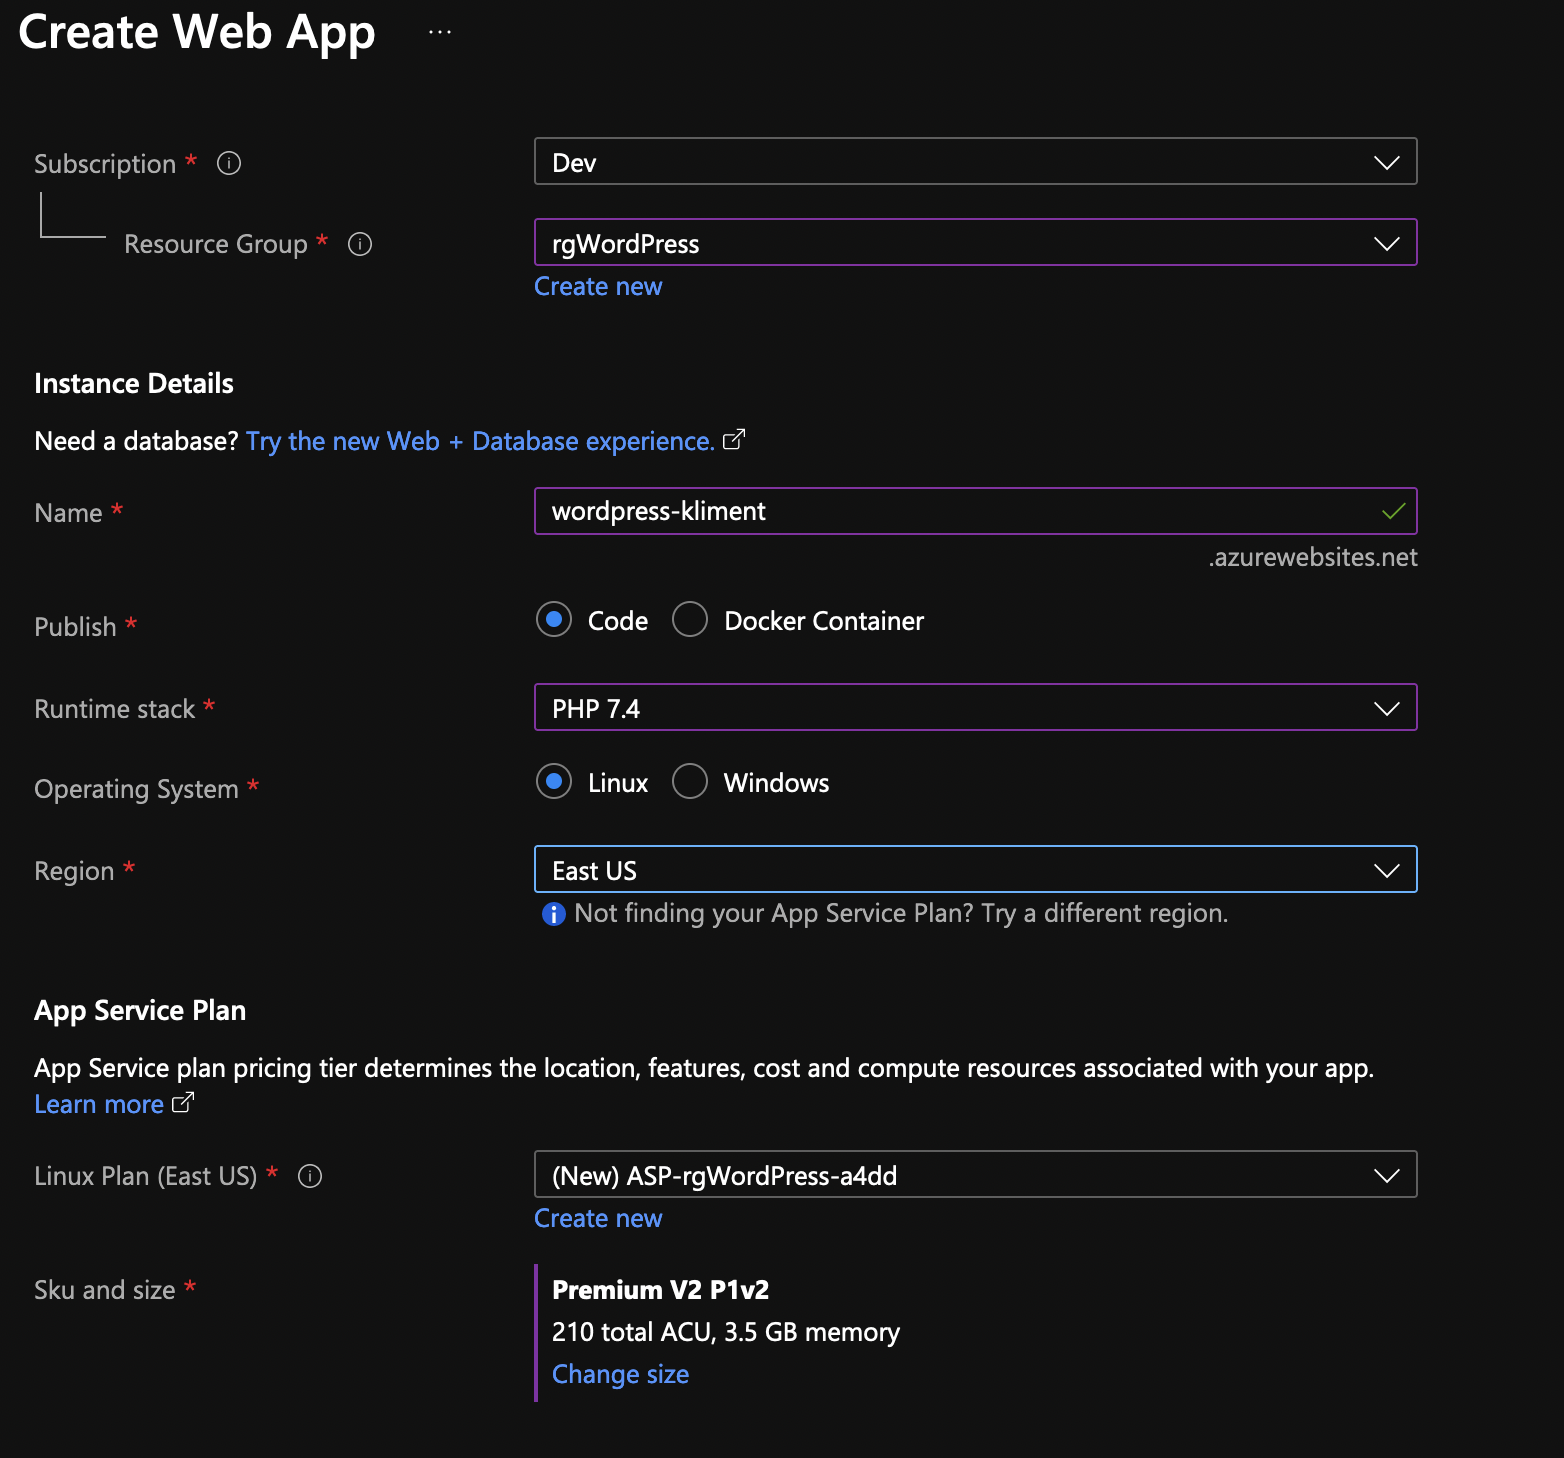
Go to App Services and create one. Make sure you use Premium offering so you can do a VNET integration. The initial parameters are self explaining. Use the defaults for the rest of the screens. You won’t be able to do much with PHP anyway.
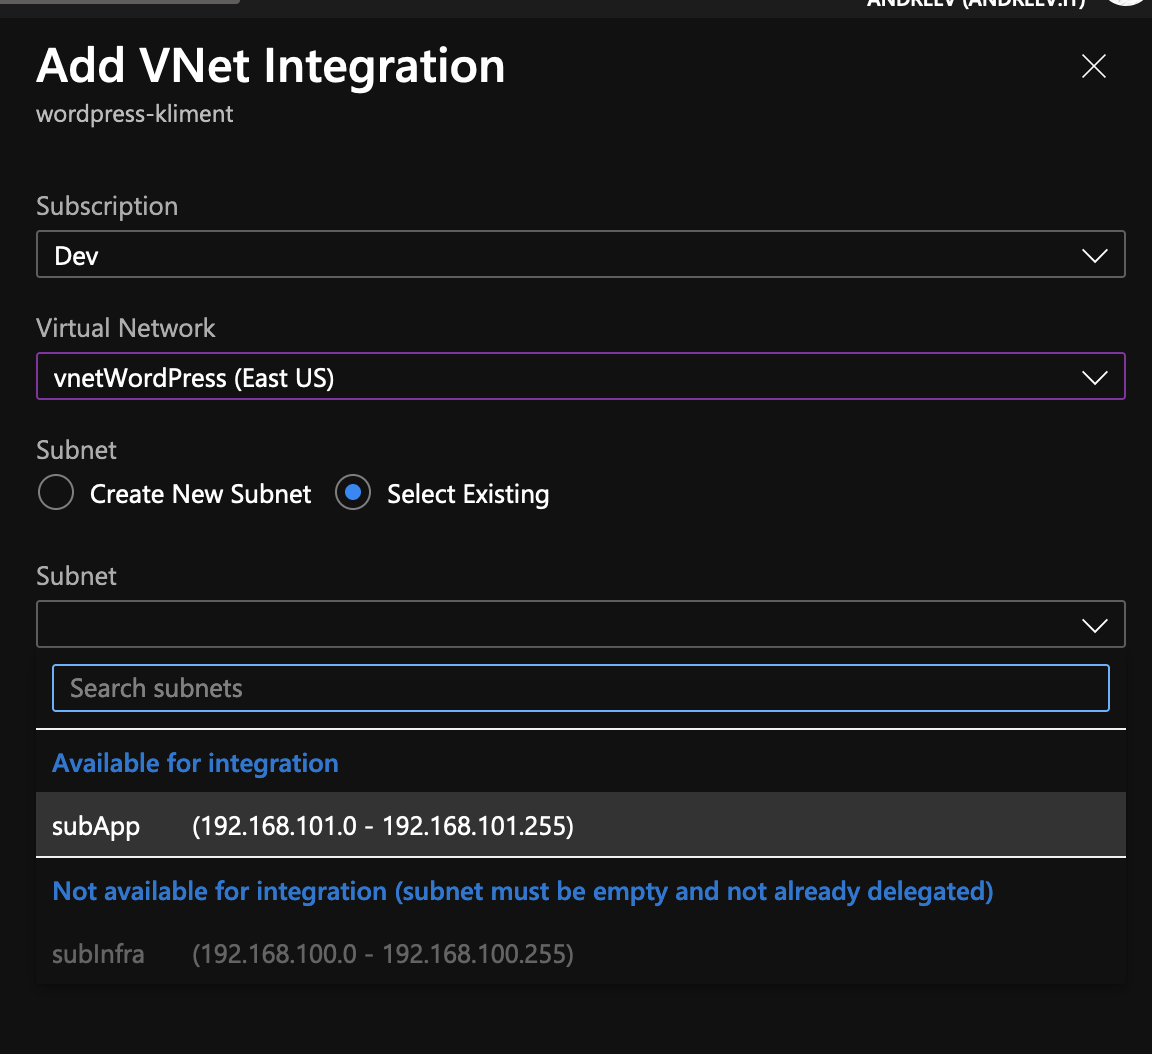
Once the app is provisioned, on the left side/blade, go to the Networking menu under Settings. You’ll see that the VNET integration is not configured. Click on the link.
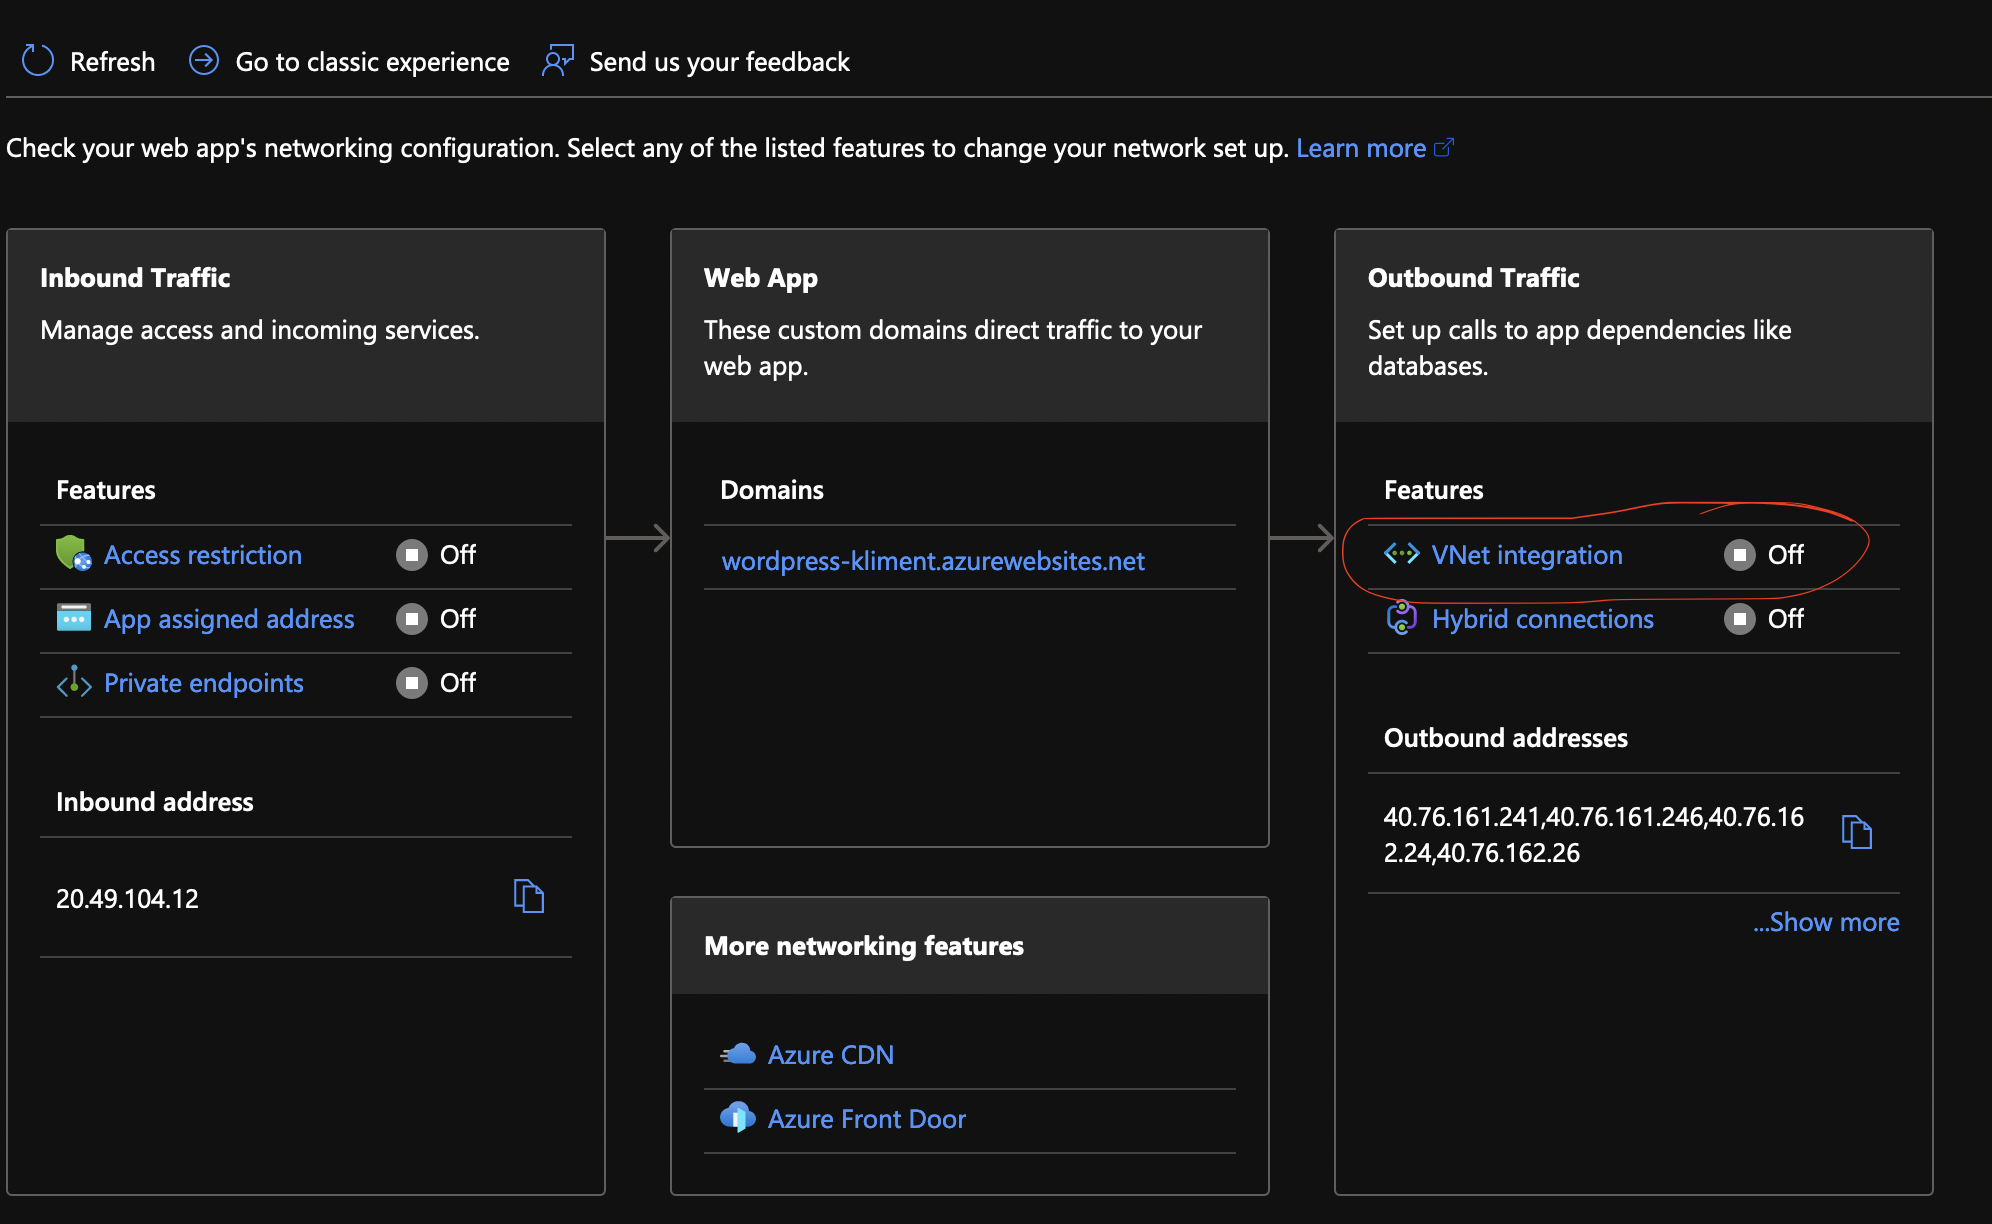
Pretty much, you have to select the VNET and an empty subnet. As you can see, I can only select subApp from the dropdown.
Close the blade and from the App menu, click on SSH under Development Tools on the left. This will open a new tab in your browser with a SSH session.
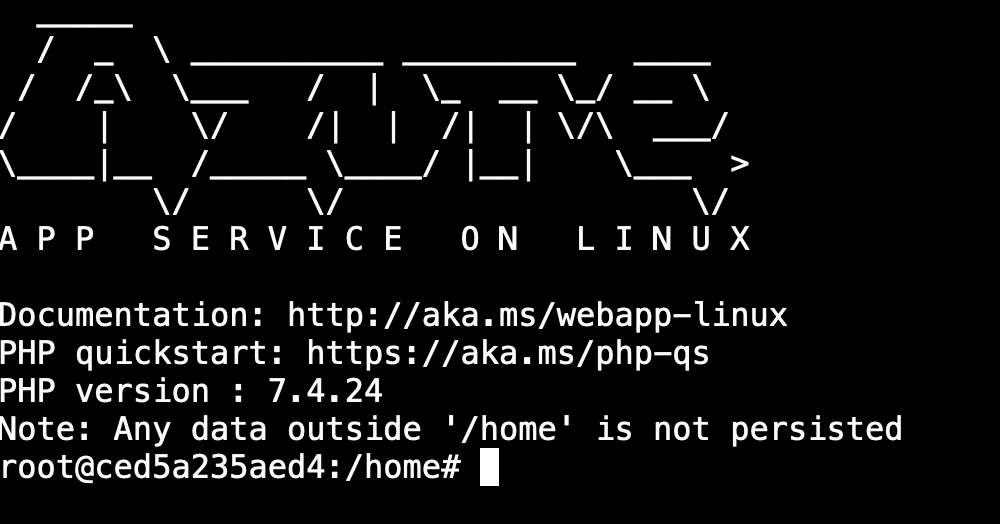
We have to create the WordPress database now. You can do that from the test server that we used initially or from the actual SSH session. Let’s use the SSH session. It already comes with mysql client preinstalled.
wget https://www.digicert.com/CACerts/BaltimoreCyberTrustRoot.crt.pem
mysql -u klimenta@mysqlwordpress-single -h mysqlwordpress-single.mysql.database.azure.com -p --ssl-ca=BaltimoreCyberTrustRoot.crt.pem
Once in MySQL client, execute these SQL statements.
CREATE DATABASE dbwordpress;
GRANT ALL PRIVILEGES ON dbwordpress.* TO "wordpressuser"@"%" IDENTIFIED BY "SuperSecret";
FLUSH PRIVILEGES;
EXIT
Replace the values with yours for the database name, MySQL host name, username and password.
Now, you can download WordPress and extract it.
cd /home/site/wwwroot
wget -c http://WordPress.org/latest.tar.gz
tar -xzvf latest.tar.gz
mv WordPress/* /home/site/wwwroot/
rm -rf WordPress
rm -rf latest.tar.gz
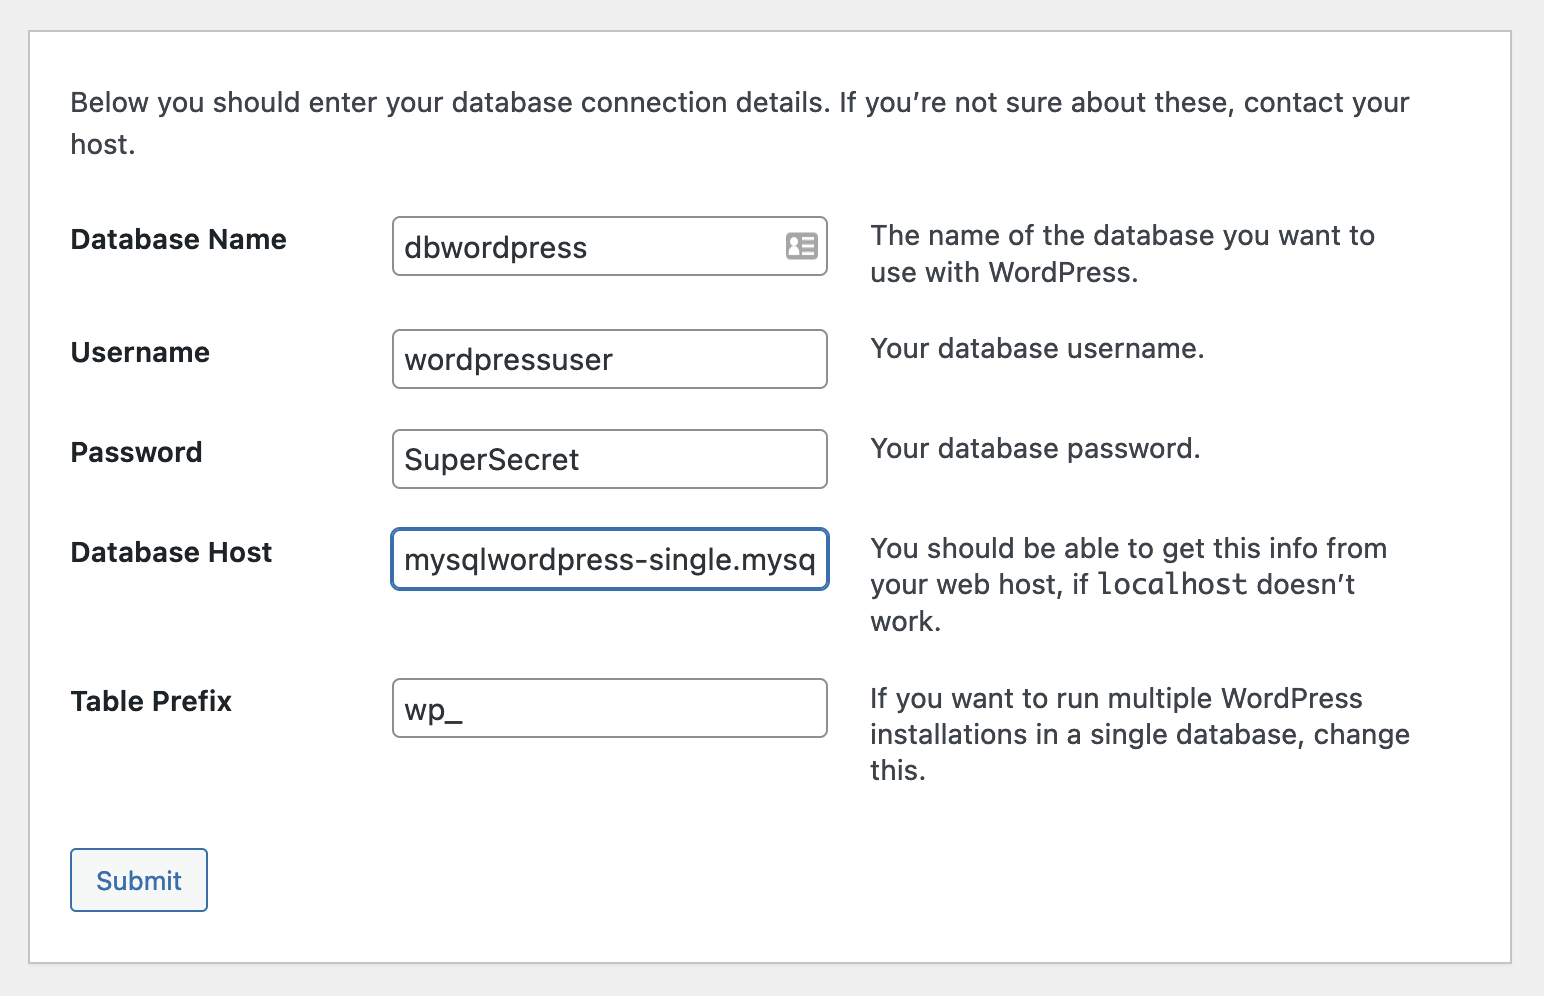
Once completed, go to the URL for the app. It should be under the Overview. You have to provide the database name (dbwordpress), username (wordpressuser@mysqlwordpress-single), password (SuperSecret) and the database host (mysqlwordpress-single.mysql.database.azure.com).
Most likely you’ll see an error. The easiest way is to disable the SSL requirement for the MySQL database from Connection security under Settings for the database.

If this doesn’t work for you, you’ll have to manually specify the parameters in wp-config.php. You can search this on your own.
Once you are done, specify the values in WordPress install screen and you are all set.
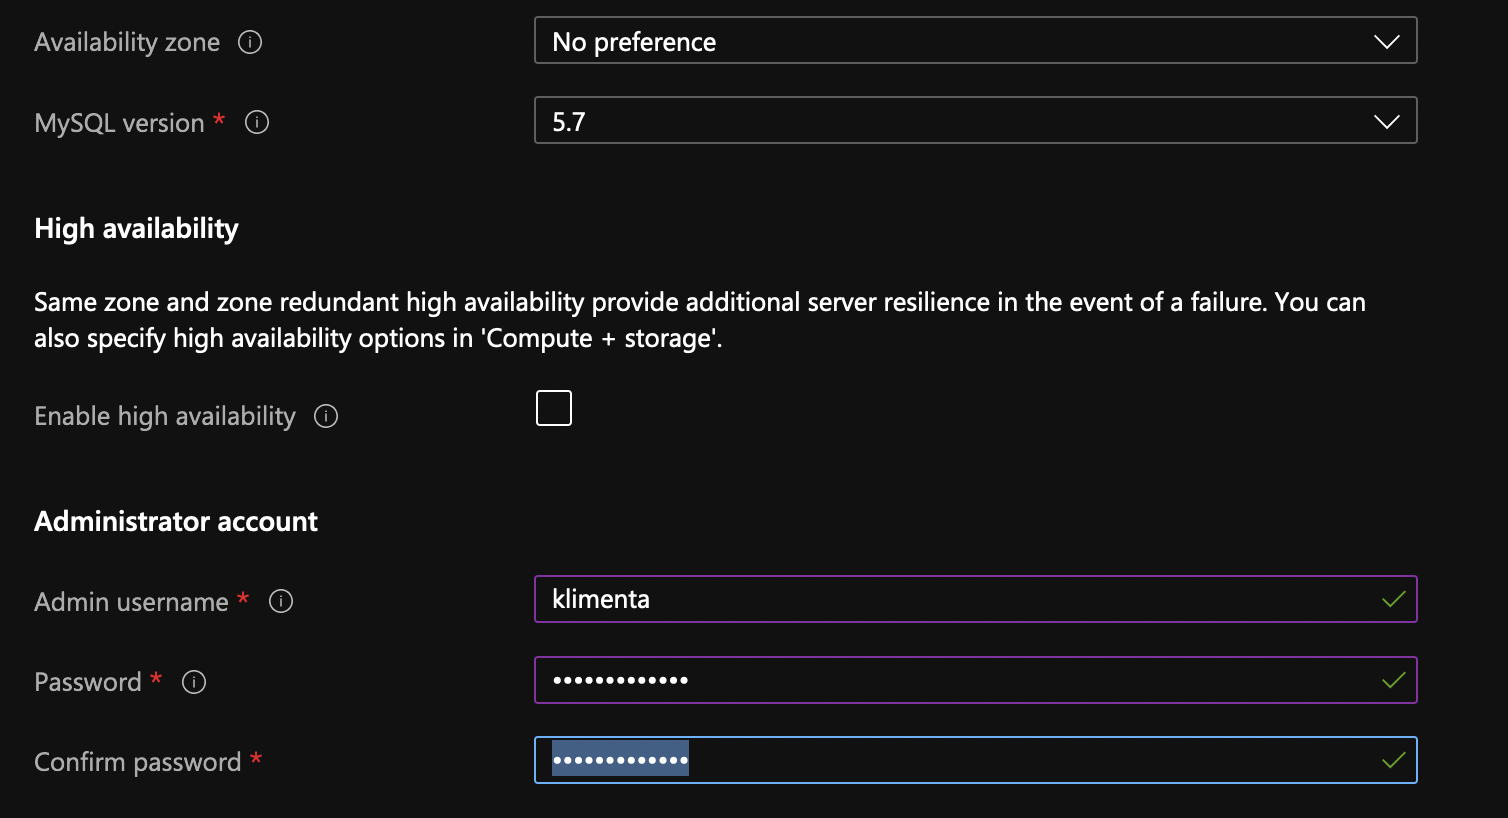
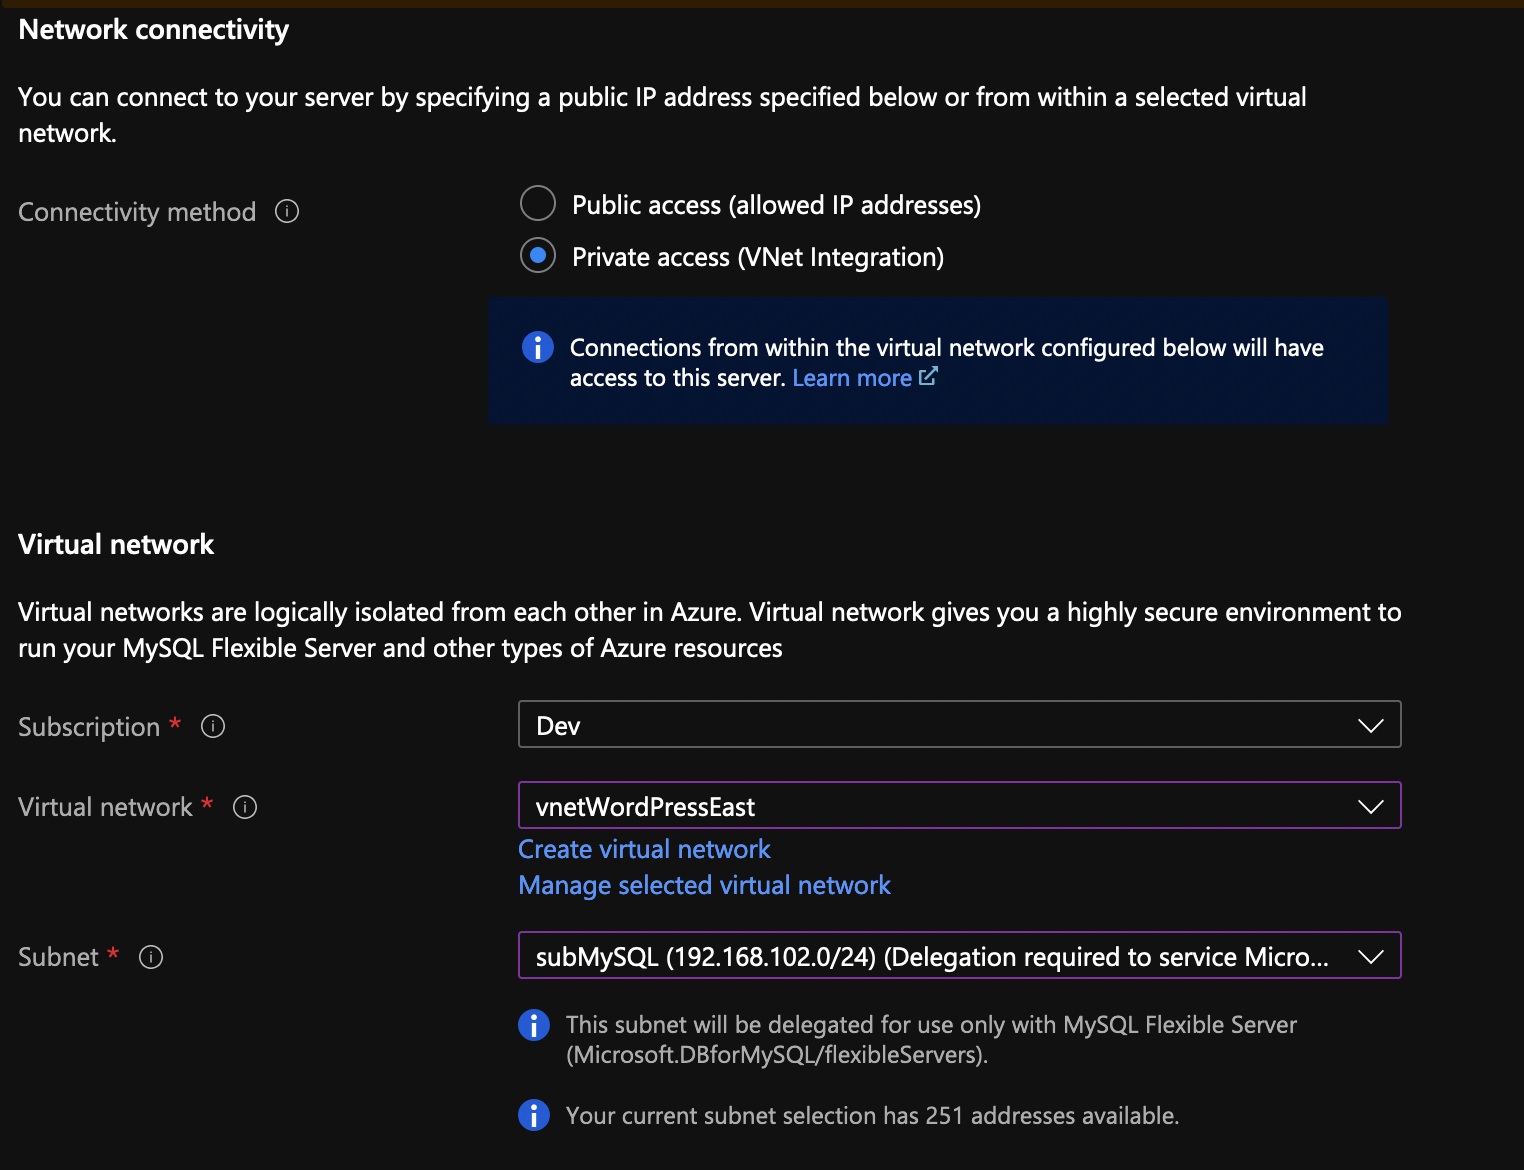
Flex MySQL server
Let’s see how Flex MySQL server works. Go to Azure MySQL but this time provision a flex server.
This is how my setup looks like.
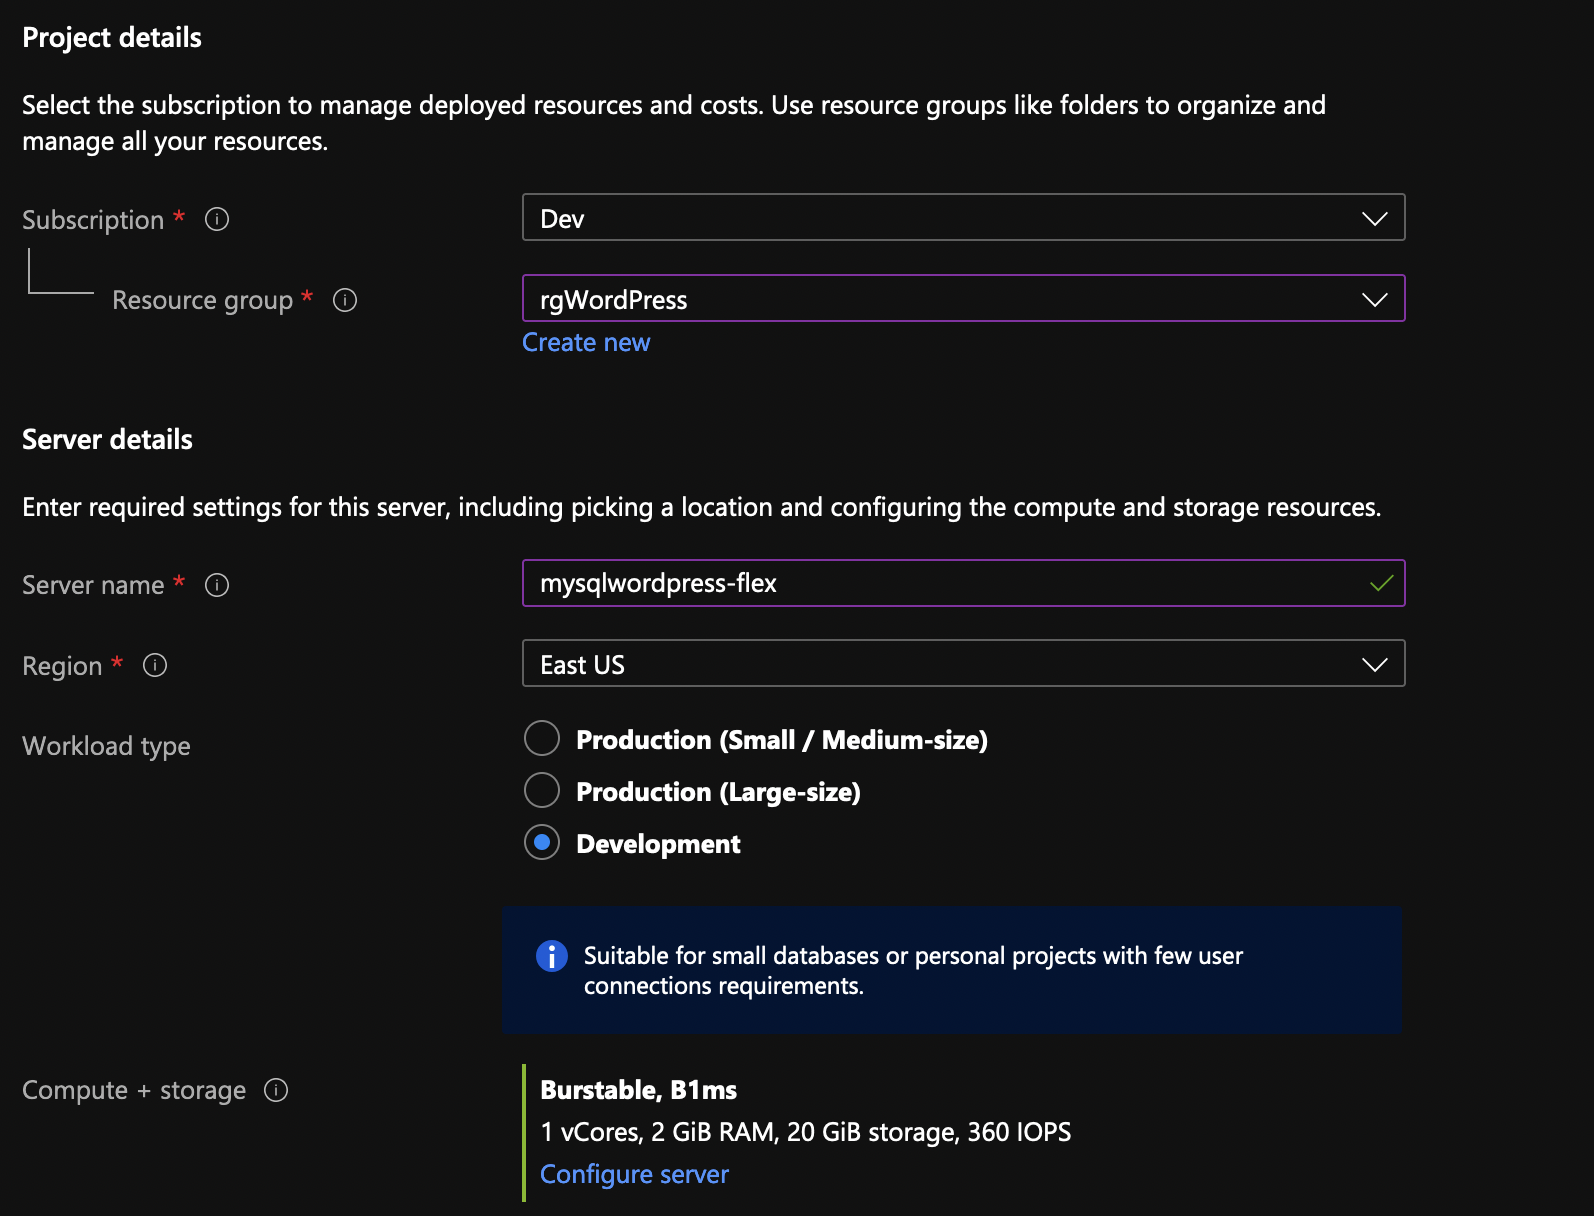
…and this.
A flexible MySQL server can’t have a private endpoint, but it can be VNET integrated, same as the Azure App Services. And if you choose for the flex server to be VNET integrated, you’ll need a dedicated and empty subnet, same as Azure App Services.
Once you provision the flex MySQL server, you’ll be able to manage it the same as a single server with a private endpoint. You can also see the entry in the private DNS zone for a flex server, same as with the single server. A flex server also allows you to have a hot standby HA pair but you can’t use this hot standby as a replica. A HA will double the price and you won’t be able to create replicas. The HA is in a different zone but in a same region and it allows forced and automatic failovers. And if you want to use a read only replica (up to 10), you have to take care of the SQL proxying using ProxySQL, HAProxy or Nginx.
So, if you want some sort of HA for the MySQL, go with the flexible MySQL. You’ll have automatic failover within the region. But if you want to recover from a regional failure, use a single MySQL server with a read replica in another region (flexible MySQL can’t have replica in another region) and when you need to failover, just promote the replica in a standalone server (you’ll also need an Azure App Service in the DR region). The bad thing is that once you promote a replica in a standalone server and the original regions comes back up, you can’t revert the DR MySQL server in a replica again.