
Lately, I was playing with pfSense trying to access my internal resources from outside (mostly my Plex server) so I made this tutorial on how to access my home network. I’ve used the official howto from pfSense, but it’s a little bit outdated and it doesn’t cover Linux/FreeBSD non-GUI, so there are some changes that I’ve made. I’ll be using IPsec IKEv2 AES256/SHA256/MSChapV2/DH14 on the pfSense side (strongSwan IPsec implementation) and the clients will use various VPN clients.
There are a lot of different versions of VPN IPsec implementation, so even the slightest updates can make the VPN fail. I’ll write the version of the server/client for each configuration, so you’ll know that it works. If you are using different versions of the OS or the client, it might not work. I will use only one pfSense config for all mobile clients. Unfortunately, pfSense does not support multiple mobile clients configs as of 2.4.2.
How this works? Each client will receive a certificate and a username and a password. The certificate is the same for all clients, but the username/password is not.
Table of Contents
pfSense 2.4.2
In order for the VPN config to work we’ll need a Certificate Authority (CA) and a server certificate. If you have them already, then you can skip the following three parts, if not, I’ll show you how to create them.
pfSense FQDN
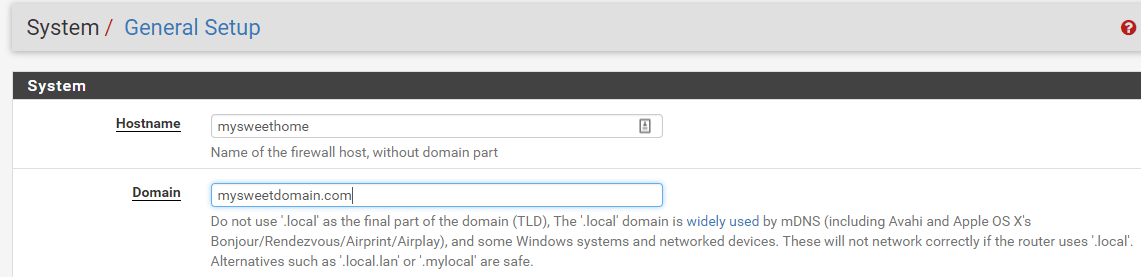
Check your FQDN first under System | General Setup. This is what I have as FQDN and I’ll use this FQDN later in my certificate and in my client’s config.
pfSense CA (Certificate Authority)
From the pfSense menu go to System | Cert. Manager. Click on Add and then you can choose to Import an existing Certificate Authority or Create an internal Certificate Authority. In my home lab I already have an existing CA (see this link on how to create your own CA), but for this post, I’ll create a new CA. Enter a Descriptive Name for the CA and choose to Create an internal Certificate Authority.

Under the Internal Certificate Authority section , fill out the values that suit your home/lab/company. In my case, I used 2048 for Key length (bits) and sha256 for Digest Algorithm. Enter the Lifetime of the CA, I used 3650 days which is 10 years and fill out the rest of the form. Make sure to use your FQDN for the Common Name. For example, my pfSense box has an external IP assigned to the WAN interface which is 1.2.3.4. Also, somewhere in my DNS, I resolve this IP to mysweethome.mysweetdomain.com. You have to put mysweethome.mysweetdomain.com for Common Name.
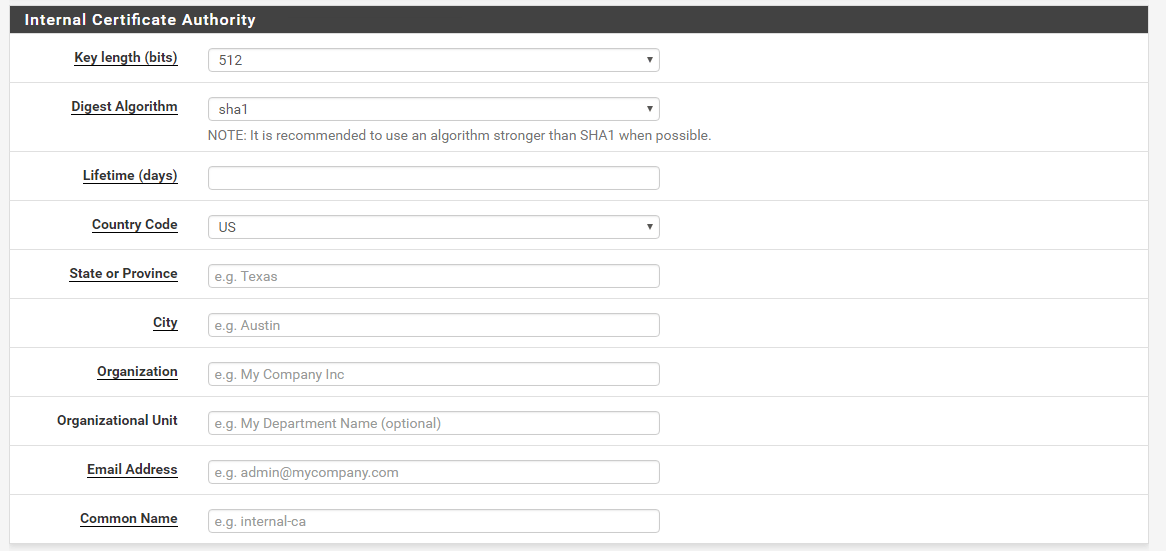
Click Save when done.
pfSense Server Certificate
From the pfSense menu go to System | Cert. Manager. Click on the Certificates tab and choose Create an internal Certificate.

For the Internal Certificate section, choose the CA that you’ve just created, keep the same Key length and Digest Algorithm and fill out the rest of the form so it looks like this.
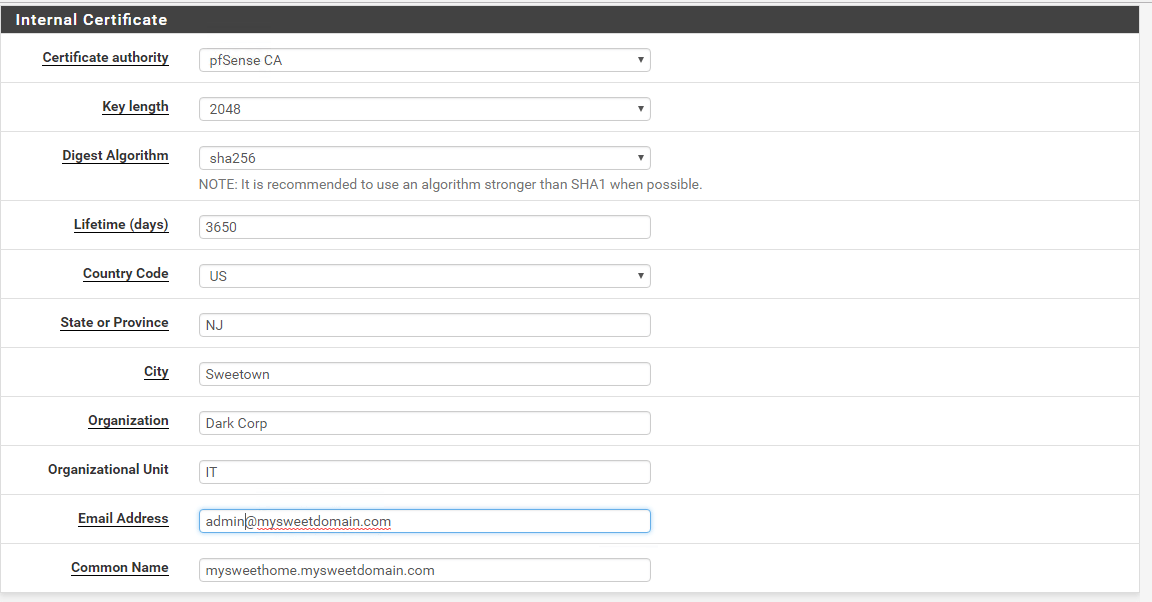
Again, for the Common Name choose the DNS name of your pfSense.
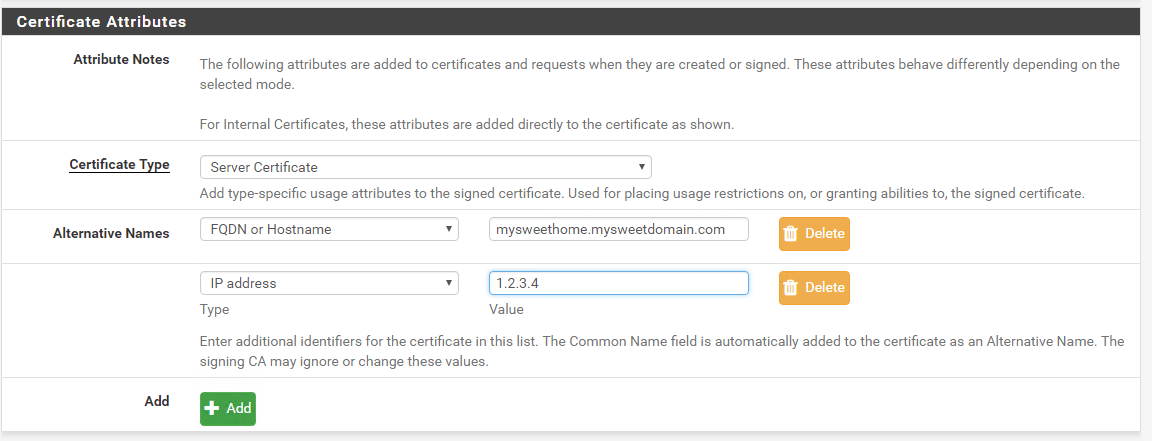
For the Certificate Attributes section, choose a Server Certificate, not User Certificate and enter the FQDN domain of your pfSense box, as well as the IP. The IP is not mandatory, but it means that when you create your client config, you can specify the IP of the pfSense, instead of using FQDN.
pfSense IPsec mobile clients config
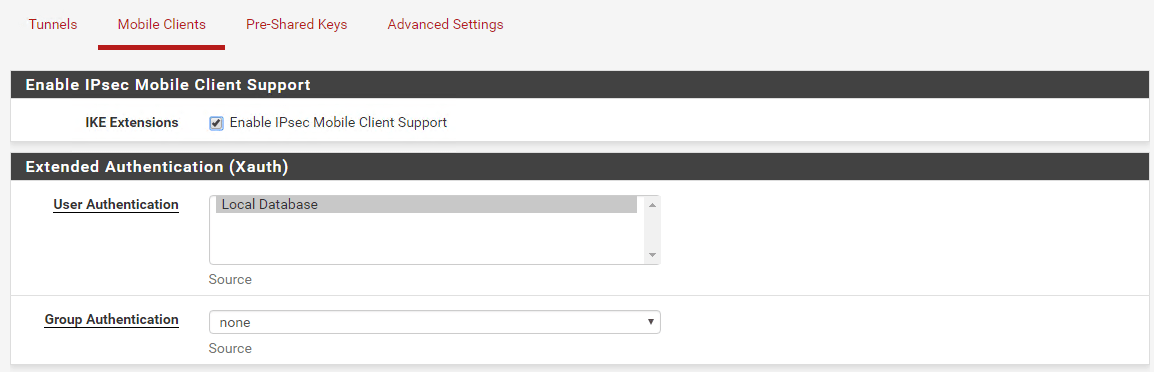
Once the certificates are in place, go to VPN | IPsec from the menu and then click on Mobile Clients. Enable the IKE Extensions, choose Local Database for User Authentication and none for Group Authentication.
For the Client Configuration section, use the following settings. Check the Virtual Address Pool and assign a subnet. This subnet will be assigned to the clients when they connect. In my case, I have a 192.168.2.0/24 subnet. My home subnet behind pfSense is 192.168.1.0/24, so make sure that the subnet behind pfSense and the subnet for the VPN clients don’t overlap. If you want you can provide a DNS Default Domain to the VPN clients. For example, my iPhone is not joined to my local domain, so when I connect to VPN and I want to access a server on a local network, I don’t have to specify the FQDN. It will be automatically added. In addition, make sure you provide a list of DNS Servers. In my case, the first two are my local Domain Controllers and the third one is the Google’s DNS, in case the first two are down. You can also provide a login banner, although I never saw where does that shows up on any of the clients.

pfSense IPsec tunnel Phase 1
Go back to the Tunnels tab and click on Add P1. Fill out the first section, so it looks like this.

For the second section Phase 1 Proposal (Authentication), make sure that you enter the FQDN of your pfSense. This value MUST be the same as the one that you used when creating the certificates. For My Certificate, choose the certificate that you just created.

For the thirds section Phase 1 Proposal (Algorithms), choose AES256, SHA256 and DH Group 14.
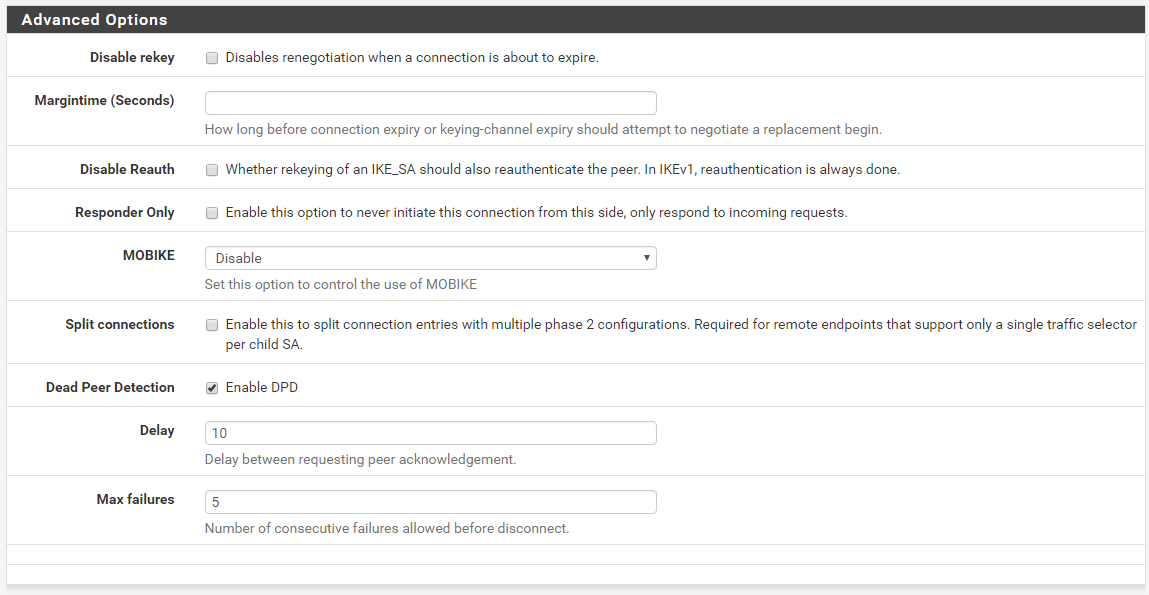
And for the Advanced Options, set it up like the screenshot below.
pfSense IPsec tunnel Phase 2
For the phase 2 of the tunnel, use these settings. In my case I choose Network and 0.0.0.0/0. This means that all the traffic from the clients will use the tunnel. For example, once connected, if you open up a browser and type what’s my IP in Google, you’ll get the external IP of the pfSense box. If you choose LAN Subnet, then only the traffic destined for your local home network will be using the VPN. The other Internet traffic will use whatever gateway you are connected to. For example, if I am using my iPhone connected to VPN and I use the Verizon network, the VPN will work, but if I type what’s my IP in a browser, I’ll get the external IP that Verizon provided me.

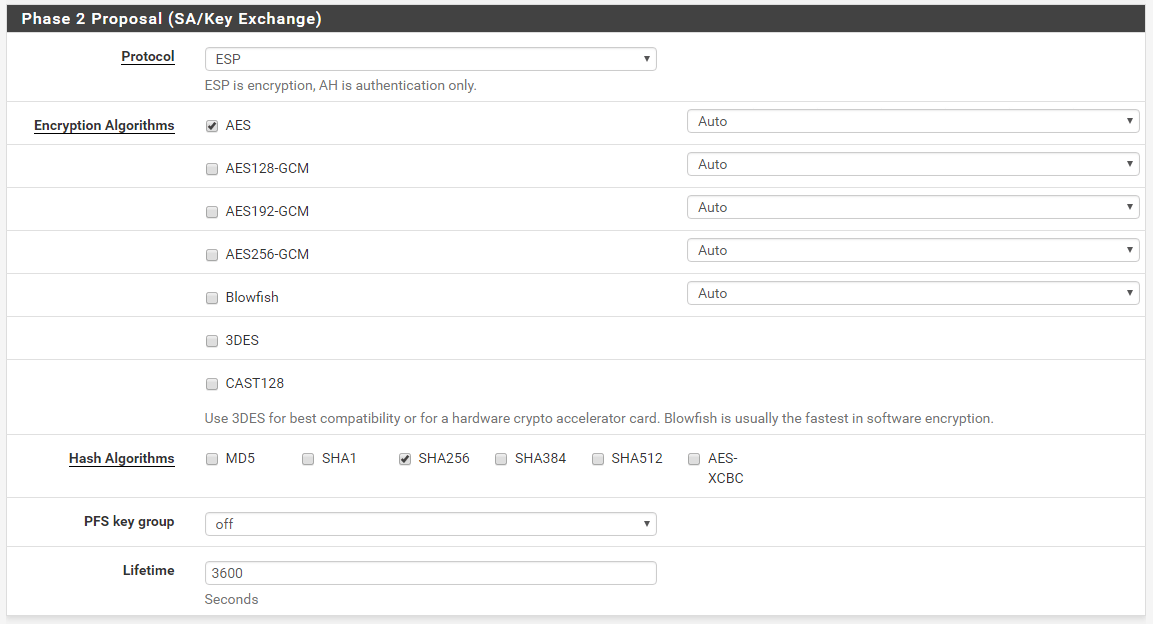
Use the following settings for the SA/Key Exchange.
You don’t have to do anything under Advanced Configuration.

pfSense Client Pre-Shared Keys
For each client, you will need a certificate and a username/password combo. You can’t connect with the same username and password from two different clients at the same time. The client that connects later will kick the former. So, go to VPN | IPsec and click on Pre-Shared Keys tab. Click Add to add a unique user. Make sure you choose EAP for Secret type. The Identifier is your user name, the Pre-Shared Key is your password.

pfSense Firewall Rules for IPsec
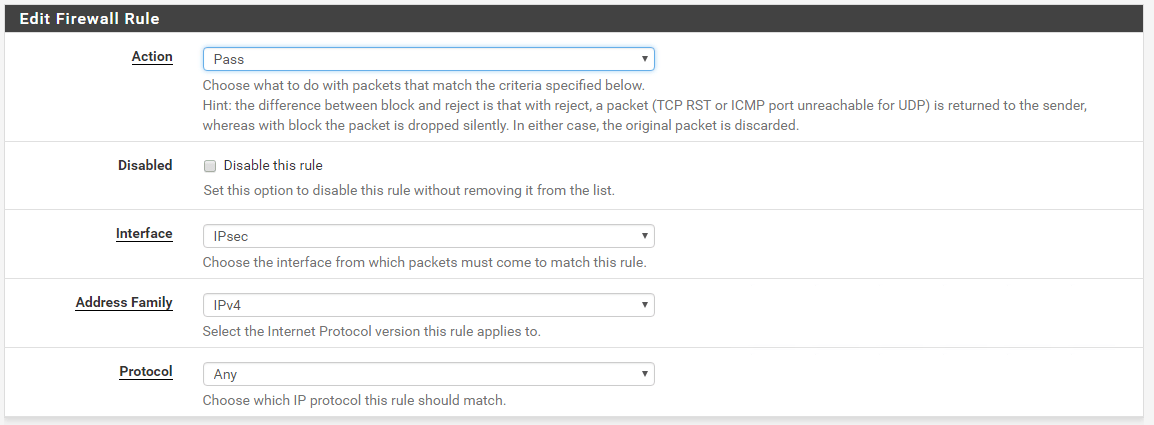
You will also need a rule that will allow the IPsec traffic. In my case, I will allow all the traffic that comes from the VPN clients. Go to Firewall | Rules and click on IPsec tab.
Pretty much,you’ll have to create a rule that looks like this.
…and this. Don’t change anything under the Display Advanced.
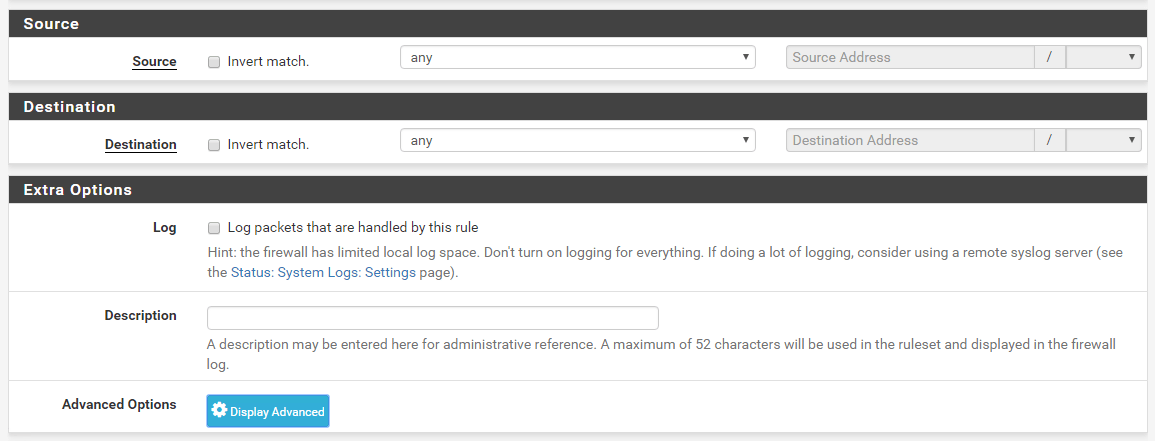
When you are done, it will look like this screenshot.

pfSense Export Certificate
The final step is to export the certificate. You will have to give this to each client along with their username and password. The certificate is the same for all of them. Go to System | Cert. Manager and click on CA tab. Under the Actions, click on the icon that looks like a sun.This will download a certificate in a PEM format. Send this file to your users however you find it fit. Do not send the certificate and the username and password in the same e-mail. Do not store them together. That’s what best practices say. :)
OK, we are done with pfSense, let’s move to the clients.

Windows 10, Windows 2012R2, Windows 2016 clients
These OSes work out of the box. There is no need to install any clients and no updates or service packs are needed. But, there are some changes that have to be made.
CA certificate
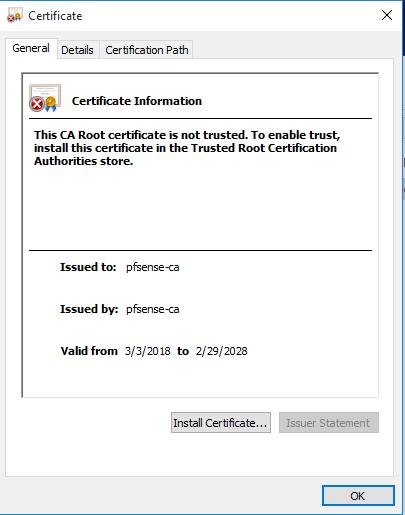
First, you’ll have to install the certificate from pfSense, the one that you’ve just downloaded. Transfer it to the Windows client and double-click on it. When the certificate shows up, click on Install Certificate.
Select Local Machine.

Select Place all certificates in the following store, then click Browse and choose Trusted Root Certification Authorities.
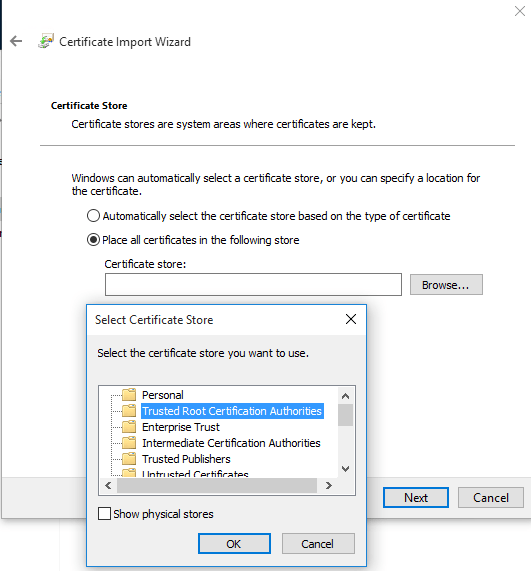
Click Finish. You should get a pop-up saying that the import was successful.

Registry change
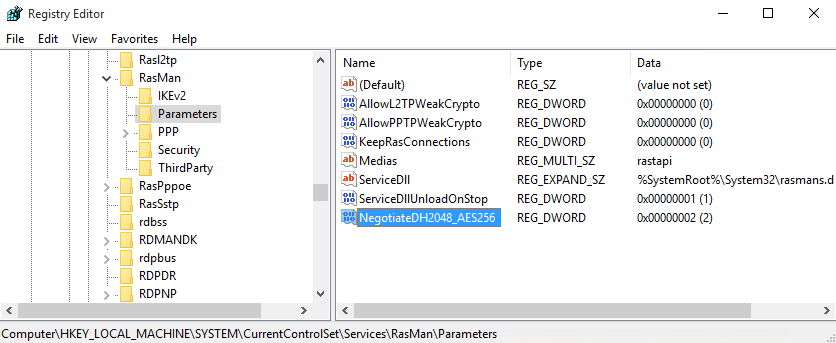
By default, Windows uses DH Group-2. This is a bit outdated and you’ll see later that strongSwan VPN client for Android dropped the support for this. So, we have to tell Windows to use IKEv2 with AES256 and SHA256 with DH14. Check this link for more info (look at table 2). In essence, we need to create a new registry entry and reboot. So, launch regedit and create a new DWORD key under HKLM\SYSTEM\CurrentControlSet\Services\RasMan\Parameters.

The name of the key is NegotiateDH2048_AES256 and the value is 2.
Reboot.
Create the VPN connection
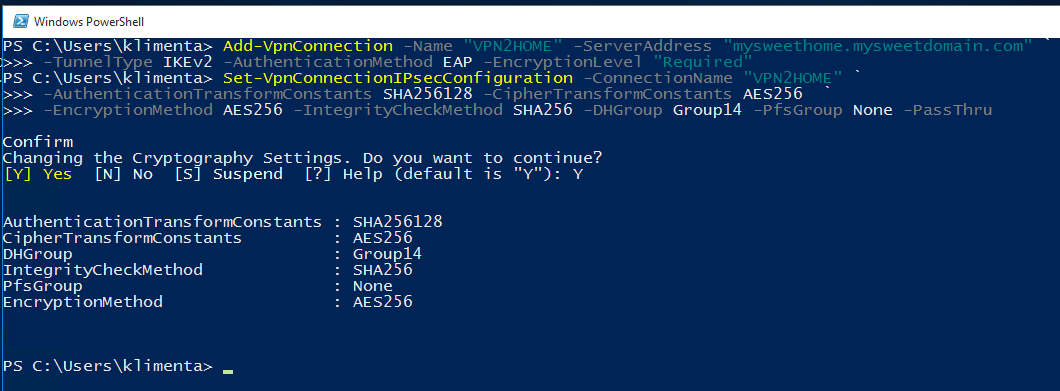
We’ll create the VPN now. Fire up powershell and execute these commands. Replace the ServerAddress parameter with the FQDN of your pfSense. For a detailed explanation of these commands visit the links here and here.
Add-VpnConnection -Name "VPN2HOME" -ServerAddress "mysweethome.mysweetdomain.com" `
-TunnelType IKEv2 -AuthenticationMethod EAP -EncryptionLevel "Required"
Set-VpnConnectionIPsecConfiguration -ConnectionName "VPN2HOME" `
-AuthenticationTransformConstants SHA256128 -CipherTransformConstants AES256  `
-EncryptionMethod AES256 -IntegrityCheckMethod SHA256 -DHGroup Group14 -PfsGroup None -PassThru
Say “Y” when prompted and you should see this.
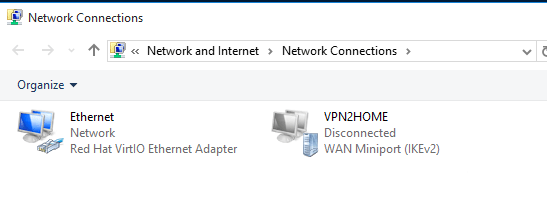
If you go to your Network Connections, you’ll see the VPN connection that you’ve just created.
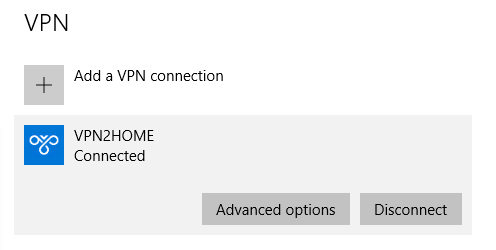
Right click and choose Connect/Disconnect. Enter the username and password.

You are good!
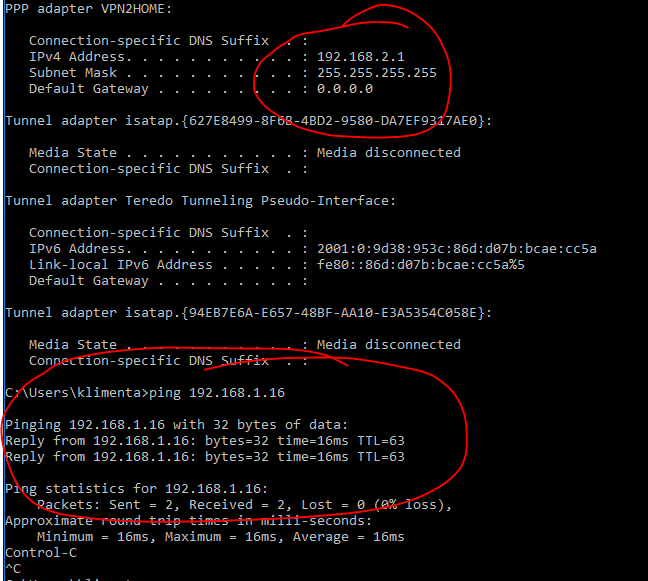
If you go to a command prompt and do ipconfig, you’ll see that you have an IP 192.168.2.1. That’s the subnet that we allocated for the remote clients. As you can see, I can ping an internal resource.
Remove the certificate (optional)
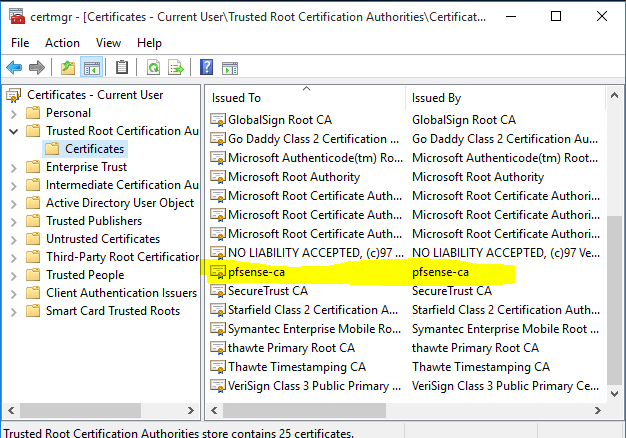
If you want to remove the certificate for some reason, you can start the Certificate Manager as Start | Run, type certmgr.msc and then under Trusted Root Certification Authorities you’ll see your certificate. Right click and Delete.
iPhone 11.2.6
iPhone also works without any clients installed. I am not sure if earlier versions of iOS will work, but according to this Apple support document, you should be able to use AES256/SHA256/DH14 as of iOS 9.3.
CA Certificate
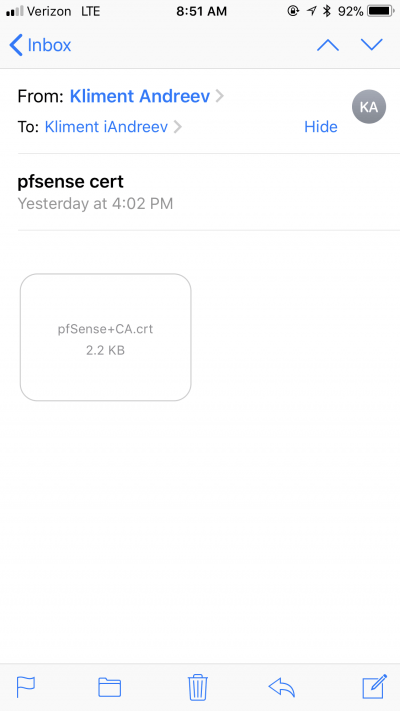
The easiest way is to send the certificate as attachment. Once received in your e-mail, just tap on it.
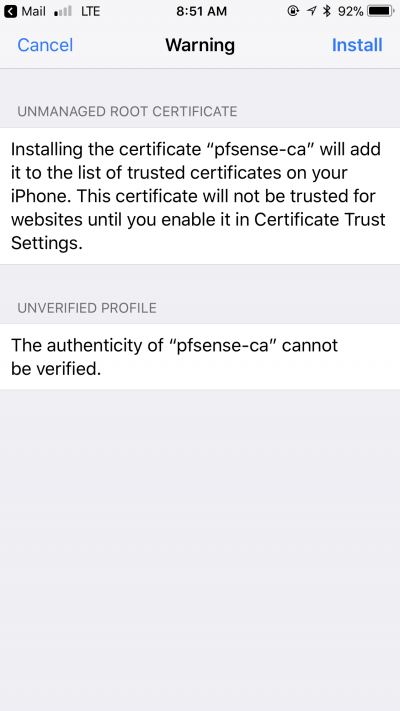
In the upper right corner, tap Install.

You’ll get a warning, bypass it by tapping on Install again in the upper right corner.
Create the VPN connection
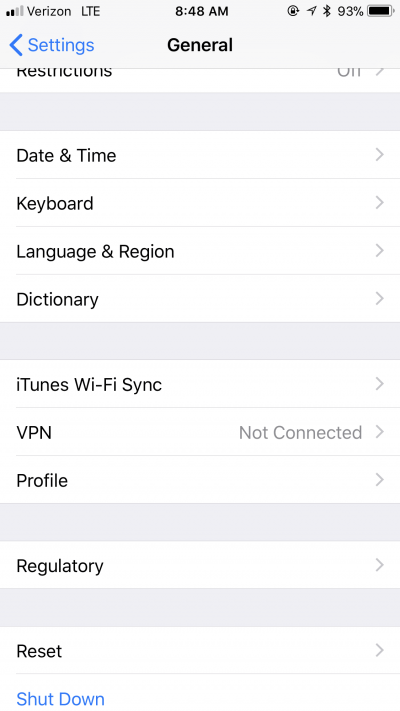
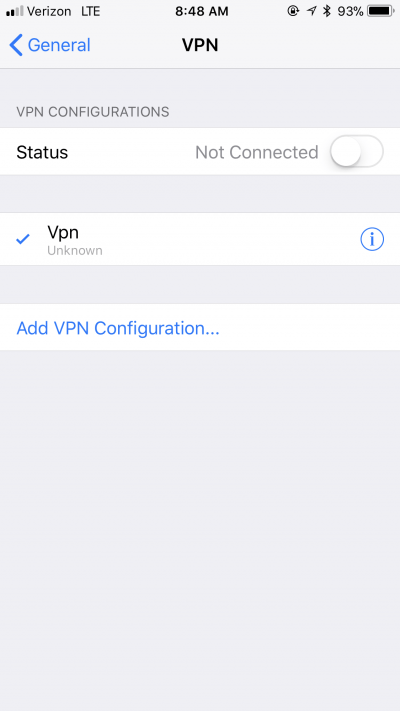
Tap on Settings and then General. Scroll a bit down until you see the VPN option.
Tap on Add VPN Configuration.
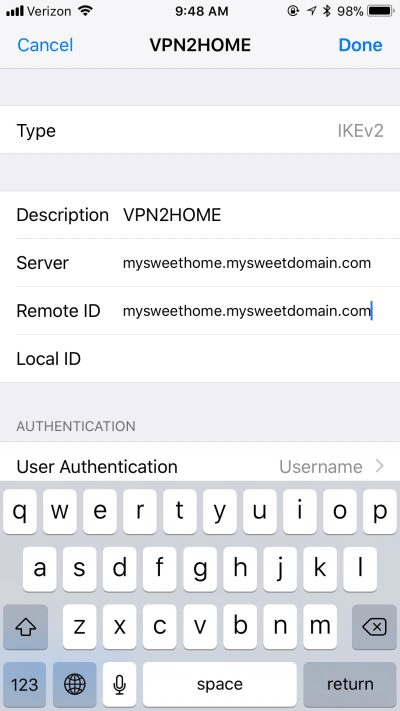
Choose IKEv2 for the Type, enter a Description and use the FQDN of your pfSense box for both Server and Remote ID.
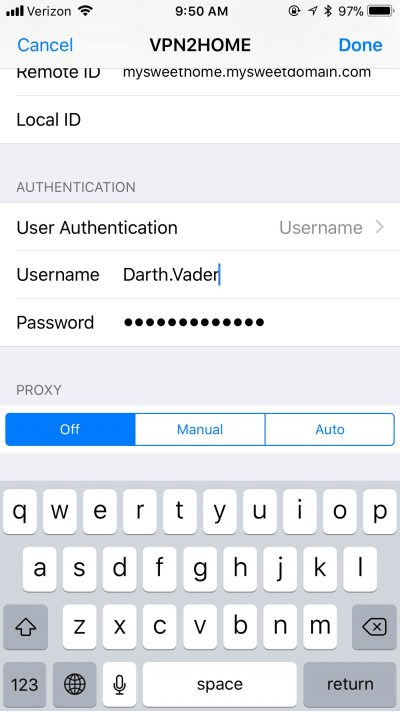
Under the Authentication section, choose Username for User Authentication and then enter your username and password. Tap Done in the upper-right corner when completed.
Now, you can connect. Slide the button to the right under Status and within a second or two, you should be connected.

You will see a VPN icon in the top portion of the screen, right next to your cell signal strength icon.
Remove the certificate (optional)
If you want to remove the certificate, tap on Settings | General, then scroll until you see the VPN entry. Right below, you’ll see an entry that says Profile. Tap on Profile. Tap on the Configuration Profile.
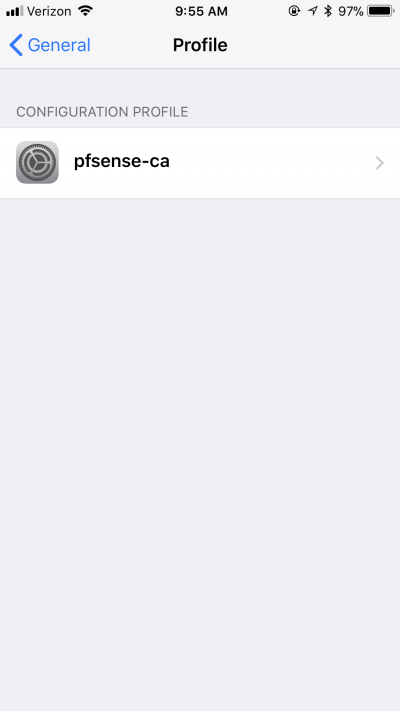
Tap on Remove Profile.
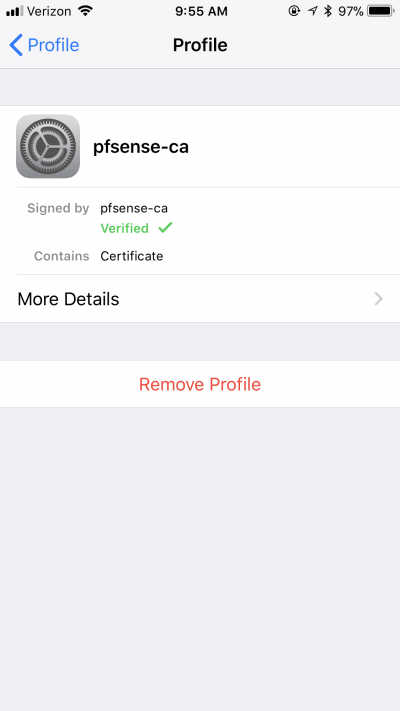
Or, you can go to Settings | General | About and then tap on Certificate Trust Settings to see your certificate.
Ubuntu 17.10 (artful) and GNOME
Ubuntu 17.10 doesn’t work out of the box, so some changes are needed. Same with the other clients, we’ll need a certificate and some libraries and plugins enabled.
CA Certificate
Transfer the pfSense CA certificate to your Ubuntu box. In my case, I’ve sent the certificate in an e-mail and then downloaded the certificate under Download folder from Firefox. We’ll have to make this certificate trusted in the certificate store. In a terminal window, do the following. You need to type what’s highlighted, the rest is the output. Pretty much, I am copying a file called pfSense+CA.crt to a folder called /usr/local/share/ca-certificates and the 2nd command is to update the CA certificates.
sudo cp Downloads/pfSense+CA.crt /usr/local/share/ca-certificates/
sudo update-ca-certificates
Updating certificates in /etc/ssl/certs...
1 added, 0 removed; done.
Running hooks in /etc/ca-certificates/update.d...
done.
Install libraries and plugins for strongSwan client
By default, there is no IKEv2 support in GNOME Network Manager, so we’ll have to install the necessary libraries. From a command prompt install the network-manager-strongswan plugin and the libraries for the extra plugins (eap-mschapv2 and eap-identity) that come with libcharon-extra-plugins.
sudo apt-get install network-manager-strongswan libcharon-extra-plugins
This is what it looks like if I check the version.
dpkg-query -l | grep swan
ii  libstrongswan                              5.5.1-4ubuntu2.2                            amd64        strongSwan utility and crypto library
ii  libstrongswan-extra-plugins                5.5.1-4ubuntu2.2                            amd64        strongSwan utility and crypto library (extra plugins)
ii  libstrongswan-standard-plugins             5.5.1-4ubuntu2.2                            amd64        strongSwan utility and crypto library (standard plugins)
ii  network-manager-strongswan                 1.4.2-1                                     amd64        network management framework (strongSwan plugin)
ii  strongswan-libcharon                       5.5.1-4ubuntu2.2                            amd64        strongSwan charon library
ii  strongswan-nm                              5.5.1-4ubuntu2.2                            amd64        strongSwan plugin to interact with NetworkManager
ii  strongswan-tnc-base                        5.5.1-4ubuntu2.2                            amd64        strongSwan Trusted Network Connect's (TNC) - base files
dpkg-query -l | grep charon
ii  libcharon-extra-plugins                    5.5.1-4ubuntu2.2                            amd64        strongSwan charon library (extra plugins)
ii  libcharon-standard-plugins                 5.5.1-4ubuntu2.2                            amd64        strongSwan charon library (standard plugins)
ii  strongswan-libcharon                       5.5.1-4ubuntu2.2                            amd64        strongSwan charon library
Create the VPN connection
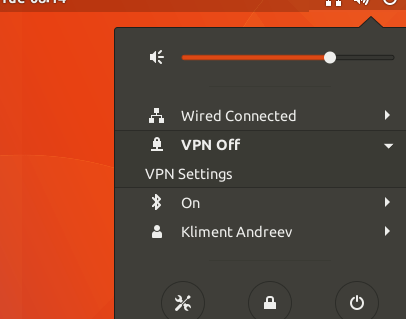
In the upper right corner, click on the icon for the network and choose VPN Settings.
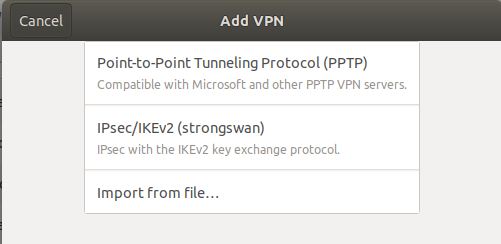
Click on the plus (+) sign to create a new VPN connection.

Choose IPsec/IKEv2 (strongswan).
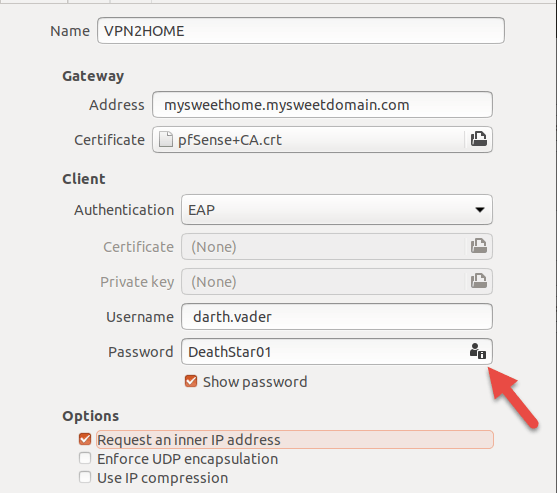
Then fill out the form as below. If you are unable to type the password, click on the icon marked with the red arrow and choose one of the options provided for storing the password.
Finally, click on the slider to enable VPN. If you have any issues, you can look at the logs at /var/log/syslog.
Remove the certificate (optional)
This is a local CA certificate file, so you can just delete the crt file that you’ve downloaded from /etc/ssl/certs, the Download folder and /usr/local/share/ca-certificates/.
Mac OS X 10.13.3 High Sierra
I’ve tested this configuration on High Sierra, but it should work for all OS X 10.x versions. As usual, I’ll start with the certificate.
CA Certificate
Transfer the certificate to your Mac and double click on it. It will prompt you for your admin password. Once completed, the Keychain will open up. This is where the certificates are stored. Find your certificate under System and double-click on it.

You’ll see that the certificate is not trusted, so expand the Trust and change When using this certificate to Always Trust.

Create the VPN connection
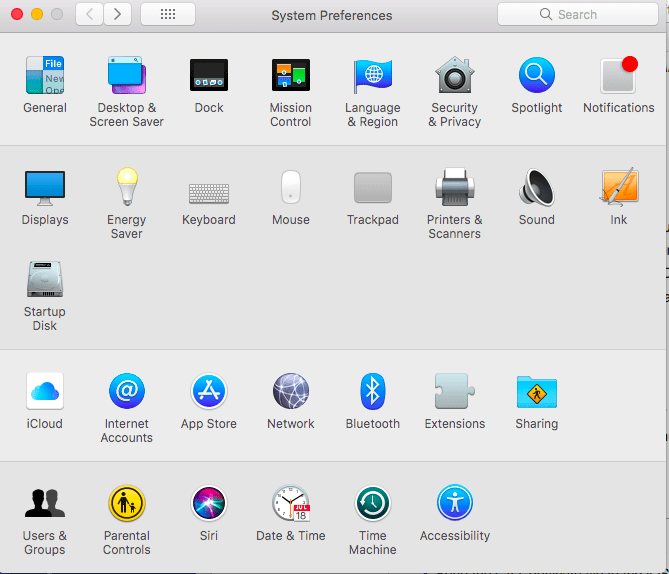
Go to your System Preferences and click the Network icon.
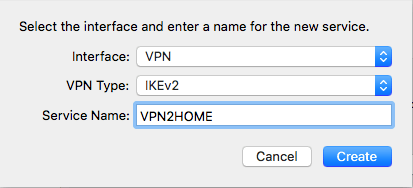
Click on the plus (+) icon in the bottom left corner.
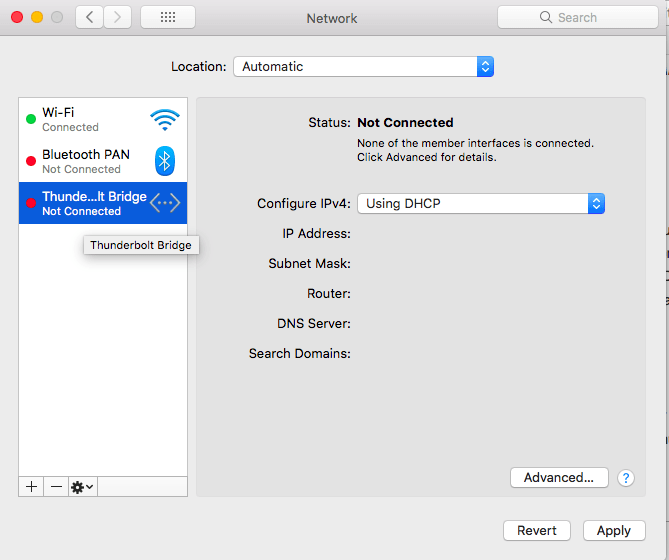
Change the Interface to VPN, VPN Type to IKEv2 and enter some description for the Service Name.
For the Server Address and Remote ID enter the FQDN name of your pfSense box. Click on Authentication Settings.
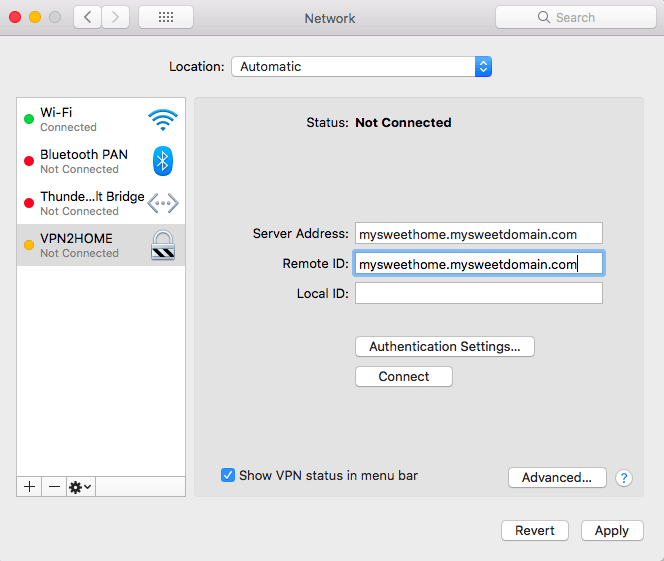
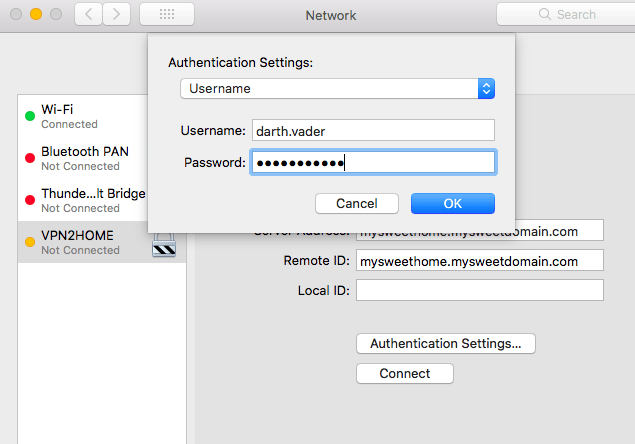
For the Authentication Settings choose Username and enter your username and password. Once you click OK you’ll go back o the previous dialog box where you can click Connect.
Remove the certificate (optional)
If you want to remove the certificate, all you have to do is to launch Keychain (Go | Utilities | Keychain Access.app), find your certificate, right-click and Delete. You’ll be prompted for the admin password to do that.
Android 6.x Marshmallow
I’ve tested the configuration on an Android 6.x tablet and strongSwan client v1.9.6. From what I see, as long you use this client, you should be able to use the VPN even with Android 5.
CA Certificate
Get the certificate on the device. In my case, I sent the certificate over e-mail and used the Firefox browser to access my web based e-mail. I’ve downloaded the certificate under Downloads folder on my Android tablet. You don’t have to do anything with the certificate now, just remember where it is.
Install the strongSwan client
Go to the app store (Google Play), download and install the strongSwan client.
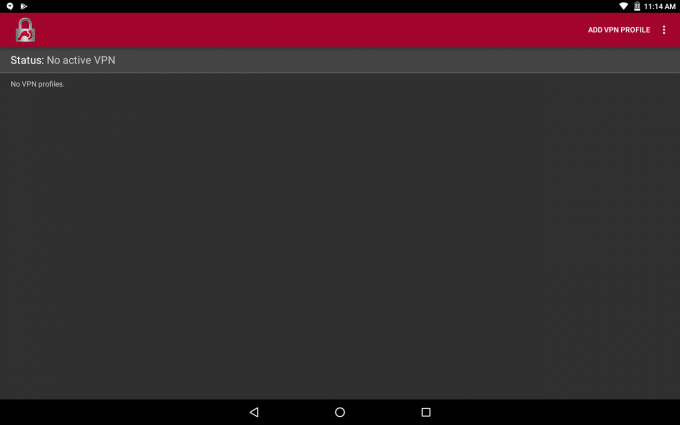
Create the VPN connection
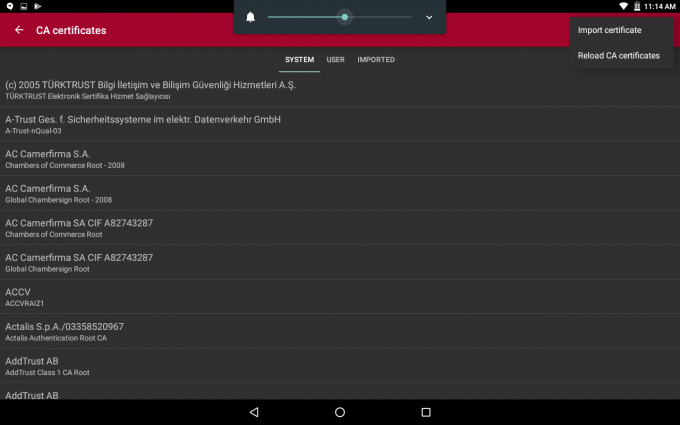
Open the strongSwan client and in the upper right corner, tap on the three vertical dots.
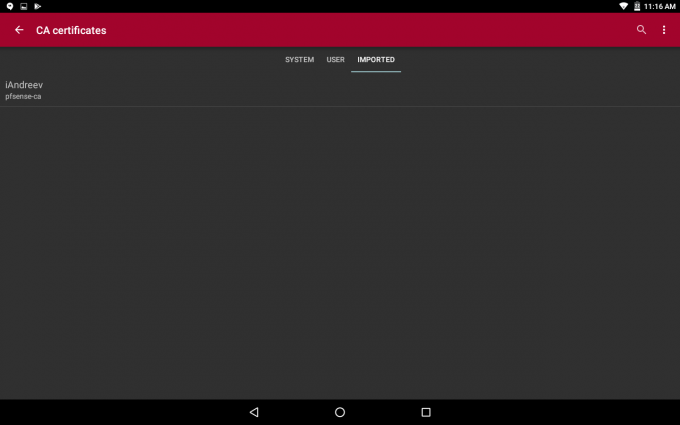
Then tap on CA certificates.
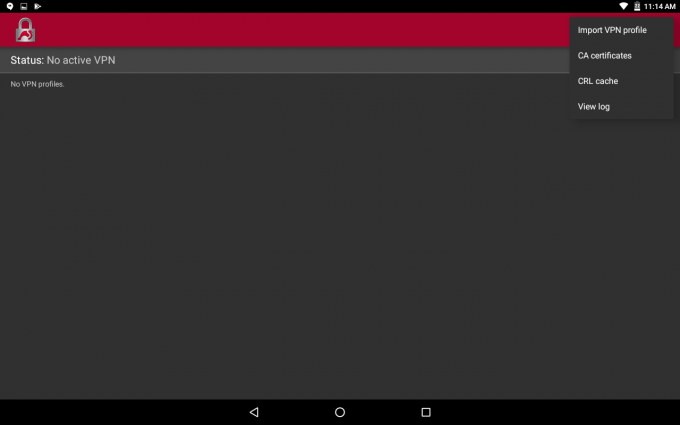
Tap on Import certificate.
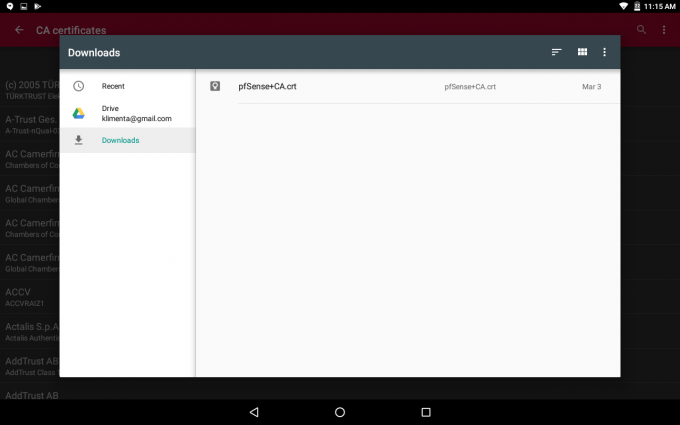
Select the CA certificate that you’ve just downloaded.
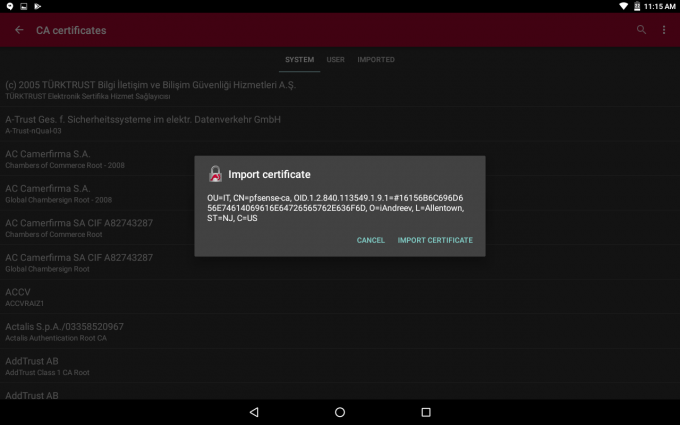
Tap on Import Certificate.
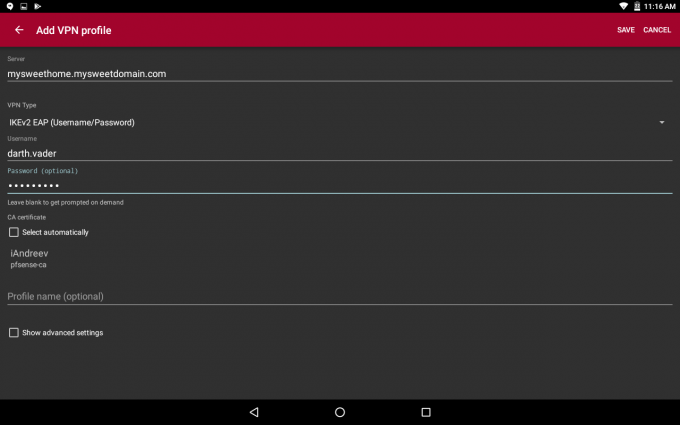
Once imported, go back and tap on Add VPN Profile. Fill out the form so it looks like this. For the Server, enter the FQDN of the pfSense box, choose IKEv2 EAP for VPN Type, enter the username and password and then uncheck Select automatically for CA certificate.
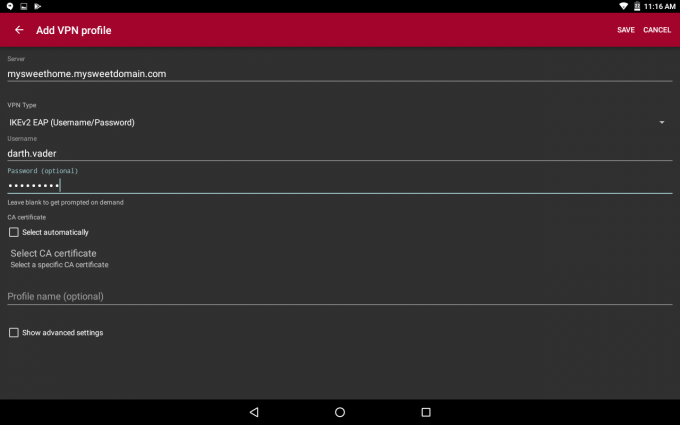
Tap Select CA certificate, tap on Imported and select the certificate that you’ve imported.
Click Save in the upper right corner and you are ready to connect.
CentOS 7 (non-GUI)
The CentOS 7 client that I am using comes with firewalld enabled and SElinux disabled. You don’t have to make any firewall changes.
Install strongSwan
strongSwan doesn’t come up in the standard repo, so you’ll have to install the EPEL first.
yum install epel-release
Then install strongSwan and enable it so it starts on boot.
yum install strongswan
systemctl enable strongswan
CA Certificate
Get the certificate and place it under /etc/strongswan/ipsec.d/cacerts. We will need the DN (Distinguished Name) from the certificate. Replace certfilename.crt with the name of your certificate file.
openssl x509 -noout -in /etc/strongswan/ipsec.d/cacerts/certfilename.crt -issuer
You’ll see something like this:
issuer= /C=US/ST=XY/L=Town/O=something/[email protected]/CN=whatever/OU=YX.
Copy the value that’s after = /.
Create the VPN connection
Go to /etc/strongswan and edit ipsec.conf. Make sure your config file looks like this. Replace the values for right and put your FQDN of your pfSense box, enter the username under eap_identity and paste the value for the DN under rightca.
conn rw-base
    dpdaction=restart
    dpddelay=30
    dpdtimeout=90
    fragmentation=yes

conn vip-base
    also=rw-base
    leftsourceip=%config

conn ikev2-eap-mschapv2
    also=vip-base
    keyexchange=ikev2
    ike=aes256-sha256-modp2048!
    leftauth=eap-mschapv2
    rightauth=pubkey
    right=mysweethome.mysweetdomain.com
    eap_identity=darth.vader
    rightca="C=US/ST=XY/L=Town/O=something/[email protected]/CN=whatever/OU=YX"
    rightsubnet=0.0.0.0/0
    auto=add
Edit ipsec.secrets and enter your username and password.
# ipsec.secrets - strongSwan IPsec secrets file
darth.vader : EAP "DeathStar01"
Finally, launch the connection.
systemctl restart strongswan
strongswan up ikev2-eap-mschapv2
BTW, you can replace the ikev2-eap-mschapv2 with vpn in ipsec.conf file (line 11), so you can start the connection as strongswan up vpn.
You can bring the connection down with…down.
strongswan down ikev2-eap-mschapv2
You should be able to ping the internal resources now. I wasn’t able to ping the resources internally using the FQDN, only by IP. There is something how CentOS/Fedora compiled the package. See this link.
I didn’t bother to investigate further.
FreeBSD (non-GUI)
FreeBSD comes up with the generic kernel already configured for IPsec. I didn’t test my config if my FreeBSD client is behind the NAT, but I think you should recompile the generic kernel and add support for NAT_T. Not 100% sure though, it’s on my to do list. So, this config will probably work only if your FreeBSD box has a public IP.
Install strongSwan
Install strongSwan from the packages.
pkg install strongswan
Let it start on boot. Add this line in /etc/rc.conf.
strongswan_enable="YES"
CA Certificate
Get the certificate and place it under /usr/local/etc/ipsec.d/cacerts. We will need the DN (Distinguished Name) from the certificate. Replace certfilename.crt with the name of your certificate file.
openssl x509 -noout -in /usr/local/etc/ipsec.d/cacerts/certfilename.crt -issuer
You’ll see something like this:
issuer= /C=US/ST=XY/L=Town/O=something/[email protected]/CN=whatever/OU=YX.
Copy the value that’s after = /.
Create the VPN connection
Go to /usr/local/etc and edit ipsec.conf. Make sure your config file looks like this. Replace the values for right and put your FQDN of your pfSense box, enter the username under eap_identity and paste the value for the DN under rightca.
conn rw-base
    dpdaction=restart
    dpddelay=30
    dpdtimeout=90
    fragmentation=yes

conn vip-base
    also=rw-base
    leftsourceip=%config

conn ikev2-eap-mschapv2
    also=vip-base
    keyexchange=ikev2
    ike=aes256-sha256-modp2048!
    leftauth=eap-mschapv2
    rightauth=pubkey
    right=mysweethome.mysweetdomain.com
    eap_identity=darth.vader
    rightca="C=US/ST=XY/L=Town/O=something/[email protected]/CN=whatever/OU=YX"
    rightsubnet=0.0.0.0/0
    auto=add
Edit ipsec.secrets and enter your username and password.
# ipsec.secrets - strongSwan IPsec secrets file
darth.vader : EAP "DeathStar01"
Finally, launch the connection.
service strongswan restart
ipsec up ikev2-eap-mschapv2
BTW, you can replace the ikev2-eap-mschapv2 with vpn in ipsec.conf file (line 11), so you can start the connection as ipsec up vpn.
You can bring the connection down with…down.
ipsec down ikev2-eap-mschapv2
You should be able to ping the internal resources now.
7 comments
Thank you for the very detailed breakdown. This was exactly what I was searching for. Thanks!
Great article, much appreciated.
Thanks for taking the time to write this. This is the first guide I’ve found which is current, comprehensive and works out of the box. I’ve tested with iPhone, Windows and Android.
I’ve linked to this article from my blog, I hope that is okay.
https://nickver.de/gem/?p=316
I am glad that it helped you and that you linked the article.
It works after doing everything that is possible, I get an error, an error mapping group policy Windows 10
not work on win 10
Hi Kliment,
Excellent article, very detailed and very actual.
I concur with everyone else that this is the best article I have read so far on the web.
Everything went smooth with Windows 10 & Mac OS Big Sur installation, but the only problem that I have, is that on the Mac OS Sur it gets connected, receives an IP from the VPN, but I get no traffic across the network, meaning that I can not ping anything on the remote network, any ideas?
Thanks