
In this post I’ll explain how to install and configure BIND DNS server to act as an authoritative server for a public domain in a master/slave configuration. This is not a setup for a server that will act as a DNS server in your local environment and does DNS resolution for your local network. In this post, the DNS server won’t resolve any DNS queries except for the domain that it is authoritative. The domain that I’ll use is cloudwerk.us registered with Go Daddy, so some of the configurations will apply to Go Daddy only. The IPs and keys that I’ll use will be visible. The setup will be gone by the time you read this.
So, I have my master server, ns1.cloudwerk.us (67.205.160.87) and the slave server ns2.cloudwerk.us (104.248.184.142).
I will be using CentOS 7.5 and BIND 9.9.4-72. Before you start, make sure you have your domain purchased and you have 2 servers with public IPs up and running. You can leave the default registrant’s DNS servers for now.
Table of Contents
Installation, startup and control
First, I’ll install BIND on both servers. All commands below are executed as root.
yum -y install bind
Then, we have to configure the rndc (Remote Name Daemon Control) utility. This utility allows management of the named (DNS) daemon. Moreover, you can manage remote DNS servers and I’ll explain how. So, let’s create the keys (highlighted line is what you type, the rest is output). DO this on the master server only.
rndc-confgen -a -r /dev/urandom
wrote key file "/etc/rndc.key"
As you can see, there is a file called rndc.key created under /etc directory. This is the default directory where BIND expects to find its config files. The zone files are under /var.
Now, copy this file to the second server in the same location. You can use scp, copy & paste in a terminal session, it doesn’t matter. What matters is that you have to change the permissions and the owner of the file. BIND runs under the named user, not root. Do this on both servers.
cd /etc
chown root:named rndc.key
chmod 640 rndc.key
Let’s make sure that BIND starts on boot. On both servers, execute:
systemctl enable named
Now, we can start the BIND daemon on both.
systemctl start named
Check the logs.
tail /var/log/messages
Dec 19 16:33:40 master named[1308]: zone 1.0.0.127.in-addr.arpa/IN: loaded serial 0
Dec 19 16:33:40 master named[1308]: zone localhost.localdomain/IN: loaded serial 0
Dec 19 16:33:40 master named[1308]: zone 1.0.0.0.0.0.0.0.0.0.0.0.0.0.0.0.0.0.0.0.0.0.0.0.0.0.0.0.0.0.0.0.ip6.arpa/IN: loaded serial 0
Dec 19 16:33:40 master named[1308]: all zones loaded
Dec 19 16:33:40 master named[1308]: running
Dec 19 16:33:40 master systemd: Started Berkeley Internet Name Domain (DNS).
Dec 19 16:33:40 master systemd: Reached target Host and Network Name Lookups.
Dec 19 16:33:40 master systemd: Starting Host and Network Name Lookups.
Dec 19 16:33:40 master named[1308]: network unreachable resolving './DNSKEY/IN': 2001:500:84::b#53
Dec 19 16:33:40 master named[1308]: network unreachable resolving './NS/IN': 2001:500:84::b#53
We can’t start the server with the rndc utility, but we can stop it if needed with rndc stop or simply systemctl stop named.
To control the slave server from the master, we have to modify the main BIND configuration file, named.conf on the slave server. Also, the keys have to be the same, but we already took care of that part above.
So, in the same /etc directory, edit named.conf and add these lines, right before the options directive. Do this on the slave server, not the master.
include "/etc/rndc.key";

controls {
        inet 127.0.0.1 allow { localhost; } keys { "rndc-key"; };
        inet 104.248.184.142 allow { 67.205.160.87; } keys { "rndc-key"; };
};
If you look at my IPs above, this means that the rndc utility will be accepted from the localhost and from the the IP 67.205.160.87 which is the master server. But, we also have to tell BIND to listen on the public IP. By default, it listens on the localhost only.
Do this on BOTH servers. In named.conf find the options directive and modify the listen-on option so it looks like this. You should put the public IP of each server there, so the line will differ on both servers.
//Master server
listen-on       { 127.0.0.1; 67.205.160.87; };
//Slave server
listen-on       { 127.0.0.1; 104.248.184.142; };
Allow traffic on the firewalls if you have them enabled. Do this on both.
firewall-cmd --add-port=53/tcp --permanent
firewall-cmd --add-port=53/udp --permanent
On the master node, do this.
firewall-cmd --permanent --zone=public --add-rich-rule='
  rule family="ipv4"
  source address="104.248.184.142/32"
  port protocol="tcp" port="953" accept'
On the slave node, do this.
firewall-cmd --permanent --zone=public --add-rich-rule='
  rule family="ipv4"
  source address="67.205.160.87/32"
  port protocol="tcp" port="953" accept'
Reload the rules on both.
firewall-cmd --reload
Restart BIND on both.
systemctl restart named
Now, you can manage them with rndc.
rndc reload
rndc status
From the master server, try to reload the slave server.
rndc -s 104.248.184.142 reload
server reload successful
What we also want to do is tell the OS that from now on, the default DNS server will be our local DNS.
So, edit /etc/resolv.conf and add this line as the first line on both.
nameserver 127.0.0.1
If we try to ping google.com we should get a response or at least an IP resolved. That’s good. From another computer, try to use any of our servers as a DNS. This is what you should get: Query refused. That’s good too, because we don’t want our server to be used as a DNS server for other domains. We want to access the Internet from the server, e.g. to update the server, so we need to be able to use the local server to resolve any domains but only from localhost.
C:\Users\klimenta>nslookup
Default Server:  google-public-dns-a.google.com
Address:  8.8.8.8

> server 67.205.160.87
Default Server:  [67.205.160.87]
Address:  67.205.160.87

> www.google.com
Server:  [67.205.160.87]
Address:  67.205.160.87

*** [67.205.160.87] can't find www.google.com: Query refused
You can allow this server to act as a forwarder by including recursion yes; option under options and allow-access to all IPs (0.0.0.0/0), but that’s not the intended use of an authoritative DNS server.
Zone file
Now that we have the servers up and running, let’s create the zone file. The zone file tells where the records can be found. On the master server only, edit named.conf and add these two lines right after the listen-on option. We are allowing the transfer of the zones to the slave server only
allow-transfer { localhost; 104.248.184.142; };
notify yes;
Go all the way at the bottom and add these line to define the zone file.
NOTE: If you have SELinux enabled, you can’t define your zone anywhere. Make sure you use /var/named for your zone file.).
zone "cloudwerk.us" {
        type master;
        file "/var/named/db.cloudwerk.us";
};
Now, go to the /var/named directory and create the zone file to look like this. The file should be called db.cloudwerk.us. Do this on the master server only. You might want to read the following link if you are not familiar with the syntax of a zone file.
$TTL    604800
@       IN      SOA     ns1.cloudwerk.us.       admin.cloudwerk.us. (
                        2018121901;     Serial
                        3H;             Refresh
                        15M;            Retry
                        2W;             Expiry
                        1D );           Minimum

; name servers - NS records
        IN      NS      ns1.cloudwerk.us.
        IN      NS      ns2.cloudwerk.us.

; name servers - A records
ns1.cloudwerk.us.       IN      A       67.205.160.87
ns2.cloudwerk.us.       IN      A       104.248.184.142

; other servers - A records
www.cloudwerk.us.       IN      A       52.71.63.84
All you have to do now is to reload the new config with rndc reload. At this point we have the master server up and running. Now, we have to configure the slave server. Edit the named.conf file and add these lines at the bottom. Very self-explanatory.
zone "cloudwerk.us" {
        type slave;
        masters { 67.205.160.87; };
        file "/var/named/slaves/db.cloudwerk.us";
};
Restart the named daemon and if you go to /var/named/slaves directory, you’ll see that the zone file replicated from the master. Finally, on both servers you have to allow the queries from the Internet. Edit named.conf and comment this line.
//allow-query { localhost; };
Reload with rndc reload on both after.
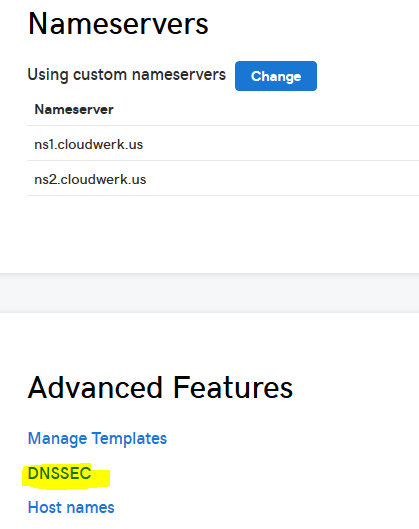
At this point, we have both the master and the slave servers configured, up and running. But no one on the Internet knows that our servers are authoritative servers. You have to make this change at your domain registrant. In my case, I’ve purchased the domain from Go Daddy, so I went to the DNS management panel and added two A records for ns1.cloudwerk.us and ns2.cloudwerk.us. Then, at the bottom of the web control panel, I’ve changed the DNS from xy.domaincontrol.com to custom and added my servers. I’ve encountered some issues, but the on-line chat with the support resolved this in 5 minutes. In essence, if you open up the DNS console, scroll all the way down and under Advanced Features, you’ll see Host names link. Click on this one and create two records, ns1 and ns2 with your IPs. Now, you can switch to Custom Nameserves on the same page.
Leave some time for replication. It might take up to 24 hrs, but in my case it took less than 20 mins.
You should know that you are in charge when these commands return your servers. In Windows:
C:\Users\klimenta>nslookup
Default Server:  google-public-dns-a.google.com
Address:  8.8.8.8

> set query=soa
> cloudwerk.us
Server:  google-public-dns-a.google.com
Address:  8.8.8.8

Non-authoritative answer:
cloudwerk.us
        primary name server = ns1.cloudwerk.us
        responsible mail addr = admin.cloudwerk.us
        serial  = 2018121901
        refresh = 10800 (3 hours)
        retry   = 900 (15 mins)
        expire  = 1209600 (14 days)
        default TTL = 86400 (1 day)
> set query=ns
> cloudwerk.us
Server:  google-public-dns-a.google.com
Address:  8.8.8.8

Non-authoritative answer:
cloudwerk.us    nameserver = ns1.cloudwerk.us
cloudwerk.us    nameserver = ns2.cloudwerk.us
In Linux/BSD if you use dig:
dig +short NS cloudwerk.us
ns2.cloudwerk.us.
ns1.cloudwerk.us.
Or, if you want to do it on-line.
This is what I got.
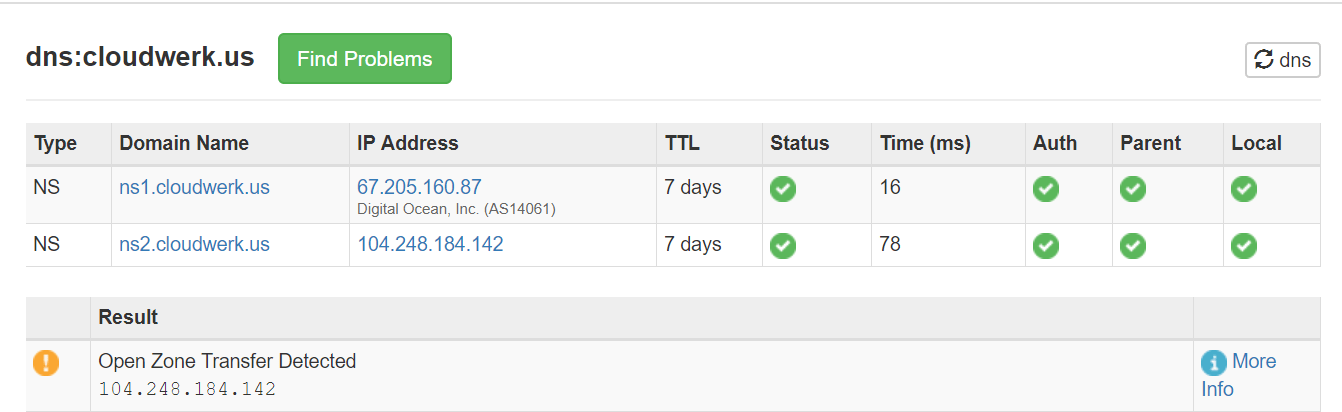
It says that the slave server is leaking the zone which means anyone can list all the records. In order to prevent that, we have to edit named.conf on the slave server and add this line after listen-on option.
allow-transfer { localhost; 67.205.160.87; };
Do rndc reload after and if you re-execute the test, you’ll see that everything looks OK.
DNSSEC (optional)
I won’t go into details of what is DNSSEC, I’ll just explain how to configure and secure your DNS server. It’s pretty much a PKI infrastructure for securing your records by signing them with a private key. If you need more info, you can find tons of info by googling DNSSEC.
On the master server, add this line after dnssec-validation yes; option in named.conf.
key-directory "/var/named/keys";
On the slave server don’t do anything.
Add these lines in the same file (named.conf) on the master server only. They should be below file directive where your zone is defined (at the bottom of the file). These lines are part of your zone config, not separate directives.
auto-dnssec maintain;
inline-signing yes;
Let’s create the KSK and ZSK keys. Master server only.
cd /var/named/keys
dnssec-keygen -r /dev/urandom -a RSASHA256 -b 2048 -f KSK -n ZONE cloudwerk.us
ls -l
echo "Take a note of the key file that ends with .key"
dnssec-keygen -r /dev/urandom -a RSASHA256 -b 2048 -n ZONE cloudwerk.us
You’ll see 4 files created. Scribble down the first key file that was created (.key), see the output from above. Reload the config on the master but make sure BIND can access the keys.
chown -R named:named /var/named/keys
rndc reload
You’ll see two more files (.jbk and .signed) under /var/named. These are the signed files. If you check the slaves directory on the slave node, you’ll see a signed file there as well.
Let’s do a test. Go to this link, type your domain name and hit enter.
You should see something like this.
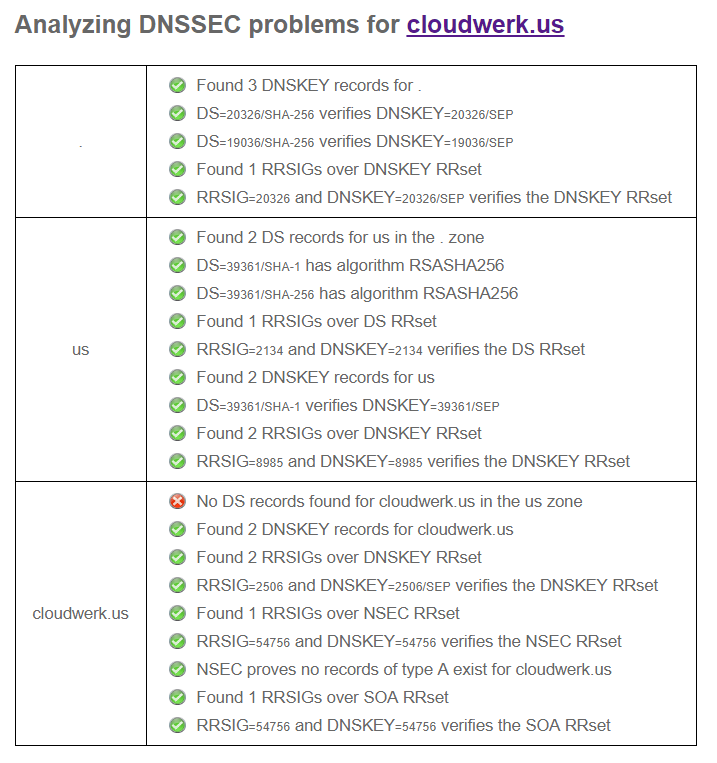
Now, stop the master server with rndc stop and refresh the web page. The test will take a little bit longer, because NS1 is down, but eventually you’ll get something like this.

That’s normal. It tells us that ns1 is down. What’s not normal is the red X mark that says “No DS records found for coudwerk.us in the us zone”. This translates as, yes you signed your zone, but no one can validate it. It’s like a fake certificate. So, we need to tell our registrant that we really own the domain and that we signed it.
This portion is also registrant’s dependent. I’ll describe how to overcome this error with Go Daddy.
So, go to the keys directory and execute this command against the first file, that one that you took note about.
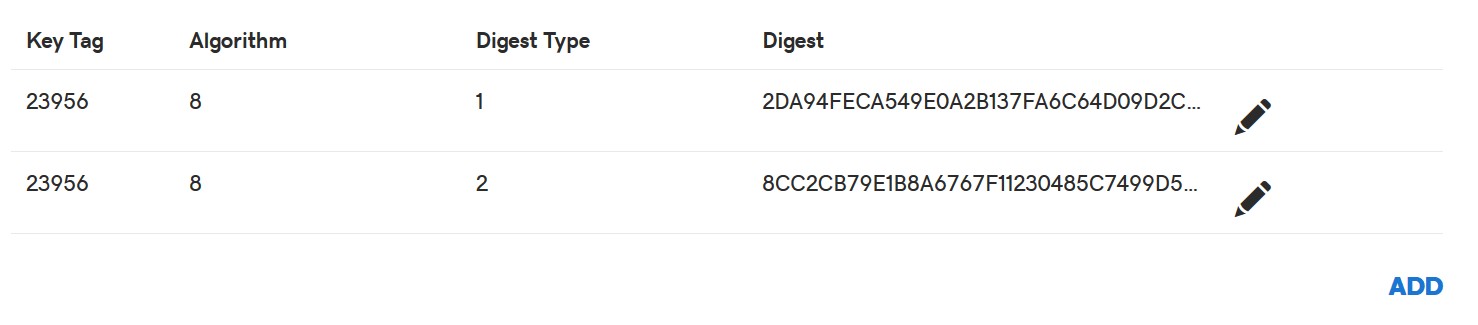
cd /var/named/keys
dnssec-dsfromkey Kcloudwerk.us.+008+23956.key
cloudwerk.us. IN DS 23956 8 1 2DA94FECA549E0A2B137FA6C64D09D2CBADF8864
cloudwerk.us. IN DS 23956 8 2 8CC2CB79E1B8A6767F11230485C7499D52162135E1F6DAA503ADEC4470E417A9
Now go to the DNS management panel for your domain at Go Daddy and you’ll see something like this. Click on DNSSEC and then click ADD.
Looks confusing but it’s very simple. Just look at the output from the dnssec-dsfromkey and add accordingly. You’ll have to add both hash values.
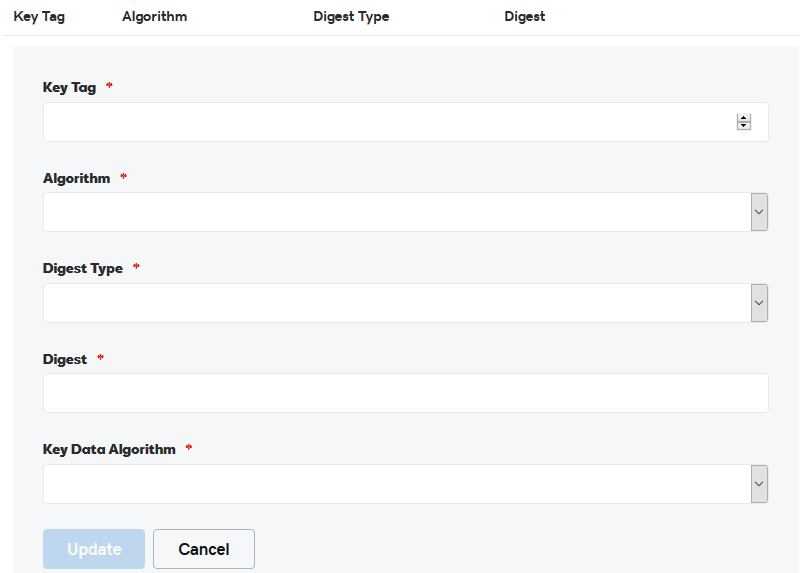
For Key Tag enter 23956, Algorithm is 8, Digest Type is 1, Digest is the hash value and Key Data Algorithm is also 8, the value of Algorithm. Click Update , do the 2nd line of the output and wait 30-45 mins. Sometimes, even more. It depends on your registrant.

At the end it should look like this.
And if you analyze your domain again, the result should look like this.
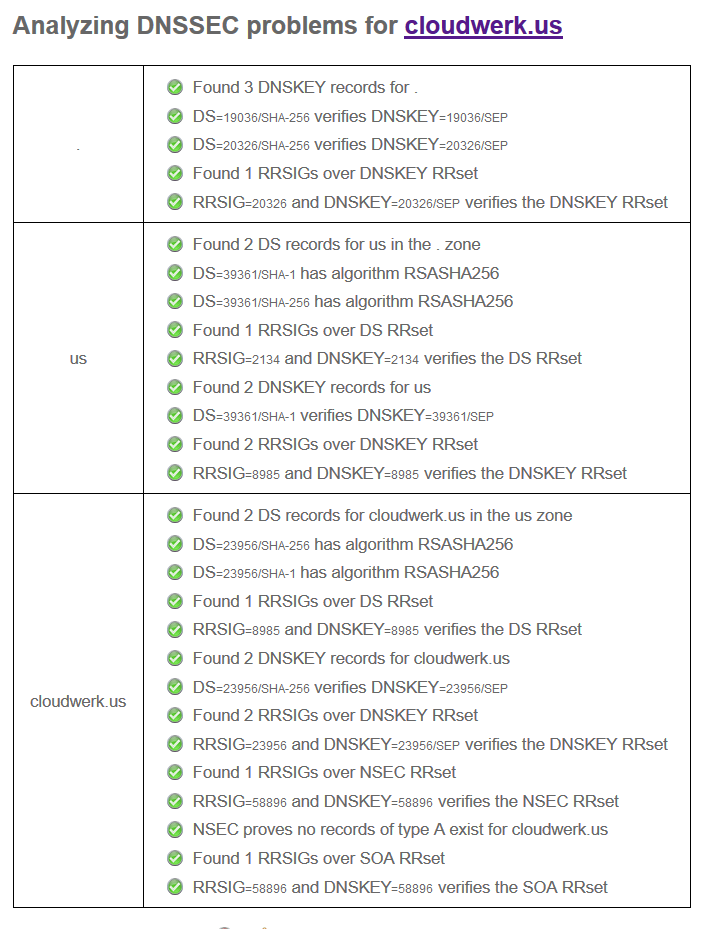
Or if you use dig, use the Google’s DNS server to check.
dig +trace +noadditional DS cloudwerk.us. @8.8.8.8 | grep DS