
In one of my previous posts, I’ve explained how to install LAMP on CentOS 6.4. Things changed a little bit in version 7, because of systemd.
Table of Contents
Hostname
First, let’s verify that we have a valid hostname and that it resolves properly. Type:
hostname
and make sure you have the FQDN of your server. If not, edit /etc/hostname and enter it there. In my case, it will be master.iandreev.us
cat /etc/hostname
master.iandreev.us
NOTE: Highlighted numbers are what you type. The rest is the response from the server.
Restart the service, so the changes take effect if you changed your hostname.
systemctl restart systemd-hostnamed
Install Apache
Apache can be installed by executing:
yum install httpd
Once installed, go to /etc/httpd/conf and edit httpd.conf. This is the main configuration file for Apache. Change and remove the comment (#) from the following directives, ServerAdmin and ServerName. In my case it looks like this.
ServerAdmin [email protected]
ServerName master.iandreev.us
This command will enable Apache to start on boot.
systemctl enable httpd
This command will start Apache
systemctl start httpd
Now, let’s test Apache from the server. Type the following command and then some text:
telnet localhost 80
Trying ::1...
Connected to localhost.
Escape character is '^]'.
asdfd
<!DOCTYPE HTML PUBLIC "-//IETF//DTD HTML 2.0//EN";>
<html><head>
<title>501 Not Implemented</title>
</head><body>
<h1>Not Implemented</h1>
<p>asdfd to / not supported.<br />
</p>
</body></html>
Connection closed by foreign host.
If you see the response like above, you are OK. If not check the log files under /var/log/httpd.
Now, from a browser on another computer, go to your server IP or name, in my case http://master.iandreev.us. Nothing will happen. That’s because there is a firewall enabled.
Check the firewall status.
systemctl status firewalld
firewalld.service - firewalld - dynamic firewall daemon
   Loaded: loaded (/usr/lib/systemd/system/firewalld.service; enabled)
   Active: active (running) since Sun 2015-05-31 13:49:37 UTC; 5h 37min ago
 Main PID: 403 (firewalld)
   CGroup: /system.slice/firewalld.service
           └─403 /usr/bin/python -Es /usr/sbin/firewalld --nofork --nopid

May 31 13:49:36 master.iandreev.us systemd[1]: Starting firewalld - dynamic ....
May 31 13:49:37 master.iandreev.us systemd[1]: Started firewalld - dynamic f....
May 31 13:57:04 master.iandreev.us systemd[1]: Started firewalld - dynamic f....
Hint: Some lines were ellipsized, use -l to show in full.
Let’s poke a hole for Apache. We’ll verify that the public zone is the default first, then add the http service to be allowed, then reload the rules and finally list the allowed services.
firewall-cmd --get-default-zone
public
firewall-cmd --add-service=http --permanent
success
firewall-cmd --reload
success
firewall-cmd --list-services
dhcpv6-client http ssh
You can also check the rules with:
iptables -L -n | grep 80
ACCEPT     tcp  --  0.0.0.0/0            0.0.0.0/0            tcp dpt:80 ctstate NEW
If you go to your page now, you’ll see something like this.

Apache Virtual hosts
The scenario described above works fine but only if you plan to run one single server. If you want to host different web apps, you’ll have to configure virtual hosts. The module for virtual hosts is enabled by default, so we’ll just have to define the virtual hosts. Go to /etc/httpd/conf.d and create a file called httpd-vhosts.conf.
cd /etc/httpd/conf.d
touch httpd-vhosts.conf
We’ll define two virtual hosts (blog.iandreev.us and mail.iandreev.us). Consider these URLs as two different web applications. Make sure that you have both of these hosts in the DNS so they resolve to the same IP of your server. Apache knows that these hosts are different by analyzing host headers. In my case httpd-vhosts.conf looks like this.
<VirtualHost *:80>
    ServerAdmin [email protected]
    DocumentRoot "/var/www/blog.iandreev.us"
    ServerName blog.iandreev.us
    ErrorLog "/var/log/httpd/blog.iandreev.us-error_log"
    CustomLog "/var/log/httpd/blog.iandreev.us-access_log" common
    <Directory "/var/www/blog.iandreev.us">
        Options All
        AllowOverride All
        Require all granted
    </Directory>
</VirtualHost>
<VirtualHost *:80>
    ServerAdmin [email protected]
    DocumentRoot "/var/www/mail.iandreev.us"
    ServerName mail.iandreev.us
    ErrorLog "/var/log/httpd/mail.iandreev.us-error_log"
    CustomLog "/var/log/httpd/mail.iandreev.us-access_log" common
    <Directory "/var/www/mail.iandreev.us">
        Options All
        AllowOverride All
        Require all granted
    </Directory>
</VirtualHost>
It’s pretty much self-explanatory, you have the server name, the location of log files, the root directories for the servers, admin’s e-mail etc.
Now, let’s create the two web sites. For each web-site I’ll specify a simple text file, just so you can see the difference.
cd /var/www
mkdir blog.iandreev.us mail.iandreev.us
echo "blog.iandreev.us"> blog.iandreev.us/index.html
echo "mail.iandreev.us"> mail.iandreev.us/index.html
chown -R apache:apache blog.iandreev.us/ mail.iandreev.us/
chmod -R 755 blog.iandreev.us/ mail.iandreev.us/
systemctl reload httpd
So, I’ve created two root directories, then created two text files that will be the main page for each site and finally I changed the owner and permissions. At the end, I’ve restarted Apache because we made changes to the configuration file for the virtual hosts.
Now, go to each of these web sites, in my case http://blog.iandreev.us and http://mail.iandreev.us and you’ll see that the main page is different.
SSL virtual hosts
First, we have to install mod_ssl and restart Apache.
yum install mod_ssl
apachectl restart
SSL uses certificates to test the authenticity, so you can buy one or for the purpose of testing, you can generate your own fake certificate authority (CA), request a certificate from the CA and then sign it.
Let’s say that we want another virtual host called https://test.iandreev.us that will run on port 443.
Let’s generate the certificate.
openssl genrsa -out test.iandreev.us.key 1024
openssl req -new -key test.iandreev.us.key -out test.iandreev.us.csr
openssl x509 -req -days 365 -in test.iandreev.us.csr -signkey test.iandreev.us.key -out test.iandreev.us.crt
Fill out the questions asked. The most important thing is “Common Name (eg, your name or your server’s hostname)”. Enter the FQDN of the domain in our case test.iandreev.us. The file with the .crt extension is your server certificate. Copy the certificate file *.crt under /etc/pki/tls/certs directory and copy the key file under /etc/pki/tls/private.
The definition for the SSL virtual hosts have the same structure as regular hosts on port 80, except that you have to specify the certificate path and the key path. Also, you have to specify the port 443, very similar to a regular host.
In our case, it will be.
<VirtualHost *:443>
        SSLEngine on
        SSLCertificateFile /etc/pki/tls/certs/test.iandreev.us.crt
        SSLCertificateKeyFile /etc/pki/tls/private/test.iandreev.us.key
        ServerAdmin [email protected]
        DocumentRoot /var/www/test.iandreev.us
        ServerName test.iandreev.us
        ErrorLog logs/test.iandreev.us-error_log combined
        CustomLog logs/test.iandreev.us-access_log combined
</VirtualHost>
See above (firewall-cmd –add-service=https –permanent && firewall-cmd –reload) how to open a firewall port. Replace service=http with service=https and you are all set.
MySQL or MariaDB
We’ll use MariaDB which is a drop-in binary replacement for MySQL.
yum install mariadb-server mariadb
systemctl enable mariadb
systemctl start mariadb
mysql_secure_installation
The first command installs the server and the client, the second line enables the server to start on boot, the third line starts the server and the fourth line configures MySQL/MariaDB for the first time.
Check my previous post. MySQL initial config is exactly the same.
There is no need to allow MySQL/MariaDB outside, so we won’t configure the firewall for MySQL.
PHP
We will install PHP and the MySQL module for PHP using:
yum install php php-mysql php-extensions php-curl php-zlib
Restart Apache after that.
systemctl restart httpd
BTW, you can also use apachectl command to start, stop or reload Apache. The syntax is apachectl stop or apachectl start, etc…
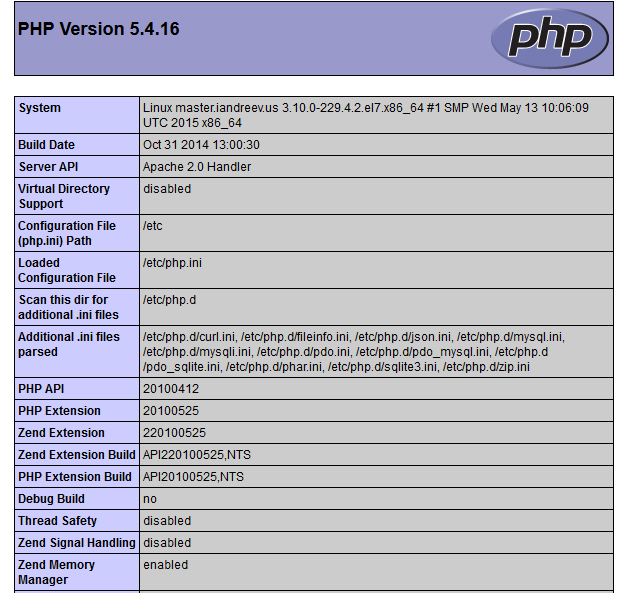
Now, let’s go to one of the virtual hosts that we created earlier and create a small PHP file.
cd /var/www/blog.iandreev.us
echo "<?php phpinfo(); ?>"> index.php
If you go to your web-site now, you’ll see something like this.
Congrats, if you made it, now you have a full LAMP stack installed. To see a working example, we’ll install WordPress. Pretty much all web-apps based on PHP are installed this way. You configure your virtual host, create the database and point your browser to the install or index file. The rest is just simple configuration.
WordPress
Let’s delete our blog directory first.
cd /var/www
rm -Rf blog.iandreev.us
Get the latest WordPress install file.
wget http://www.wordpress.org/latest.zip
The default CentOS doesn’t come up with unzip, so get unzip first and then unpack the archive.
yum install unzip
unzip latest.zip
You’ll see a directory called wordpress. Just rename it so it becomes a root folder for the virtual host.
In my case, I’ll rename the wordpress folder to blog.iandreev.us, because that’s what I have as a DocumentRoot in my config file for the virtual hosts.
mv wordpress blog.iandreev.us
chown -R apache:apache blog.iandreev.us
Let’s create the required database. We’ll specify the database name (wordpress), the user that will have owner rights (wpuser) and its password (secret).
mysql -u root -p
Type your root password and then type the following SQL commands.
CREATE DATABASE wordpress;
GRANT ALL PRIVILEGES ON wordpress.* TO "wpuser"@"localhost" IDENTIFIED BY "secret";
FLUSH PRIVILEGES;
QUIT;
Go to http://blog.iandreev.us, choose the default language and when prompted enter the values that you used when you created the database.
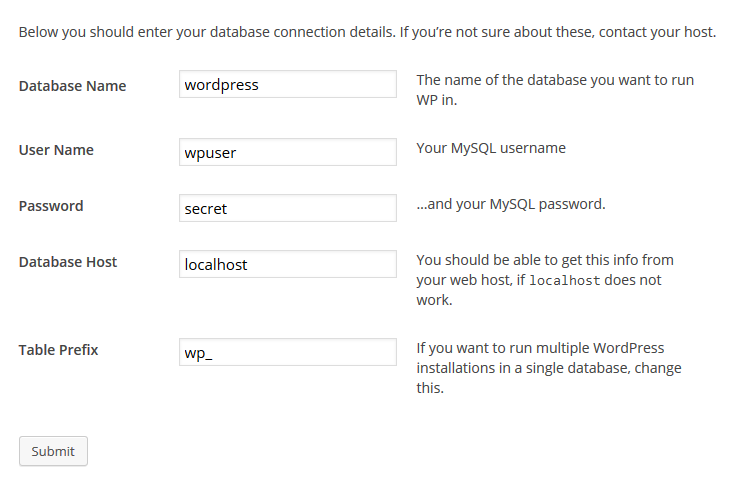
Click Submit, then Run Install and you are all set.