
In this post I’ll describe how to install Samba 4 to act as a Windows domain controller on a FreeBSD 10 server that sits in the cloud with a public IP. No worries, nothing will be exposed to the public. We’ll use OpenVPN + pf for that. What you need is a FreeBSD 10 server as a VPS with public IP, a Windows 7 computer with Internet connection that will join the domain, some patience and willing to troubleshoot reading logs if something goes haywire.
Table of Contents
Prep work
Get yourself a FreeBSD 10 server somewhere in the cloud with a public IP. Make sure that none of the ports are blocked, not on your server but on your VPS provider’s firewall. It doesn’t matter if some ports necessary to run a domain controller (135, 139) are blocked on your home network. E.g. my home Internet provided Comcast blocks these ports. If the port tree is missing, fetch it with portsnap. If the pf firewall is enabled on the BSD server, disable it (pfctl -d). You’ll enable it later. You can keep your Windows firewall enabled all the time and no changes will be necessary on your Windows computer except installing OpenVPN. If you want your NetBIOS domain to be named SOMETHING, then your FreeBSD hostname can’t be something.domain.com. In the examples below, my FreeBSD host will be dc.fluffycloud.us and my NetBIOS domain will be IANDREEV. I won’t hide any IPs or passwords. This is a sandbox server that will be long gone when you read this.
OK. Let’s get started.
Install OpenVPN 2.3.4 server
In my latest post I’ve described how to install OpenVPN, but this time, it’s going to be slightly different. Instead of tun, we’ll use tap adapter. The reason behind this is that Samba 4 can’t use tun, because tun adapters do not have a broadcast address. OpenVPN server can be installed from the ports.
cd /usr/ports/security/openvpn
make all install clean
Select the defaults.


Once completed, edit /etc/rc.conf and add:
openvpn_enable="YES"
This will allow OpenVPN server to start on boot. Now, let’s create the configuration file. By default, OpenVPN will look at openvpn.conf file at /usr/local/etc/openvpn/ directory. We’ll use one of the example files that came with OpenVPN.
cd /usr/local/etc
mkdir openvpn
cd /usr/local/share/examples/openvpn/sample-config-files/
cp server.conf /usr/local/etc/openvpn/openvpn.conf
Edit openvpn.conf and make sure that these directives below exist. For example, if you uncomment dev tap, you’ll have to comment dev tun. Both can’t work at the same time. What each line does is beyond the scope of this post. In essence, this configuration file will allow OpenVPN server to start in bridged mode, listening on port 1194 UDP and it will use certificates for authentication. In addition, the VPN IP address of the server will be 10.8.0.1 and it will act as a DHCP server for all clients, assigning a range of IPs from 10.8.0.50 to 10.8.0.100 with 10.8.0.1 and 8.8.8.8 as DNS servers. Finally, client-to-client will allow clients to see each other.
port 1194
proto udp
dev tap
ca ca.crt
cert server.crt
key server.key  # This file should be kept secret
dh dh1024.pem
ifconfig-pool-persist ipp.txt
server-bridge 10.8.0.1 255.255.255.0 10.8.0.50 10.8.0.100
server-bridge
push "dhcp-option DNS 10.8.0.1 8.8.8.8"
client-to-client
keepalive 10 120
comp-lzo
user nobody
group nobody
persist-key
persist-tun
status openvpn-status.log
verb 3
Now it’s time to create the certificates. First, we’ll build the certificate authority CA, then the server certificate and one client certificate.
cd /usr/local/share/easy-rsa/
sh
. ./vars
./clean-all
./build-ca
This is the output. Change the values to match your needs.
Generating a 1024 bit RSA private key
...................................++++++
..++++++
writing new private key to 'ca.key'
-----
You are about to be asked to enter information that will be incorporated
into your certificate request.
What you are about to enter is what is called a Distinguished Name or a DN.
There are quite a few fields but you can leave some blank
For some fields there will be a default value,
If you enter '.', the field will be left blank.
-----
Country Name (2 letter code) [US]:US
State or Province Name (full name) [CA]:NJ
Locality Name (eg, city) [SanFrancisco]:Lawrenceville
Organization Name (eg, company) [Fort-Funston]:iAndreev
Organizational Unit Name (eg, section) [changeme]:.
Common Name (eg, your name or your server's hostname) [changeme]:dc.fluffycloud.us
Name [changeme]:iAndreev
Email Address [[email protected]]:[email protected]
Let’s build the server certificate.
./build-key-server server
This is the output. Change the values to match your needs.
Generating a 1024 bit RSA private key
......++++++
..........++++++
writing new private key to 'server.key'
-----
You are about to be asked to enter information that will be incorporated
into your certificate request.
What you are about to enter is what is called a Distinguished Name or a DN.
There are quite a few fields but you can leave some blank
For some fields there will be a default value,
If you enter '.', the field will be left blank.
-----
Country Name (2 letter code) [US]:US
State or Province Name (full name) [CA]:NJ
Locality Name (eg, city) [SanFrancisco]:Lawrenceville
Organization Name (eg, company) [Fort-Funston]:iAndreev
Organizational Unit Name (eg, section) [changeme]:.
Common Name (eg, your name or your server's hostname) [server]:dc.fluffycloud.us
Name [changeme]:iAndreev
Email Address [[email protected]]:[email protected]

Please enter the following 'extra' attributes
to be sent with your certificate request
A challenge password []:
An optional company name []:
Using configuration from /usr/local/share/easy-rsa/openssl-1.0.0.cnf
Check that the request matches the signature
Signature ok
The Subject's Distinguished Name is as follows
countryName           :PRINTABLE:'US'
stateOrProvinceName   :PRINTABLE:'NJ'
localityName          :PRINTABLE:'Lawrenceville'
organizationName      :PRINTABLE:'iAndreev'
commonName            :PRINTABLE:'dc.fluffycloud.us'
name                  :PRINTABLE:'iAndreev'
emailAddress          :IA5STRING:'[email protected]'
Certificate is to be certified until Jul 22 14:52:51 2024 GMT (3650 days)
Sign the certificate? [y/n]:y

1 out of 1 certificate requests certified, commit? [y/n]y
Write out database with 1 new entries
Data Base Updated
Now, let’s create a certificate for one client. In my case, the hostname is liquid. The name of the client host doesn’t matter, it’s more like a unique description, but make sure that the common name is unique. Otherwise, you’ll receive an error saying “failed to update database, TXT_DB error number 2“.Sign the certificate as well.
./build-key liquid
This is the output. Change the values to match your needs.
Generating a 1024 bit RSA private key
.....++++++
............++++++
writing new private key to 'liquid.key'
-----
You are about to be asked to enter information that will be incorporated
into your certificate request.
What you are about to enter is what is called a Distinguished Name or a DN.
There are quite a few fields but you can leave some blank
For some fields there will be a default value,
If you enter '.', the field will be left blank.
-----
Country Name (2 letter code) [US]:
State or Province Name (full name) [CA]:NJ
Locality Name (eg, city) [SanFrancisco]:Lawrenceville
Organization Name (eg, company) [Fort-Funston]:iAndreev
Organizational Unit Name (eg, section) [changeme]:.
Common Name (eg, your name or your server's hostname) [liquid]:liquid
Name [changeme]:iAndreev
Email Address [[email protected]]:[email protected]

Please enter the following 'extra' attributes
to be sent with your certificate request
A challenge password []:
An optional company name []:
Using configuration from /usr/local/share/easy-rsa/openssl-1.0.0.cnf
Check that the request matches the signature
Signature ok
The Subject's Distinguished Name is as follows
countryName           :PRINTABLE:'US'
stateOrProvinceName   :PRINTABLE:'NJ'
localityName          :PRINTABLE:'Lawrenceville'
organizationName      :PRINTABLE:'iAndreev'
commonName            :PRINTABLE:'liquid'
name                  :PRINTABLE:'iAndreev'
emailAddress          :IA5STRING:'[email protected]'
Certificate is to be certified until Jul 22 14:54:28 2024 GMT (3650 days)
Sign the certificate? [y/n]:y

1 out of 1 certificate requests certified, commit? [y/n]y
Write out database with 1 new entries
Data Base Updated
Build the certificate parameters.
./build-dh
It doesn’t take that long. Less than a minute.
Generating DH parameters, 1024 bit long safe prime, generator 2
This is going to take a long time
..........................+...........+.........................+
....................................................+.............
.............................+...................+................
...................+....................................++*++*++*
Now that the certificates are generated, go to the directory where certificates are stored and copy them to our openvpn config folder.
cd /usr/local/share/easy-rsa/keys
cp server.crt /usr/local/etc/openvpn/
cp dh1024.pem /usr/local/etc/openvpn/
cp server.key /usr/local/etc/openvpn/
cp ca.crt /usr/local/etc/openvpn/
We don’t need to copy the client certificates. They belong to the client.
In case you want to revoke the client certificate for client liquid, do:
cd /usr/local/share/easy-rsa
sh
. ./vars
./revoke-full liquid
Install bridged network adapter
This is how my /etc/rc.conf looks like at this point. The command cloned_interfaces tells FreeBSD to create two interfaces tap0 and bridge0, where bridge0 is the actual bridge interface. For more details, check this link. I assigned 10.8.0.1 to the tap interface first and then I am adding tap0 and vtnet0 as member interfaces of the bridge.
ifconfig_vtnet0="inet 209.222.2.147 netmask 255.255.255.224"
defaultrouter="209.222.2.129"
hostname=”dc.fluffycloud.us"
cloned_interfaces="tap0 bridge0"
ifconfig_tap0="10.8.0.1/24"
ifconfig_bridge0="addm tap0 addm vtnet0 up"
sshd_enable=YES
openvpn_enable="YES"
Make sure that you create the bridged interface before you start OpenVPN. At this point, reboot the server. When it comes up, do:
ps –waux | grep openvpn
You should see an output like this.
nobody 966 0.0 0.6 21492 4704 - Ss 3:19PM 0:00.00 /usr/local/sbin/openvpn --cd /usr/local/etc/openvpn --daemon openvpn -
Then, check the network with:
ifconfig -a
This is my output.
vtnet0: flags=8943<UP,BROADCAST,RUNNING,PROMISC,SIMPLEX,MULTICAST> metric 0 mtu 1500
options=6c00b9<RXCSUM,VLAN_MTU,VLAN_HWTAGGING,JUMBO_MTU,VLAN_HWCSUM,VLAN_HWTSO,LINKSTATE,RXCSUM_IPV6,TXCSUM_IPV6>
	ether 52:54:00:83:38:f9
	inet <209.222.2.147 netmask 0xffffffe0 broadcast 209.222.2.159
	inet6 fe80::5054:ff:fe83:38f9%vtnet0 prefixlen 64 scopeid 0x1
	nd6 options=29<PERFORMNUD,IFDISABLED,AUTO_LINKLOCAL>
	media: Ethernet 10Gbase-T <full-duplex>
	status: active
lo0: flags=8049<UP,LOOPBACK,RUNNING,MULTICAST> metric 0 mtu 16384
	options=600003<RXCSUM,TXCSUM,RXCSUM_IPV6,TXCSUM_IPV6>
	inet6 ::1 prefixlen 128
	inet6 fe80::1%lo0 prefixlen 64 scopeid 0x2
	inet 127.0.0.1 netmask 0xff000000
	nd6 options=21<PERFORMNUD,AUTO_LINKLOCAL>
tap0: flags=8943<UP,BROADCAST,RUNNING,PROMISC,SIMPLEX,MULTICAST> metric 0 mtu 1500
	options=80000<LINKSTATE>
	ether 00:bd:b6:00:00:00
	inet 10.8.0.1 netmask 0xffffff00 broadcast 10.8.0.255
	inet6 fe80::2bd:b6ff:fe00:0%tap0 prefixlen 64 scopeid 0x3
	nd6 options=29<PERFORMNUD,IFDISABLED,AUTO_LINKLOCAL>
	media: Ethernet autoselect
	status: active
	Opened by PID 964
bridge0: flags=8843<UP,BROADCAST,RUNNING,SIMPLEX,MULTICAST> metric 0 mtu 1500
	ether 02:d1:f9:85:8a:00
	nd6 options=9<PERFORMNUD,IFDISABLED>
	id 00:00:00:00:00:00 priority 32768 hellotime 2 fwddelay 15
	maxage 20 holdcnt 6 proto rstp maxaddr 2000 timeout 1200
	root id 00:00:00:00:00:00 priority 32768 ifcost 0 port 0
	member: vtnet0 flags=143<LEARNING,DISCOVER,AUTOEDGE,AUTOPTP>
	        ifmaxaddr 0 port 1 priority 128 path cost 2000
	member: tap0 flags=143<LEARNING,DISCOVER,AUTOEDGE,AUTOPTP>
	        ifmaxaddr 0 port 3 priority 128 path cost 2000000
Install OpenVPN client
On your Windows machine, install the OpenVPN from here. Go to C:\Program Files\OpenVPN and copy the client.ovpn file from sample-config folder to the config folder. Edit the client.ovpn file and change the values for the server and the path to the client certificates. You’ll have to copy these three client certificate files (ca.crt, liquid.crt and liquid.key) from the FreeBSD server to the client. Actually, ca.crt is the public server key. I used WinSCP to copy the files over. I’ve also decided to keep the certificates under c:\keys. (Note: use double back-slash in the config file). If you are having problems saving the file under C:\Program Files\OpenVPN\config, save it on the desktop first and then manually copy it over to C:\Program Files\OpenVPN\config folder. Here is my client.ovpn.
client
dev tap
proto udp
remote dc.fluffycloud.us 1194
resolv-retry infinite
nobind
persist-key
persist-tun
ca c:\\keys\\ca.crt
cert c:\\keys\\liquid.crt
key c:\\keys\\liquid.key
ns-cert-type server
keepalive 10 120
comp-lzo
verb 3
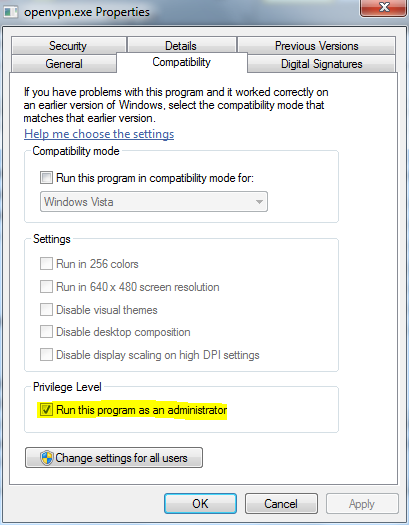
Make sure that the openvpn-gui executable always starts with full admin privileges. Go to the bin folder, right click the executable, click Properties and check Run this program as administrator.
The OpenVPN GUI creates an icon in the tray, right-click that icon and click Connect. If everything is fine, you should see that openvpn client is connected and that you can ping the server. In case something is wrong, right-click the same OpenVPN GUI icon and choose View log.
It is possible to have multiple client configuration files. Put them in the same folder and OpenVPN GUI will recognize them. Next time you want to connect to another server, right-click on the tray icon and you’ll see all these entries.
Install BIND DNS 9.9.5P1_3
Samba 4 comes with its own DNS server, but it won’t work with our scenario. Therefore we’ll install BIND 9.9.5P1_3. In order to install BIND, do:
cd /usr/ports/dns/bind99
make all install clean
Accept the defaults for the dependencies. Make sure that named starts on boot. Edit /etc/rc.conf and add:
named_enable=”YES”
after ssh_enable=”YES” and before openvpn_enable=”YES”.
Go to the BIND’s folder and create a security key so you can manage the DNS service.
cd /usr/local/etc/namedb
rndc-confgen –a
This will create a file rndc.key. We will include this file in the main configuration file. Edit named.conf and change the values for the listener, the forwarder and create a reverse zone. The primary zone is not needed, Samba will take care of this.
listen-on       { 127.0.0.1; 10.8.0.1; };
        forwarders {
                8.8.8.8;
        };
/* Put the lines below all the way at the end */
zone "0.8.10.in-addr.arpa" {
        type master;
        file "/usr/local/etc/namedb/master/0.8.10.in-addr.arpa.db";
};

controls {
  inet 127.0.0.1 allow { localhost; } keys { "rndc-key"; };
};
include "/usr/local/etc/namedb/rndc.key";
Create the reverse zone file under /usr/local/etc/namedb/master. The file name is 0.8.10.in-addr.arpa.db.
@ IN SOA        dc.fluffycloud.us. klimenta.fluffycloud.us. (
                   2014071201           ; Serial
                         3600           ; Refresh [1h]
                          600           ; Retry   [10m]
                        86400           ; Expire  [1d]
                          600 )         ; Negative Cache TTL [1h]
;
@       IN      NS      dc.fluffycloud.us.

1       IN      PTR     dc.fluffycloud.us.
Now, edit /etc/resolv.conf and tell BSD where to lookup first for all the queries.
domain dc.fluffycloud.us
nameserver 10.8.0.1
nameserver 8.8.8.8
nameserver 8.8.4.4
NOTE: If you use a DHCP provided address, /etc/resolv.conf will be overwritten. Create the following file /etc/resolvconf.conf and add these two lines.
search_domains="fluffycloud.us"
name_servers="10.8.0.1"
Then execute
resolvconf -u
It’s time to start the DNS now.
service named start
ps -waux | grep named
You should see something like this.
bind 58068 0.0 2.5 45672 18904 - Ss 6:46PM 0:00.04 /usr/local/sbin/named -u bind -c /usr/local/etc/namedb/named.conf
From the client computer that’s connected to your OpenVPN server, verify that 10.8.0.1 is your DNS server and check if the actual name resolution works. Type:
ipconfig /all | more
And the output:
Windows IP Configuration

    Host Name . . . . . . . . . . . . : WIN-15VO4PNDU6T
    Primary Dns Suffix  . . . . . . . :
    Node Type . . . . . . . . . . . . : Hybrid
    IP Routing Enabled. . . . . . . . : No
    WINS Proxy Enabled. . . . . . . . : No

Ethernet adapter Local Area Connection 2:

    Connection-specific DNS Suffix  . :
    Description . . . . . . . . . . . : TAP-Windows Adapter V9
    Physical Address. . . . . . . . . : 00-FF-AB-E2-00-0B
    DHCP Enabled. . . . . . . . . . . : Yes
    Autoconfiguration Enabled . . . . : Yes
    Link-local IPv6 Address . . . . . :
fe80::2d71:58da:776e:e903%15(Preferred)
    IPv4 Address. . . . . . . . . . . : 10.8.0.51(Preferred)
    Subnet Mask . . . . . . . . . . . : 255.255.255.0
    Lease Obtained. . . . . . . . . . : Thursday, July 24, 2014 11:27:39 AM
    Lease Expires . . . . . . . . . . : Friday, July 24, 2015 11:27:38 AM
    Default Gateway . . . . . . . . . :
    DHCP Server . . . . . . . . . . . : 10.8.0.0
    DHCPv6 IAID . . . . . . . . . . . : 335609771
    DHCPv6 Client DUID. . . . . . . . :
00-01-00-01-1B-46-4F-25-00-0C-29-60-32-7E
    DNS Servers . . . . . . . . . . . : 10.8.0.1
    NetBIOS over Tcpip. . . . . . . . : Enabled

Ethernet adapter Local Area Connection:
And type…
nslookup
You should see something like this. Test with slashdot.org. This will test the forwarder, meaning your DNS server doesn’t know where is slashdot.org, but the forwarder 8.8.8.8 knows.
Default Server:  UnKnown
Address:  10.8.0.1

> slashdot.org
Server:  UnKnown
Address:  10.8.0.1

Non-authoritative answer:
Name:    slashdot.org
Address:  216.34.181.45
Enable ACL on the filesystem(s)
Before we install Samba we have to enable ACLs (Access Control Lists). Just add acls directive in /etc/fstab. In my case it looks like this.
# Device		Mountpoint		FStype		Options	Dump Pass
/dev/label/rootfs0	/		ufs	rw,noatime,acls	1	1
/dev/label/swap0	none		swap	sw	0	0
Do this for all file systems where you plan to have a Windows share. There is no need to reboot, just do:
mount -o acls /
Configure time zone and ntpdate
Find your time zone from this file /usr/share/zoneinfo. List the directory:
ls –l /usr/share/zoneinfo
In my case it’s America/New_York so I have to do:
cp /usr/share/zoneinfo/America/New_York /etc/localtime
If you have UTC which is default, after copying this file you’ll see that time will change to EDT. Type date to confirm:
date
In order to synchronize the time with an NTP server, execute:
ntpdate –v –b 0.north-america.pool.ntp.org
where 0.north-america.pool.ntp.org is an NTP server that’s in US. Check the following site and pick up NTP server that’s closest to you.
To start the time sync on boot, edit /etc/rc.conf and add these two lines after hostname.
ntpdate_enable=”YES”
ntpdate_hosts=”0.north-america.pool.ntp.org“
Install Samba 4.1.9 server
Samba depends on a lot of dependencies, so the compilation from source is going to take some time. Because we want to use BIND instead of built-in Samba DNS, we have to compile it from the source.
cd /usr/ports/net/samba41
make all install clean
Scroll down from the initial menu and choose BIND99 instead of NSUPDATE.

After some time, when everything is done we have to provision the domain. These steps are crucial. If you mess up something or if you get an error, delete the following two files and start with the provisioning again.
rm /usr/local/etc/smb4.conf
rm -Rf /var/db/samba4/private
OK. So, let’s start. Again, my hostname is dc.fluffycloud.us and I want my NetBIOS domain to be IANDREEV.
samba-tool domain provision --use-rfc2307 --host-ip=10.8.0.1 --interactive
This is the output. Replace the values to suit your needs.
Realm [FLUFFYCLOUD.US]: FLUFFYCLOUD.US
Domain [FLUFFYCLOUD]: IANDREEV
Server Role (dc, member, standalone) [dc]: dc
DNS backend (SAMBA_INTERNAL, BIND9_FLATFILE, BIND9_DLZ, NONE) [SAMBA_INTERNAL]: BIND9_DLZ
Administrator password: Password01
Retype password: Password01
Looking up IPv6 addresses
No IPv6 address will be assigned
Setting up share.ldb
Setting up secrets.ldb
Setting up the registry
Setting up the privileges database
Setting up idmap db
Setting up SAM db
Setting up sam.ldb partitions and settings
Setting up sam.ldb rootDSE
Pre-loading the Samba 4 and AD schema
Adding DomainDN: DC=fluffycloud,DC=us
Adding configuration container
Setting up sam.ldb schema
Setting up sam.ldb configuration data
Setting up display specifiers
Modifying display specifiers
Adding users container
Modifying users container
Adding computers container
Modifying computers container
Setting up sam.ldb data
Setting up well known security principals
Setting up sam.ldb users and groups
Setting up self join
Adding DNS accounts
Creating CN=MicrosoftDNS,CN=System,DC=fluffycloud,DC=us
Creating DomainDnsZones and ForestDnsZones partitions
Populating DomainDnsZones and ForestDnsZones partitions
See /var/db/samba4/private/named.conf for an example configuration include file for BIND
and /var/db/samba4/private/named.txt for further documentation required for secure DNS updates
Setting up sam.ldb rootDSE marking as synchronized
Fixing provision GUIDs
A Kerberos configuration suitable for Samba 4 has been generated at /var/db/samba4/private/krb5.conf
Setting up fake yp server settings
Once the above files are installed, your Samba4 server will be ready to use
Server Role:           active directory domain controller
Hostname:              dc
NetBIOS Domain:        IANDREEV
DNS Domain:            fluffycloud.us
DOMAIN SID:            S-1-5-21-3839416751-3718245204-1409092853
Before we start samba, we have to modify named.conf again. Edit /usr/local/etc/namedb/named.conf and add this line at the end.
include "/var/db/samba4/private/named.conf";
Now edit file /var/db/samba4/private/named.conf and uncomment the line for 9.9 and comment the line for 9.8 like this.
dlz "AD DNS Zone" {
    # For BIND 9.8.0
    # database "dlopen /usr/local/lib/shared-modules/bind9/dlz_bind9.so";

    # For BIND 9.9.0
    database "dlopen /usr/local/lib/shared-modules/bind9/dlz_bind9_9.so";
};
Restart BIND with:
service named restart.
Finally, start samba.
samba
Do some tests.
sockstat -4 | grep samba
If everything is OK, you’ll see a lot of output, if nothing comes up, check /var/log/messages.
Do another test of the name resolution on the server, not on the client.
nslookup
Type dc.fluffycloud.us and it should return 10.8.0.1.
Another test.
smbclient -L localhost -U%
Output:
Domain=[IANDREEV] OS=[Unix] Server=[Samba 4.1.9]

        Sharename       Type      Comment
        ---------       ----      -------
        netlogon        Disk
        sysvol          Disk
        IPC$            IPC       IPC Service (Samba 4.1.9)
Domain=[IANDREEV] OS=[Unix] Server=[Samba 4.1.9]

        Server               Comment
        ---------            -------

        Workgroup            Master
        ---------            -------
Another test.
smbclient //localhost/netlogon -UAdministrator -c 'ls'
And the output.
Enter Administrator's password:Password01
Domain=[IANDREEV] OS=[Unix] Server=[Samba 4.1.9]
  .                                   D        0  Fri Jul 25 20:41:48 2014
  ..                                  D        0  Fri Jul 25 20:41:54 2014

                51697 blocks of size 262144. 37389 blocks available
More tests.
host -t SRV _ldap._tcp.fluffycloud.us.
_ldap._tcp.fluffycloud.us has SRV record 0 100 389 dc.fluffycloud.us.
host -t SRV _kerberos._udp.fluffycloud.us.
_kerberos._udp.fluffycloud.us has SRV record 0 100 88 dc.fluffycloud.us.
host -t A dc.fluffycloud.us.
dc.fluffycloud.us has address 10.8.0.1
kinit [email protected]
[email protected]’s Password:Password01
There shouldn't be any output.
klist
Credentials cache: FILE:/tmp/krb5cc_0

        Principal: [email protected]
Issued Expires Principal
Jul 25 20:50:15 2014 Jul 26 06:50:15 2014 krbtgt/[email protected]
If all tests passed, you are all set. You just have to add:
samba_server_enable="YES"
in your /etc/rc.conf so Samba starts automatically on boot.
The order of the commands is important, so here is my /etc/rc.conf.
ifconfig_vtnet0="inet 209.222.2.147 netmask 255.255.255.224"
defaultrouter="209.222.2.129"
hostname="dc.fluffycloud.us"
ntpdate_enable="YES"
ntpdate_hosts="0.north-america.pool.ntp.org"
cloned_interfaces="tap0 bridge0"
ifconfig_tap0="10.8.0.1/24"
ifconfig_bridge0="addm tap0 addm vtnet0 up"
sshd_enable=YES
named_enable="YES"
openvpn_enable="YES"
samba_server_enable="YES"
Testing and managing the domain controller
On your Windows computer, install DcDiag from here. Make sure that you are connected to the OpenVPN server and that you have an IP in that range (10.8.0.0/24). Do nslookup from command prompt. It should return 10.8.0.1. Also, make sure that when you query for your FQDN it actually returns 10.8.0.1, not the public IP. This is how it should look like.
C:\Users\Kliment>nslookup
Default Server:  UnKnown
Address:  10.8.0.1
> dc.fluffycloud.us
Server:  UnKnown
Address:  10.8.0.1

Name:    dc.fluffycloud.us
Address:  10.8.0.1
Go to c:\Program Files (x86)\Resource Kit folder and do:
c:\Program Files (x86)\Resource Kit>dcdiag /s:dc.fluffycloud.us /u:andreev\Administrator /p:Password01
You will see that some tests will fail. That’s OK. As long as the output looks like mine below, you should be OK.
Domain Controller Diagnosis

Performing initial setup:
   Done gathering initial info.

Doing initial required tests

   Testing server: Default-First-Site-Name\DC
      Starting test: Connectivity
         ......................... DC passed test Connectivity

Doing primary tests

   Testing server: Default-First-Site-Name\DC
      Starting test: Replications
         ......................... DC passed test Replications
      Starting test: NCSecDesc
         ......................... DC passed test NCSecDesc
      Starting test: NetLogons
         ......................... DC passed test NetLogons
      Starting test: Advertising
         ......................... DC passed test Advertising
      Starting test: KnowsOfRoleHolders
         ......................... DC passed test KnowsOfRoleHolders
      Starting test: RidManager
         ......................... DC passed test RidManager
      Starting test: MachineAccount
         ......................... DC passed test MachineAccount
      Starting test: Services
            Could not open Dnscache Service on [DC]:failed with 8: Not enough st
orage is available to process this command.
            Could not open NtFrs Service on [DC]:failed with 8: Not enough stora
ge is available to process this command.
            Could not open IsmServ Service on [DC]:failed with 8: Not enough sto
rage is available to process this command.
            Could not open kdc Service on [DC]:failed with 8: Not enough storage
 is available to process this command.
            Could not open SamSs Service on [DC]:failed with 8: Not enough stora
ge is available to process this command.
            Could not open LanmanServer Service on [DC]:failed with 8: Not enoug
h storage is available to process this command.
            Could not open LanmanWorkstation Service on [DC]:failed with 8: Not
enough storage is available to process this command.
            Could not open RpcSs Service on [DC]:failed with 8: Not enough stora
ge is available to process this command.
            Could not open w32time Service on [DC]:failed with 8: Not enough sto
rage is available to process this command.
         ......................... DC failed test Services
      Starting test: ObjectsReplicated
         Failed to read object metadata on DC, error The request is not supporte
d.
         Failed to read object metadata on DC, error The request is not supporte
d.
         ......................... DC passed test ObjectsReplicated
      Starting test: frssysvol
         The SysVol is not ready.  This can cause the DC to not advertise
         itself as a DC for netlogon after dcpromo.  Also trouble with FRS
         SysVol replication can cause Group Policy problems.  Check the FRS
         event log on this DC.
         ......................... DC failed test frssysvol
      Starting test: frsevent
         Error 161 opening FRS eventlog \\DC:File Replication Service:
 The specified path is invalid.
         ......................... DC failed test frsevent
      Starting test: kccevent
         Error 161 opening FRS eventlog \\DC:Directory Service:
 The specified path is invalid.
         Failed to enumerate event log records, error The specified path is inva
lid.
         ......................... DC failed test kccevent
      Starting test: systemlog
         Error 161 opening FRS eventlog \\DC:System:
 The specified path is invalid.
         Failed to enumerate event log records, error The specified path is inva
lid.
         ......................... DC failed test systemlog
      Starting test: VerifyReferences
         Some objects relating to the DC DC have problems:
            [1] Problem: Missing Expected Value
             Base Object: CN=DC,OU=Domain Controllers,DC=fluffycloud,DC=us
             Base Object Description: "DC Account Object"
             Value Object Attribute Name: frsComputerReferenceBL
             Value Object Description: "SYSVOL FRS Member Object"
             Recommended Action: See Knowledge Base Article: Q312862

            [1] Problem: Missing Expected Value
             Base Object:
            CN=NTDS Settings,CN=DC,CN=Servers,CN=Default-First-Site-Name,CN=Site
s,CN=Configuration,DC=fluffycloud,DC=us
             Base Object Description: "DSA Object"
             Value Object Attribute Name: serverReferenceBL
             Value Object Description: "SYSVOL FRS Member Object"
             Recommended Action: See Knowledge Base Article: Q312862

         ......................... DC failed test VerifyReferences

   Running partition tests on : Configuration
      Starting test: CrossRefValidation
         ......................... Configuration passed test CrossRefValidation
      Starting test: CheckSDRefDom
         ......................... Configuration passed test CheckSDRefDom

   Running partition tests on : Schema
      Starting test: CrossRefValidation
         ......................... Schema passed test CrossRefValidation
      Starting test: CheckSDRefDom
         ......................... Schema passed test CheckSDRefDom

   Running partition tests on : fluffycloud
      Starting test: CrossRefValidation
         ......................... fluffycloud passed test CrossRefValidation
      Starting test: CheckSDRefDom
         ......................... fluffycloud passed test CheckSDRefDom

   Running partition tests on : DomainDnsZones
      Starting test: CrossRefValidation
         ......................... DomainDnsZones passed test CrossRefValidation

      Starting test: CheckSDRefDom
            The application directory partition
            DC=DomainDnsZones,DC=fluffycloud,DC=us is missing a security
            descriptor reference domain.  The administrator should set the
            msDS-SD-Reference-Domain attribute on the cross reference object
            CN=a3a9e7bb-205b-44d8-9427-7647f64cb839,CN=Partitions,CN=Configurati
on,DC=fluffycloud,DC=us
            to the DN of a domain.
         ......................... DomainDnsZones failed test CheckSDRefDom

   Running partition tests on : ForestDnsZones
      Starting test: CrossRefValidation
         ......................... ForestDnsZones passed test CrossRefValidation

      Starting test: CheckSDRefDom
            The application directory partition
            DC=ForestDnsZones,DC=fluffycloud,DC=us is missing a security
            descriptor reference domain.  The administrator should set the
            msDS-SD-Reference-Domain attribute on the cross reference object
            CN=a4b7fc27-1dd7-4b9f-8443-d0c445ee817f,CN=Partitions,CN=Configurati
on,DC=fluffycloud,DC=us
            to the DN of a domain.
         ......................... ForestDnsZones failed test CheckSDRefDom

   Running enterprise tests on : fluffycloud.us
      Starting test: Intersite
         ......................... fluffycloud.us passed test Intersite
      Starting test: FsmoCheck
         ......................... fluffycloud.us passed test FsmoCheck
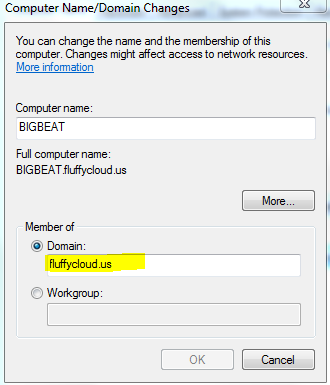
At this point you can join the domain. For the domain, type the REALM name, not the FQDN. See below.
Once you join the domain, you’ll be prompted to restart your computer. Do that, but log back to your computer as local admin. If you try to log in as the domain administrator, you’ll receive an error that there are no logon servers available. Why? Because, once you restart, the VPN connection to the domain is gone. What you can do is, log as local admin, establish VPN again and then click to switch user and log as the domain admin. Next time you reboot, you don’t have to be logged as the domain admin because of the cached credentials. But, that’s not the way I wanted it. I want to be able to log to the domain at anytime. Unfortunately, OpenVPN client doesn’t work as a service, but we can do a trick. In the same bin folder (C:\Program Files\OpenVPN\bin\) where openvpn-gui is, there is another executable – openvpn.exe. This is the CLI version. In order to connect to a server, you have to specify the path to the config file with the –config parameter.
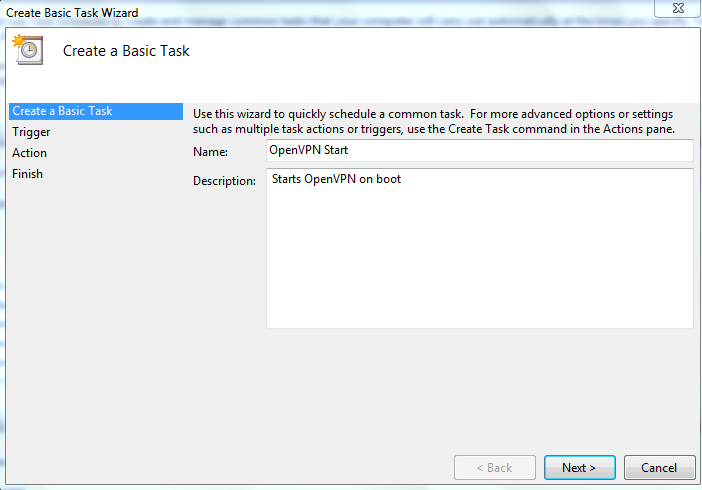
This is what we will do. Go to Accessories, System Tools and start the Task Scheduler. Click to Create Basic Task…Follow the screenshots below.
Type a description here and click Next.
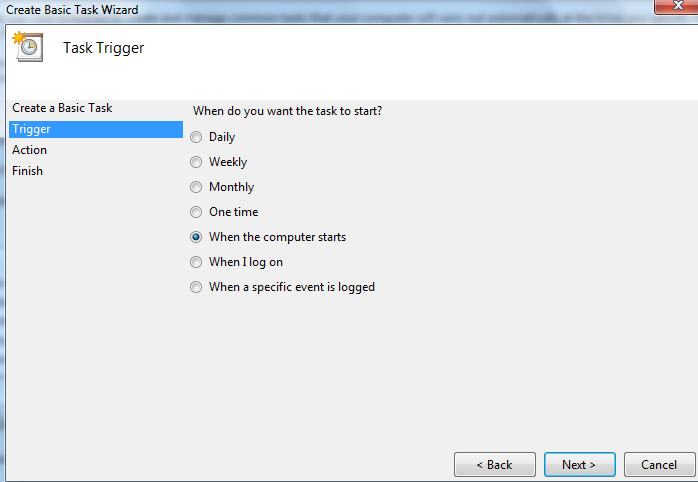
Choose when the Computer starts and Next.
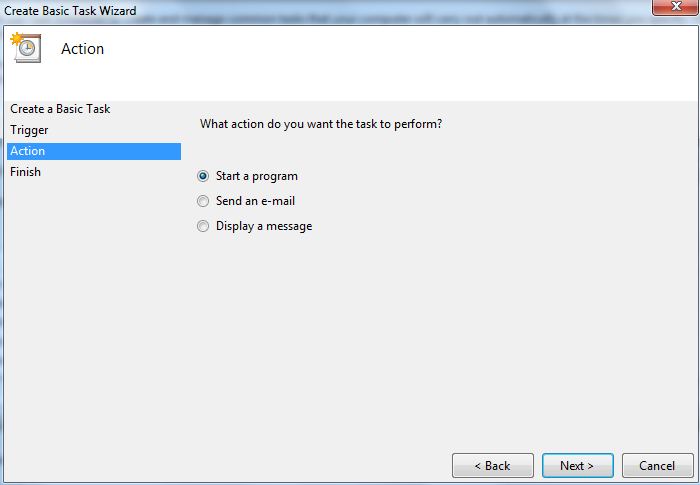
Select Start a program and Next.
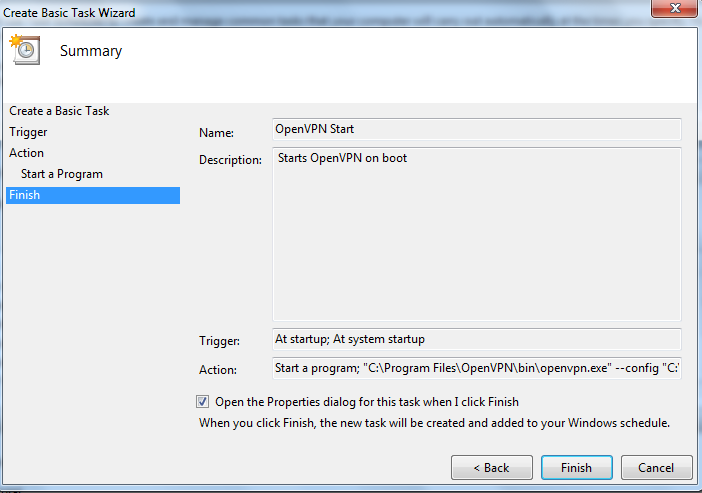
For the program type “C:\Program Files\OpenVPN\bin\openvpn.exe” and for the arguments use –config “C:\Program Files\OpenVPN\config\client.ovpn”

Select to open the properties dialog and click Finish.
Click on Change User or Group and choose SYSTEM. Select Run with highest privileges.
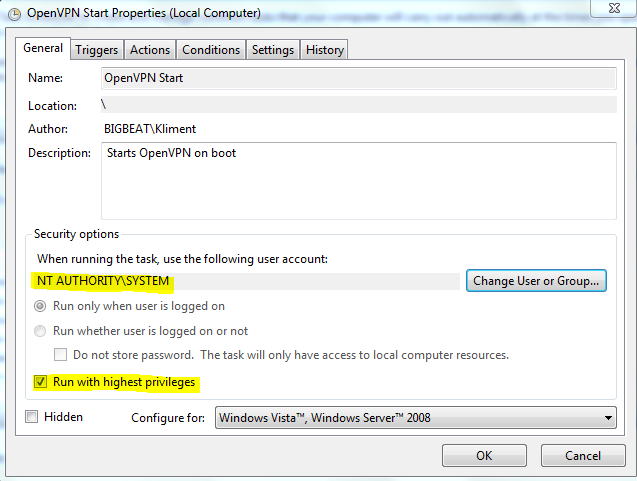
Reboot and you should be able to log as domain admin. You won’t see any icons in the tray, but if you hit CTRL-ALT-DEL you’ll see the openvpn.exe running.
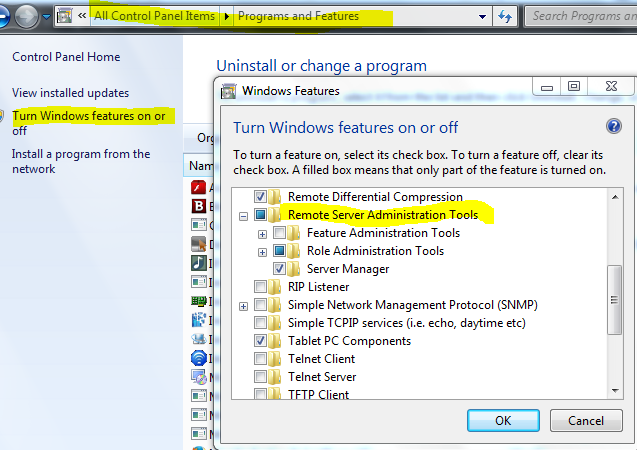
Finally, go to this site and download Remote Server Administration Tools for Windows 7 with SP1. Once installed, go to Control Panel, Programs and Features, Turn Windows Features on or off and select the tools that you want to show up under Administrative Tools in your Start Menu. These tools are for managing users, computers, DNS etc…
Finally, here is how to create a Windows share and map it through a logon script. I’ve used this link. Because we don’t have a member server, first thing is to grant some rights to the domain administrator.
net rpc rights grant 'IANDREEV\Domain Admins' SeDiskOperatorPrivilege -Uadministrator
Edit /usr/local/etc/smb4.conf and define the share.
[share]
        path = /home/folder
        read only = no
Then reload the config with:
smbcontrol all reload-config
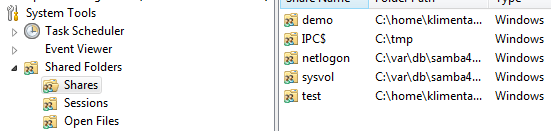
In Windows 7, Open Computer Management (compmgmt.msc). Right-click on Computer Management (Local) and choose to connect to another computer (fluffycloud.us). Expand System Tools, Shared Folders and your new share will be there.
Right-click on the share and if you don’t see the Permissions tab, disable the Offline files. Reboot. If you still don’t see the Permissions tab, just log off and log back on. Now, create a text file called logon.bat with the following inside.
@echo off
net use h: \\dc\share /persistent:YES
Copy this file under \\dc\netlogon folder and change the user settings in AD to use this logon script. You might not see this share mapped automatically, because how we setup OpenVPN, but if you double-click the batch file, you’ll see the folder mapped thru reboots.
Configure the pf firewall
If you did all these steps and everything works, great! But, this is how your server will look like on the Internet after a basic port scan. Make sure you are NOT connected to the VPN.
c:\>nmap -Pn dc.fluffycloud.us

Starting Nmap 6.46 ( http://nmap.org ) at 2014-07-26 18:32 Eastern Daylight Time

Nmap scan report for dc.fluffycloud.us (209.222.2.147)
Host is up (0.019s latency).
Not shown: 987 closed ports
PORT     STATE    SERVICE
22/tcp   open     ssh
25/tcp   filtered smtp
88/tcp   open     kerberos-sec
113/tcp  filtered ident
135/tcp  filtered msrpc
139/tcp  filtered netbios-ssn
389/tcp  open     ldap
445/tcp  filtered microsoft-ds
464/tcp  open     kpasswd5
636/tcp  open     ldapssl
1024/tcp open     kdm
3268/tcp open     globalcatLDAP
3269/tcp open     globalcatLDAPssl

Nmap done: 1 IP address (1 host up) scanned in 23.88 seconds
c:\>
This is no-no. We’ll restrict the ports with pf firewall, so they are accessible only over VPN.
Edit /etc/rc.conf and add these two lines at the end.
pf_enable="YES"
pflog_enable="YES"
Edit the firewall config file, /etc/pf.conf and paste these values. If you already have firewall rules there, you have to modify them.
# Interfaces
ext_if = "vtnet0"       # Internet Interface
vpn_if = "tap0"         # OpenVPN Interface

# Externally permitted inbound icmp types
icmp_types= "echoreq"

set loginterface $ext_if
set skip on lo0

# table <bruteforce> persist
# tcp_pass = "{ 80 }"

# Network address translation
nat on $ext_if from !($ext_if) -> ($ext_if:0)

# NAT the VPN connections (for access to the remote secure networks)
nat on $vpn_if from !($ext_if) -> ($vpn_if:0)

# Restrictive default rules
block all

# Allow SSH
# block quick from <bruteforce>
# pass quick proto { tcp, udp } from any to any port ssh \
    flags S/SA keep state \
    (max-src-conn 15, max-src-conn-rate 5/3, \
    overload <bruteforce> flush global)

# Allow tcp ports from tcp_pass table above
# pass log on $ext_if proto tcp to any port $tcp_pass keep state

# Allow permitted icmp (ping)
pass in on $ext_if inet proto icmp all icmp-type $icmp_types keep state

# VPN connections inbound
pass in on $ext_if proto udp from any to port 1194 keep state
pass quick on $vpn_if keep state

# Filter rules for $ext_if outbound
pass out on $ext_if keep state
Make sure you have an access to the console. After you reboot and apply these rules, your SSH sessions are GONE and you won’t be able to connect. Do another port scan without VPN connection. You are actually simulating how someone else will see your server.
If you think that these rules are too restrictive, allow SSH access from outside by removing comments from lines 11, 24 and 25. If you want other protocols, add them to the table at line 12 and uncomment both lines 12 and 31.
c:\>nmap -Pn dc.fluffycloud.us

Starting Nmap 6.46 ( http://nmap.org ) at 2014-07-26 18:41 Eastern Daylight Time

Nmap scan report for dc.fluffycloud.us (209.222.2.147)
Host is up.
All 1000 scanned ports on dc.fluffycloud.us (209.222.2.147) are filtered

Nmap done: 1 IP address (1 host up) scanned in 214.71 seconds
Much better. Now try to establish a VPN connection. Start the task from Task Scheduler or use OpenVPN GUI. At this point, dc.fluffycloud.us should resolve as 10.8.0.1. So, let’s do another port scan.
c:\>nmap -Pn dc.fluffycloud.us

Starting Nmap 6.46 ( http://nmap.org ) at 2014-07-26 18:48 Eastern Daylight Time

Nmap scan report for dc.fluffycloud.us (10.8.0.1)
Host is up (0.016s latency).
Not shown: 988 closed ports
PORT     STATE SERVICE
22/tcp   open  ssh
53/tcp   open  domain
88/tcp   open  kerberos-sec
135/tcp  open  msrpc
139/tcp  open  netbios-ssn
389/tcp  open  ldap
445/tcp  open  microsoft-ds
464/tcp  open  kpasswd5
636/tcp  open  ldapssl
1024/tcp open  kdm
3268/tcp open  globalcatLDAP
3269/tcp open  globalcatLDAPssl
MAC Address: 00:BD:B9:00:00:00 (Unknown)

Nmap done: 1 IP address (1 host up) scanned in 14.09 seconds
You are all set.
5 comments
Is there an updated version of this guide? In the openvpn section there is already some information different from the version I installed.
What’s the issue with the OpenVPN config?
This part is quite different
cd /usr/local/share/easy-rsa/
sh
. ./vars
./clean-all
./build-ca
Yes, you are right. Looks like easy-rsa changed the way how to generate the certificates. I’ll probably have to update this article, but the idea is to generate these 4 files.
cp server.crt /usr/local/etc/openvpn/
cp dh1024.pem /usr/local/etc/openvpn/
cp server.key /usr/local/etc/openvpn/
cp ca.crt /usr/local/etc/openvpn/
More info how to do that “the new way” is here:
https://community.openvpn.net/openvpn/wiki/EasyRSA3-OpenVPN-Howto
Thanks man, I appreciate