
The goal of this post is to have postfix (SMTP, SSL/TLS and SASL) and dovecot (POP3s, IMAPs) serving multiple non-U*ix users in multiple e-mail domains on one CentOS box. I am using CentOS 6.3, postfix 2.6.6 and dovecot 2.0.9. The configuration files shouldn’t be different on any other Linux distro but there might be some slight differences in how things get accomplished.
Postfix
First, install postfix and configure it to start on boot with:
yum install postfix
chkconfig postfix on
You might get a notice that postfix is already installed and that’s fine. The configuration files for postfix are in /etc/postfix. There are two main files, main.cf and master.cf. Make a copy of both these files. Usually I do:
cd /etc/postfix
cp main.cf main.cf.20131124
cp master.cf master.cf.20131124
20131124 represents the date the copy was taken.
Now, edit main.cf and change the following values:
myhostname = www.example.com
mydomain = example.com
myorigin = $mydomain
inet_interfaces = all
home_mailbox = Maildir/
Create a user that will have access to the mailboxes.
adduser vpostfix
tail /etc/passwd
Make sure to change the login shell to /sbin/nologin.
usermod -s /sbin/nologin vpostfix.
Look at the UID:GUID for the vpostfix user. In my case it’s 502:502.
Add the following lines at the end of main.cf and replace the UID:GUID under virtual_minimum_uid, virtual_maximum_uid, virtual_uid_maps and virtual_gid_maps with the values that you got from tail /etc/passwd or grep vpostfix /etc/passwd.
# Virtual domain config
virtual_mailbox_domains = /etc/postfix/virtual_domains
virtual_mailbox_base = /var/mail/vhosts
virtual_mailbox_maps = hash:/etc/postfix/vmailbox
# Make sure you replace these UID:GUID numbers
virtual_minimum_uid = 502
virtual_maximum_uid = 502
virtual_uid_maps = static:502
virtual_gid_maps = static:502
virtual_alias_maps = hash:/etc/postfix/virtual
Edit or create /etc/postfix/virtual_domains. This is a file where all of your domains will be listed. Of course, you’ll have to make sure that MX records of your domains point to the IP of the CentOS box.
#  Put each domain in a separate line.
domain-one.com
domain-two.net
domain-three.org
As you can see, we have three virtual domains, but the myhostname points to www.example.com. If you put one of these three domains as myhostname and mydomain values, you’ll get a warning that the local domain is already listed in the virtual domains list. In addition, if you keep e.g. domain-one.com as a local domain and remove it from the virtual domains list, then you can’t treat domain-one.com as a virtual domain and deliver its mail to /var/mail/vhosts. Don’t use myhostname = localhost either, because if some other mail server has the same config, you’ll get an error that the destination loops back and the mail won’t be delivered. Don’t use www.example.com either, because you won’t be able to send to www.example.com or any other server that have www.example.com as myhostname. So, pick something that’s unique even if you don’t own that domain or that domain is not registered. Mind that if you send an email from this server and analyze the headers, you’ll see that www.example.com is in the headers. Most e-mail servers won’t complain and treat this e-mail as spam, as long as you have a valid MX record for the virtual domains that point to that IP.

Create the mail folder, subfolders for the domains and assign the proper permissions.
mkdir /var/mail/vhosts
chgrp -R vpostfix /var/mail
cd /var/mail/vhosts
mkdir domain-one.com
mkdir domain-two.net
mkdir domain-three.org
cd ..
chown -R vpostfix:vpostfix vhosts
Once you do that, postfix will create the “Maildir” folders automatically and assign the proper permissions. Finally, create a file /etc/postfix/vmailbox and add all of the users that will receive e-mails. Here is an example:
[email protected]        domain-one.com/joe/
[email protected]       domain-one.com/bill/
@domain-one.com           domain-one.com/catch-all/
[email protected]        domain-two.net/joe/
Make sure you end up each line with “/”, otherwise mail won’t be delivered.
Virtual user “[email protected]” (mind that there is no CentOS login for this user, these are all virtual users) will have his email delivered under /var/mail/vhosts/domain-one.com/joe folder. You don’t have to create these subfolders. Once everything is up and running, postfix will take care of creating the Maildir structure (cur, new, tmp).
If you want you can create a catch-all address, see the example above (catch-all). This line tells postfix to get all the emails for the non-existing users in that domain (domain-one.com), which means a lot of spam.
But what if you have a valid CentOS user named bill? Where that email goes? In this case, nowhere. If we want this OS user to receive an email, we’ll have to treat him as a virtual user and add him to a virtual domain. It’s much easier to maintain one list of virtual users and hosts than deal with separate configuration files.
Maybe you’ve noticed that the file with the e-mail addresses (vmailbox) has a hash: prefix in the config file. This is to speed-up lookups. Postfix can use hash: (Berkeley-DB), mySQL or PostgreSQL database to store the e-mail accounts. Check the postfix howto if you want to use mySQL or PostgreSQL. We’ll be dealing with Berkeley DB.
Once we are done with the editing of these files, do the following to create the hashed files (extension .db). You should execute these lines anytime you make a change to these files.
postmap /etc/postfix/virtual
postmap /etc/postfix/vmailbox
Now, everything is ready for postfix to receive an email. Make sure that postfix is running and that it actually listens on port 25. Also make sure that port 25 is opened on the firewall.
ps -eaf | grep postfix
netstat -an | grep :25
iptables --list | grep smtp
You can restart postfix with postfix stop and postfix start or reload the configuration files with postfix reload.
From another domain (e.g. your hotmail or gmail account) send an e-mail to [email protected] or whatever your domain is. Do :
tail -f /var/log/maillog
You should see something like this.
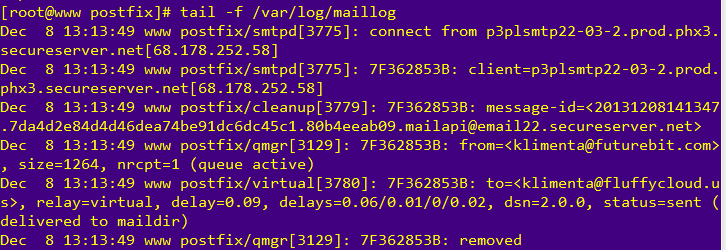
If you check /var/mail/vhosts/domain-one/joe/new folder you’ll see a file with some gibberish name. This is your e-mail that you just sent to joe. But, how will this virtual user retrieve this e-mail? There is a login (the e-mail address), but what’s the password?
Dovecot
In order to retrieve the e-mails, we’ll install Dovecot. Dovecot is an open-source POP and IMAP client.
yum install dovecot
chkconfig dovecot on
As of version 2.0, there are multiple configuration files for Dovecot. The main file is /etc/dovecot/dovecot.conf, but you’ll see a lot of include directives there that point to /etc/dovecot/conf.d folder where we have about 22 configuration files.
Make a copy of dovecot.conf and change only one line.
protocols = imap pop3
Then, go to conf.d folder and change the following lines in the following files.
10-auth.conf
disable_plaintext_auth = no
#!include auth-system.conf.ext
!include auth-passwdfile.conf.ext
10-logging.conf
log_path = /var/log/dovecot.log
auth_verbose = no
auth_debug = no
verbose_ssl = no
10-mail.conf
mail_location = maildir:/var/mail/vhosts/%d/%n
mail_uid = 502
mail_gid = 502
mail_privileged_group = vpostfix
10-master.conf
  unix_listener auth-userdb {
    mode = 0600
    user = postfix
    group =  postfix
  }
  # Postfix smtp-auth
  unix_listener /var/spool/postfix/private/auth {
    mode = 0666
    user = postfix
    group = postfix
  }
10-ssl.conf
ssl = no
# ssl_cert = </etc/ssl/certs/dovecot.pem
# ssl_key = </etc/ssl/private/dovecot.pem
If you look at 10-auth.conf, we commented the line #!include auth-system.conf.ext and uncommented the !include auth-passwdfile.conf.ext. Take a look at this file and you’ll see:
passdb {
  driver = passwd-file
  args = scheme=CRYPT username_format=%u /etc/dovecot/users
}

userdb {
  driver = passwd-file
  args = username_format=%u /etc/dovecot/users
}
This describes how our username/password database will be in the file /etc/dovecot/users. To generate a password with SHA512-CRYPT password scheme do:
doveadm pw -s SHA512-CRYPT
You’ll be prompted to enter a password twice and the output will be similar to this:

If you want to use a different password scheme, take a look at this link.
Now, create or open /etc/dovecot/users and copy and paste the password after the username. In my case, I have [email protected] with some password that I just generated. So the line will be like this.

Don’t forget to add 4 colons after the password “::::”. Even if you use the same password for the users, they’ll be encrypted differently.
The problem with this scenario is that the end users won’t have the ability to change their passwords. So, you’ll have to provide them with the password and they won’t be able to reset them. But, there are plenty of perl scripts that can take care of this or you can write your own.
Start dovecot, by simply typing dovecot and check for any errors with tail -f /var/log/dovecot.log. At this point, we should have dovecot running and listening for pop and imap connections.
netstat -an | grep :110
netstat -an | grep :143
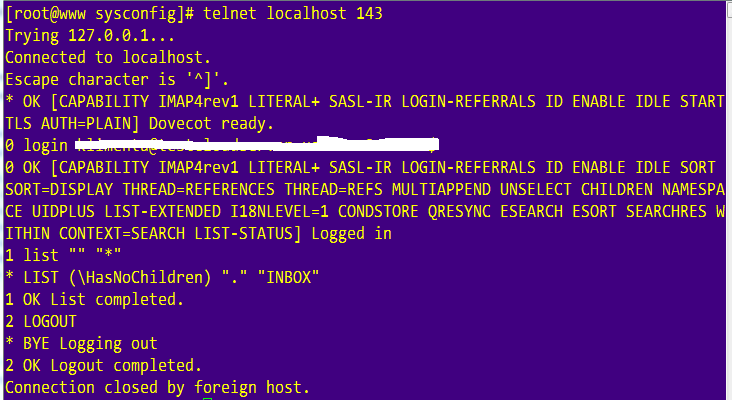
If needed, open the firewall for these two ports and let’s check our e-mail. You can do that from the server using the telnet command (yum install telnet if it’s not installed).

In the above example, I am testing POP3. For IMAP, do the following.
If you want you can test retrieving these emails with a mail client such as Outlook, Opera Mail or any MUA of your preference.
At this point the server can receive e-mails from others and you can retrieve those e-mails from outside using POP and IMAP. What we need to do now is to be able to reply to those e-mails from outside (using MUA of your choice). Nowadays port 25 is blocked at some major providers (Verizon, Comcast for example), so we’ll use SASL in Postfix and we’ll use Dovecot to authenticate the users using the same username/password combination. In addition, we’ll use certificates, so instead of POP3 and IMAP, we’ll use their secure equivalents, POP3s and IMAPs running on ports 995 and 993 respectively. Dovecot should already listen on these ports, so you can allow these ports on the firewall and close 110 and 143.
Postfix
Edit /etc/postfix/main.cf and add the following lines at the end.
# TLS
smtpd_use_tls = yes
smtpd_tls_security_level = may
smtpd_tls_auth_only = yes
smtpd_tls_key_file = /etc/postfix/myserver.key
smtpd_tls_cert_file = /etc/postfix/server.crt
smtpd_tls_loglevel = 1
smtpd_tls_received_header = yes
smtpd_tls_session_cache_timeout = 3600s
tls_random_source = dev:/dev/urandom

# SASL
smtpd_sasl_type = dovecot
broken_sasl_auth_clients = yes
smtpd_sasl_path = private/auth
smtpd_sasl_auth_enable = yes
smtpd_sasl_security_options = noanonymous
smtpd_recipient_restrictions = permit_sasl_authenticated, permit_mynetworks, reject_unauth_destination
Then, edit master.cf and remove the comments from the submission part.
submission inet n       -       n       -       -       smtpd
  -o smtpd_tls_security_level=encrypt
  -o smtpd_sasl_auth_enable=yes
  -o smtpd_client_restrictions=permit_sasl_authenticated,reject
  -o milter_macro_daemon_name=ORIGINATING
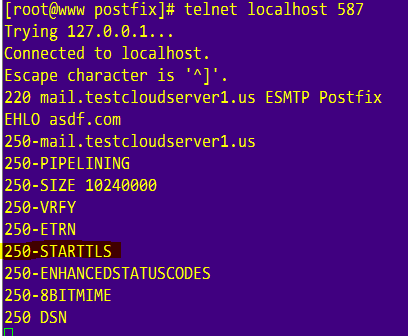
Restart postfix after these changes. For information of what these values mean, check the links at the end of this post. If you do netstat -an, you’ll see that postfix is also listening on port 587. Allow this port on the firewall, but don’t close port 25. This port is used for server to server communication.
If you do telnet localhost 587 and type EHLO something.com you should see that postfix replies with STARTTLS.
Dovecot
Edit 10-auth.conf and change disable_plaintext_auth = no to disable_plaintext_auth = yes. Then, edit 10-ssl.conf (you did a backup of this file, didn’t you?) and change the following values.
ssl = yes
ssl_cert = </etc/postfix/server.crt
ssl_key = </etc/postfix/myserver.key
We’ll use self-signed certificates, but check www.startssl.com for free certificates. Unlike virtual Apache domains, you don’t need multiple certificates for each virtual domain. Self-signed certificates are fake, so you’ll get a prompt to accept a fake certificate when you try to send/receive an email, but the goal is to show you how to use them, not to be a 100% compliant.
openssl genrsa -out myserver.key 1024
openssl req -new -key myserver.key -out myserver.csr
openssl x509 -req -days 3650 -in myserver.csr -signkey myserver.key -out server.crt
Coopy server.crt and myserver.key under /etc/postfix and restart both postfix and dovecot.
You can test SMTP SSL/TLS on submission port 587.
openssl s_client -starttls smtp -connect localhost:587
Then type ehlo something.com , hit ENTER and then mail from:[email protected]. If these steps work, you should be OK. To test SASL with postfix and dovecot, type:
doveadm auth -a /var/spool/postfix/private/auth [email protected] joe'spasswd
You should receive passdb: [email protected] auth succeeded.
At this point, you should be able to send e-mails from your favorite MUA, but you’ll have to make some changes in order to send and receive. For example, in Outlook, you should use these settings.
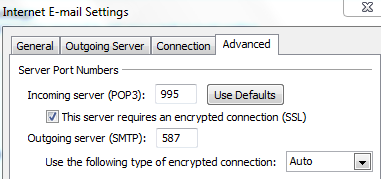
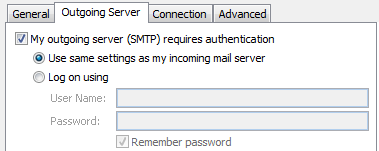
So, no more port 110 and 143. Instead use 995 for POP3s, 587 for SMPT (SASL) and 993 for IMAPs. The username is your e-mail address and the password is the one that you generated with doveadm pw command.
References:
http://www.postfix.org/VIRTUAL_README.html#virtual_mailbox
http://www.postfix.org/SASL_README.html
http://wiki2.dovecot.org/HowTo/PostfixAndDovecotSASL
http://mxtoolbox.com/
18 comments
WOW.
Simple and efficient.
Just one only question: How can i maintain both secure (995+587+993) and non secure (1110+143+25) environments.
Bettere said , which changes should i do to have both configs?
I’ve checked my config and locally the ports are open (995,587,993,110, 143 and 25). Make sure you are not blocking them with iptables.
Hi, I just registered to ask this question. I like the way you present the tutorials, but I am going crazy about it now working for me. here is the screen shot. ( http://minus.com/i/d3BuvJmTtdwl )
I’ve been searching for tutorial all over the web, but only yours seems good. Can you help me?
My environment:
I am on 2 VPSs, running CentOs 6.5, 32bit fresh install with root access.
one deals with web hosting. i.e. IP 192.168.995.2 points to http://www.my-domain.tld
I am using the second as a mail server (Where I am trying out your tutorials). I have added a record for this server eg: 192.168.77.98 point to mail.my-domain.tld
Can you help me?
Send me the output of both “postconf” and “postconf -d”. Don’t copy and paste them here. Use pastebin.com
Thanks
Hi Kliment. Thanks for replying back.
Here is pastebin for ” postconf ”
http://pastebin.com/geVpbQqS
and for ” postconf -d”
http://pastebin.com/jnc2eMGD
Just so you know, I have stopped iptables, disabled SELinux. I did all you asked on a fresh CentOs 6.5 VPS again, and I still got the same issue as before. One thing that you may want to know is that, my VPS server is for hosting only emails. So no domain is actually pointing to my VPS, because all my domains point to my other (secondary) VPS machine, which is taking care of hosting my websites. So, I have two VPS. One for email, and other for hosting.
So, I filled “myhostname = http://www.my-site.com” and “mydomain = my-site.com” even though those sites point to my other VPS. But I had no choice. But, I have added A record and MX to mail.my-site.com pointing to my email VPS.
Thanks again
Hey, sorry to disturb you but I am still waiting for any answers you have about my question.
Sorry I am late. I’ll take a look at the conf files and probably have an answer for you this Friday.
Thanks
From the screenshot, I can’t tell if the postfix crashes or are you sending a stop signal? Do this:
# service postfix stop
# service postfix start
# tail /var/log/maillog
(send me the last 10-20 lines)
are you able to telnet to port 25?
# yum install telnet (if you don’t have it)
# telnet localhost 25
CTRL-] to quit.
Sorry. I kida had given up :).
Here is a screen host. I did what you asked, first I didn’t have telnet, but I installed it. And still the same problem.
http://i3.minus.com/jku5ffGmrDT0D.jpg
I know this is a big DONT DO, but I could give you my password to my VPS so you could take a look if you wanted too. Since I have nothing in it, and will be re-installing it again, it won’t be a problem.
Sorry for this whole mess. I just can’t find a clue of what the problem could be,
Send the password to [email protected] and I’ll take a look. I can’t guarantee that I’ll fix it though…BTW, I am using Digital Ocean VPS and all my posts are tested on CentOS 6.5 hosted there.
Dear Kliment Andreev,
I can’t understand How to create specify 3 domain email user id
domain-one.com
[email protected]
domain-two.net
[email protected]
domain-three.org
i,[email protected]
pls tell me how to create new email ID
It is simple. How many domains do you own and want postfix to be a mail server? Let’s say only one e.g. something.com.
How many users need email? Let’s say three e.g. user1, user2 and user3. In that case, create/edit this file (/etc/postfix/virtual_domains) and add the following line.
something.com
Edit or create /etc/postfix/vmailbox and add the following lines.
[email protected] something.com/user1/
[email protected] something.com/user2/
[email protected] something.com/user3/
Hi Kliment,
I just want to say thank you so much for writing this tutorial. I does help me a lot.
I wish you the best.
Tuyen Nguyen
Good job. Very good tutorial, and everything work perfect.
Very useful tutorial. Thank you very much.
But I have one problem for retrieving catch-all email.
After setting the catch-all email like below, which user should i set in dovecot user to retrieve its mail?
@domain-one.com domain-one.com/catch-all/
Consider catch-all as a regular user that receives e-mail for non-existing users on @domain-one.com. As you can see there is no username in front of
@domain-one.com domain-one.com/catch-all/
So, if I send an email to [email protected] and there is no such user, it will end up in catch-all mailbox, therefore you have to create this user in dovecot.
Thanks for this tutorial. But is it possible to enable end users to change their passwords?
One option is to create a web page that allows users to reset their passwords, but you need to implement some sort of double authentication. Otherwise everyone can reset anyone’s password by simply knowing their e-mail. It’s not that easy, you have to implement a whole web mail type of program.