
In this post, I’ll explain how to establish a IKEv2 VPN tunnel with strongSwan between two sites with public IPs. The scenario below won’t work if strongSwan is behind NAT, for example if the instances are in AWS or Azure. So, you’ll need IPs that are seen by the OS. In this example, I’ll use two hosts, host1 and host2, each with two NICs and two IPs. Here is how my servers look like.
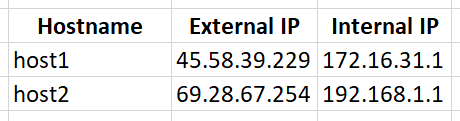
The internal subnets are 172.16.31.0/16 and 192.168.1.0/24.
Table of Contents
Installation
We need some changes made before we configire strongSwan. First, install the EPEL repo because strongSwan doesn’t come up with strongSwan in the default one, then install strongSwan.
yum -y install epel-release
yum -y install strongswan
In order to allow the external IP to forward packets to the internal network, we’ll have to enable the forwarding.
echo "net.ipv4.ip_forward = 1" >> /etc/sysctl.conf
sysctl -p /etc/sysctl.conf
Finally, enable strongSwan to start on each reboot.
systemctl enable strongswan
Pre-shared key authentication
This type of VPN connection uses passwords. It’s easier to configure. In my case, I’ll use Str0ngSw4n as password. Make sure you use something more complex. On both hosts, edit /etc/strongswan/ipsec.secrets file and make sure that you have this line.
# For host1
45.58.39.229 69.28.67.254 : PSK "Str0ngSw4n"
# For host2
69.28.67.254 45.58.39.229 : PSK "Str0ngSw4n"
Now, we have to change the config files for both hosts. On both hosts, edit /etc/strongswan/ipsec.conf file and make sure that you have only these lines in the config. The current commented line there can stay.
# For host1
config setup

conn %default
        ikelifetime=60m
        keylife=20m
        rekeymargin=3m
        keyingtries=1
        authby=secret
        keyexchange=ikev2
        mobike=no

conn site2site
        authby=secret
        left=45.58.39.229
        leftsubnet=172.16.31.0/16
        right=69.28.67.254
        rightsubnet=192.168.1.0/24
        ike=aes256-sha2_256-modp2048!
        esp=aes256-sha2_256!
        auto=start
# For host2
config setup

conn %default
        ikelifetime=60m
        keylife=20m
        rekeymargin=3m
        keyingtries=1
        authby=secret
        keyexchange=ikev2
        mobike=no

conn site2site
        authby=secret
        left=69.28.67.254
        leftsubnet=192.168.1.0/24
        right=45.58.39.229
        rightsubnet=172.16.31.0/16
        ike=aes256-sha2_256-modp2048!
        esp=aes256-sha2_256!
        auto=start
At this point, you can establish the tunnel.
systemctl start strongswan
You can check the logs.
tail -f /var/log/messages
Or get some info on the tunnel.
strongswan statusall
X.509 certificates
In most cases, certificates are used. The configuration is a little bit different and it involves an extra step of creating the certificates. The idea is to have one CA (Certificate Authority) that will sign the certificates for both hosts. Here are the steps that you have take.
- Create a private key for the CA and sign the CA certificate with the private key. Distribute the certificate to both hosts.
- Create a private key for the host1 and sign the certificate for host1. Distribute these certificates to host1.
- Create a private key for the host2 and sign the certificate for host2. Distribute these certificates to host2.
So, you’ll end up having 6 different files. More details about certificates can be found here. It is recommended that you have a separate CA, but we will use host1 to create the certificates. Create a directory called certs where we’ll store the certificates. So, in my case below, I’ve created the directory called certs and then I created the private key for the CA called caKey.der. Then I am creating a CA certificate and signing it with my private key that I’ve just created. The certificate only (not the private key) will have to be stored under /etc/strongswan/ipsec.d/cacerts directory on both hosts. The last two lines do that. If you have problems copying with scp, just find a way to move one file from host1 to host2.
mkdir /certs && cd /certs
strongswan pki --gen > caKey.der
strongswan pki --self --in caKey.der --dn "C=US, O=iAndreev, CN=strongSwan CA" --ca > caCert.der
/bin/cp -rf caCert.der /etc/strongswan/ipsec.d/cacerts/
scp caCert.der [email protected]:/etc/strongswan/ipsec.d/cacerts
The next step is to create a private key and certificate for host1 and let the CA sign them. The first line creates a private key for host1, the second line creates a signed certificate for host1. The host private key goes to /etc/strongswan/ipsec.d/private and the host certificate goes to /etc/strongswan/ipsec.d/certs/. The last two lines copy the certificates to those directories.
strongswan pki --gen > host1.der
strongswan pki --pub --in host1.der | strongswan pki --issue --cacert caCert.der --cakey caKey.der --dn "C=US, O=iAndreev, CN=host1.iandreev.com" > host1Cert.der
/bin/cp -rf host1Cert.der /etc/strongswan/ipsec.d/certs/
/bin/cp -rf host1.der /etc/strongswan/ipsec.d/private
Let’s do the same for host2.
strongswan pki --gen > host2.der
strongswan pki --pub --in host2.der | strongswan pki --issue --cacert caCert.der --cakey caKey.der --dn "C=US, O=iAndreev, CN=host2.iandreev.com" > host2Cert.der
scp host2Cert.der [email protected]:/etc/strongswan/ipsec.d/certs
scp host2.der [email protected]:/etc/strongswan/ipsec.d/private
Now that the certificates are in place, we can configure the config files (/etc/strongswan/ipsec.conf).
# For host1
config setup

conn %default
        ikelifetime=60m
        keylife=20m
        rekeymargin=3m
        keyingtries=1
        authby=pubkey
        keyexchange=ikev2
        mobike=no

conn site2site
        left=45.58.39.229
        leftcert=host1Cert.der
        leftid="C=US, O=iAndreev, CN=host1.iandreev.com"
        leftsubnet=172.16.31.0/16
        right=69.28.67.254
        rightid="C=US, O=iAndreev, CN=host2.iandreev.com"
        rightsubnet=192.168.1.0/24
        ike=aes256-sha2_256-modp2048!
        esp=aes256-sha2_256!
        auto=start
config setup

conn %default
        ikelifetime=60m
        keylife=20m
        rekeymargin=3m
        keyingtries=1
        authby=pubkey
        keyexchange=ikev2
        mobike=no

conn site2site
        left=69.28.67.254
        leftcert=host2Cert.der
        leftid="C=US, O=iAndreev, CN=host2.iandreev.com"
        leftsubnet=192.168.1.0/24
        right=45.58.39.229
        rightid="C=US, O=iAndreev, CN=host1.iandreev.com"
        rightsubnet=172.16.31.0/16
        ike=aes256-sha2_256-modp2048!
        esp=aes256-sha2_256!
        auto=start
The /etc/strongswan/ipsec.secrets files on both hosts should look like this.
# For host1
: RSA host1.der
# For host2
: RSA host2.der
At this point, you can establish the tunnel.
systemctl start strongswan
You can check the logs.
tail -f /var/log/messages
Or get some info on the tunnel.
strongswan statusall
Firewall
If you have the firewall enabled and for some reason you are able to establish the tunnel, but you can’t access anything over the tunnel, execute these iptables commands. They work fine even with firewalld enabled.
iptables -I INPUT -p esp -j ACCEPT
iptables -I INPUT -p udp --dport 500 -j ACCEPT
iptables -I INPUT -p udp --dport 4500 -j ACCEPT
iptables -I INPUT -m policy --pol ipsec --dir in -j ACCEPT
iptables -I FORWARD -m policy --pol ipsec --dir in -j ACCEPT
iptables -t nat -I POSTROUTING  -m policy --dir out --pol ipsec -j ACCEPT
4 comments
Great documentation you got here!
Thank you so much !
Thanks for the great article.
Just for knowledge, why won’t this work for strongswans behind NAT?
In this config, strongswan requires access to the external IPs. If there is a NAT, the external IP is not part of the OS, so strongswan can’t see it.
It is possible to have an IPSEC tunnel behind NAT, but with a different config.