Bitbucket is a web-based hosting service for projects that use either the Mercurial (since launch) or Git (since October 2011) revision control systems. In this post I’ll show you how to install BitBucket on a FreeBSD server.
NOTE: BitBucket is not supported on FreeBSD, so I wouldn’t recommend this in production.
First, we need some prerequisites:
- FreeBSD 11.x or higher
- OpenJDK 1.8.x or higher
- Git 1.8.x or higher
- Perl 5.8.8 or higher
- bash 4.x or higher
- PostgreSQL 9.6 or higher
- BitBucket 4.13 or higher
Table of Contents
Install OpenJDK
Install Java from the packages.
pkg install openjdk8
Add these two lines in /etc/fstab so it mounts the filesystems on boot.
fdesc   /dev/fd         fdescfs         rw      0       0
proc    /proc           procfs          rw      0       0
You can mount them immediately, without a reboot.
mount -t fdescfs fdesc /dev/fd
mount -t procfs proc /proc
Make sure you have the correct version.
java -version
openjdk version "1.8.0_112"
OpenJDK Runtime Environment (build 1.8.0_112-b16)
OpenJDK 64-Bit Server VM (build 25.112-b16, mixed mode)
Install Git and Perl
On a fresh FreeBSD install, Perl doesn’t come up pre-installed as before, so we have to install it from the ports. Perl is a prerequisite for Git, so once you install Git, you will install Perl as well.
pkg install git
Check the versions.
git --version
git version 2.11.0
perl --version
This is perl 5, version 24, subversion 1 (v5.24.1) built for amd64-freebsd-thread-multi
Install bash
We also need bash, some of the BitBucket startup scripts use bash.
pkg install bash
Add this line to /etc/fstab.
fdesc /dev/fd fdescfs rw 0 0
You can mount the filesystem immediately.
mount -t fdescfs fdesc /dev/fd
Create a symlink for programs that expect bash under /bin/bash.
cd /bin
ln -s /usr/local/bin/bash
Install PostgreSQL
BitBucket comes with its own database, but it’s for testing only. In addition, on their web-site, Atlassian suggests not to use MySQL or MariaDB because of some performance issues with large instances. So, we’ll use PostgreSQL and we don’t have to worry about any JDBC connectors.
pkg install postgresql96-server
This will install the PostgreSQL client as well. Add this line so PostgreSQL starts at boot.
echo 'postgresql_enable="YES"' >> /etc/rc.conf
Initialize the database for the first time.
/usr/local/etc/rc.d/postgresql initdb
Check this file – /var/db/postgres/data96/postgresql.conf.
By default PostgreSQL listens on the localhost interface which is fine for us, because we’ll use the same server for BitBucket and PostgreSQL. So, leave this line as is.
#listen_addresses = 'localhost'
If you have a separate server for PostgreSQL, make sure that listen_address is set to listen_address=”*”.
Also, check the pg_hba.conf file in the same directory.
This line is fine.
host all all 127.0.0.1/32 trust
If you run PostgreSQL and BitBucket on different boxes, you’ll have to modify accordingly. The file has plenty of examples.
Now, let’s start PostgreSQL.
/usr/local/etc/rc.d/postgresql start
Switch to the postgres user that runs PostgreSQL.
su postgres
Create a super-root-admin-dba-sa user.
createuser -sdrP dba
Enter password for new role:
Enter it again:
Start the PostgreSQL shell.
psql
Create a BitBucket user and a database. Modify accordingly.
CREATE ROLE bitbucketuser WITH LOGIN PASSWORD 'jellyfish' VALID UNTIL 'infinity';
CREATE DATABASE bitbucket WITH ENCODING='UTF8' OWNER=bitbucketuser CONNECTION LIMIT=-1;
Hit CTRL-D or type \q to exit.
Add a BitBucket user
We don’t want BitBucket to run as root, so we’ll create a separate user for that. Use the defaults for the other prompts.
adduser
Username: bitbucket
Full Name: Atlassian bitbucket
Shell: bash
Enter password:
Re-enter password:
OK? Yes
Add another user? no
Install BitBucket
We can’t fetch or wget BitBucket tarball from a command prompt so we’ll have to download it somehow from a GUI. In my case I’ll put the tarball under /tmp.
Then, I’ll extract it to /usr/local/ and I’ll get a folder called atlassian-bitbucket-4.13.0, which is too long, so I’ll just rename it to bitbucket.
cd /tmp
tar xzvf atlassian-bitbucket-4.13.0.tar.gz -C /usr/local
cd /usr/local
mv atlassian-bitbucket-4.13.0/ bitbucket
Final setup
BitBucket will run as the bitbucket user, so that user will need to own the installation directory.
cd /usr/local
chown -R bitbucket:bitbucket bitbucket
BitBucket also requires a home directory. This is different than the home directory for the bitbucket user. We’ll create the home directory under /usr/local/etc.
cd /usr/local/etc
mkdir bitbucket
chown -R bitbucket:bitbucket bitbucket
Now log as the bitbucket user.
su - bitbucket
Edit the .profile file, uncomment the PATH directive and add the BITBUCKET_HOME variable so it looks like this.
PATH=/sbin:/bin:/usr/sbin:/usr/bin:/usr/games:/usr/local/sbin:/usr/local/bin:$HOME/bin:/usr/local/linux-oracle-jre1.8.0/bin; export PATH
BITBUCKET_HOME=/usr/local/etc/bitbucket; export BITBUCKET_HOME
Hit CTRL-D to exit the bitbucket session and then log back as bitbucket.
su - bitbucket
Starting BitBucket
Go to the install dicrectory.
cd /usr/local/bitbucket/bin
You can start BitBucket with the bundled ElasticSearch or not.
With ElasticSearch.
./start-bitbucket.sh
Without ElasticSearch.
./start-webapp.sh
If you see something like this, you are all set.
Using CLASSPATH:       /usr/local/bitbucket/bin/bitbucket-bootstrap.jar:/usr/local/bitbucket/bin/bootstrap.jar:/usr/local/bitbucket/bin/tomcat-juli.jar
Using CATALINA_PID:    /usr/local/bitbucket/work/catalina.pid
Tomcat started.

Success! You can now use Bitbucket at the following address:

http://localhost:7990/

If you cannot access Bitbucket at the above location within 3 minutes, or encounter any other issues starting or stopping Atlassian Bitbucket, please see the troubleshooting guide at:

https://confluence.atlassian.com/display/BitbucketServerKB/Troubleshooting+Installation
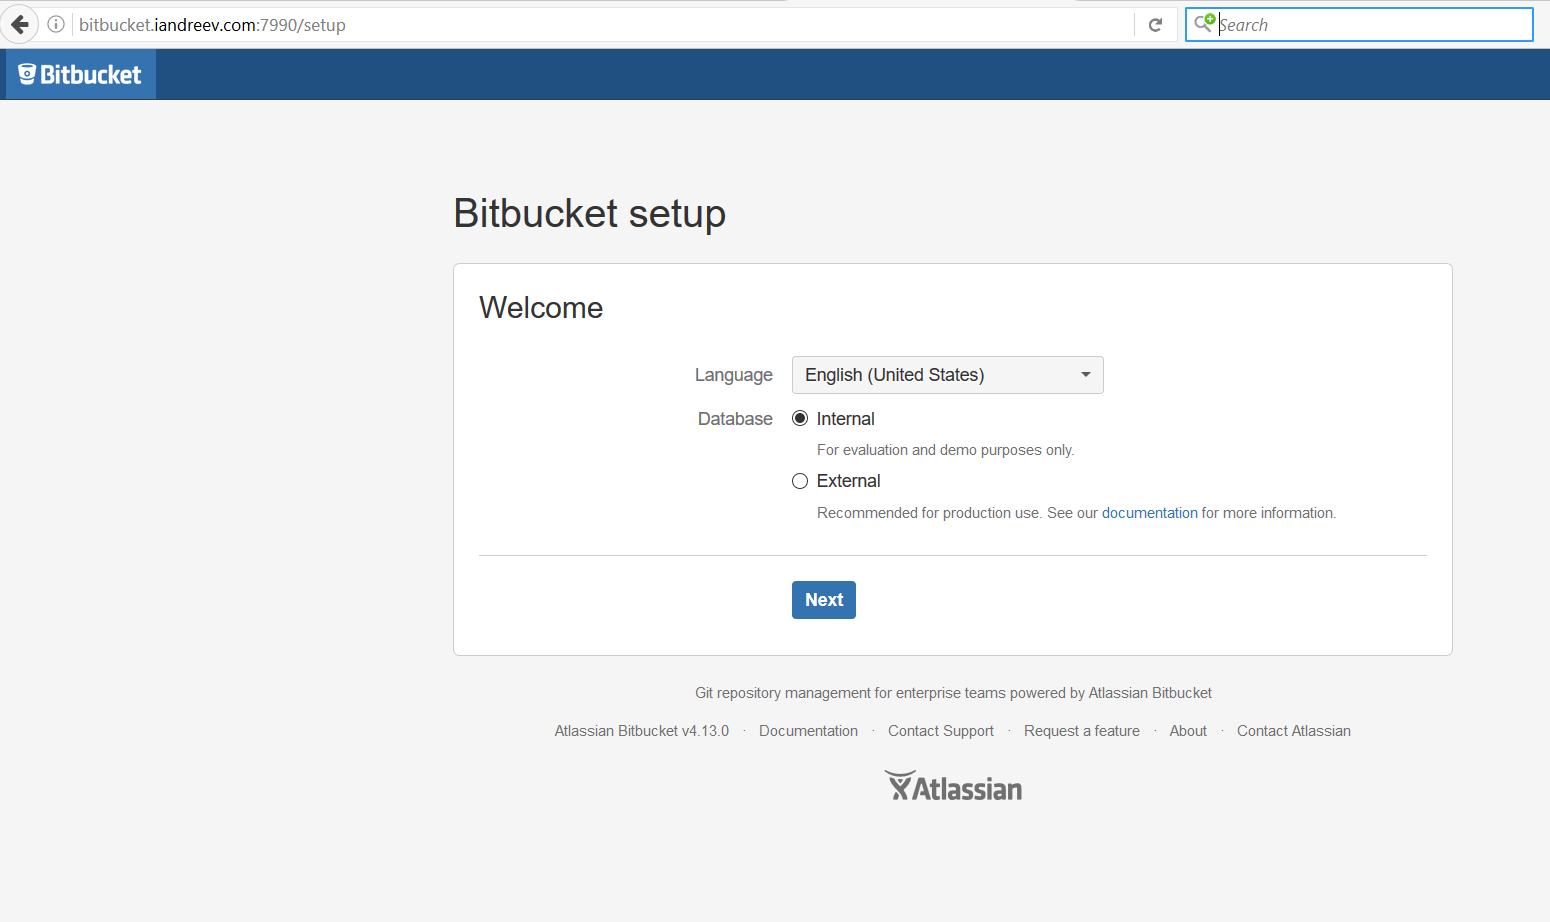
Go to http://your_IP_hostname_whatever:7990
…and you are on your own.