In this post I’ll describe how to install the so called LAMP (Linux, Apache, MySQL, Perl/PHP) on a FreeBSD 10 server. Technically, it should be FAMP. We’ll use FreeBSD 10, Apache 2.4.9, PHP 5.4.34 and MySQL 5.6.17.
Apache
First, let’s install Apache.
pkg install apache24
Leave the defaults which will install SSL as well (mod_ssl). Once the installation finishes, edit /etc/rc.conf and add the following line which will ensure that apache will start on boot.
apache24_enable="YES"
The main configuration file for apache is /usr/local/etc/apache24/httpd.conf. Edit this file and change these two values.
ServerName www.yourserver.com:80
ServerAdmin [email protected]
They should match whatever your server name is and whatever is your admin’s e-mail. Another important command is apachectl. Use this command to start, stop and restart the apache daemon. If you want to make a change in your configuration files and don’t want to kick off any current users, use:
apachectl graceful
In this case, apache will wait for the open connections to close before stopping the daemon. With these simple config changes, we can now start the Apache and test it.
apachectl start
Go to your www.servername.com domain and you should see the “It works!” page.
Most of the time, you will need to host multiple web sites and in order to do that we need to make some other changes.
Edit httpd.conf again, look for the following line and uncomment it.
Include etc/apache24/extra/httpd-vhosts.conf
This tells apache to read another configuration file that describes the virtual hosts. This config file is under /usr/local/etc/apache24/extra directory. Edit this file and change the values so it suit your needs. In my case, here is an example of a server that I have.
<VirtualHost *:80>
    # e-mail for the server admin
    ServerAdmin [email protected]
    # Top directory where the files for this virtual hosts are
    DocumentRoot "/usr/local/www/mail.mycloudserver.org"
    # The server URL for the public. Make sure it's in DNS somewhere
    ServerName mail.mycloudserver.org
    # All the errors with the config files, server misconfiguirations etc. are logged here
    ErrorLog "/var/log/mail.mycloudserver.org-error_log"
    # This is the access log in common format.
    CustomLog "/var/log/mail.mycloudserver.org-access_log" common
    # Use this to give access to the servers, otherwise users will receive access denied
    <Directory "/usr/local/www/mail.mycloudserver.org">
        Options All
        AllowOverride All
        # The syntax is case sensitive!
        Require all granted
    </Directory>
</VirtualHost>
Test the server by accessing the virtual host name, in my case it was http://mail.mycloudserver.org.
Finally, let’s configure the SSL portion of it. We’ll use fake (self-issued) certificate, so you’ll get a warning. Again, edit httpd.conf and uncomment the following lines.
LoadModule authn_socache_module libexec/apache24/mod_authn_socache.so
LoadModule socache_shmcb_module libexec/apache24/mod_socache_shmcb.so
LoadModule ssl_module libexec/apache24/mod_ssl.so
Include etc/apache24/extra/httpd-ssl.conf
Then go to the extra directory and edit httpd-ssl.conf file. Uncomment the way the random numbers are generated. See the URL inside the config file for more info. For FreeBSD I used this line.
SSLRandomSeed startup file:/dev/urandom 512
Similary to the httpd.conf file, configure the ServerName and ServerAdmin. At the end, create the self-signed certificate.
cd /usr/local/etc/apache24
openssl genrsa -out server.key 1024
openssl req -new -key server.key -out server.csr
openssl x509 -req -days 3650 -in server.csr -signkey server.key -out server.crt
Restart the apache daemon and test with https://www.servername.com. If you want to create a SSL virtual hosts, use the same httpd-vhosts file and add the following.In this case, we are configuring the server https://freebsd-ssl.andreev.us.
<VirtualHost *:443>
    SSLEngine On
    SSLCertificateFile /usr/local/etc/apache24/server.crt
    SSLCertificateKeyFile /usr/local/etc/apache24/server.key
    ServerAdmin [email protected]
    DocumentRoot "/usr/local/www/freebsd-ssl.andreev.us"
    ServerName freebsd-ssl.andreev.us
    ErrorLog "/var/log/freebsd-ssl.andreev.us-error_log"
    CustomLog "/var/log/freebsd-ssl.andreev.us-access_log" common
    <Directory "/usr/local/www/freebsd-ssl.andreev.us">
        Options All
        AllowOverride All
        Require all granted
    </Directory>
</VirtualHost>
MySQL
MySQL installation is very straightforward with minimal configuration files.
pkg install mysql56-server
If you want to install MariaDB instead, do:
pkg install mariadb55-server
Once completed, edit /etc/rc.conf and add this line so MySQL starts on each boot. The entry is the same for MySQL and MariaDB.
mysql_enable="YES"
Start the server with:
service mysql-server start
Do the initial config. Hit ENTER for the first question (current root password), then just follow the prompts. Pretty much, accept all the defaults. Again, it’s the same for MySQL and MariaDB.
mysql_secure_installation
PHP
Install PHP by doing:
pkg install php5 php5-extensions mod_php5 php5-mysql
This will install the PHP language, some PHP extensions (accept the defaults) and the Apache PHP module. Once completed, create the php.ini file.
cd /usr/local/etc
cp php.ini-production php.ini
Now, edit the php.ini file and change the date.timezone line. Pick a value from here. In my case, I used America/New_York. Then, edit the httpd.conf file and look for these configuration lines.
<Files “.ht>
	Require all denied
</Files>
Insert the following after (you can insert them at the end if you want).
<FilesMatch "\.php$">
    SetHandler application/x-httpd-php
</FilesMatch>
<FilesMatch "\.phps$">
    SetHandler application/x-httpd-php-source
</FilesMatch>
Again, look for these configuration lines.
<IfModule dir_module>
    DirectoryIndex index.html
</IfModule>
and change it so it looks like this.
<IfModule dir_module>
    DirectoryIndex index.php index.html
</IfModule>
Finally, create this file in the root folder of the Apache or anywhere in the root folder of any virtual host.
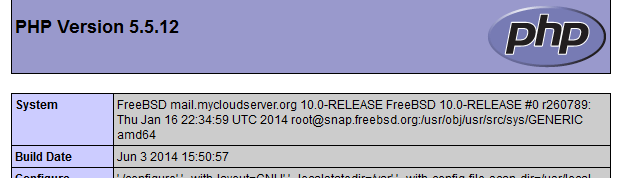
echo '<?php phpinfo(); ?>' > index.php
Restart the apache daemon and go to http://somewhere.com. You don’t have to put index.php. Apache should pick that up automatically with the DirectoryIndex change that we made above. If everything is OK, you should see something like this.
1 comment
It helped a lot thank you for the good guide