
If you are behind a firewall and want to access some resources over SSH or RDP, most likely you won’t be able to do that. It’s because most of the corporate firewalls allow only ports 80 and 443 outbound. But you can still bypass that by tunneling everything over port 443. You will need a software called shellinabox to tunnel SSH over 443 and RDP gateway to tunnel the RDP traffic over 443. I’ll present the shellinabox solution for both CentOS 7 and FreeBSD 11. Both of these servers will be sitting somewhere in the cloud or behind your home firewall. The only requirement is to have port 443 opened and accessible on Internet. You might have a public IP or your home firewall will forward the traffic to 443, it doesn’t matter. Another option for connecting to any port is to use putty and a Linux/FreeBSD instance. I’ll describe that option last.
Table of Contents
CentOS 7
shellinabox doesn’t come up with the default packages, so you have to install the EPEL release first.
yum install epel-release
yum install shellinabox
systemctl enable shellinaboxd
Edit the configuration file for shellinabox which is /etc/sysconfig/shellinaboxd. Make sure it looks like this.
# Shell in a box daemon configuration
# For details see shellinaboxd man page
# Basic options
USER=shellinabox
GROUP=shellinabox
CERTDIR=/var/lib/shellinabox
PORT=4200
OPTS="--css white-on-black.css -t -s /:SSH:localhost"
#OPTS="--css color.css -t -s /:SSH:localhost"
shellinabox runs on port 4200 by default. You can change it to run on 443, but you have to run as root. A better solution is to install Apache and use the mod_proxy so the Apache will listen on 443 and forward the traffic to 4200.
yum install httpd mod_ssl
systemctl enable httpd
Create the configuration file for the Apache server. In my case, I’ll access the SSH over HTTPS as sshtest.iandreev.com. Change the config below to suit your needs.
cd /etc/httpd/conf.d
touch httpd-vhosts.conf
Edit httpd-vhosts.conf and paste the following.
<VirtualHost *:443>
    SSLEngine On
    SSLCertificateFile /etc/pki/tls/certs/sshtest.iandreev.com.crt
    ServerAdmin [email protected]
    ServerName sshtest.iandreev.com
    ErrorLog "/var/log/httpd/sshtest.iandreev.com-error_log"
    CustomLog "/var/log/httpd/sshtest.iandreev.com-access_log" combined
    ProxyRequests On
    ProxyPreserveHost On
    <Proxy *>
        AuthUserFile /var/www/sshtest.iandreev.com/.htpasswd
        AuthName EnterPassword
        AuthType Basic
        require user ssh.admin
        Order deny,allow
        Allow from all
    </Proxy>
    ProxyPass / http://localhost:4200/
    ProxyPassReverse / http://localhost:4200/
</VirtualHost>
HTTPS requires a certificate, we’ll create a fake one. If you have a valid certificate, just put it under /etc/pki/tls/certs as sshtest.iandreev.com.crt.
cd /etc/pki/tls/certs
./make-dummy-cert sshtest.iandreev.com.crt
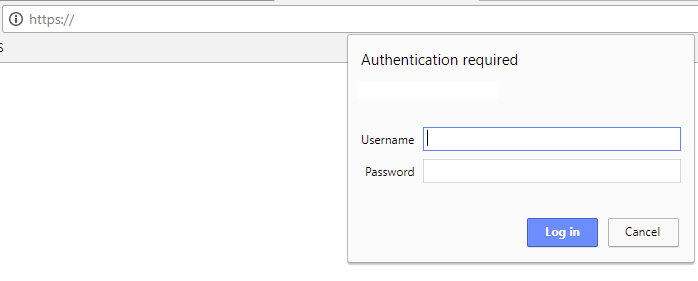
shellinabox when started will give you a SSH prompt so you can login to your server. A more secure solution is to protect the access even more with a username and password. Anytime you access your server, you’ll get prompted with a username and password and then you’ll get prompted with your SSH credentials.
cd /var/www
mkdir sshtest.iandreev.com
cd sshtest.iandreev.com
htpasswd -c .htpasswd ssh.admin
cd ..
chown -R apache:apache sshtest.iandreev.com
I’ve created a user called ssh.admin and the commands above will ask you for a password.
Now, it’s time to start shellinabox.
systemctl start httpd
systemctl start shellinaboxd
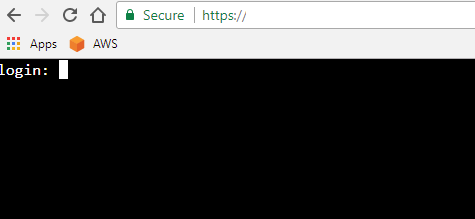
On a laptop behind your comporate firewall, go to https://sshtest.yourdomain.com and you should get prompted for ssh.admin’s password. Once you pass that you’ll see the login prompt in your browser. From here you can SSH to any server that has port 22 opened.
shellinabox comes with two styles. If you see above in it’s config, we provided these two lines.
OPTS="--css white-on-black.css -t -s /:SSH:localhost"
#OPTS="--css color.css -t -s /:SSH:localhost"
If you prefer black on white background, uncomment the last line, save the config file and restart shellinabox.
Depending on your CentOS install, you might have firewall and SElinux enabled. If these are not configured, shellinabox won’t work. For the firewall, you’ll have to allow port 443 inbound.
firewall-cmd --add-service=https --permanent
firewall-cmd --reload
For SElinux, you’ll have to allow Apache to make outbound connections.
/usr/sbin/setsebool -P httpd_can_network_connect 1
At the end, it will look like this.
…and this.
FreeBSD 11
We have to install Apache and shellinabox first.
pkg install shellinabox apache24
Make sure they start on boot. Add these two lines in /etc/rc.d
apache24_enable="YES"
shellinaboxd_enable="YES"
shellinaboxd_flags="--disable-ssl --css=/usr/local/www/sshtest.iandreev.com/style.css"
Go to the Apache config directory and edit the config file /usr/local/etc/apache24/httpd.conf. Make sure these lines are uncommented.
Include etc/apache24/extra/httpd-vhosts.conf
LoadModule authn_socache_module libexec/apache24/mod_authn_socache.so
LoadModule socache_shmcb_module libexec/apache24/mod_socache_shmcb.so
LoadModule ssl_module libexec/apache24/mod_ssl.so
Include etc/apache24/extra/httpd-ssl.conf
LoadModule proxy_module libexec/apache24/mod_proxy.so
LoadModule proxy_http_module libexec/apache24/mod_proxy_http.so
ServerName www.example.com:80
Go to /usr/local/etc/apache24/extra folder and make sure you have the definitiopn for the virtual host there. Change it to suit your needs.
<VirtualHost *:443>
    SSLEngine On
    SSLCertificateFile /usr/local/share/certs/sshtest.iandreev.com.crt
    SSLCertificateKeyFile /usr/local/share/certs/sshtest.iandreev.com.key
    ServerAdmin [email protected]
    ServerName sshtest.iandreev.com
    ErrorLog "/var/log/sshtest.iandreev.com-error_log"
    CustomLog "/var/log/sshtest.iandreev.com-access_log" combined
    ProxyRequests On
    ProxyPreserveHost On
    <Proxy *>
        AuthUserFile /usr/local/www/sshtest.iandreev.com/.htpasswd
        AuthName EnterPassword
        AuthType Basic
        require user ssh.admin
        Order deny,allow
        Allow from all
    </Proxy>
    ProxyPass / http://localhost:4200/
    ProxyPassReverse / http://localhost:4200/
</VirtualHost>
In the same directory, edit httpd-ssl.conf file and make sure it looks like this.
SSLRandomSeed startup file:/dev/urandom 512
Listen 443
SSLCipherSuite HIGH:MEDIUM:!MD5:!RC4
SSLProxyCipherSuite HIGH:MEDIUM:!MD5:!RC4
SSLHonorCipherOrder on
SSLProtocol all -SSLv3
SSLProxyProtocol all -SSLv3
SSLPassPhraseDialog  builtin
SSLSessionCache        "shmcb:/var/run/ssl_scache(512000)"
SSLSessionCacheTimeout  300
We’ll protect shellinabox with extra username (ssh.admin) and password.
cd /usr/local/www
mkdir sshtest.iandreev.com
cd sshtest.iandreev.com
htpasswd -c .htpasswd ssh.admin
We’ll need a certificate for the HTTPS site. Use your own or create a fake one. Hit ENTER for everything prompted. It’s a fake certificate.
cd /usr/local/share/certs
openssl genrsa -out sshtest.iandreev.com.key 2048
openssl req -new -key sshtest.iandreev.com.key -out sshtest.iandreev.com.csr
openssl x509 -req -days 3650 -in sshtest.iandreev.com.csr -signkey sshtest.iandreev.com.key -out sshtest.iandreev.com.crt
Unlike CentOS, FreeBSD shellinabox doesn’t come up with CSS files for the color, so we can use these two. Copy these files under /usr/local/www/sshtest.iandreev.com as blackonwhite.css and whiteonblack.css.
This is blackonwhite.css. Click to expand.
#vt100 .ansiDefR {
  color:            #ffffff;
}

#vt100 .bgAnsiDefR {
  background-color: #123450;
}

#vt100 #scrollable.inverted .ansiDefR {
  color:            #000000;
}

#vt100 #scrollable.inverted .bgAnsiDefR {
  background-color: #ffffff;
}

#vt100 .ansiDefR {
  color:            #ffdfd0;
}

#vt100 .bgAnsiDefR {
  background-color: #010203;
}

#vt100 #scrollable.inverted .ansiDefR {
  color:            #002030;
}

#vt100 #scrollable.inverted .bgAnsiDefR {
  background-color: #1f1fff;
}
This is whiteonblack.css. Click to expand.
#vt100 #cursor.bright {
  background-color: white;
  color:            black;
}

#vt100 #cursor.dim {
  background-color: black;
  opacity:          0.2;
  -moz-opacity:     0.2;
  filter:           alpha(opacity=20);
}

#vt100 #scrollable {
  color:            #ffffff;
  background-color: #000000;
}

#vt100 #scrollable.inverted {
  color:            #000000;
  background-color: #ffffff;
}

#vt100 .ansiDef {
  color:            #ffffff;
}

#vt100 .ansiDefR {
  color:            #000000;
}

#vt100 .bgAnsiDef {
  background-color: #000000;
}

#vt100 .bgAnsiDefR {
  background-color: #ffffff;
}

#vt100 #scrollable.inverted .ansiDef {
  color:            #000000;
}

#vt100 #scrollable.inverted .ansiDefR {
  color:            #ffffff;
}

#vt100 #scrollable.inverted .bgAnsiDef {
  background-color: #ffffff;
}

#vt100 #scrollable.inverted .bgAnsiDefR {
  background-color: #000000;
}
Copy one of them to be your style. Anytime you change the style, restart shellinabox.
cd /usr/local/www/sshtest.iandreev.com
cp blackonwhite.css style.css
cd ..
chown -R www:www sshtest.iandreev.com
Finally, start Apache and shellinabox.
service shellinaboxd start
service apache24 start
Access your server from a laptop behind your corporate firewall as https://sshtest.domain.com.
Windows 2016
You will need a Windows 2016 server with a public IP and port 443 allowed or you can use a Windows server behind your home network as long as port 443 is allowed. In order to bypass the RDP restriction, we’ll tunnel the RDP traffic over HTTPS using Remote Desktop Gateway.
From the Server Manager, go to Add Roles and Features. Select Remote Desktop Services.

Click Next 2-3 times and then select Remote Desktop Gateway. Click Next again and accept all the defaults. Windows will install some other components for you.
Once everything is installed, from the Server Manager’s menu click on Tools, Remote Desktop Services and then Remote Desktop Gateway Manager.
Click on the server name and in the middle pane you’ll see what you have to do.

Click on the first link, View or modify certificate properties. Choose to create a fake certificate or you can import your own. It has to be in p12 format, not PEM.
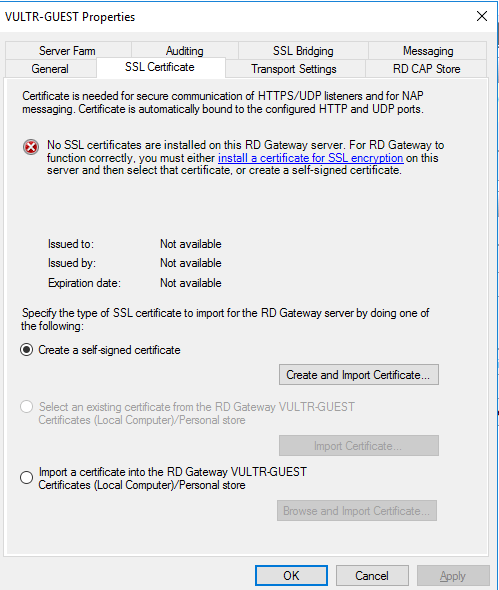
If you decide to go with a fake certificate, enter the FQDN of the server, e.g sshtest.iandreev.com. You will have to make sure that sshtest.iandreev.com resolves to the public IP of the Windows box or if you have an internal server in your home lab, then the external IP of your cable/DSL modem. Then just click on the button Create and Import Certificate, enter the FQDN sshtest.iandreev.com and then click OK when prompted. Click Apply and OK to go back.
At this point, you might want to create a user or a group that you can allow access to the Gateway.
I created a user called RDP. Back in the RD Gateway Manager, select Policies under the server name, right-click on it and choose Create New Authorization Policies. Choose the option to create both RD CAP and RD RAP policies. Here is what I did in the wizard config.
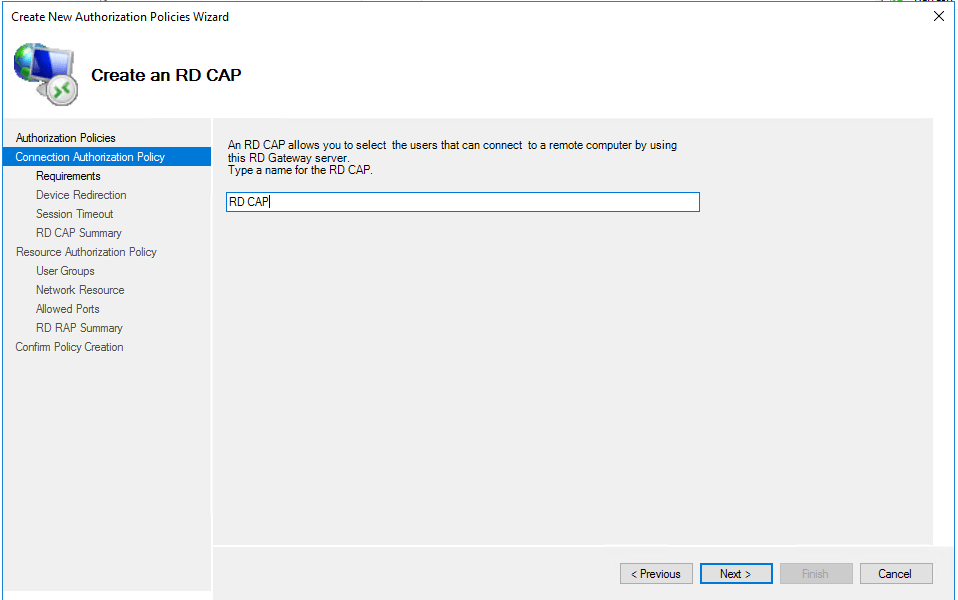
I choose BUILTIN\Users to be able to use the Gateway. The generic user RDP that I created is by default a member of the users group.
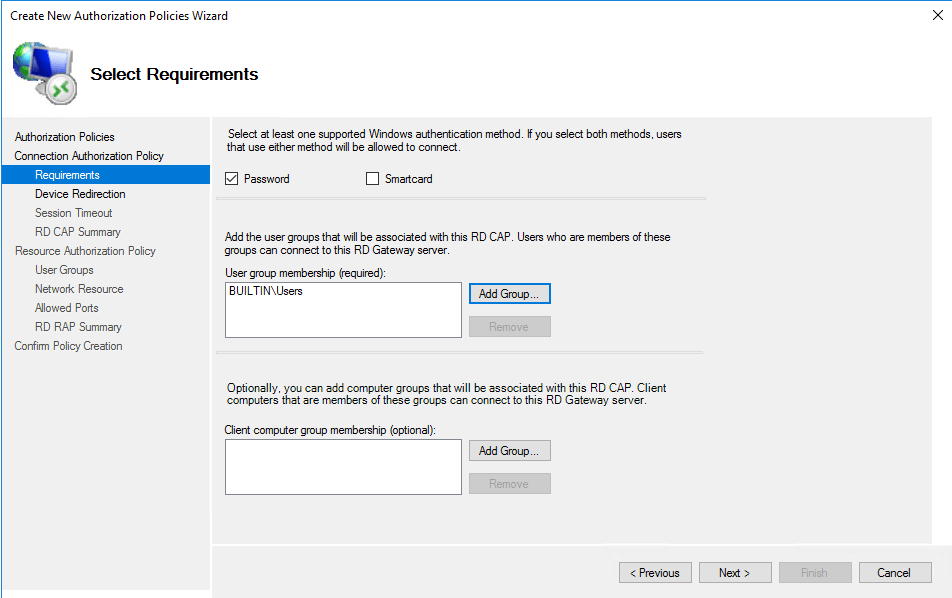
Select the default Enable device redirection for all client devices.
Check both checkmarks for Idle Timeout and Session Timeout. This is optional, but it’s good to have.
Click Next and then create the Resource Authorization Policy.
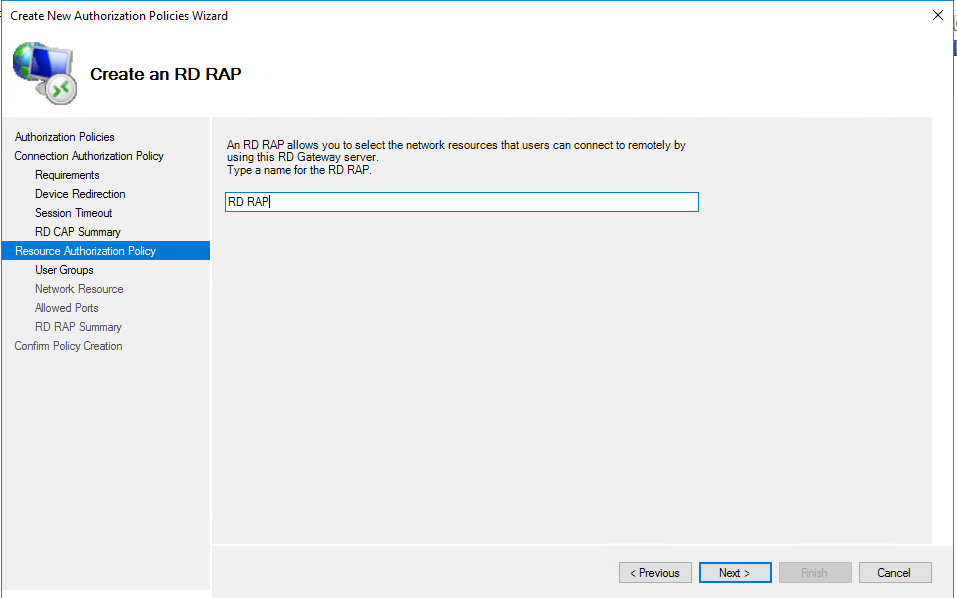
Accept the same group (BUILTIN\Users).
Choose the option at the bottom, Allow users to connect to any network resource (computer).
Choose the first option, Allow connections only to port 3389.
Click Next and Finish.
So, how do you use this solution now? Easy…
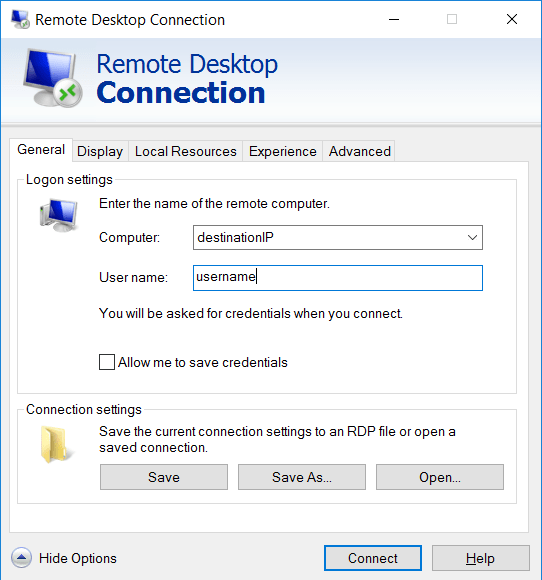
All you have to do is go to your corporate laptop and create a new RDP connection. Under the General tab enter the IP address of the Windows box that you want to reach. This is the box that listens on 3389 and that you are not able to reach directly. Mind that the Windows server that we just built is a gateway, so the Windows RD Gateway server should be able to talk to the destination server over 3389 and your corporate laptop will talk to Windows RD Gateway server over 443.
Click on the Advanced tab and then the Settings button. Select to Use these RD Gateway server settings and enter the FQDN (sshtest.iandreev.com) of the RD Gateway server that we just built.
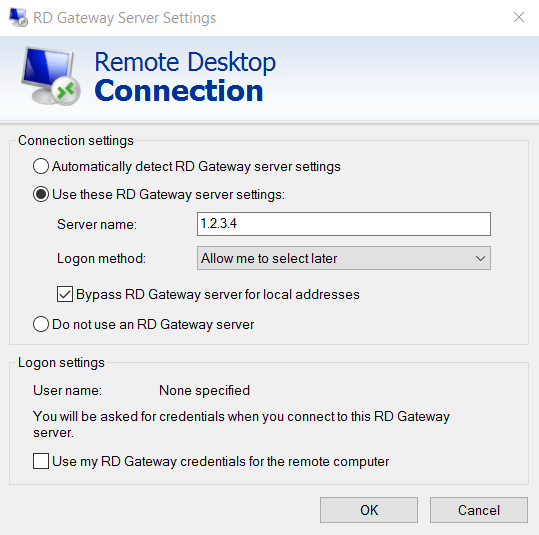
Once you are done, click Connect and you should get prompted to enter the credentials for the RD Gateway (in my case the username and password for the RDP user) and then you’ll have to enter the username and password for the destination server.
NOTE: Make sure you use .\rdp for the username, not rdp. You can also get an error saying that the identity of the RD Gateway can’t be verified. This is most likely if you messed up the certificate and it doesn’t match the hostname. In that case, the RDP client will allow you to view the certificate. Then copy it to a file and import it on the local machine under the Trusted Root Cert Authorities.
Tunnel over putty
Let’s say that your corporate firewall allows only port 443 outbound. In this case, we’ll build a Linux/BSD server with a public IP and change the SSH listener port from 22 to 443. For this, edit sshd_config under /etc/ssh/sshd_config or /usr/local/etc/ssh/sshd_config. Look for the directive Port 22 and change it to Port 443. Restart the ssh service.
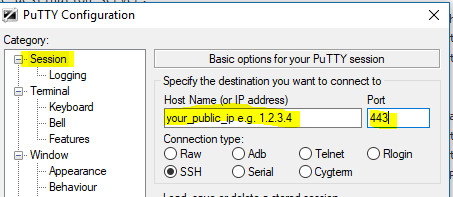
On your client machine behind the corporate firewall, open putty and under Session enter the public IP of your Linux/BSD server and port 443 so it looks like this.
Now, expand the Connection on the left side, then SSH and select Tunnels. For the source port enter 3390 and for the destination enter the IP of your Windows box where you want to connect.
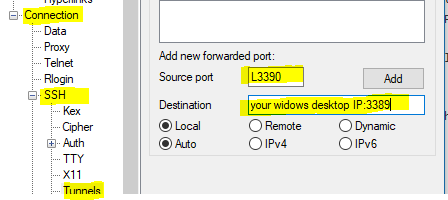
Finally, save this session, open it and login to the Linux server to establish the tunnel. You should be able to run the RDP client (mstsc) and RDP to 127.0.0.1:3390.
1 comment
Nice one, will have to try it out.