
In one of my previous posts I’ve described how to run a postfix and dovecot servers on FreeBSD 9. This time, we’ll go a step further and after the installation of postfix and dovecot, we’ll talk about mail filtering, spam and anti-virus protection.
Table of Contents
Pre install
The post described below uses:
- FreeBSD 10.0-p12 (fresh install)
- postfix 2.11.3
- dovecot 2.2.15
- amavisd-new 2.9.1
- spamassasin 3.4.0
- clamav 0.98.4
- pigeonhole 0.4.3
and will allow you to use virtual e-mail domains and users.
FreeBSD comes with sendmail preinstalled, so we need to remove it first. Edit /etc/rc.conf and add these lines.
# Disable sendmail
sendmail_enable="NO"
sendmail_submit_enable="NO"
sendmail_outbound_enable="NO"
sendmail_msp_queue_enable="NO"
Then terminate all sendmail processes.
killall sendmail
postfix
We’ll install postfix from the ports. The packaged install doesn’t come up with some prerequisites.
NOTE: Recently, I got an e-mail saying that if you install the postfix-sasl package, you don’t have to deal with the ports. Try pkg install postfix-sasl instead and see if it works.
cd /usr/ports/mail/postfix
make all install clean
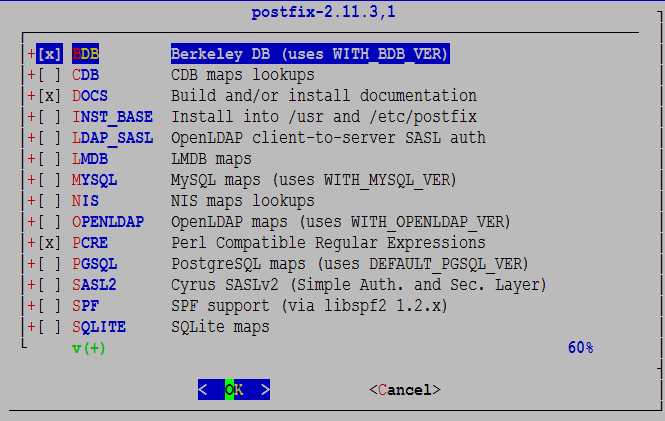
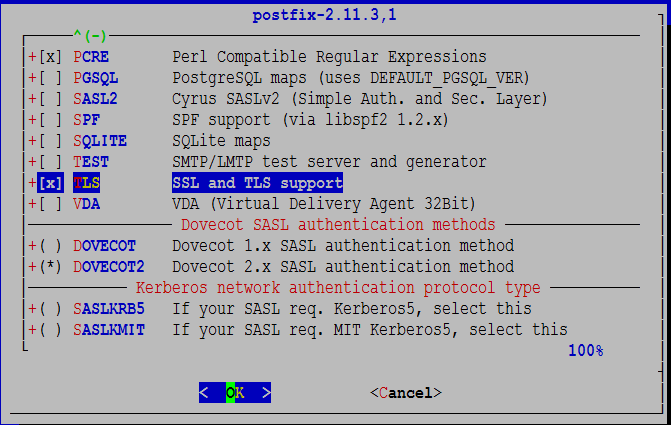
Make sure that BDB, PCRE, TLS and DOVECOT2 are selected and INST_BASE is not selected. OPTIONAL: Select TEST if you want to do a stress test (see below). I am using Berkeley DB as a back-end database. If you want to use MySQL or PostgreSQL, the scenario below won’t apply for postfix. The rest (dovecot, amavisd…) configs should be fine.
You should accept the defaults for perl5, pcre, db5, gmake, gettext and dovecot2. Once completed you’ll see this message.
Would you like to activate Postfix in /etc/mail/mailer.conf [n]?
Say y, edit /etc/rc.conf and add these two lines to start postfix and dovecot automatically on boot.
postfix_enable="YES"
dovecot_enable="YES"
The configuration files for postfix are in /usr/local/etc/postfix. There are two main files, main.cf and master.cf. Make a copy of both these files.
cd /usr/local/etc/postfix
cp main.cf main.cf.ORIG
cp master.cf master.cf.ORIG
Create a user that will have access to the mailboxes and get its UID and GID.
pw groupadd vpostfix && pw useradd vpostfix -g vpostfix -s /usr/sbin/nologin -c "Virtual Postfix user" -d /var/empty
grep vpostfix /etc/passwd
In my case the output was this, which means the UID is 1002 and GID is 1001.
vpostfix:*:1002:1001:Virtual Postfix user:/var/empty:/usr/sbin/nologin
Now, edit main.cf and change the following values:
myhostname = www.example.com
mydomain = example.com
myorigin = $mydomain
inet_interfaces = all
home_mailbox = Maildir/
Replace www.example.com with whatever your FQDN of the server is. While editing main.cf, add these lines at the end of the file.
# Virtual domain config
virtual_mailbox_domains = /usr/local/etc/postfix/virtual_domains
virtual_mailbox_base = /var/mail/vhosts
virtual_mailbox_maps = hash:/usr/local/etc/postfix/vmailbox
# Make sure you replace these UID:GID numbers
virtual_minimum_uid = 1002
virtual_uid_maps = static:1002
virtual_gid_maps = static:1001
virtual_alias_maps = hash:/usr/local/etc/postfix/virtual
Now, create a new file called /usr/local/etc/postfix/virtual_domains. This is the file where all of your domains will be listed. Of course, you’ll have to make sure that MX records of your domains point to the IP of the FreeBSD box.
cd /usr/local/etc/postfix/
touch virtual_domains
The format looks like this.
#  Put each domain in a separate line.
domain-one.com
domain-two.net
domain-three.org
Create the mail directory, sub-directories for the domains and assign the proper permissions. This is where the mail will be stored for all virtual domains.
mkdir /var/mail/vhosts
chgrp -R vpostfix /var/mail
cd /var/mail/vhosts
mkdir domain-one.com
mkdir domain-two.net
mkdir domain-three.org
cd ..
chown -R vpostfix:vpostfix vhosts
Once you do that, postfix will create the “Maildir” directories automatically and assign the proper permissions once an e-mail hits these destinations. Finally, create a file /usr/local/etc/postfix/vmailbox and add all of the users that will receive e-mails. Here is an example:
[email protected]        domain-one.com/joe/
[email protected]       domain-one.com/bill/
@domain-one.com           domain-one.com/catch-all/
[email protected]        domain-two.net/joe/
NOTE: Make sure you end up each line with “/”, otherwise mail won’t be delivered.
Virtual user “[email protected]” (mind that there is no FreeBSD login for this user, these are all virtual users) will have his email delivered under /var/mail/vhosts/domain-one.com/joe directory. You don’t have to create these sub-directories. Once everything is up and running, postfix will take care of creating the Maildir structure (cur, new, tmp).
If you want you can create a catch-all address, see the example above (catch-all). This line tells postfix to get all the emails for the non-existing users in that domain (domain-one.com), which means a lot of spam.
But what if you have a valid FreeBSD user named bill? Where that email goes? In this case, nowhere. If we want this OS user to receive an email, we’ll have to treat him as a virtual user and add him to a virtual domain. It’s much easier to maintain one list of virtual users and hosts than deal with separate configuration files.
Maybe you’ve noticed that the file with the e-mail addresses (vmailbox) has a hash: prefix in the config file. This is to speed-up lookups. Postfix can use hash: (Berkeley-DB), mySQL or PostgreSQL database to store the e-mail accounts. Check the postfix howto if you want to use mySQL or PostgreSQL. We’ll be dealing with Berkeley DB.
Create the virtual aliases file and create a local aliases file.
touch /usr/local/etc/postfix/virtual
cd /etc
postalias aliases
Once we are done with editing these files, do the following to create the hashed files (extension .db).
NOTE: You should execute these lines anytime you make a change to these files.
postmap /usr/local/etc/postfix/virtual
postmap /usr/local/etc/postfix/vmailbox
Postfix can be started with:
service postfix start
Check the log file with:
tail /var/log/maillog
In my case I saw these lines in the log file.
Nov  6 17:57:04 www postfix/postfix-script[76814]: starting the Postfix mail system
Nov  6 17:57:04 www postfix/master[76816]: daemon started -- version 2.11.3, configuration /usr/local/etc/postfix
Check if postfix runs and listens on port 25.
ps -waux | grep postfix
sockstat -4 | grep :25
NOTE: You can stop and restart postfix with service postfix stop and service postfix restart or reload the configuration files with service postfix reload.
From another domain (e.g. your hotmail or gmail account) send an e-mail to [email protected] or whatever your domain is and watch the log file.
tail -f /var/log/maillog
You should see something like this.
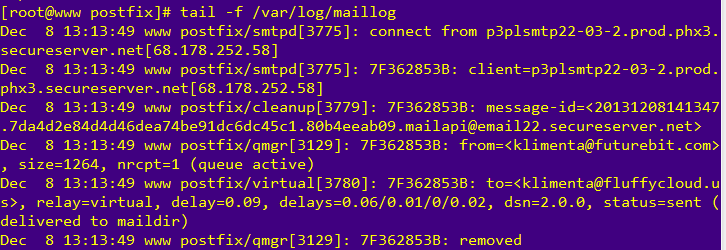
If you check /var/mail/vhosts/domain-one/joe/new directory you’ll see a file with some gibberish name. This is your e-mail that you just sent to joe. But, how will this virtual user retrieve this e-mail? There is a login (the e-mail address), but what’s the password?
dovecot
In order to retrieve the e-mails, we’ll configure dovecot. Dovecot is an open-source POP and IMAP client.
As of version 2.0, there are multiple configuration files for dovecot. The main file is /usr/local/etc/dovecot/dovecot.conf, but you’ll see a lot of include directives there that point to /usr/local/etc/dovecot/conf.d directory where we have multiple configuration files. FreeBSD comes with these files under a different directory, so we’ll have to copy them to their proper location.
cd /usr/local/etc/dovecot
cp -R /usr/local/share/doc/dovecot/example-config/ .
Make a copy of dovecot.conf and remove the comment from this line.
protocols = imap pop3 lmtp
Then, go to conf.d directory and change the following lines in the following files.
10-auth.conf
disable_plaintext_auth = no
#!include auth-system.conf.ext
!include auth-passwdfile.conf.ext
10-logging.conf
log_path = /var/log/dovecot.log
auth_verbose = no
auth_debug = no
verbose_ssl = no
10-mail.conf
mail_home = /var/mail/vhosts/%d/%n
mail_location = maildir:~
mail_uid = 1002    # These are the GID and UID numbers for vpostfix
mail_gid = 1001    # Don't just put these numbers here
mail_privileged_group = vpostfix
10-master.conf
unix_listener auth-userdb {
  mode = 0600
  user = postfix
  group =  postfix
}
# Postfix smtp-auth
unix_listener /var/spool/postfix/private/auth {
  mode = 0666
  user = postfix
  group = postfix
}
10-ssl.conf
ssl = no
# ssl_cert = </etc/ssl/certs/dovecot.pem
# ssl_key = </etc/ssl/private/dovecot.pem
If you look at 10-auth.conf, we commented the line #!include auth-system.conf.ext and uncommented the !include auth-passwdfile.conf.ext. Take a look at this file (auth-passwdfile.conf.ext) and you’ll see:
passdb {
  driver = passwd-file
  args = scheme=CRYPT username_format=%u /usr/local/etc/dovecot/users
}

userdb {
  driver = passwd-file
  args = username_format=%u /usr/local/etc/dovecot/users
}
This tells us that our username/password database will be in the file /usr/local/etc/dovecot/users. To generate a password with SHA512-CRYPT password scheme do:
doveadm pw -s SHA512-CRYPT
You’ll be prompted to enter a password twice and the output will be similar to this.

If you want to use a different password scheme, take a look at this link.
Now, create or open /usr/local/etc/dovecot/users and copy and paste the password after the username. In my case, I have [email protected] with some password that I just generated. So the line will be like this.

Don’t forget to add 4 colons after the password “::::”. Even if you use the same password for the users, they’ll be encrypted differently.
The problem with this scenario is that the end users won’t have the ability to change their passwords. So, you’ll have to provide them with the password and they won’t be able to reset them. But, there are plenty of perl scripts that can take care of this or you can write your own.
Start dovecot and check for any errors. At this point, we should have dovecot running and listening for pop and imap connections.
service dovecot start
tail /var/log/dovecot.log
sockstat -4 | grep :110
sockstat -4 | grep :143
Now, let’s check our e-mail. You can do that from the server using the telnet command.
NOTE: Highlighted numbers are what you type. The rest is the response from the server.
telnet localhost 110
Trying 127.0.0.1...
Connected to localhost.
Escape character is '^]'.
+OK Dovecot ready.
user [email protected]
+OK
pass topsecret
+OK Logged in.
stat
+OK 2 2037
list
+OK 2 messages:
1 1027
2 1010
.
quit
+OK Logging out.
Connection closed by foreign host.
In the above example, I am testing POP3. For IMAP, do the following.
telnet localhost 143
Trying 127.0.0.1...
Connected to localhost.
Escape character is '^]'.
* OK [CAPABILITY IMAP4rev1 LITERAL+ SASL-IR LOGIN-REFERRALS ID ENABLE IDLE AUTH=PLAIN] Dovecot ready.
? login [email protected] topsecret
? OK [CAPABILITY IMAP4rev1 LITERAL+ SASL-IR LOGIN-REFERRALS ID ENABLE IDLE SORT SORT=DISPLAY THREAD=REFERENCES THREAD=REFS THREAD=ORDEREDSUBJECT MULTIAPPEND URL-PARTIAL CATENATE UNSELECT CHILDREN NAMESPACE UIDPLUS LIST-EXTENDED I18NLEVEL=1 CONDSTORE QRESYNC ESEARCH ESORT SEARCHRES WITHIN CONTEXT=SEARCH LIST-STATUS SPECIAL-USE BINARY MOVE] Logged in
? list "" "*"
* LIST (\HasNoChildren) "." INBOX
? OK List completed.
? logout
* BYE Logging out
? OK Logout completed.
Connection closed by foreign host.
If you want you can test retrieving these emails from a mail client such as Outlook, Opera Mail or any MUA of your preference. At this point the server can receive e-mails from others and you can retrieve those e-mails from outside using POP and IMAP. What we need to do now is to be able to reply to those e-mails from outside (using MUA of your choice). Nowadays port 25 is blocked at some major providers (Verizon, Comcast for example), so we’ll use SASL in Postfix and we’ll use Dovecot to authenticate the users using the same username/password combination. In addition, we’ll use certificates, so instead of POP3 and IMAP, we’ll use their secure equivalents, POP3s and IMAPs running on ports 995 and 993 respectively. Dovecot should already listen on these ports, so you can allow these ports on the firewall and close 110 and 143.
postfix and TLS
Edit /usr/local/etc/postfix/main.cf and add the following lines at the end.
# TLS
smtpd_use_tls = yes
smtpd_tls_security_level = may
smtpd_tls_auth_only = yes
smtpd_tls_key_file = /usr/local/etc/postfix/myserver.key
smtpd_tls_cert_file = /usr/local/etc/postfix/server.crt
smtpd_tls_loglevel = 1
smtpd_tls_received_header = yes
smtpd_tls_session_cache_timeout = 3600s
tls_random_source = dev:/dev/urandom

# SASL
smtpd_sasl_type = dovecot
broken_sasl_auth_clients = yes
smtpd_sasl_path = private/auth
smtpd_sasl_auth_enable = yes
smtpd_sasl_security_options = noanonymous
smtpd_recipient_restrictions = permit_sasl_authenticated, permit_mynetworks, reject_unauth_destination
smtpd_relay_restrictions = permit_sasl_authenticated, permit_mynetworks, reject_unauth_destination
NOTE: As of postfix 2.10 the last line is needed. See this link.
Then, edit /usr/local/etc/postfix/master.cf and remove the comments from the submission part.
submission inet n       -       n       -       -       smtpd
  -o syslog_name=postfix/submission
  -o smtpd_tls_security_level=encrypt
  -o smtpd_sasl_auth_enable=yes
  -o smtpd_reject_unlisted_recipient=no
  -o smtpd_recipient_restrictions=permit_sasl_authenticated,reject
  -o milter_macro_daemon_name=ORIGINATING
Restart postfix after these changes.
service postfix restart
For information of what these values mean, check the links at the end of this post. If you do
sockstat -4
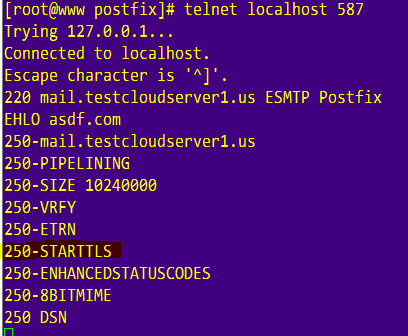
you’ll see that postfix is also listening on port 587. Allow this port on the firewall if you have it enabled, but don’t close port 25. This port is used for server to server communication. If you do telnet localhost 587 and type EHLO something.com you should see that postfix replies with STARTTLS.
dovecot and SSL
Edit 10-auth.conf and change:
disable_plaintext_auth = yes
Then, edit 10-ssl.conf and change:
ssl = yes
ssl_cert = </usr/local/etc/postfix/server.crt
ssl_key = </usr/local/etc/postfix/myserver.key
We’ll use self-signed certificates, but check http://www.startssl.com for free certificates. Unlike virtual Apache domains, you don’t need multiple certificates for each virtual domain. Self-signed certificates are fake, so you’ll get a prompt to accept a fake certificate when you try to send/receive an email, but the goal is to show you how to use them, not to be a 100% compliant.
cd /usr/local/etc/postfix
openssl genrsa -out myserver.key 1024
openssl req -new -key myserver.key -out myserver.csr
You have to answer some questions for the certificate request.
You are about to be asked to enter information that will be incorporated
into your certificate request.
What you are about to enter is what is called a Distinguished Name or a DN.
There are quite a few fields but you can leave some blank
For some fields there will be a default value,
If you enter '.', the field will be left blank.
-----
Country Name (2 letter code) [AU]:US
State or Province Name (full name) [Some-State]:NJ
Locality Name (eg, city) []:Lawrenceville
Organization Name (eg, company) [Internet Widgits Pty Ltd]:Joe's Plumbing
Organizational Unit Name (eg, section) []:
Common Name (e.g. server FQDN or YOUR name) []:www.domain-one.com
Email Address []:[email protected]

Please enter the following 'extra' attributes
to be sent with your certificate request
A challenge password []:
An optional company name []:
Sign the certificate.
openssl x509 -req -days 3650 -in myserver.csr -signkey myserver.key -out server.crt
Copy server.crt and myserver.key under /usr/local/etc/postfix and restart both postfix and dovecot.
service postfix restart
service dovecot restart
You can test SMTP SSL/TLS on submission port 587.
openssl s_client -starttls smtp -connect localhost:587
Then type ehlo something.com , hit ENTER and then mail from:[email protected]. If these steps work, you should be OK. To test SASL with postfix and dovecot, type:
doveadm auth test -a /var/spool/postfix/private/auth [email protected] joe's_passwd
You should receive passdb: [email protected] auth succeeded.
At this point, you should be able to send e-mails from your favorite MUA, but you’ll have to make some changes in order to send and receive. For example, in Outlook, you should use these settings.
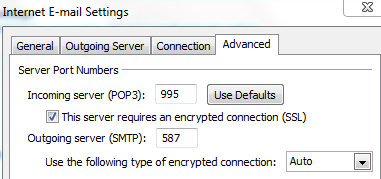
So, no more port 110 and 143. Instead use 995 for POP3s, 587 for SMPT (SASL) and 993 for IMAPs. The username is your e-mail address and the password is the one that you generated with doveadm pw command.
Roundcube IMAP webmail client
In order to send/receive e-mails using a web client, you can use Roundcube. Please follow these guides to install it.
FreeBSD 10: Apache, PHP and MySQL
FreeBSD 10: Install Roundcube Web Mail Client
Amavisd, Spamassassin and clamav
This software trio is used to fight spam messages and e-mails with virus attachments. Amavisd is used as an interface between postfix as MTA (mail transfer agent) and the content checkers (spamassassin and clamav). There are no specific configurations, so we’ll install them from the packages.
pkg install amavisd-new
pkg install clamav
Spamassassin is a dependency for amavisd so it will be installed automatically. First, let’s configure amavisd. The configuration file is /usr/local/etc/amavisd.conf. Edit this file and make sure that these values are correct.
# @bypass_virus_checks_maps = (1);  # controls running of anti-virus code
# @bypass_spam_checks_maps  = (1);  # controls running of anti-spam code
# $bypass_decode_parts = 1;         # controls running of decoders&dearchivers
$daemon_user  = 'vscan';     # (no default;  customary: vscan or amavis), -u
$daemon_group = 'vscan';     # (no default;  customary: vscan or amavis), -g
$mydomain = 'example.com';   # a convenient default for other settings (change it)
$MYHOME = '/var/amavis';   # a convenient default for other settings, -H (remove the comment in front)
@local_domains_maps = ( [".$mydomain","myotherdomain.net"] );  # list of all local domains
$myhostname = 'host.example.com';  # must be a fully-qualified domain name! (remove the comment in front)
There are a lot of changes that you can configure, but these are the basic ones. See the official page for more information.
Finally, let’s make another change in this file, so amavisd and clamav know about each other. Remove the comments from lines 2 to 5.
NOTE ABOUT MEMORY
Clamav eats up a lot of memory. You won’t be able to run it on a server with less than 2GB RAM. If you feel comfortable, you can disable it. Don’t uncomment the lines below, remove the comment from # @bypass_virus_checks_maps = (1); # controls running of anti-virus code and remove it from rc.conf if you already installed it.
# ### http://www.clamav.net/
['ClamAV-clamd',
  \&ask_daemon, ["CONTSCAN {}\n", "/var/run/clamav/clamd.sock.sock"],
  qr/\bOK$/m, qr/\bFOUND$/m,
  qr/^.*?: (?!Infected Archive)(.*) FOUND$/m ],
# # NOTE: run clamd under the same user as amavisd - or run it under its own
# #   uid such as clamav, add user clamav to the amavis group, and then add
# #   AllowSupplementaryGroups to clamd.conf;
# # NOTE: match socket name (LocalSocket) in clamav.conf to the socket name in
# #   this entry; when running chrooted one may prefer a socket under $MYHOME.
The default amavisd.conf file comes with “sock.sock” in line 3. Remove it, so line 3 looks like
\&ask_daemon, ["CONTSCAN {}\n", "/var/run/clamav/clamd.sock"],
Now, edit /etc/group and add clamav as a member of vscan group so it looks like this.
vscan:*:110:clamav
Then check the configuration file for clamav (/usr/local/etc/clamd.conf) and make sure that this line exists.
AllowSupplementaryGroups yes
Now, let’s tie everything together with postfix. Edit /usr/local/etc/postfix/master.cf and add these lines at the end.
# Amavisd
amavisfeed unix - - n - 2 lmtp
        -o lmtp_data_done_timeout=1200
        -o lmtp_send_xforward_command=yes
127.0.0.1:10025 inet n - n - - smtpd
        -o content_filter=
        -o smtpd_delay_reject=no
        -o smtpd_client_restrictions=permit_mynetworks,reject
        -o smtpd_helo_restrictions=
        -o smtpd_sender_restrictions=
        -o smtpd_recipient_restrictions=permit_mynetworks,reject
        -o smtpd_data_restrictions=reject_unauth_pipelining
        -o smtpd_end_of_data_restrictions=
        -o smtpd_restriction_classes=
        -o mynetworks=127.0.0.0/8
        -o smtpd_error_sleep_time=0
        -o smtpd_soft_error_limit=1001
        -o smtpd_hard_error_limit=1000
        -o smtpd_client_connection_count_limit=0
        -o smtpd_client_connection_rate_limit=0
        -o receive_override_options=no_header_body_checks,no_unknown_recipient_checks,no_milters,no_address_mappings
        -o local_header_rewrite_clients=
        -o smtpd_milters=
        -o local_recipient_maps=
        -o relay_recipient_maps=
Edit /usr/local/etc/postfix/main.cf and add these lines at the end.
# Amavisd
content_filter = amavisfeed:[127.0.0.1]:10024
Let’s make sure that our trio starts on each reboot. Edit /etc/rc.conf and add these lines.
amavisd_enable="YES"
clamav_clamd_enable="YES"
clamav_freshclam_enable="YES"
spamd_enable="YES"
The clamav_freshclam daemon part is to update the anti-virus signatures. For updating spamassassin’s definitions and signatures, we’ll have to run a cron job. First, let’s do an initial run for spamassassin.
sa-update -D
The “-D” option is to run in debug mode so you can see what’s going on. If there is an update available, spamassassin’s exit code is 0, if not the exit code is 1. In case there is an update, we’ll have to restart the spamassassin’s daemon. So, let’s create a cron job that runs once a day and checks for updates.
crontab -e
Add this line so the updates start 1 minute after midnight.
1 0 * * * /usr/local/bin/sa-update && /usr/local/sbin/service sa-spamd restart
Once we took care of the updates part, let’s start spamassassin.
service sa-spamd start
Let’s do an initial run for clamav.
freshclam
You’ll see a warning, but ignore that. clamav daemon is still not started.
ClamAV update process started at Sun Nov 2 18:49:06 2014
main.cvd is up to date (version: 55, sigs: 2424225, f-level: 60, builder: neo)
daily.cvd is up to date (version: 19576, sigs: 1244373, f-level: 63, builder: neo)
bytecode.cvd is up to date (version: 242, sigs: 46, f-level: 63, builder: dgoddard)
WARNING: Clamd was NOT notified: Can't connect to clamd through /var/run/clamav/clamd.sock: No such file or directory
Finally, let’s start the services and restart postfix.
service clamav-clamd start
service clamav-freshclam start
service amavisd start
service postfix restart
Check the connection between amavisd and postfix.
telnet localhost 10024
Type ehlo localhost and check the ouput. In my case it looks like this.
250-[127.0.0.1]
250-VRFY
250-PIPELINING
250-SIZE
250-ENHANCEDSTATUSCODES
250-8BITMIME
250-DSN
250 XFORWARD NAME ADDR PORT PROTO HELO IDENT SOURCE
Then do.
telnet localhost 10025
Again, type ehlo localhost and check the ouput. In my case it looks like this.
250-www.testcloudserver.org
250-PIPELINING
250-SIZE 10240000
250-VRFY
250-ETRN
250-STARTTLS
250-ENHANCEDSTATUSCODES
250-8BITMIME
250 DSN
And finally, some real tests. First, check the mail log file.
tail -f /var/log/maillog
Then, from another e-mail account, send a text (not HTML) e-mail with this in the body.
X5O!P%@AP[4\PZX54(P^)7CC)7}$EICAR-STANDARD-ANTIVIRUS-TEST-FILE!$H+H*
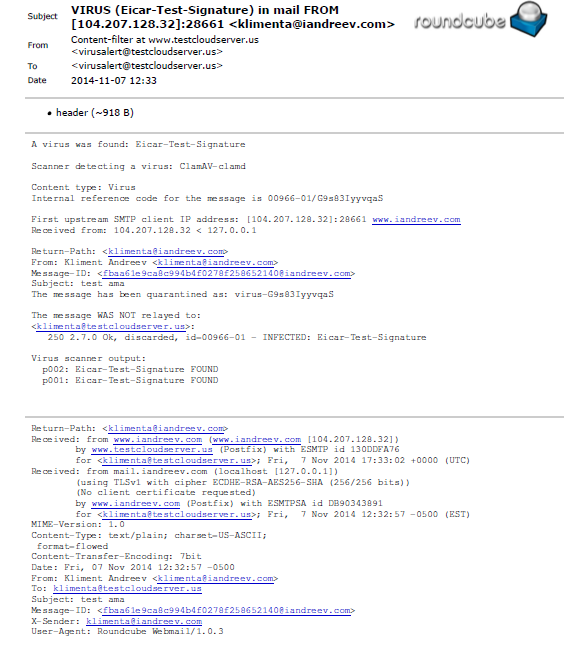
You should see something like this in the logs.
Nov  7 17:33:02 www amavis[966]: (00966-01) Blocked INFECTED (Eicar-Test-Signature) {DiscardedInbound,Quarantined}, [104.207.128.32]:28661 [104.207.128.32] <[email protected]> -> <[email protected]>, quarantine: virus-G9s83IyyvqaS, Queue-ID: 130DDFA76, Message-ID: <[email protected]>, mail_id: G9s83IyyvqaS, Hits: -, size: 952, 172 ms
Nov  7 17:33:02 www postfix/lmtp[1167]: 130DDFA76: to=<[email protected]>, relay=127.0.0.1[127.0.0.1]:10024, delay=0.21, delays=0.03/0.01/0.01/0.17, dsn=2.7.0, status=sent (250 2.7.0 Ok, discarded, id=00966-01 - INFECTED: Eicar-Test-Signature)
Nov  7 17:33:02 www postfix/qmgr[1063]: 130DDFA76: removed
Nov  7 17:33:02 www postfix/qmgr[1063]: 43707FA84: from=<[email protected]>, size=2765, nrcpt=1 (queue active)
Nov  7 17:33:02 www postfix/virtual[1170]: 43707FA84: to=<[email protected]>, relay=virtual, delay=0.02, delays=0.01/0.01/0/0, dsn=2.0.0, status=sent (delivered to maildir)
Nov  7 17:33:02 www postfix/qmgr[1063]: 43707FA84: removed
The e-mail won’t be delivered to the recipient, instead the message will be forwarded to the virusalert account. I don’t have this account created as virtual account, but I have a catch-all virtual account, so this is what I’ve received in Roundcube.
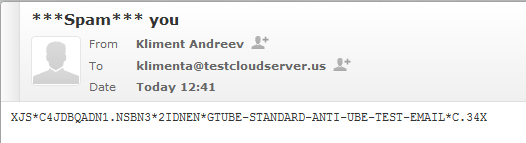
Leave the log file open and let’s send another test e-mail, same text format, but this time put this line in the body of the message.
XJS*C4JDBQADN1.NSBN3*2IDNEN*GTUBE-STANDARD-ANTI-UBE-TEST-EMAIL*C.34X
You should see something like this in the log file.
Nov 7 17:41:44 www amavis[965]: (00965-01) Passed SPAM {RelayedTaggedInbound,Quarantined}, [104.207.128.32]:57855 [104.207.128.32] <[email protected]> -> <[email protected]>, quarantine: spam-hPo7Kn_vhzBm.gz, Queue-ID: 3A733FA72, Message-ID: <[email protected]>, mail_id: hPo7Kn_vhzBm, Hits: 999.407, size: 947, queued_as: 98A9AFA76, 364 ms
If you check your e-mail, you’ll see this in your inbox.
Now that we have spam and anti-virus covered, we’ll discuss another topic. And that’s e-mail filtering and sorting.
dovecot pigeonhole
There are many other options that can be used for e-mail filtering and sorting, but pigeonhole uses Sieve language and it’s very powerful.
Let’s install it from the packages.
pkg install dovecot-pigeonhole
cd /usr/local/etc/dovecot/conf.d
cp /usr/local/share/doc/dovecot-pigeonhole/example-config/conf.d/* .
This will copy three files to the existing configuration files (20-managesieve.conf, 90-sieve-extprograms.conf and 90-sieve.conf). Let’s make the following changes.
In /usr/local/etc/postfix/main.cf add these lines at the end.
# LMTP
virtual_transport = lmtp:unix:private/dovecot-lmtp
NOTE ABOUT VIRTUAL USERS
Once you enable virtual_transport in main.cf, postfix virutal users won’t have any effect. All virtual users are defined in /usr/local/etc/dovecot/users file from now on and dovecot will take care of mail delivery.
Then edit the following files under /usr/local/etc/dovecot/conf.d/ and make sure that these parameters are as below.
10-mail.conf
mail_home = /var/mail/vhosts/%d/%n
mail_location = maildir:~
mail_privileged_group = vpostfix
10-master.conf
service lmtp {
  unix_listener /var/spool/postfix/private/dovecot-lmtp {
    mode = 0600
    user = postfix
    group = postfix
  }
15-lda.conf
recipient_delimiter = +
mail_plugins = $mail_plugins sieve
20-lmtp.conf
lmtp_save_to_detail_mailbox = yes
protocol lmtp {
  # Space separated list of plugins to load (default is global mail_plugins).
  postmaster_address = [email protected]
  mail_plugins = $mail_plugins sieve
}
90-sieve.com
recipient_delimiter = +
Now, go to the mail directory of one of the virtual users.
cd /var/mail/vhosts/domain-one.com/joe
and create this file .dovecot.sieve with the following Sieve commands inside.
require "fileinto";
if header :comparator "i;ascii-casemap" :contains "Subject" "***Spam***"  {
        fileinto "Junk";
        stop;
}
This means that if an e-mail arrives flagged with “***Spam***” in the subject (as we configured Spamassassin), then move it to the “Junk” folder (make sure that you have Junk IMAP folder created).
Restart both postfix and dovecot and you are all set.
service postfix restart
service dovecot restart
Stress test
From another server with postfix installed, do:
time /usr/sbin/smtp-source -s 40 -l 10120 -m 5000 -c -f [email protected] -t [email protected] mail.domain-one.com:25
On your server do:
tail -f /var/log/maillog
smtp-source comes up with FreeBSD only if you select TEST during the install, but it comes with CentOS in the default install.
Make sure that the server where you run smtp-source is a legit server, otherwise your postfix will just reject all messages.
Watch how your log file gets bombarded with messages. You can also watch the queue real-time with:
postqueue -p
If you are satisfied with the results after 5-10 mins, empty the postfix queue with:
postsuper -d ALL
Issues with clamav
I was testing the whole scenario on a 768MB RAM server. For some reason, clamav eats up a lot of memory.
You might see this in /var/log/messages when you try to start the daemon.
Nov 7 22:04:03 www kernel: pid 997 (clamd), uid 106, was killed: out of swap space
My VPS had no swap space when purchased. From what I see, clamav is memory hungry and while there are some workarounds, the easiest way is to create a swap partition. FreeBSD 10 has a wonderful option to create a swap without a dedicated partition. You just create a file that will be used as a swap. So, if you have a server with less than 4GB RAM and no swap partition, do the following.
dd if=/dev/zero of=/usr/swap0 bs=1m count=1024
where 1024 means 1GB file. Then, change the permissions.
chmod 0600 /usr/swap0
Edit /etc/fstab and add this line.
md99 none swap sw,file=/usr/swap0 0 0
Reboot after this. You can do “swapon -aq” without a reboot, but it didn’t work for me.
Anyway, type:
swapinfo
to see the swap usage.
29 comments
Great write up! I followed it to the “T” and it worked smoothly…until I tried to implement the sieve plugin (I didn’t install clamav due to memory limitations). After installing amavisd-new and trying to load the sieve plugin by editing the 15-lda.conf and 20-lmtp.conf files, I get the following errors when trying to restart the dovecot service:
doveconf: Error: Couldn’t load plugin [path]/libmanagesieve_login_settings.so: Module is for different ABI version 2.2.ABIv15(2.2.15) (we have 2.2.ABIv16(2.2.16))
There’s not much out in the internet explaining this error, or the possibility of working around it. Any suggestions?
Thanks!
On top of my post, you’ll see the version of dovecot that I am using, that’s 2.2.15. Most likely, you’ve updated the ports or you use a slightly newer version of FreeBSD that comes with dovecot 2.2.16.
FYI, a week after I attempted to install the dovecot-pigeonhole package and got that version mismatch error, the port was updated (it now depends on dovecot2-2.2.16). All I had to do was run “portsnap fetch update”, and then run “make all install clean” against the dovecot-pigeonhole port (dovecot-pigeonhole-0.4.7). After the installation of this updated port, I was able to restart the dovecot service without issues!
I finished all the step and everything works except the mail sent to gmail was put into the spam folder. I have installed opendkim and spf, but still was treated as spam. Can you send an email to gmail or hotmail to see if it is treated as spam?
Most of the time, the problem is with your rDNS or MX records. Do this for your domain:
$ nslookup mail.iandreev.com

Server:         8.8.8.8

Address:        8.8.8.8#53
Non-authoritative answer:
Name: mail.iandreev.com
Address: 104.207.133.245
$ nslookup 104.207.133.245
Server: 8.8.8.8
Address: 8.8.8.8#53
Non-authoritative answer:
245.133.207.104.in-addr.arpa name = www.iandreev.com.
Authoritative answers can be found from:
$ nslookup
> set type=MX
> iandreev.com
Server: 8.8.8.8
Address: 8.8.8.8#53
Non-authoritative answer:
iandreev.com mail exchanger = 0 mail.iandreev.com.
iandreev.com mail exchanger = 10 mail.iandreev.com.
Go to this web site http://mxtoolbox.com/blacklists.aspx and see if your domain is treated as a known spammer.
I had this problem as well. Depending on your ISP, they can restrict DHCP customers from running a “Trusted” mail server. To get around this, you’ll have to route your outgoing mail through your ISP’s smtp server. In my case, I needed to modify and uncomment the following in the /usr/local/etc/postfix/main.cf:
relayhost = smtp.charter.net
As you mentioned in your tutorial, there’s a drawback to defining the user’s password using doveadm and storing them to a flat file (/usr/local/etc/dovecot/users).
“The problem with this scenario is that the end users won’t have the ability to change their passwords. So, you’ll have to provide them with the password and they won’t be able to reset them. But, there are plenty of perl scripts that can take care of this or you can write your own.”
I’ve been searching around for any example scripts to accomplish this task, but have come up empty. Could you suggest any resources for where I can find a suitable utility/plugin/script?
Thanks again!
Look for roundcube password plugins. I’ve never tried one but it might work.
http://acmeous.blogspot.com/2012/02/how-to-enable-change-password-for.html
I got success to add a new user. Besides of the steps obvious in this instruction, some things have to be done as following:
cd /etc
postalias aliases
postmap /usr/local/etc/postfix/virtual
postmap /usr/local/etc/postfix/vmailbox
I do not understand about this.
Quote from above
Maybe you’ve noticed that the file with the e-mail addresses (vmailbox) has a hash: prefix in the config file. This is to speed-up lookups. Postfix can use hash: (Berkeley-DB), mySQL or PostgreSQL database to store the e-mail accounts. Check the postfix howto if you want to use mySQL or PostgreSQL. We’ll be dealing with Berkeley DB.
So, when you add users and domains in those files, that’s for you to easily edit them. But postfix doesn’t use the text files. Because we choose Berkeley DB, when you use postmap, this command creates a Berkeley DB database with those entries. The database files have the same filename with .db extension. If you have thousands of virtual domains and virtual users, Berkeley DB searches these .db files much faster than text files. You can also use MySQL or PostgreSQL for lookups. It’s really only important for *a lot* of users and domains.
What do we have for a web-based administration where admins can add/delete users and users can change the password themselves? This howto is great, just this one though. Thanks.
I’ve never played with this Roundcube plugin, so you might want to take a look.
http://trac.roundcube.net/browser/github/plugins/password/README
Also, you can always use LDAP for authentication (first install/configure OpenLDAP), configure Dovecot to use LDAP and then use some web front-end as a self-service portal such as pwm or LDAP-ToolBox Project (self service pwd).
https://code.google.com/p/pwm/
http://ltb-project.org/wiki/documentation/self-service-password
postfix seems to have issues with the TLS and SASL additions
/usr/local/sbin/postconf: warning: /usr/local/etc/postfix/main.cf: unused parameter: smptd_tls_security_level=may
/usr/local/sbin/postconf: warning: /usr/local/etc/postfix/main.cf: unused parameter: smptd_tls_auth_only=yes
/usr/local/sbin/postconf: warning: /usr/local/etc/postfix/main.cf: unused parameter: smptd_tls_key_file=/usr/local/postfix/xxx.key
/usr/local/sbin/postconf: warning: /usr/local/etc/postfix/main.cf: unused parameter: smptd_tls_received_header=yes
/usr/local/sbin/postconf: warning: /usr/local/etc/postfix/main.cf: unused parameter: smptd_tls_loglevel=1
/usr/local/sbin/postconf: warning: /usr/local/etc/postfix/main.cf: unused parameter: smptd_tls_session_cache_timeout=3600s
/usr/local/sbin/postconf: warning: /usr/local/etc/postfix/main.cf: unused parameter: smptd_relay_restrictions=permit_sasl_authenticated, permit_mynetworks, reject_unauth_destination
/usr/local/sbin/postconf: warning: /usr/local/etc/postfix/main.cf: unused parameter: smptd_tls_cert_file=/usr/local/etc/postfix/xxx.crt
/usr/local/sbin/postconf: warning: /usr/local/etc/postfix/main.cf: unused parameter: smptd_tls_security_level=may
/usr/local/sbin/postconf: warning: /usr/local/etc/postfix/main.cf: unused parameter: smptd_tls_auth_only=yes
/usr/local/sbin/postconf: warning: /usr/local/etc/postfix/main.cf: unused parameter: smptd_tls_key_file=/usr/local/postfix/xxx.key
/usr/local/sbin/postconf: warning: /usr/local/etc/postfix/main.cf: unused parameter: smptd_tls_received_header=yes
/usr/local/sbin/postconf: warning: /usr/local/etc/postfix/main.cf: unused parameter: smptd_tls_loglevel=1
/usr/local/sbin/postconf: warning: /usr/local/etc/postfix/main.cf: unused parameter: smptd_tls_session_cache_timeout=3600s
I don’t see any issues on my side with the config described in the blog. I would check the certificates.
Any idea how to get some useful diagnostics here? I have a self generated cert for ipsec, which I am trying to use for email as well, given the amount of work it took to create it. The cert works for ikev2, and the guy who helped me said it should work for email. That is, there is no password on it.
BTW, checking the postfix config, I added SASL2, though I built dovecot2 with the Berkeley database. That is the only difference I see.
Sorry, but it would be very difficult for me to troubleshoot if the config differs. :(
I love the guide, however I am stuck sending mail. I get an error message … was rejected by the server because it does not allow relaying.
I believe it has something to do with /etc/postfix/main.cf the lines;
smtpd_recipient_restrictions = permit_sasl_authenticated, permit_mynetworks, reject_unauth_destination
smtpd_relay_restrictions = permit_sasl_authenticated, permit_mynetworks, reject_unauth_destination
I have a registered .key and .crt file, but I do not see why the server isn’t allowing relaying. Any help would be appreciated
I can send email and download it from the server. But I can’t accept incoming email. My port 25 shows up as closed. [Shown via telnet and nmap -p 25.] Is that the problem? I have verified that it is not blocked. My MX record is set on the DNS.
Can you also delete my other post that had the smtp stmp typo.
Doing some hacking, I think you need to enable both the smtp and submission lines in master.cf to accept incoming email. Well at least it works for me, but I’d like your opinion since this isn’t in your instructions.
smtp inet n – n – – smtpd
#smtp inet n – n – 1 postscreen
#smtpd pass – – n – – smtpd
#dnsblog unix – – n – 0 dnsblog
#tlsproxy unix – – n – 0 tlsproxy
submission inet n – n – – smtpd
-o syslog_name=postfix/submission
-o smtpd_tls_security_level=encrypt
-o smtpd_sasl_auth_enable=yes
-o smtpd_reject_unlisted_recipient=no
-o smtpd_relay_restrictions=permit_sasl_authenticated,reject
-o milter_macro_daemon_name=ORIGINATING
So /usr/local/etc/postfix/virtual is empty?
what should i write in this file!?
postfix logs say unknown user when i send something to it
“So /usr/local/etc/postfix/virtual is empty?” I have de same question and the follow issue:
Oct 28 13:51:33 server postfix/smtpd[3314]: connect from s15433861.onlinehome-server.com[74.208.72.7]
Oct 28 13:51:34 server postfix/smtpd[3314]: lost connection after AUTH from s15433861.onlinehome-server.com[74.208.72.7]
Oct 28 13:51:34 server postfix/smtpd[3314]: disconnect from s15433861.onlinehome-server.com[74.208.72.7]
What does mean?
Any suggestion for a method to clean up files that have been in either the Junk or Trash folders for “x” days or hours?
Thanks
Run a crontab script that search for .Trash folders content, older than X days, in your domains ?
There are several quota plugins too for dovecot, maybe one does auto-expunge (?)
Great tutorial!
Note, I had issues sending emails with dovecot 1.2.17 + postfix 2.11.7 and Outlook 201x clients..
For some reason these clients kept on disconnecting after the EHLO command, enabling ssl debug didn’t help much, but, this did:
In postfix/main.cf, in the SASL section, add:
smtpd_sasl_authenticated_header = yes
Otherwise AUTH PLAIN LOGIN CRAM-MD5 isn’t displayed in the EHLO sequence, making Outlook very unhappy (or so it seams)..
This tutorial is fantastic for someone that has no previous experience in setting up a mail server.
Just one question: Where do I define the username and password for the accounts I want to enable submission port? I’m not using relaying to another mail server.
I use a slightly modified version of this setup, but I started here and it was well worth my time. Good information, thanks
Wonderful tutorial, I have set this up on FreeBSD 11.0, and I hope you are still checking this blog.
i have enabled connection to the server via SSL (993) and it works, I am trying to send via SSL (465) but in maillog I see
Mar 10 21:32:59 freemail postfix/smtps/smtpd[1107]: warning: bsdmini.domain.com[10.10.10.6]: SASL PLAIN authentication failed:
Mar 10 21:33:03 freemail postfix/smtps/smtpd[1107]: disconnect from bsdmini.domain.com[10.10.10.6] ehlo=1 auth=0/2 quit=1 commands=2/4
So my question is that to send via SSL , do I need a ‘system user’ to be able to send ? I can send fine without authentication.
Thx
Not sure about that. This tutorial uses SMTP-MSA that uses port 587. Avoid 465, it’s considered legacy.
I did not realize that 465 was legacy, will go through it one more time…
Thank you very much for the response.
CT