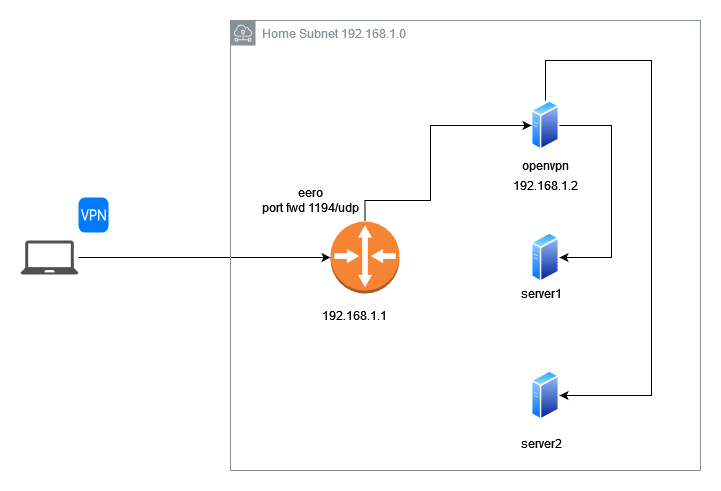
In this post I’ll describe a use case that I am currently using. I have a standard Internet connection that goes to my Eero mesh router and behind that I have a homelab on 192.168.1.0/24 network as shown in the diagram. I have a port forwarding configured on the router so I can access one of my Linux servers, but if I want to access other servers, I have to either port forward SSH on some other-than-22/tcp port or use the Linux server as a jump-box. None of this is good, so I decided to create an OpenVPN server. Anytime I VPN to this server I can ssh/rdp to any of the internal servers. The OpenVPN server requires one nic.
NOTE: This post is very FreeBSD specific so if you want to use some Linux server as OpenVPN server, this guide won’t help you at all.

IMPORTANT: On your home router port-forward port 1194/udp to your OpenVPN server.
Table of Contents
OpenVPN server
Let’s install OpenVPN server first.
pkg install openvpn
Make sure it starts on boot and enable the NAT.
sysrc openvpn_enable=YES
sysrc gateway_enable=YES
Next, we need a directory where we’ll store our config files and the PKI.
mkdir /usr/local/etc/openvpn
cd /usr/local/etc/openvpn
Create the PKI structure.
easyrsa init-pki
Go to the newly created pki directory and make a copy of the vars.example file.
cd pki
cp vars.example vars
Now edit this file and uncomment the following lines and change to match your needs. It’s optional and you can keep everything-as-is.
set_var EASYRSA_REQ_COUNTRY     "US"
set_var EASYRSA_REQ_PROVINCE    "NJ"
set_var EASYRSA_REQ_CITY        "Allentown"
set_var EASYRSA_REQ_ORG         "iAndreev"
set_var EASYRSA_REQ_EMAIL       "[email protected]"
set_var EASYRSA_REQ_OU          "iAndreev"
set_var EASYRSA_CA_EXPIRE       3650
set_var EASYRSA_CERT_EXPIRE     825
Now create the Certificate Authority based on these values.
cd /usr/local/etc/openvpn
easyrsa build-ca
This command will prompt you to create a password that you will you to sign the certificates for the server and the clients.
Then create the DH parameters. It might take 30+ seconds.
easyrsa gen-dh
Create the server request and sign it.
easyrsa build-server-full server nopass
You have to type yes to confirm and then use the password that you created above to sign the cert.
The command will create some files under the pki directory and we’ll need those later.
Next, we’ll create the same for the client. In my case it’s a Dell laptop, so I use the word dell, but you can use client, client1, something-whatever…
easyrsa build-client-full dell nopass
Same thing, answer yes and then use the password to sign the certs.
Copy the OpenVPN config example file that comes with the package.
cp /usr/local/share/examples/openvpn/sample-config-files/server.conf /usr/local/etc/openvpn/openvpn.conf
Edit openvpn.conf and make sure these values are changed and match the certs you created earlier.
ca /usr/local/etc/openvpn/pki/ca.crt
cert /usr/local/etc/openvpn/pki/issued/server.crt
key /usr/local/etc/openvpn/pki/private/server.key

dh /usr/local/etc/openvpn/pki/dh.pem
In addition to that, find the line that says push route and create a new one that matches your internal subnet. In my case it looks like this.
push "route 192.168.1.0 255.255.255.0"
If you have internal DNS and you want to send that as well, uncomment the following line and change to match your DNS IP.
push "dhcp-option DNS 208.67.222.222"
Now, you can start the OpenVPN server. Make sure you check the syslog for any errors.
service openvpn start
tail /var/log/messages
OpenVPN client
On your laptop that you want to use as a VPN client, download the OpenVPN client from here. When you install the client, you’ll have a generic config file under C:\Program Files\OpenVPN\sample-config folder. Copy that file under c:\users\[your_username]\OpenVPN\config.
Then, edit the file and change the following lines.
remote public-ip-or-hostname-of-your-router 1194
ca ca.crt
cert dell.crt
key dell.key
NOTE: Make sure you copy ca.crt from /usr/local/etc/openvpn/pki, dell.crt or client.crt or whatever.crt from /usr/local/etc/openvpn/pki/issued and dell.key or client.key or whatever.key from /usr/local/etc/openvpn/pki/private directories to the same c:\users\[your-user-name]\OpenVPN\config folder. There should be 4 files there. The config file, the CA certificate, the client certificate and the private key for the client.
Start the OpenVPN client and connect. You shouldn’t have any problems and you’ll get 10.8.0.2 IP assigned to your laptop. If you try to ping 10.8.0.1 you’ll get a response. Do route print and you’ll see that the routes for 192.168.1.0 are going over 10.8.0.1. But, if you try to ping some server internally, e.g. 192.168.1.21, you won’t get any response. That’s because that server doesn’t know the route back. You can easily add the route to each server but it’s not practical. Let’s make one more change to the server.
OpenVPN server
Add these two lines to /etc/rc.conf. That’s the FreeBSD pf firewall.
pf_enable="YES"
pf_rules="/etc/pf.conf"
Now, create this config file in /etc/pf.conf. Many thanks to this guy.
vpnclients = "10.8.0.0/24"
# The name of your NIC. I am using a VM on ESXi and vmx0 is my NIC.
wanint = "vmx0"
# put your tunnel interface here, it is usually tun0
vpnint = "tun0"
# OpenVPN by default runs on udp port 1194
udpopen = "{1194}"
# Open the SSH port.
tcpopen = "{22}"
icmptypes = "{echoreq, unreach}"

set skip on lo
# the essential line
nat on $wanint inet from $vpnclients to any -> $wanint

block in
pass in on $wanint proto udp from any to $wanint port $udpopen
pass in on $wanint proto tcp from any to $wanint port $tcpopen
# the following two lines could be made stricter if you don't trust the clients
pass out quick
pass in on $vpnint from any to any
pass in inet proto icmp all icmp-type $icmptypes
Reboot the OpenVPN server and if you reconnect from the client, you can use the internal IPs directly to connect.

