
In this post I’ll describe how to install FreeBSD pf firewall. The focus is on a simple VPS server that I have in the cloud running a web and mail server. In order to enable pf, edit /etc/rc.conf and add the following lines. This will enable the pf firewall and it will allow traffic logging.
pf_enable="YES"
pflog_enable="YES"
The default ruleset is in the file /etc/pf.conf. On some installations, there is a sample file /etc/pf.conf.sample and there are some examples under /usr/share/examples/pf/. Here are some basic commands, for more consult the official pf guide or the FreeBSD page for it.
pfctl -e # Enables the firewall
pfctl -d # Disables the firewall
pfctl -f /etc/pf.conf # Loads the config. The changes are applied immediately.
pfctl -nf /etc/pf.conf # Tests the config, but the changes are not applied. t
pfctl -sr # Show the current ruleset
pfctl -ss # Show the current state table
pfctl -si # Show filter stats and counters
pfctl -sa # Show EVERYTHING it can show
Note: If you make a change in pf.conf, disabling/enabling the firewall won’t make any changes to the rules. You have to load the rules with pfctl -f /etc/pf.conf in order to make changes. The easiest way is to do:
pfctl -F all -f /etc/pf.conf
Here is my /etc/pf.conf config with explanation of what each line does.
# pf config - K.Andreev 20140604
# This is the external interface. I don't have an internal one. Get the name with ifconfig -a.
ext_if = "vtnet0"
# This command tells pf to do the logging on the external interface
set loginterface $ext_if
# Bypass any packet filtering on the localhost interface.
# If you skip this line, you won't be able to telnet localhost anyport
# Which means any web application that uses smtp/pop, sql, imap won't work
set skip on lo
# This is how you create tables. In this case the name of the table is bruteforce.
table <bruteforce> persist
# These are the TCP ports that I will allow to be accessible from inside out and vice versa
tcp_pass = "{ 22 25 80 443 587 993 995 }"
# This is the UDP port for DNS that I will have to allow, otherwise name resolution won't work
udp_pass = "{ 53 }"
# pf works from top to bottom. The last matching rule wins.
# Here I will block everything and then poke holes.
block all
# The quick command is an exception. It cancels any other rules for this packet
# and causes an immediate action, regardless of the following rules.
block quick from <bruteforce>
# This line means to block any IP that makes more than 5 connections in 3 seconds
# It also limits the number of connections per IP to 15
# Any IP that violates this will be stored in the table <bruteforce>
pass quick proto { tcp, udp } from any to any port ssh \
    flags S/SA keep state \
    (max-src-conn 15, max-src-conn-rate 5/3, \
    overload <bruteforce> flush global)
# This line means to allow in and out all ports that were listed in the $tcp_pass varaible
# The log directive also means to log all the traffic
pass log on $ext_if proto tcp to any port $tcp_pass keep state
# This line means to pass only the UDP traffic on port 53 outside. Inside access to UDP port 53 is blocked.
pass out on $ext_if proto udp to any port $udp_pass keep state
# This means that we allow our IP to be pinged or tracerouted.
# If you remove this line, everything will work fine, but you can't ping your IP and you can't ping
# anything outside. It's a good way to hide your presence, but most port scans will find you anyway
pass inet proto icmp from any to any
Now, enable the firewall and load the rules.
pfctl -e
pfctl -f /etc/pf.conf
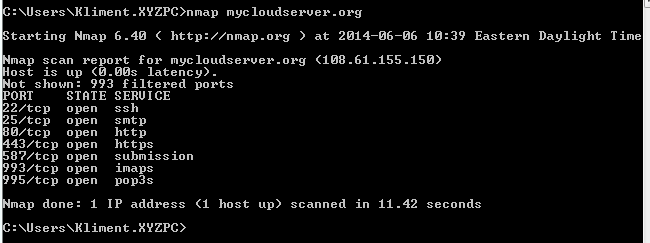
From another computer, do a port scan and you’ll see that only the ports that we allowed are now open.
If you have a public IP for your server, most likely you’ll have a lot of brute force attacks on the sshd. You can check that with:
grep Invalid /var/log/auth.log
In our configuration file, we block those users and their IP is stored in the table bruteforce. For how long? Indefinitely or until you reboot and clear the table which is stored in the memory. The problem with this scenario is that your server can be up for a year and all these IPs will eat up the memory sooner or later. pf has a command to flush these IPs after certain period of time. Put this line in your crontab. It will run every Sunday at 5PM and clean the IPs blocked. The value of 604800 is in seconds which means 7 days.
00 17 * * 0 /sbin/pfctl -t bruteforce -T expire 604800 > /dev/null 2>&1
If you want to see what IPs are blocked, do:
pfctl -t bruteforce -T show
And if you want to remove an IP (e.g. 193.194.195.196) from the list do:
pfctl -t bruteforce -T delete 193.194.195.196
Finally, if you want to watch the traffic in real time, do:
tcpdump -n -e -ttt -i pflog0
Only the first packet will be logged because of keep state.
You might also want to block some IPs permanently. In that case, we have to modify pf.conf to read these IPs from a file.
Add this lines after line 11 (table <bruteforce> persist)
table <blocked_subnets> persist file "/etc/blocked_subnets"
….and these two lines after line 18 (block all).
# Block some subnets
block in log quick on $ext_if from <blocked_subnets> to any
block out log quick on $ext_if from any to <blocked_subnets>
Then create /etc/blocked_subnets file and add whatever ranges (CIDR format) you want to block. E.g:
223.223.176.0/20
223.223.192.0/20
You can block certain countries if you want. Use this link to see a full list.
Sometimes, you might want to restrict access to some port to only a handful of IPs. I’ll show how to restrict access to ssh based on IP.
Create a file called /etc/allow_ssh and add a couple of IPs that will be allowed to remote (each IP in a separate line).
Add the definition after line 11 (table <bruteforce>) so it looks like this.
table <allow_ssh> persist file "/etc/allow_ssh"
Remove port 22 from the tcp_pass table. The tcp_pass table should contain ports that should be allowed from everywhere.
In line 25 (pass quick proto), replace from any to any with from <allow_ssh> to any and reload the config.
1 comment
This is probably the best, most clean-cut and easy to understand pf instructions I have ever seen! thank you so much Kliment for sharing this! :)