
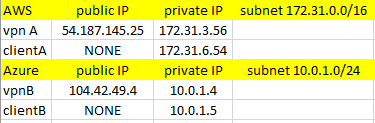
In this post I’ll describe how to configure a VPN connection/tunnel between AWS and Azure using strongswan running on CentOS 7.x. I’ll have 2 instances in each cloud for this purpose, I’ll call them vpnA, clientA in AWS and vpnB and clientB in Azure. The goal is to be able to access clientA from clientB and vice versa. This is how my setup looks like.
NOTE: By default, the AWS CentOS comes up with SELinux enabled and no firewalld installed. The Azure CentOS comes with SELinux enabled as well, but also with firewalld installed but not running. So, there is no firewall running on any instance.
Table of Contents
strongswan installation
Install strongswan by doing the following. strongswan does not come with strongswan in the default repo, so you’ll have to install EPEL first. The third line enables strongswan so it starts on boot. Do this on vpnA and vpnB servers.
yum -y install epel-release
yum -y install strongswan
systemctl enable strongswan
Once installed, change these system variables so you allow IP forwarding and prevent ICMP redirects. Do this on vpnA and vpnB servers. There are no changes to be made on any of the clientA or clientB instances.
echo "net.ipv4.ip_forward=1" >> /etc/sysctl.conf
echo "net.ipv4.conf.all.accept_redirects=0" >> /etc/sysctl.conf
echo "net.ipv4.conf.all.send_redirects=0" >> /etc/sysctl.conf
sysctl -p /etc/sysctl.conf
strongswan configuration
strongswan on CentOS places its config under /etc/strongswan directory. We’ll use a config with pre-shared key because it’s easier to implement. If you want to use X.509 certificate, look at my other post. It shouldn’t be difficult to change the config below to use certs instead of pre-shared key.
So, on the vpnA server at AWS edit the /etc/strongswan/ipsec.conf file, remove everything there and paste this config. Of course, this assumes that you don’t have any working configs there. Now, look at the highlighted lines. That’s where you have to replace the IPs and the subnets with your values. E.g. line 13 is the private IP of the AWS VPN server, 14 is the subnet, 17 is the external IP of the Azure VPN server and 18 is its subnet.
config setup

conn %default
        ikelifetime=60m
        keylife=20m
        rekeymargin=3m
        keyingtries=1
        authby=secret
        keyexchange=ikev2
        mobike=no

conn net-net
        left=172.31.3.56
        leftsubnet=172.31.0.0/16
        leftid=@aws
        leftfirewall=no
        right=104.42.49.4
        rightsubnet=10.0.1.0/24
        rightid=@azure
        ike=aes256-sha2_256-modp2048!
        esp=aes256-sha2_256!
        auto=start
On the same server, edit the /etc/strongswan/ipsec.secret file and specify the pre-shared key. This is a password that the servers will use to authenticate. Make sure it’s something more complex in production. In my case, the password is “secret“.
# ipsec.secrets - strongSwan IPsec secrets file
@aws @azure : PSK "secret"
Now, on the Azure server, do the same. These are the config files for the vpnB server. Again, replace the values to suit your needs.
config setup

conn %default
        ikelifetime=60m
        ikeylife=20m
        rekeymargin=3m
        ikeyingtries=1
        authby=secret
        ikeyexchange=ikev2
        mobike=no

conn net-net
        left=10.0.1.4
        leftsubnet=10.0.1.0/24
        leftid=@azure
        leftfirewall=no
        right=54.187.145.25
        rightsubnet=172.31.0.0/16
        rightid=@aws
        ike=aes256-sha2_256-modp2048!
        esp=aes256-sha2_256!
        auto=start
Specify the password in /etc/strongswan/ipsec.secret file. The password is the same, but the order of the IDs is different.
# ipsec.secrets - strongSwan IPsec secrets file

@azure @aws : PSK "secret"
IPSec tunnel
At this point, you can start the tunnel.
systemctl start strongswan
Look at the /var/log/messages and see if you see any errors.
tail -f /var/log/messages
If everything is OK, you should see that the tunnel is established after 5-10 seconds.
strongswan status
A successful tunnel, looks like this.
[root@ip-172-31-3-56 strongswan]# strongswan status
Security Associations (1 up, 0 connecting):
     net-net[1]: ESTABLISHED 23 seconds ago, 172.31.3.56[aws]...104.42.49.4[azure]
     net-net{1}:  INSTALLED, TUNNEL, reqid 1, ESP in UDP SPIs: cf039e91_i cf42e692_o
     net-net{1}:   172.31.0.0/16 === 10.0.1.0/24
Let’s do some testing. We’ll ping each host from another.
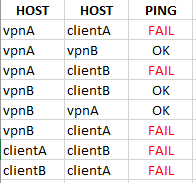
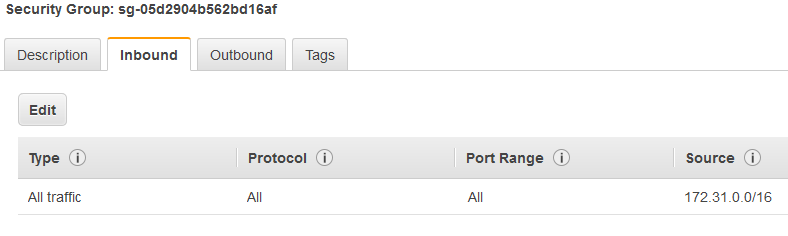
In my case, I wasn’t able to ping the hosts between AWS because my security group allowed only SSH traffic. So, I had to create a new security group and attach it to both AWS instances. It looks like this.
Once I did that, I was able to ping the hosts between each other. Ping between the VPN servers works fine, but if you try to ping a host on the other side of the VPN tunnel from the server, it will fail. In order to fix that, we’ll enable iptables on both hosts.
yum -y install iptables-services iptables-utils
And then, we’ll do this on the AWS VPN server.
iptables -t nat -A POSTROUTING -s 10.0.1.0/24 -d 172.31.0.0/16 -j MASQUERADE
iptables -t nat -I POSTROUTING -m policy --pol ipsec --dir out -j ACCEPT
Same thing on the Azure server, but a little bit different.
iptables -t nat -A POSTROUTING -s 172.31.0.0/16 -d 10.0.1.0/24 -j MASQUERADE
iptables -t nat -I POSTROUTING -m policy --pol ipsec --dir out -j ACCEPT
If you want to save the rules, you have to enable iptables on boot.
systemctl enable iptables
iptables-save > /etc/sysconfig/iptables
At this point, you should be able to ping the hosts from the VPN servers, but if you try to ping the hosts behind the VPN server e.g. ping clientB from clientA, it will fail. Also, if you try to ping the VPN server in Azure from the client in AWS, it will fail. The reason is very simple. There is no route. Here is an example from clientA in AWS.
[centos@ip-172-31-6-54 ~]$ ip route show all
default via 172.31.0.1 dev eth0
172.31.0.0/20 dev eth0 proto kernel scope link src 172.31.6.54
This means that if the clientA tries to ping a 10.x network, the clientA will use the default gateway which is 172.31.0.1. But that’s not our VPN server. We want all the traffic for 10.0.1.0/24 to go through the VPN servers.
This is how you can accomplish that.
In AWS, go to the vpnA server and get the name of the NIC. In my case it looks like this. Click on eth0 in the lower right corner and copy the value that interface ID (eni-something).
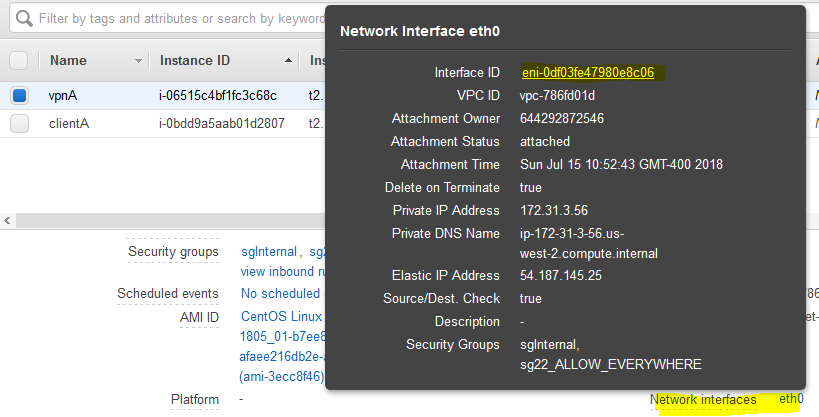
Go to the VPC menu, then Route Tables and click to Edit the route. Add 10.0.1.0/24 (Azure subnet) and the interface ID that you just copied. So, basically, you are telling AWS to create a route to use the vpnA server as a default gateway for the 10.0.1.0/24 subnet, not the internal AWS Internet gateway.
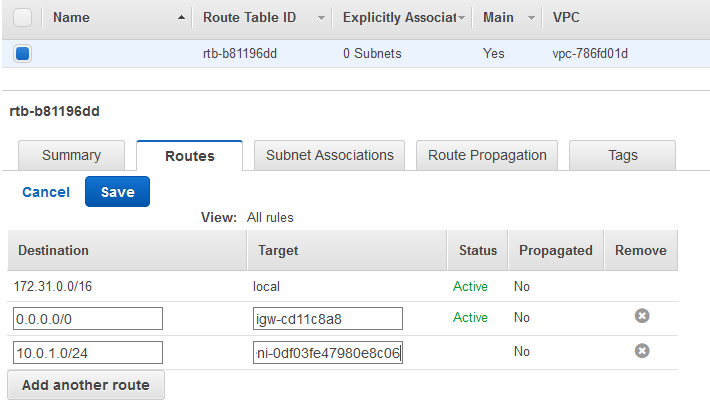
In addition, go to the vpnA instance, right-click on it, choose Networking, choose Change Source/Dest. Check and click Yes, Disable.

Now, you should be able to ping clientB in Azure from clientA in AWS. If you try to ping clientA from clientB, it won’t work. Again, same issue, you are missing the route.
In Azure, create a new resource Route Table and make sure it’s in the same resource group and same location as your servers.

This is just a place holder. We need to associate this route table with the subnet. Once the route table is created, click on Subnets and then click Associate.
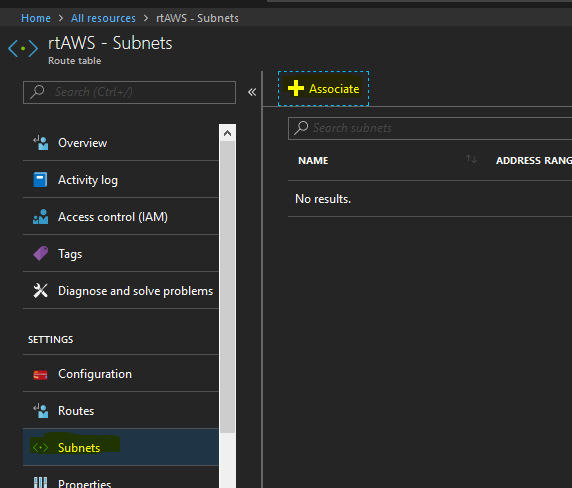
Choose the subnet and the network where your servers are and click OK.
In my case, it looks like this.

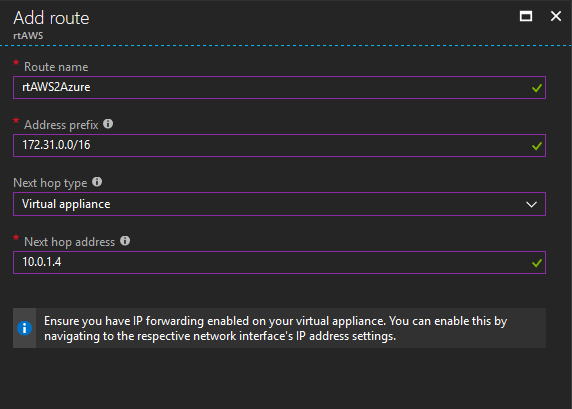
But, we are not finished yet. Click on Routes, that’s just above Subnets in the same blade and choose to Add a new route. This is what you have to type. A name, a subnet prefix which is the AWS subnet, choose Virtual Appliance for the next hop type and the internal IP address of the vpnB server. Pretty much, we are telling Azure to do the same thing as with AWS.
At this point, you have a fully functioning tunnel.
1 comment
Works..!!
But only update tag on rightid and leftid .conf files..
Thanks, you save me probono… :)