
I’ve started playing with Terraform in order to automate some server builds and found it to be very useful. It has its own quirks, strange JSON-like syntax and it takes some time to get fully on-board. I’ve noticed several bugs but there is always a workaround if you google it. At the time of this writing, Terraform is version 0.11.7 so it’s still some kind of beta. The team behind it are making a lot of changes so expect some things to break. The book that I was using to study was already out of date and some commands were deprecated.
I won’t explain how to install it and configure it. It’s very easy to get it up and running. In order for the following script to work, make sure that you have Terraform and AWS CLI installed and configured.
Create a separate folder/directory for this project and create three files. The first file is vars.tf. That’s where we define the variables.
variable "region" {
	description = "The region for the deployment"
	default = "us-west-2"
}

variable "vpc_id" {
	description = "The VPC ID where WordPress will reside"
	default = "vpc-a36ga9zd"
}

variable "ami_id" {
	description = "The AMI ID for AWS Linux 2 in us-west-2. In other regions, the ID is different"
	default = "ami-a9d09ed1"

}

variable "instance_type" {
	description = "AWS Instance type to be used for the WordPress instance"
	default = "t2.small"
}

variable "volume_size" {
	description = "EBS volume size in GBs for the instance"
	default = 8
}

variable "key_name" {
	description = "The key pair that will be used to log to the server using SSH"
	default = "MyKeyPair-Oregon"
}

variable "ssh_port" {
	description = "The SSH port for the server"
	default = 22
}

variable "http_port" {
	description = "The HTTP port for the server"
	default = 80
}

variable "mysql_port" {
	description = "The MySQL port for the database"
	default = 3306
}

variable "nfs_port" {
	description = "The NFS port for the shared filesystem"
	default = 2049
}

variable "allocated_storage" {
	description = "The size in GBs of the SQL database"
	default = 10
}

variable "instance_class" {
	description = "The size/type of the SQL instance"
	default = "db.t2.micro"
}

variable "db_admin" {
	description = "The dbadmin username"
	default = "dbadmin"
}

variable "db_password" {
	description = "The dbadmin password"
	default = "SuperSecret"
}

variable "db_name" {
	description = "The database name"
	default = "dbwordpress"
}
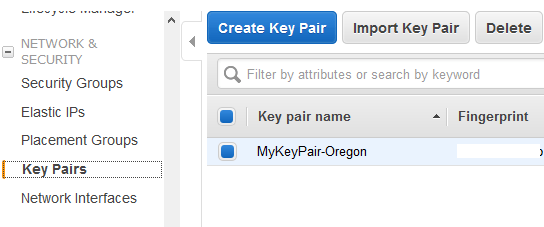
Make sure you specify your region, your VPC ID and the key name. That’s how you will login to your instance. You can find your key name if you go to Key Pairs menu in AWS console.
I tried to test the same setup on CentOS 7.x but for some reason the user data boot script was never executed, thus making this script unusable. It might work with Ubuntu or some other flavor of Linux, if you can make the user data script execute on boot and make some modifications, e.g. apt-get instead of yum etc…
The next file is outputs.tf. These are the variables that are needed at the end of the run of the script. BTW, the script takes around 4 minutes to complete.
output "efs_dns_name" {
	value = "${aws_efs_file_system.efsWordPress.dns_name}"
}

output "ip_address" {
    value = "${aws_instance.wordpress.public_ip}"
}

output "sql_hostname" {
    value = "${aws_db_instance.dbWordPress.address}"
}
At the end of the script, we’ll get the DNS name of the EFS filesystem, the external IP address of the instance and the MySQL hostname. We’ll need the last two.
And finally, the main script (main.tf) is where all the resources that are needed are specified.
provider "aws" {
	region = "${var.region}"
}

resource "aws_security_group" "sgWordPress" {
	name = "sgWordPress"
	vpc_id      = "${var.vpc_id}"

	ingress {
		from_port = "${var.ssh_port}"
		to_port = "${var.ssh_port}"
		protocol = "tcp"
		cidr_blocks =["0.0.0.0/0"]
	}

	ingress {
		from_port = "${var.http_port}"
		to_port = "${var.http_port}"
		protocol = "tcp"
		cidr_blocks = ["0.0.0.0/0"]
	}

	ingress {
		from_port = "${var.mysql_port}"
		to_port = "${var.mysql_port}"
		protocol = "tcp"
		self = true
	}

	ingress {
		from_port = "${var.nfs_port}"
		to_port = "${var.nfs_port}"
		protocol = "tcp"
		self = true
	}

	egress {
		from_port = 0
		to_port = 0
		protocol = "-1"
		cidr_blocks = ["0.0.0.0/0"]
	}

	tags {
		Name = "sgWordPress"
	}
}

resource "aws_efs_file_system" "efsWordPress" {
  creation_token = "EFS for WordPress"

  tags {
    Name = "EFS for WordPress"
  }
}

data "aws_subnet_ids" "suballIDs" {
	vpc_id = "${var.vpc_id}"
}

resource "aws_efs_mount_target" "mtWordPress" {
  count = "${length(data.aws_subnet_ids.suballIDs.ids)}"
  file_system_id = "${aws_efs_file_system.efsWordPress.id}"
  subnet_id      = "${element(data.aws_subnet_ids.suballIDs.ids, count.index)}"
  security_groups = ["${aws_security_group.sgWordPress.id}"]
}

resource "aws_instance" "wordpress" {
	ami = "${var.ami_id}"
	instance_type = "${var.instance_type}"
	vpc_security_group_ids = ["${aws_security_group.sgWordPress.id}"]
	key_name = "${var.key_name}"
	ebs_block_device {
		device_name = "/dev/sdb"
    	volume_size = "${var.volume_size}"
    	delete_on_termination = "true"
  	}

	tags {
		Name = "WordPress Server"
	}

	user_data = <<EOF
		#!/bin/bash
		echo "${aws_efs_file_system.efsWordPress.dns_name}:/ /var/www/html nfs defaults,vers=4.1 0 0" >> /etc/fstab
		yum install -y php php-dom php-gd php-mysql
		for z in {0..120}; do
			echo -n .
			host "${aws_efs_file_system.efsWordPress.dns_name}" && break
		  	sleep 1
		done
		cd /tmp
		wget https://www.wordpress.org/latest.tar.gz
		mount -a
		tar xzvf /tmp/latest.tar.gz --strip 1 -C /var/www/html
		rm /tmp/latest.tar.gz
		chown -R apache:apache /var/www/html
		systemctl enable httpd
		sed -i 's/#ServerName www.example.com:80/ServerName www.myblog.com:80/' /etc/httpd/conf/httpd.conf
		sed -i 's/ServerAdmin root@localhost/ServerAdmin [email protected]/' /etc/httpd/conf/httpd.conf
		#setsebool -P httpd_can_network_connect 1
		#setsebool -P httpd_can_network_connect_db 1
		systemctl start httpd
		#firewall-cmd --zone=public --permanent --add-service=http
		#firewall-cmd --reload
		#iptables -A INPUT -p tcp --dport 80 -m conntrack --ctstate NEW,ESTABLISHED -j ACCEPT
		#iptables -A OUTPUT -p tcp --sport 80 -m conntrack --ctstate ESTABLISHED -j ACCEPT
	EOF

}

resource "aws_db_instance" "dbWordPress" {
	identifier = "dbwordpress"
	engine = "mysql"
	engine_version = "5.7"
	allocated_storage = "${var.allocated_storage}"
	instance_class = "${var.instance_class}"
	vpc_security_group_ids = ["${aws_security_group.sgWordPress.id}"]
	name = "${var.db_name}"
	username = "${var.db_admin}"
	password = "${var.db_password}"
	parameter_group_name = "default.mysql5.7"
	skip_final_snapshot = true
	tags {
		Name = "WordPress DB"
	}
}
The script starts with the name of the provided that will be used (AWS), then a security group is being defined with ports 22 and 80 open to the world. Opening port 22 to the world is not a good idea, so you can restrict the access. In line 13, you can change the subnets allowed, e.g. instead of [“0.0.0.0/0”], you can restrict the SSH to a couple of IPs, e.g. [“1.2.3.4/32″,”12.13.14.15/32”]. Then, we define the ports for NFS and MySQL. If you can see these ports are open to themselves only. That means that only the resources having assigned that security group can talk between themselves on these two ports. And finally, we allow all outgoing traffic.
Further, we have an EFS file system created and mount targets. The mounts targets define in what availability zones the EFS system will be available. Since each region has different numbers of availability zones, we don’t know that number, so we have to enumerate the AZs for each region. If you look at lines 61 to 66 you’ll see how we do that. It’s pretty much a for..next loop in Terraform.
At line 68, we have our main resource defined, the instance. You’ll see that each resource has a lot of input parameters. Some of these are mandatory and some are optional. For each resource, you can find a detailed explanation on the Terraform site. For example, if you google “terraform aws_instance” the first link that shows up on terraform.io website will be about that.
At line 83 the custom script begins. It will add the EFS mount point to /etc/fstab so the NFS system is mounted on each reboot. At line 87 there is a short delay until EFS filesystem becomes available. Because the resources are created in parallel, it takes up to 90 seconds for the EFS DNS name to get propagated. If we don’t have the delay, the instance will boot up, try to mount the EFS system and fail, because the DNS mount point won’t be accessible. AWS Linux 2 comes with SELinux disabled and no firewalls, but if you have some other instance, you can uncomment the lines at the end of the user data script. Otherwise, SELinux will prevent Apache and MySQL to work with PHP. Lines 106 and 107 are if you use iptables instead of firewalld. Tailor to your needs. Finally, at line 112, the MySQL DB is defined.
Once you have all these three files (vars.tf, outputs.tf and main.tf) modified and saved in the same folder/directory, you can star the provisioning. First, initialize the script so Terraform can download the plugin for AWS.
terraform init
Then, check if everything is OK with the script.
terraform plan
And finally, execute the script.
terraform apply
It will prompt you to say “yes” and after the script completes, you’ll have something like this at the end.
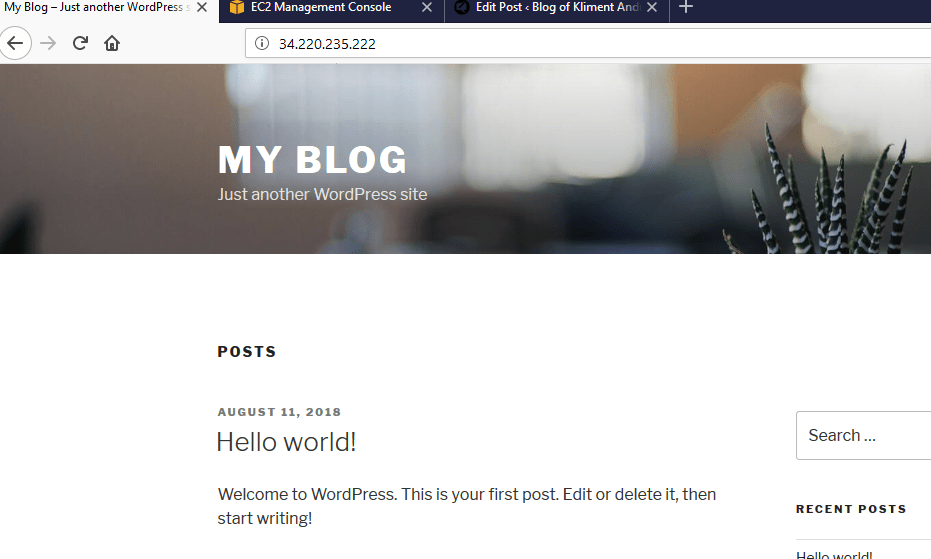
Apply complete! Resources: 7 added, 0 changed, 0 destroyed.

Outputs:

efs_dns_name = fs-64307acd.efs.us-west-2.amazonaws.com
ip_address = 34.220.235.222
sql_hostname = dbwordpress.cbh9gck8kp6s.us-west-2.rds.amazonaws.com
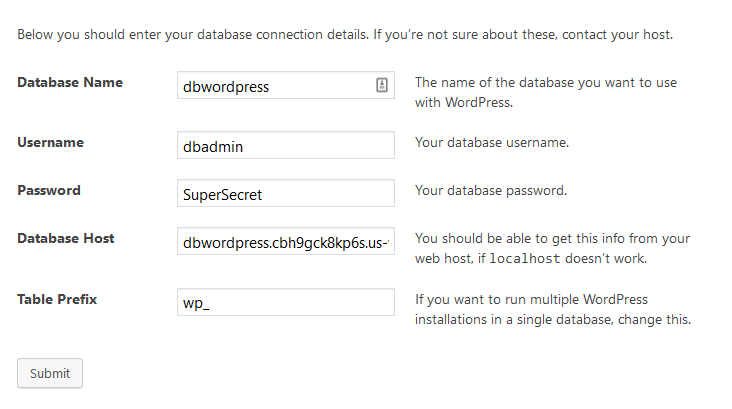
Go to http://your_ip and you should have the welcome WordPress screen. Use the database name, username and the password for the database defined in vars.tf (dbwordpress, dbadmin, SuperSecret) and for the hostname use the SQL DB output variable (sql_hostname) above.
And that’s it! You have your WordPress up and running on RDS and EFS filesystem without even logging to AWS console or your Linux instance.
Once you are done playing you can destroy all of the resources with one command.
terraform destroy